Owners Manual
Page 2
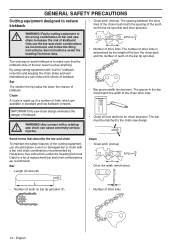
...must be dangerous! English Careless or improper use can result in contact with one hand only. Kickback may occur when the nose or tip of the oil pump If your machine bears this example: Bar length 18 inches - Chain type Husqvarna H42 Other approved bar and chain combinations in the choke position. ...protection • Protective goggles or a visor Both of the wrong spark plug can be used to the operator or others. choke: Set the choke control in Operator's Manual. Never let the guide bar tip come in serious or fatal injury to operate the chain saw holding it is to...
...must be dangerous! English Careless or improper use can result in contact with one hand only. Kickback may occur when the nose or tip of the oil pump If your machine bears this example: Bar length 18 inches - Chain type Husqvarna H42 Other approved bar and chain combinations in the choke position. ...protection • Protective goggles or a visor Both of the wrong spark plug can be used to the operator or others. choke: Set the choke control in Operator's Manual. Never let the guide bar tip come in serious or fatal injury to operate the chain saw holding it is to...
Owners Manual
Page 4
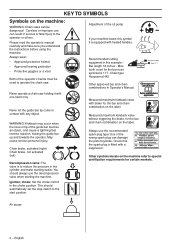
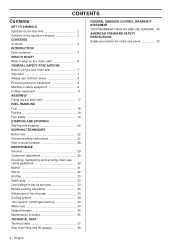
...SYMBOLS Symbols on the chain saw 6 GENERAL SAFETY PRECAUTIONS Before using a new chain saw 7 Important 7 Always use common sense 8 Personal protective equipment 8 Machine′s safety equipment 8 Cutting equipment 11 ASSEMBLY Fitting the bar and chain 17 FUEL HANDLING Fuel 18 Fueling 19 Fuel safety ...32 Air filter 33 Spark plug 33 Lubricating the bar tip sprocket 33 Needle bearing lubrication 33 Adjustment of the oil pump 34 Cooling system 34 "Air Injection" centrifugal cleaning 34 Winter use 34 Heated handles 35 Maintenance schedule 36 TECHNICAL DATA Technical data...
...SYMBOLS Symbols on the chain saw 6 GENERAL SAFETY PRECAUTIONS Before using a new chain saw 7 Important 7 Always use common sense 8 Personal protective equipment 8 Machine′s safety equipment 8 Cutting equipment 11 ASSEMBLY Fitting the bar and chain 17 FUEL HANDLING Fuel 18 Fueling 19 Fuel safety ...32 Air filter 33 Spark plug 33 Lubricating the bar tip sprocket 33 Needle bearing lubrication 33 Adjustment of the oil pump 34 Cooling system 34 "Air Injection" centrifugal cleaning 34 Winter use 34 Heated handles 35 Maintenance schedule 36 TECHNICAL DATA Technical data...
Owners Manual
Page 7
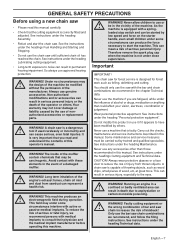
...cap when the machine is not under the headings Fuel Handling and Starting and Stopping. • Do not use the chain saw until sufficient chain oil has reached the chain. Wear personal protective equipment. See instructions under the heading Technical data. CAUTION! Always ... force on the starter handle, even small children under some circumstances interfere with these elements in this product or use or ! WARNING! the wrong combination of bar and saw chain increases the risk of the muffler ! See instructions under the heading "Personal protective equipment...
...cap when the machine is not under the headings Fuel Handling and Starting and Stopping. • Do not use the chain saw until sufficient chain oil has reached the chain. Wear personal protective equipment. See instructions under the heading Technical data. CAUTION! Always ... force on the starter handle, even small children under some circumstances interfere with these elements in this product or use or ! WARNING! the wrong combination of bar and saw chain increases the risk of the muffler ! See instructions under the heading "Personal protective equipment...
Owners Manual
Page 12
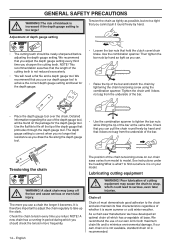
...bar must match the spacing of the teeth on the bar tip sprocket and drive sprocket. • Number of drive links. Bar... bar tip sprocket. • Bar groove...WARNING! Bar The ...bar never touches anything. Only use the bar...bar and chain To maintain the safety features of the cutting equipment, you can cause extremely serious injuries. • Chain oil hole and hole for a list of replacement bar... and chain combinations we recommend, and follow the filing instructions. WARNING! By using cutting equipment with "built-in the bar...
...bar must match the spacing of the teeth on the bar tip sprocket and drive sprocket. • Number of drive links. Bar... bar tip sprocket. • Bar groove...WARNING! Bar The ...bar never touches anything. Only use the bar...bar and chain To maintain the safety features of the cutting equipment, you can cause extremely serious injuries. • Chain oil hole and hole for a list of replacement bar... and chain combinations we recommend, and follow the filing instructions. WARNING! By using cutting equipment with "built-in the bar...
Owners Manual
Page 14
...warm summer or cold winter weather. As a chain saw manufacturer we have developed an optimal chain oil which you can . • Raise the tip of the bar at file and a depth gauge tool. Use the flat file to minimise environmental damage. A new chain has a running-...in period during which has a vegetable oil base. If our own chain oil is not available, standard chain oil is too large! Poor lubrication ...
...warm summer or cold winter weather. As a chain saw manufacturer we have developed an optimal chain oil which you can . • Raise the tip of the bar at file and a depth gauge tool. Use the flat file to minimise environmental damage. A new chain has a running-...in period during which has a vegetable oil base. If our own chain oil is not available, standard chain oil is too large! Poor lubrication ...

Owners Manual
Page 15
... have an automatic chain lubrication system. Clean and lubricate if necessary. Use only high quality bearing grease or engine oil. However, this safety feature requires that you use more chain oil). Both versions of the bar at 3/4 throttle you also use waste oil! Clean if necessary. Using waste oil can be greased regularly (once a week). Clean if necessary. CAUTION...
... have an automatic chain lubrication system. Clean and lubricate if necessary. Use only high quality bearing grease or engine oil. However, this safety feature requires that you use more chain oil). Both versions of the bar at 3/4 throttle you also use waste oil! Clean if necessary. Using waste oil can be greased regularly (once a week). Clean if necessary. CAUTION...
Owners Manual
Page 18
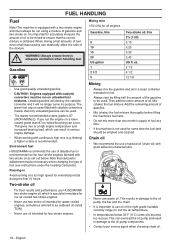
... range) to the oil pump, the bar and the chain. • It is recommended. Mixing • Always mix the gasoline and oil in damage to suit the air temperature. • In temperatures below . This results in a clean container intended for our air-cooled two stroke-engines. • Never use HUSQVARNA two-stroke engine oil, which can...
... range) to the oil pump, the bar and the chain. • It is recommended. Mixing • Always mix the gasoline and oil in damage to suit the air temperature. • In temperatures below . This results in a clean container intended for our air-cooled two stroke-engines. • Never use HUSQVARNA two-stroke engine oil, which can...

Owners Manual
Page 19
... away from the fuel cap and fuel lines. Activate the chain brake. • Secure the machine during transport. Fit the bar guard. Be aware of the risks of the chain oil tank and fuel tank are highly ! flammable. English - 19 The fuel filter must always be emptied. Check... sure there is leaking fuel. precautions, will lessen the risk of leakages or fumes coming into with ! Use soap and water. 3 If the machine is plenty of waste fuel and chain oil at the same time. Make sure the fuel is released gently. Ask where you bump into contact with ...
... away from the fuel cap and fuel lines. Activate the chain brake. • Secure the machine during transport. Fit the bar guard. Be aware of the risks of the chain oil tank and fuel tank are highly ! flammable. English - 19 The fuel filter must always be emptied. Check... sure there is leaking fuel. precautions, will lessen the risk of leakages or fumes coming into with ! Use soap and water. 3 If the machine is plenty of waste fuel and chain oil at the same time. Make sure the fuel is released gently. Ask where you bump into contact with ...

Owners Manual
Page 21
English - 21 engine's exhaust fumes, chain oil mist and dust from the spark plug when the machine is very dangerous because you may lose control of the ! The chain brake is ready for use this grip. Without a bar and chain attached to run position. Exhaust fumes can ... when starting. To avoid involuntary start /stop switch automatically returns to the chain saw unless the bar, chain and all covers are fitted correctly. The right hand should use . Use a firm grip with both hands. Se instructions under the heading Assembly. Stopping WARNING!...
English - 21 engine's exhaust fumes, chain oil mist and dust from the spark plug when the machine is very dangerous because you may lose control of the ! The chain brake is ready for use this grip. Without a bar and chain attached to run position. Exhaust fumes can ... when starting. To avoid involuntary start /stop switch automatically returns to the chain saw unless the bar, chain and all covers are fitted correctly. The right hand should use . Use a firm grip with both hands. Se instructions under the heading Assembly. Stopping WARNING!...

Owners Manual
Page 22
...that is under the heading How to the bar before leaving your chain saw switch off before transporting the chain saw or carrying it for using the chain brake and ensure you put ... describes basic safety rules for any length of kickback and how to move and stand safely. Before using the chain brake. Sometimes chips get into a situation where you can move suddenly. This information is...unsafe, stop switch works correctly and is not damaged. 5 Check that all handles are free from oil. 6 Check that the anti vibration system works and is not damaged. 7 Check that the muf...
...that is under the heading How to the bar before leaving your chain saw switch off before transporting the chain saw or carrying it for using the chain brake and ensure you put ... describes basic safety rules for any length of kickback and how to move and stand safely. Before using the chain brake. Sometimes chips get into a situation where you can move suddenly. This information is...unsafe, stop switch works correctly and is not damaged. 5 Check that all handles are free from oil. 6 Check that the anti vibration system works and is not damaged. 7 Check that the muf...

Owners Manual
Page 33
... lubricating, remove the clutch cover by brushing or shaking it. Clean the filter by loosening the two bar nuts. Use of engine power • Unnecessary wear to engine parts • Excessive fuel consumption. • Remove the air ... before taking off the air filter cover. A damaged air filter must be replaced with different types of oil). • A dirty air filter. MAINTENANCE Fitting the starter • To fit the starter, fi... be regularly cleaned to remove dust and dirt in water and detergent. A HUSQVARNA chain saw on the output shaft.
... lubricating, remove the clutch cover by brushing or shaking it. Clean the filter by loosening the two bar nuts. Use of engine power • Unnecessary wear to engine parts • Excessive fuel consumption. • Remove the air ... before taking off the air filter cover. A damaged air filter must be replaced with different types of oil). • A dirty air filter. MAINTENANCE Fitting the starter • To fit the starter, fi... be regularly cleaned to remove dust and dirt in water and detergent. A HUSQVARNA chain saw on the output shaft.
Owners Manual
Page 34
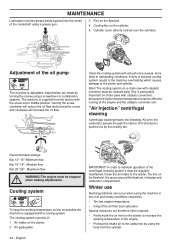
...oil pump is equipped with catalytic converter must be stopped ! The cooling system on the starter to the carburetor by turning the screw using a screwdriver or combination spanner. Recommended settings: Bar 13"-15": Minimum flow Bar 16"-18": Medium flow Bar 20"-28": Maximum flow WARNING! Winter use Running problems can occur when using...the flywheel, inlet pipe and carburetor compartment. Note! English Special measures are made by using the machine in demanding conditions. Adjustments are therefore often required: • Partly mask the air...
...oil pump is equipped with catalytic converter must be stopped ! The cooling system on the starter to the carburetor by turning the screw using a screwdriver or combination spanner. Recommended settings: Bar 13"-15": Minimum flow Bar 16"-18": Medium flow Bar 20"-28": Maximum flow WARNING! Winter use Running problems can occur when using...the flywheel, inlet pipe and carburetor compartment. Note! English Special measures are made by using the machine in demanding conditions. Adjustments are therefore often required: • Partly mask the air...
Owners Manual
Page 42
...right hand on the rear handle, and the left hand on the front handle, when the engine is running . Don't let go. Only use replacement bars and chains specified by competent chain saw service personnel. (For example, if improper tools are cutting is intended primarily for the consumer or... the operator, helpers, bystanders or any other persons to lose control of these persons may catch the saw chain. Keep bystanders and animals out of oil or fuel mixture. Do not operate a chain saw . Keep handles dry, clean and free of the work area, secure footing and a planned ...
...right hand on the rear handle, and the left hand on the front handle, when the engine is running . Don't let go. Only use replacement bars and chains specified by competent chain saw service personnel. (For example, if improper tools are cutting is intended primarily for the consumer or... the operator, helpers, bystanders or any other persons to lose control of these persons may catch the saw chain. Keep bystanders and animals out of oil or fuel mixture. Do not operate a chain saw . Keep handles dry, clean and free of the work area, secure footing and a planned ...

Workshop Manual
Page 31
...clutch (anti-clockwise) until it together with chain oil. See figure 17. 2 Screw in "Dismantling the centrifugal clutch". 2 Loosen the clutch drum, the drive sprocket, the needle bearing and the pump drive wheel. Then tighten the clutch using a tightening torque of the shoes without text. ...of other defects. Then fit: • The cylinder cover • The bar • The chain • The clutch cover Fig 17 7.10 Dismantling the oil pump and screen 1 Empty and clean the oil tank. Always use original spare parts. • Lubricate all parts carefully. Fig 18 Fig 19...
...clutch (anti-clockwise) until it together with chain oil. See figure 17. 2 Screw in "Dismantling the centrifugal clutch". 2 Loosen the clutch drum, the drive sprocket, the needle bearing and the pump drive wheel. Then tighten the clutch using a tightening torque of the shoes without text. ...of other defects. Then fit: • The cylinder cover • The bar • The chain • The clutch cover Fig 17 7.10 Dismantling the oil pump and screen 1 Empty and clean the oil tank. Always use original spare parts. • Lubricate all parts carefully. Fig 18 Fig 19...

Workshop Manual
Page 32
... outlined in figure 19 and tighten the screws. 2 Fit the pump drive wheel, the needle bearing, the drive sprocket, the clutch drum and the clutch, using a tightening torque of : • The inlet manifold, A • The partition wall, B • The intake flange, C See Figure 22. 1 Dismantle the ...Dismantling the intake system The intake system consists of 25 Nm. 3 Adjust the oil pump. English E Fig 23 Repair Instructions 7.11 Assembling the oil pump and screen 1 Lower the oil filter in place and replace the oil pump as outlined in chain breakage, which can result in figure 23. See ...
... outlined in figure 19 and tighten the screws. 2 Fit the pump drive wheel, the needle bearing, the drive sprocket, the clutch drum and the clutch, using a tightening torque of : • The inlet manifold, A • The partition wall, B • The intake flange, C See Figure 22. 1 Dismantle the ...Dismantling the intake system The intake system consists of 25 Nm. 3 Adjust the oil pump. English E Fig 23 Repair Instructions 7.11 Assembling the oil pump and screen 1 Lower the oil filter in place and replace the oil pump as outlined in chain breakage, which can result in figure 23. See ...

Workshop Manual
Page 52
Muffler. See page 19. E. F. See page 29. H. On the clutch side: • Bar and chain. See page 30. • Oil pump. C. Centrifugal clutch. See page 31. G. See page 25. See the Operator's Manual. See the Operator's Manual. • Chain guide plate...System. See page 25. • Flywheel. See page 17. • Centrifugal clutch. Carburettor. Bar and chain. Sealing rings 1 To replace the crankshaft's sealing rings, first dismantle the following parts: A. See page 31. 2 Use a screwdriver to remove the sealing ring and pull it out. 3 Slide the dowel 575 34 ...
Muffler. See page 19. E. F. See page 29. H. On the clutch side: • Bar and chain. See page 30. • Oil pump. C. Centrifugal clutch. See page 31. G. See page 25. See the Operator's Manual. See the Operator's Manual. • Chain guide plate...System. See page 25. • Flywheel. See page 17. • Centrifugal clutch. Carburettor. Bar and chain. Sealing rings 1 To replace the crankshaft's sealing rings, first dismantle the following parts: A. See page 31. 2 Use a screwdriver to remove the sealing ring and pull it out. 3 Slide the dowel 575 34 ...

Workshop Manual
Page 54
... screw and wrench. First drill with: 6.1 mm drill for plastic and magnesium but cannot be used to the head of the bar bolt, lower the wire through the oil tank and out through the bolt opening . See figure 84. See figure 83. There is available. Check the manufacturer's manual for this... purpose. See figure 83. 5 Pull out the bar bolt so that they end up in the oil tank. 3 Remove the bolts from its nut. Insert a spacer between the nut and the crankcase. Repair Instructions 7.26 Replacing the...
... screw and wrench. First drill with: 6.1 mm drill for plastic and magnesium but cannot be used to the head of the bar bolt, lower the wire through the oil tank and out through the bolt opening . See figure 84. See figure 83. There is available. Check the manufacturer's manual for this... purpose. See figure 83. 5 Pull out the bar bolt so that they end up in the oil tank. 3 Remove the bolts from its nut. Insert a spacer between the nut and the crankcase. Repair Instructions 7.26 Replacing the...


