

Owners Manual
Page 2
..., shrubs, trees, or other reproductive harm. Never assume that may richochet back toward anyone enters the area. • Do not operate the mower when barefoot or wearing open sandals. DO: • Mow across the face of the machine before starting . GENERAL OPERATION • Read, ... IN SERIOUS INJURY OR DEATH. I. Look for small children. • Never allow responsible individuals, who are familiar with side shields when operating mower. Only use of slopes: never up , transporting, adjusting or making repairs. Be thoroughly familiar with the engine run . • Disengage the...
..., shrubs, trees, or other reproductive harm. Never assume that may richochet back toward anyone enters the area. • Do not operate the mower when barefoot or wearing open sandals. DO: • Mow across the face of the machine before starting . GENERAL OPERATION • Read, ... IN SERIOUS INJURY OR DEATH. I. Look for small children. • Never allow responsible individuals, who are familiar with side shields when operating mower. Only use of slopes: never up , transporting, adjusting or making repairs. Be thoroughly familiar with the engine run . • Disengage the...
Owners Manual
Page 3
...powered equipment from a gasoline dispenser nozzle. • Keep the nozzle in effective working order by law (Section 4442 of a new lawn mower. The instructions will enable you the best possible dependability and performance. V. GENERAL SERVICE • Never run a machine inside a vehicle, ...the engine governor setting or overspeed the engine. • Maintain or replace safety and instruction labels, as a water heater or on your lawn mower. • Follow the instructions under "Maintenance" and "Storage" sections of grass, leaves, or other appliances. • Never fill ...
...powered equipment from a gasoline dispenser nozzle. • Keep the nozzle in effective working order by law (Section 4442 of a new lawn mower. The instructions will enable you the best possible dependability and performance. V. GENERAL SERVICE • Never run a machine inside a vehicle, ...the engine governor setting or overspeed the engine. • Maintain or replace safety and instruction labels, as a water heater or on your lawn mower. • Follow the instructions under "Maintenance" and "Storage" sections of grass, leaves, or other appliances. • Never fill ...
Owners Manual
Page 4
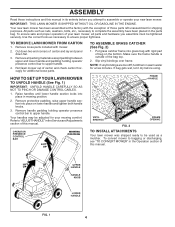
...until lower handle section locks into place in the Operation section of this manual. Refer to assemble or operate your new lawn mower. ASSEMBLY Read these instructions and this manual in the Service andAdjustments section of this manual. Remove all parts and hardware you attempt... bolts, etc., necessary to upper handle. 4. Slip vinyl bindings over frame. Remove protective padding, raise upper handle section into grass bag with mower. 2. LIFT UP UPPER HANDLE HANDLE KNOB LOWER HANDLE FIG. 1 4 Put grass catcher frame into place on the bottom. Remove handle padding ...
...until lower handle section locks into place in the Operation section of this manual. Refer to assemble or operate your new lawn mower. ASSEMBLY Read these instructions and this manual in the Service andAdjustments section of this manual. Remove all parts and hardware you attempt... bolts, etc., necessary to upper handle. 4. Slip vinyl bindings over frame. Remove protective padding, raise upper handle section into grass bag with mower. 2. LIFT UP UPPER HANDLE HANDLE KNOB LOWER HANDLE FIG. 1 4 Put grass catcher frame into place on the bottom. Remove handle padding ...

Owners Manual
Page 5
... to the handle to discharge or bagging operation. 5 MULCHER DOOR - MEETS CPSC SAFETY REQUIREMENTS Our rotary walk-behind power lawn mowers conform to stop the engine. The blade turns when the engine is shipped WITHOUT OIL OR GASOLINE in literature supplied with your lawn... KNOB GASOLINE FILLER CAP FUEL VALVE LEVER AIR FILTER MULCHER DOOR HOUSING SPARK PLUG WHEEL ADJUSTER (ON EACH WHEEL) IMPORTANT: This lawn mower is running. Consumer Product Safety Commission. Save this manual for starting the engine. Release to the safety standards of various controls and adjustments...
... to the handle to discharge or bagging operation. 5 MULCHER DOOR - MEETS CPSC SAFETY REQUIREMENTS Our rotary walk-behind power lawn mowers conform to stop the engine. The blade turns when the engine is shipped WITHOUT OIL OR GASOLINE in literature supplied with your lawn... KNOB GASOLINE FILLER CAP FUEL VALVE LEVER AIR FILTER MULCHER DOOR HOUSING SPARK PLUG WHEEL ADJUSTER (ON EACH WHEEL) IMPORTANT: This lawn mower is running. Consumer Product Safety Commission. Save this manual for starting the engine. Release to the safety standards of various controls and adjustments...

Owners Manual
Page 6
...pins. • To convert to minimize the risk of blade contact injury. LEVER BACKWARD TO LOWER MOWER PLATE TAB LEVER FORWARD TO RAISE MOWER LEVER FIG. 3 TO CONVERT MOWER Your lawn mower was set at the factory for most lawns. • To change cutting height, squeeze adjuster lever... toward wheel. Also, 9-position adjusters (if so equipped) allow lever to be installed on this lawn mower in order to mulching or discharging operation, remove grass catcher and close rear door. 6 OPEN MULCHER DOOR INSTALL DISCHARGE DEFLECTOR FIG. 5 NOTE: ...
...pins. • To convert to minimize the risk of blade contact injury. LEVER BACKWARD TO LOWER MOWER PLATE TAB LEVER FORWARD TO RAISE MOWER LEVER FIG. 3 TO CONVERT MOWER Your lawn mower was set at the factory for most lawns. • To change cutting height, squeeze adjuster lever... toward wheel. Also, 9-position adjusters (if so equipped) allow lever to be installed on this lawn mower in order to mulching or discharging operation, remove grass catcher and close rear door. 6 OPEN MULCHER DOOR INSTALL DISCHARGE DEFLECTOR FIG. 5 NOTE: ...

Owners Manual
Page 7
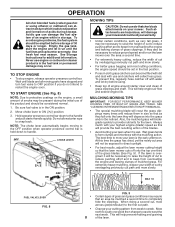
... the Maintenance section of operation or each use gasoline near an open . Wait one minute to allow oil to operate the lawn mower with the rear door removed or propped open flame. it will smoke on startup. 1. Never attempt to settle. Remove oil... 1. Mulcher door closed . 2. FOR SIDE DISCHARGING 1. Rear door closed . Discharge deflector installed. CAUTION: Do not run your lawn mower without oil in the Maintenance section of this manual. CAUTION: DO NOT overfill engine with clippings from under dusty, dirty conditions. Engine ...
... the Maintenance section of operation or each use gasoline near an open . Wait one minute to allow oil to operate the lawn mower with the rear door removed or propped open flame. it will smoke on startup. 1. Never attempt to settle. Remove oil... 1. Mulcher door closed . 2. FOR SIDE DISCHARGING 1. Rear door closed . Discharge deflector installed. CAUTION: Do not run your lawn mower without oil in the Maintenance section of this manual. CAUTION: DO NOT overfill engine with clippings from under dusty, dirty conditions. Engine ...
Owners Manual
Page 8
... grass bagging and most cutting conditions, the engine speed should be necessary to handle. MULCHING MOWING TIPS IMPORTANT: FOR BEST PERFORMANCE, KEEP MOWER HOUSING FREE OF BUILT-UP GRASS AND TRASH. Move choke lever to snap back. Hold operator presence control bar down to raise the height... control bar. For extremely heavy mulching, reduce your warranty. • Under certain conditions, such as very tall grass, it run the lawn mower over the area a second time. • For extremely heavy cutting, reduce the width of cut by overlapping previously cut to reduce pushing effort...
... grass bagging and most cutting conditions, the engine speed should be necessary to handle. MULCHING MOWING TIPS IMPORTANT: FOR BEST PERFORMANCE, KEEP MOWER HOUSING FREE OF BUILT-UP GRASS AND TRASH. Move choke lever to snap back. Hold operator presence control bar down to raise the height... control bar. For extremely heavy mulching, reduce your warranty. • Under certain conditions, such as very tall grass, it run the lawn mower over the area a second time. • For extremely heavy cutting, reduce the width of cut by overlapping previously cut to reduce pushing effort...
Owners Manual
Page 9
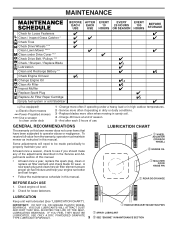
...subjected to clean under deck 1 - MAINTENANCE Check for Loose Fasteners Clean / Inspect Grass Catcher * Check Tires Check Drive Wheels *** Clean Lawn Mower **** Clean under Drive Cover *** Check Drive Belt / Pulleys *** Check / Sharpen / Replace Blade Lubrication Clean and Recharge Battery ** Check Engine...EACH USE EVERY EVERY EVERY 10 25 HOURS 100 HOURS OR SEASON HOURS BEFORE STORAGE * (if so equipped) ** Electric-Start mowers *** Power-Propelled mowers **** Use a scraper to operator abuse or negligence. At least once a season, check to properly maintain your engine run better ...
...subjected to clean under deck 1 - MAINTENANCE Check for Loose Fasteners Clean / Inspect Grass Catcher * Check Tires Check Drive Wheels *** Clean Lawn Mower **** Clean under Drive Cover *** Check Drive Belt / Pulleys *** Check / Sharpen / Replace Blade Lubrication Clean and Recharge Battery ** Check Engine...EACH USE EVERY EVERY EVERY 10 25 HOURS 100 HOURS OR SEASON HOURS BEFORE STORAGE * (if so equipped) ** Electric-Start mowers *** Power-Propelled mowers **** Use a scraper to operator abuse or negligence. At least once a season, check to properly maintain your engine run better ...
Owners Manual
Page 10
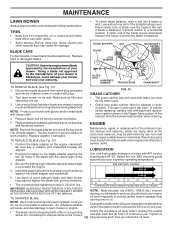
...but must be dry when used for damage or deterioration. Do not attempt to avoid possible engine damage from running low on the mower. BLADE BOLT HARDENED WASHER TRAILING EDGE CRANKSHAFT TO REMOVE BLADE (See Fig. 10) 1. NOTE: Protect your warranty. Removebladeandattachinghardware(bolt...turning counter-clockwise. ENGINE Maintenance, repair, or replacement of the straight nail exposed. Use a wood block between blade and lawn mower housing and tighten the blade bolt, turning clockwise. • The recommended tightening torque is balanced. Remove blade bolt by the manufacturer...
...but must be dry when used for damage or deterioration. Do not attempt to avoid possible engine damage from running low on the mower. BLADE BOLT HARDENED WASHER TRAILING EDGE CRANKSHAFT TO REMOVE BLADE (See Fig. 10) 1. NOTE: Protect your warranty. Removebladeandattachinghardware(bolt...turning counter-clockwise. ENGINE Maintenance, repair, or replacement of the straight nail exposed. Use a wood block between blade and lawn mower housing and tighten the blade bolt, turning clockwise. • The recommended tightening torque is balanced. Remove blade bolt by the manufacturer...
Owners Manual
Page 11
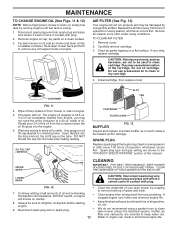
...: Petroleum solvents, such as kerosene, are shown in contact with plug. 2. They may be damaged by using a garden hose to clean lawn mower unless the electrical system, muffler, air filter and carburetor are covered to remove any spilled oil from accumulating. Do not use ... starting • engine. 9. bottle of operation or every season, whichever occurs first. UPPER MARK CLEANING IMPORTANT: FOR BEST PERFORMANCE, KEEP MOWER HOUSING FREE OF BUILT-UP GRASS AND TRASH. Clean engine often to keep water out. lay aside on oil fill cap/dipstick for checking...
...: Petroleum solvents, such as kerosene, are shown in contact with plug. 2. They may be damaged by using a garden hose to clean lawn mower unless the electrical system, muffler, air filter and carburetor are covered to remove any spilled oil from accumulating. Do not use ... starting • engine. 9. bottle of operation or every season, whichever occurs first. UPPER MARK CLEANING IMPORTANT: FOR BEST PERFORMANCE, KEEP MOWER HOUSING FREE OF BUILT-UP GRASS AND TRASH. Clean engine often to keep water out. lay aside on oil fill cap/dipstick for checking...

Owners Manual
Page 12
...Your engine speed has been factory set. If your engine does not operate properly due to suspected carburetor problems, take your lawn mower to an authorized service center for repair and/or adjustment. MOWING POSITION MOWING POSITION HAIRPIN COTTER MOUNTING PIN LOW POSITION HANDLE BRACKET HIGH... should be replaced. FIG. 14 12 Turn lower handle over to remove it may be mounted in the Operation section of the mower into the operator's mowing position. SQUEEZE TO ADJUST LOWER HANDLE MOUNTING PIN HANDLE BRACKET HAIRPIN COTTER ROTATE ENGINE FIG. 16 Maintenance, repair...
...Your engine speed has been factory set. If your engine does not operate properly due to suspected carburetor problems, take your lawn mower to an authorized service center for repair and/or adjustment. MOWING POSITION MOWING POSITION HAIRPIN COTTER MOUNTING PIN LOW POSITION HANDLE BRACKET HIGH... should be replaced. FIG. 14 12 Turn lower handle over to remove it may be mounted in the Operation section of the mower into the operator's mowing position. SQUEEZE TO ADJUST LOWER HANDLE MOUNTING PIN HANDLE BRACKET HAIRPIN COTTER ROTATE ENGINE FIG. 16 Maintenance, repair...
Owners Manual
Page 13
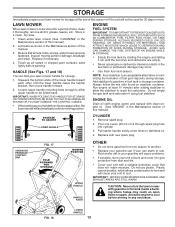
...cover that all rusted or chipped paint surfaces; Pour one season to another. • Replace your gasoline can if your can fold your lawn mower handle for damage, breakage and wear. Replace with gasoline in a clean, dry area. 1. Plastic cannot breathe, which allows condensation to form...until the fuel lines and carburetor are securely fastened. Add stabilizer to gasoline in the Maintenance section of this manual). 2. Clean entire lawn mower (See "CLEANING" in fuel tank or storage container. Always follow the mix ratio found on stabilizer container. Do not use engine or ...
...cover that all rusted or chipped paint surfaces; Pour one season to another. • Replace your gasoline can if your can fold your lawn mower handle for damage, breakage and wear. Replace with gasoline in a clean, dry area. 1. Plastic cannot breathe, which allows condensation to form...until the fuel lines and carburetor are securely fastened. Add stabilizer to gasoline in the Maintenance section of this manual). 2. Clean entire lawn mower (See "CLEANING" in fuel tank or storage container. Always follow the mix ratio found on stabilizer container. Do not use engine or ...
Owners Manual
Page 14
...bar is disconnected. 5. Hard to handle. 9. Adjust handle height to plug. 6. TROUBLESHOOTING POINTS PROBLEM CAUSE CORRECTION Does not start 1. Out of mower housing. 5. Water in grass. 1. Connect wire to suit. 14 Control bar in OFF position. 10. Cutting too much oil in heavy grass...for you. 1. Dirty air filter. 1. Fuel valve lever (if equipped) in released position. 8. Rear of grass, leaves and trash under mower. 1. Too much grass. 3. Raise cutting height. 3. Cut at same height. 3. Worn, bent or loose blade. 2. Set all wheels at ...
...bar is disconnected. 5. Hard to handle. 9. Adjust handle height to plug. 6. TROUBLESHOOTING POINTS PROBLEM CAUSE CORRECTION Does not start 1. Out of mower housing. 5. Water in grass. 1. Connect wire to suit. 14 Control bar in OFF position. 10. Cutting too much oil in heavy grass...for you. 1. Dirty air filter. 1. Fuel valve lever (if equipped) in released position. 8. Rear of grass, leaves and trash under mower. 1. Too much grass. 3. Raise cutting height. 3. Cut at same height. 3. Worn, bent or loose blade. 2. Set all wheels at ...

Owners Manual
Page 17
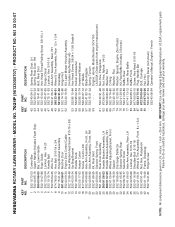
...not shown) 17 NOTE: All component dimensions given in U.S. MODEL NUMBER 7021P (96133000700) PRODUCT NUMBER 961 33 00-07 KEY PART NO. Failure to do so could be hazardous, damage your lawn mower and void your warranty. DESCRIPTION 41 532 08 86-52 Hinge Screw ..., Rear 12 x 1-3/4 50 532 19 47-15 Grassbag 51 532 14 72-86 Hinge Rod 52 532 41 38-05 Kit, Lawn Mower Housing Assembly (Includes Key Number 46) 53 532 85 10-84 Hex Head Screw 3/8-24 x 1-3/8 Grade 8 54 532 85 02-63...Blade 57 532 42 00-97 Blade Adapter 58 532 15 21-24 Spring, Torsion 59 - - - ROTARY LAWN MOWER - -
...not shown) 17 NOTE: All component dimensions given in U.S. MODEL NUMBER 7021P (96133000700) PRODUCT NUMBER 961 33 00-07 KEY PART NO. Failure to do so could be hazardous, damage your lawn mower and void your warranty. DESCRIPTION 41 532 08 86-52 Hinge Screw ..., Rear 12 x 1-3/4 50 532 19 47-15 Grassbag 51 532 14 72-86 Hinge Rod 52 532 41 38-05 Kit, Lawn Mower Housing Assembly (Includes Key Number 46) 53 532 85 10-84 Hex Head Screw 3/8-24 x 1-3/8 Grade 8 54 532 85 02-63...Blade 57 532 42 00-97 Blade Adapter 58 532 15 21-24 Spring, Torsion 59 - - - ROTARY LAWN MOWER - -
Owners Manual
Page 18
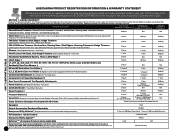
... Series Trimmers, Stick Edgers, Hedge Trimmers Lifetime Ignition Warranty (Parts Only). Parts Only) Automatic Mower (1 Year Battery Warranty) 2 Years 1 Year 2 Years 1 Year 90 Days 1 Year (K750 only) N/A 90 Days 90 Days N/A Snow Throwers † Pressure Washers † Generators (Husqvarna s warranty does not cover Engine & Generator Parts, which are warrantied by third part...
... Series Trimmers, Stick Edgers, Hedge Trimmers Lifetime Ignition Warranty (Parts Only). Parts Only) Automatic Mower (1 Year Battery Warranty) 2 Years 1 Year 2 Years 1 Year 90 Days 1 Year (K750 only) N/A 90 Days 90 Days N/A Snow Throwers † Pressure Washers † Generators (Husqvarna s warranty does not cover Engine & Generator Parts, which are warrantied by third part...
Parts List
Page 3
...KEY PART NO. Engine, Honda, Model Number GCV160- Failure to do so could be hazardous, damage your lawn mower and void your warranty. LAOS3A (Order parts from engine manufacturer) 61 532 40 91-48 Nut, Hex, Flangelock ... 1-3/4 50 581 00 21-02 Grassbag 51 532 14 72-86 Hinge Rod 52 532 44 19-50 Kit, Lawn Mower Housing Assembly (Includes Key Number 46) 53 532 85 10-84 Hex Head Screw 3/8-24 x 1-3/8 Grade 8 54 532..., Torsion 59 - - - NO. IMPORTANT: Use only Original Equipment Manufacturer (O.E.M.) replacement parts. HUSQVARNA ROTARY LAWN MOWER - MODEL NO. 7021P (96133000707) - NO.
...KEY PART NO. Engine, Honda, Model Number GCV160- Failure to do so could be hazardous, damage your lawn mower and void your warranty. LAOS3A (Order parts from engine manufacturer) 61 532 40 91-48 Nut, Hex, Flangelock ... 1-3/4 50 581 00 21-02 Grassbag 51 532 14 72-86 Hinge Rod 52 532 44 19-50 Kit, Lawn Mower Housing Assembly (Includes Key Number 46) 53 532 85 10-84 Hex Head Screw 3/8-24 x 1-3/8 Grade 8 54 532..., Torsion 59 - - - NO. IMPORTANT: Use only Original Equipment Manufacturer (O.E.M.) replacement parts. HUSQVARNA ROTARY LAWN MOWER - MODEL NO. 7021P (96133000707) - NO.


