

Owners Manual
Page 2
... and Instruction Decals 7 Decal Placement ...8 Assembly Instructions ...9 Section 2 · Operating Instructions Page Aeration Tips...10 Before You Start...10 Aerating ...10 Throttle Adjustment (Model AR25 Honda engine only 11 Rear Wheel Adjustment ...12 Turning and Maneuvering...12 Operating on Hills ...12... Section 3 · Maintenance and Service Instructions Page Transporting the Husqvarna Aerator 13 Cleaning ...
... and Instruction Decals 7 Decal Placement ...8 Assembly Instructions ...9 Section 2 · Operating Instructions Page Aeration Tips...10 Before You Start...10 Aerating ...10 Throttle Adjustment (Model AR25 Honda engine only 11 Rear Wheel Adjustment ...12 Turning and Maneuvering...12 Operating on Hills ...12... Section 3 · Maintenance and Service Instructions Page Transporting the Husqvarna Aerator 13 Cleaning ...

Owners Manual
Page 3
C) AERATION Tines Aeration width Hole pattern Core depth Holes per sq ft Working speed Productivity ¾" - (1.9 cm) open spoon tine. 30 per unit 19" (48.3 cm) 3.8" x 6.5" (9.7 x 16.5cm) ... SPECIFICATIONS A) POWER UNIT Engine Clutch Primary drive Secondary drive Gear reduction AR19 3.5HP Briggs I/C (2.6kw) 4HP Honda (3kw) Belt tensioner One V-belt (A-44") Permalube Chain 6:1 AR25 3.5HP Briggs l/C (2.6kw) 4HP Honda (3kw) Belt tensioner One V-belt (A-44") Permalube Chain 6:1 B) WHEELS Bearings Rear tires Front tire FRONT - ¾" (1.9 cm) sealed ball bearings...
C) AERATION Tines Aeration width Hole pattern Core depth Holes per sq ft Working speed Productivity ¾" - (1.9 cm) open spoon tine. 30 per unit 19" (48.3 cm) 3.8" x 6.5" (9.7 x 16.5cm) ... SPECIFICATIONS A) POWER UNIT Engine Clutch Primary drive Secondary drive Gear reduction AR19 3.5HP Briggs I/C (2.6kw) 4HP Honda (3kw) Belt tensioner One V-belt (A-44") Permalube Chain 6:1 AR25 3.5HP Briggs l/C (2.6kw) 4HP Honda (3kw) Belt tensioner One V-belt (A-44") Permalube Chain 6:1 B) WHEELS Bearings Rear tires Front tire FRONT - ¾" (1.9 cm) sealed ball bearings...
Owners Manual
Page 6
... hazards that may result in the safe operation and proper maintenance of your dealer or Husqvarna if additional information is required. WARNING indicates unsafe actions or situations that might present hazard...as sprinkler heads, stakes, water valves, clothes line anchors, etc. • Use machine for lawn aeration only. • Keep unsupervised children away from the equipment. • Adopt safe lifting and moving ...moving or rotating parts. • Do not lift Model AR19. • Do not lift Model AR25. • Do not run engine while servicing. • Do not use on any surface ...
... hazards that may result in the safe operation and proper maintenance of your dealer or Husqvarna if additional information is required. WARNING indicates unsafe actions or situations that might present hazard...as sprinkler heads, stakes, water valves, clothes line anchors, etc. • Use machine for lawn aeration only. • Keep unsupervised children away from the equipment. • Adopt safe lifting and moving ...moving or rotating parts. • Do not lift Model AR19. • Do not lift Model AR25. • Do not run engine while servicing. • Do not use on any surface ...

Owners Manual
Page 7
If any are found on Model AR19 and AR25 aerators. Model AR19 & AR25 only (2 ea) C - Model AR19 & AR25 only (1 ea) 7 K - Model AR19 only (1 ea) D2 - Model AR19 & AR25 only (1 ea) G - Model AR19 & AR25 only (1 ea) Model AR25 only (1 ea) I - Model AR25 only (1 ea) E - Model AR19 & AR25 only (1 ea) H - Model AR19 & AR25 only (1 ea) B - Model AR25 only (2 ea) D1 - SAFETY AND INSTRUCTION DECALS The following decals are missing or not legible, replace them before operating aerator. A - Model AR19 only (1 ea) J - Model AR19 & AR25 only (1 ea) F -
If any are found on Model AR19 and AR25 aerators. Model AR19 & AR25 only (2 ea) C - Model AR19 & AR25 only (1 ea) 7 K - Model AR19 only (1 ea) D2 - Model AR19 & AR25 only (1 ea) G - Model AR19 & AR25 only (1 ea) Model AR25 only (1 ea) I - Model AR25 only (1 ea) E - Model AR19 & AR25 only (1 ea) H - Model AR19 & AR25 only (1 ea) B - Model AR25 only (2 ea) D1 - SAFETY AND INSTRUCTION DECALS The following decals are missing or not legible, replace them before operating aerator. A - Model AR19 only (1 ea) J - Model AR19 & AR25 only (1 ea) F -

Owners Manual
Page 9
... 5. Wear eye protection. Run the clutch cable through the guide hole in position using the cam lock lever. Connect top of carton. 3. AR25 Lawn Aerator is shipped with fasteners located on rear wheel control handle (see Figure 5-B) For further detail on assembly, see Figure 4). 7. Model... AR25 1. Carefully cut open side of the deck (see parts manual. 4. Operator's Guide ASSEMBLY INSTRUCTIONS Model AR19 1. Lock handle in the ...
... 5. Wear eye protection. Run the clutch cable through the guide hole in position using the cam lock lever. Connect top of carton. 3. AR25 Lawn Aerator is shipped with fasteners located on rear wheel control handle (see Figure 5-B) For further detail on assembly, see Figure 4). 7. Model... AR25 1. Carefully cut open side of the deck (see parts manual. 4. Operator's Guide ASSEMBLY INSTRUCTIONS Model AR19 1. Lock handle in the ...
Owners Manual
Page 10
... manufacturer. Engage clutch control. 6. Using a garden hand spade or a large screw driver, you added control, and greater tine penetration. AR25 Honda Engines Only: The throttle cable has been installed by raising the rear wheels all times. 2. Adjust engine throttle setting, if needed..., for directions to give you should I water before aerating. The weights are unsure of the equipment at engine manufacturer's recommended level (refer to obtain maximum coring depth) you are provided...
... manufacturer. Engage clutch control. 6. Using a garden hand spade or a large screw driver, you added control, and greater tine penetration. AR25 Honda Engines Only: The throttle cable has been installed by raising the rear wheels all times. 2. Adjust engine throttle setting, if needed..., for directions to give you should I water before aerating. The weights are unsure of the equipment at engine manufacturer's recommended level (refer to obtain maximum coring depth) you are provided...
Owners Manual
Page 12
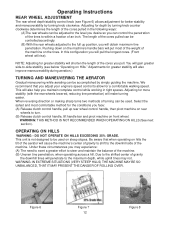
...on rear wheels to turn. (B) Release clutch control handle, lift handle bar and pivot machine on hills the tilt of the aerator will cause the machine's center of gravity to shift to the downhill side of the machine. NOTE: Adjusting for greater stability ... reducing tine penetration) will rise). You will put most comfortable method for greater stability will also improve maneuverability during aeration.) TURNING AND MANEUVERING THE AERATOR Gradual maneuvering while aerating can be accomplished by turning knob clockwise. Figure 6 Figure 7 12 Figure 8 Pushing down on the machine's ...
...on rear wheels to turn. (B) Release clutch control handle, lift handle bar and pivot machine on hills the tilt of the aerator will cause the machine's center of gravity to shift to the downhill side of the machine. NOTE: Adjusting for greater stability ... reducing tine penetration) will rise). You will put most comfortable method for greater stability will also improve maneuverability during aeration.) TURNING AND MANEUVERING THE AERATOR Gradual maneuvering while aerating can be accomplished by turning knob clockwise. Figure 6 Figure 7 12 Figure 8 Pushing down on the machine's ...
Owners Manual
Page 13
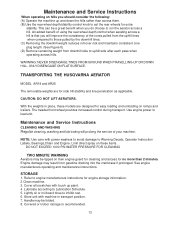
... than 2 minutes. Covered or indoor storage is that you will prolong the service of using the rear wheel depth control when aerating across a hill is recommended. 13 Lightly oil or mil board tines to engine manufacturers instructions for easy loading and unloading on ...and tine penetration as applicable. With the weights in transport position. 7. Lubricate according to load unit. TRANSPORTING THE HUSQVARNA AERATOR MODEL AR19 and AR25 The removable weights are designed for engine storage information. 2 Clean machine. 3. Handle may result from downhill side to run the...
... than 2 minutes. Covered or indoor storage is that you will prolong the service of using the rear wheel depth control when aerating across a hill is recommended. 13 Lightly oil or mil board tines to engine manufacturers instructions for easy loading and unloading on ...and tine penetration as applicable. With the weights in transport position. 7. Lubricate according to load unit. TRANSPORTING THE HUSQVARNA AERATOR MODEL AR19 and AR25 The removable weights are designed for engine storage information. 2 Clean machine. 3. Handle may result from downhill side to run the...
Owners Manual
Page 14
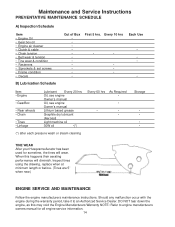
... 30W oil •(*) Every 60 hrs As Required • • • • • (*) after each pressure wash or steam cleaning Storage TINE WEAR After your Husqvarna Aerator has been used for all engine service information. 14 DO NOT tear down the engine, as this happens their...
... 30W oil •(*) Every 60 hrs As Required • • • • • (*) after each pressure wash or steam cleaning Storage TINE WEAR After your Husqvarna Aerator has been used for all engine service information. 14 DO NOT tear down the engine, as this happens their...
Owners Manual
Page 15
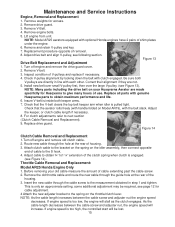
... new cable through the guide hole at the rear of the housing. 3. Lift engine from unit. NOTE: Model AR25 aerators equipped with genuine Husqvarna parts to next section (Clutch Cable Removal and Replacement). 9. Replace all parts with optional Honda engines have 2 pairs... 1. Inspect condition of removal. 8. Correct their alignment if they are made specificlly for Husqvarna to obtain ¾" to1 ¼" extension of use. Replace drive guard. Before removing your Husqvarna Aerator are not. 5. Remove and retain V-pulley and key. 7. Replacement procedure opposite of ...
... new cable through the guide hole at the rear of the housing. 3. Lift engine from unit. NOTE: Model AR25 aerators equipped with genuine Husqvarna parts to next section (Clutch Cable Removal and Replacement). 9. Replace all parts with optional Honda engines have 2 pairs... 1. Inspect condition of removal. 8. Correct their alignment if they are made specificlly for Husqvarna to obtain ¾" to1 ¼" extension of use. Replace drive guard. Before removing your Husqvarna Aerator are not. 5. Remove and retain V-pulley and key. 7. Replacement procedure opposite of ...
Owners Manual
Page 16
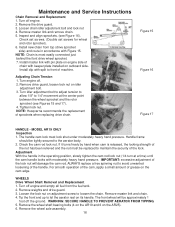
... 4. Install new chain from the fuel tank. 2. Remove drive guard, loosen lock nut on the AR25). 6. Tighten lock nut. MODEL AR19 ONLY Inspection 1. For smooth operation of the cam, apply a small... on outboard side. Remove weights and drive guard. 3. WARNING: SECURE HANDLE TO PREVENT AERATOR FROM TIPPING. 5. NOTE: Chain is released, the locking strength of the nut has .... 3. Loosen chain idler adjustment bolt and lock nut 4. Install clip with Figure 15. NOTE: Husqvarna recommends the replacement of machine. Handle frame should be approximately 1 foot off engine and empty all...
... 4. Install new chain from the fuel tank. 2. Remove drive guard, loosen lock nut on the AR25). 6. Tighten lock nut. MODEL AR19 ONLY Inspection 1. For smooth operation of the cam, apply a small... on outboard side. Remove weights and drive guard. 3. WARNING: SECURE HANDLE TO PREVENT AERATOR FROM TIPPING. 5. NOTE: Chain is released, the locking strength of the nut has .... 3. Loosen chain idler adjustment bolt and lock nut 4. Install clip with Figure 15. NOTE: Husqvarna recommends the replacement of machine. Handle frame should be approximately 1 foot off engine and empty all...
Owners Manual
Page 17
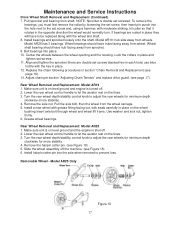
...facing away from wheel. Lower the rear wheel control handle to prevent loss. Model AR25 Only Figure 18 17 Pull sprocket and bearing from wheels. Bolt bearings into the axle when removed to let the aerator rest on the tines. 3. Turn the rear wheel depth/stability control knob to adjust... off . 2. If bearings are double set screwed. Remove the hairpin cotter pin. (see page 17). Wheel shaft bearing should have to let the aerator rest on the tines. 3. Install a new wheel with grease fitting facing out, with the key in place on level ground and the engine is...
...facing away from wheel. Lower the rear wheel control handle to prevent loss. Model AR25 Only Figure 18 17 Pull sprocket and bearing from wheels. Bolt bearings into the axle when removed to let the aerator rest on the tines. 3. Turn the rear wheel depth/stability control knob to adjust... off . 2. If bearings are double set screwed. Remove the hairpin cotter pin. (see page 17). Wheel shaft bearing should have to let the aerator rest on the tines. 3. Install a new wheel with grease fitting facing out, with the key in place on level ground and the engine is...
