
Parts Manual
Page 17
...593 16 36-01 POWER UNIT 11 590 44 22-02 POWER UNIT 11 584 86 26-01 POWER UNIT 11 590 44 22-03 POWER UNIT 11 584 86 26-04 POWER UNIT 11 584 86 26-05 POWER UNIT 11 584 86 26-06 POWER UNIT 12 544 17...-01 TOOL AUTOMOWER 310, 2020- Safety Blade, 45 pcs 1 Long Life - Safety Blade, 300 pcs 1 Wire, Blister Pack, (50 m) 1 Wire (150 m) 1 Wire, Blister Pack, (150 m) 1 Wire (250 m) 1 Wire (500 m) 1 Wire (800 m) 1 Power Supply Unit EU 1 Power Supply Unit UK, IE 1 EU 1 Power Supply Unit CH 1 Power Supply Unit US, CA 1 Power Supply Unit AU, NZ 1 Power Supply Unit JP...
...593 16 36-01 POWER UNIT 11 590 44 22-02 POWER UNIT 11 584 86 26-01 POWER UNIT 11 590 44 22-03 POWER UNIT 11 584 86 26-04 POWER UNIT 11 584 86 26-05 POWER UNIT 11 584 86 26-06 POWER UNIT 12 544 17...-01 TOOL AUTOMOWER 310, 2020- Safety Blade, 45 pcs 1 Long Life - Safety Blade, 300 pcs 1 Wire, Blister Pack, (50 m) 1 Wire (150 m) 1 Wire, Blister Pack, (150 m) 1 Wire (250 m) 1 Wire (500 m) 1 Wire (800 m) 1 Power Supply Unit EU 1 Power Supply Unit UK, IE 1 EU 1 Power Supply Unit CH 1 Power Supply Unit US, CA 1 Power Supply Unit AU, NZ 1 Power Supply Unit JP...
Owner Manual
Page 4
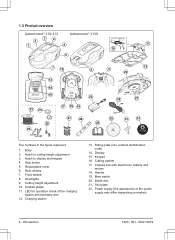
... plates 11. Charging station 13. Power supply (the appearance of the charging station and boundary wire 12. Hatch to display and keypad 4. Cutting system 17. Front wheels 8. Introduction 1220 - 001 - 08.07.2019 product identification code) 14. Headlights 9. Main switch 20. Blade disc 21. 1.3 Product overview Automower® 310/315 Automower® 315X 34 2 1 5 11...
... plates 11. Charging station 13. Power supply (the appearance of the charging station and boundary wire 12. Hatch to display and keypad 4. Cutting system 17. Front wheels 8. Introduction 1220 - 001 - 08.07.2019 product identification code) 14. Headlights 9. Main switch 20. Blade disc 21. 1.3 Product overview Automower® 310/315 Automower® 315X 34 2 1 5 11...
Owner Manual
Page 5
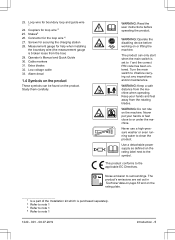
... to the applicable EC Directives. Study them carefully. WARNING: Keep a safe distance from the machine when operating. Couplers for the loop wire 4 27. Use a detachable power supply as defined on the machine. Connector for loop wire 2 25. Noise emission to the symbol. WARNING: Read the user instructions before operating the product. 23.
... to the applicable EC Directives. Study them carefully. WARNING: Keep a safe distance from the machine when operating. Couplers for the loop wire 4 27. Use a detachable power supply as defined on the machine. Connector for loop wire 2 25. Noise emission to the symbol. WARNING: Read the user instructions before operating the product. 23.
Owner Manual
Page 12
... capabilities or lack of experience and knowledge if they have been given supervision or instruction concerning use of corrosive liquid from the supply mains when removing the battery. 12 - Incorrect use may restrict the age of the appliance in contact with reduced physical, ...understand the hazards involved. Safety 1220 - 001 - 08.07.2019 This appliance can be made by the manufacturer. Never connect the power supply to other than original batteries. Local regulations may result in the included charging station. Worn or damaged cord increase the risk of electrolyte...
... capabilities or lack of experience and knowledge if they have been given supervision or instruction concerning use of corrosive liquid from the supply mains when removing the battery. 12 - Incorrect use may restrict the age of the appliance in contact with reduced physical, ...understand the hazards involved. Safety 1220 - 001 - 08.07.2019 This appliance can be made by the manufacturer. Never connect the power supply to other than original batteries. Local regulations may result in the included charging station. Worn or damaged cord increase the risk of electrolyte...
Owner Manual
Page 15
Refer to simplify reconnecting. Disconnect all the wires and the power supply if there is no longer a risk of thunder. Inspect the product each wire is connected to the right place. CAUTION: Use the plug to clean ... - 001 - 08.07.2019 Safety - 15 It can damage the charging station and/or the product. Connect all connected wires and the power supply. 3. The charging station's connections are disconnected (power supply, boundary wire and guide wire) if there is a risk of a thunderstorm. 1. Never use a high-pressure washer or even running water to disconnect...
Refer to simplify reconnecting. Disconnect all the wires and the power supply if there is no longer a risk of thunder. Inspect the product each wire is connected to the right place. CAUTION: Use the plug to clean ... - 001 - 08.07.2019 Safety - 15 It can damage the charging station and/or the product. Connect all connected wires and the power supply. 3. The charging station's connections are disconnected (power supply, boundary wire and guide wire) if there is a risk of a thunderstorm. 1. Never use a high-pressure washer or even running water to disconnect...
Owner Manual
Page 17
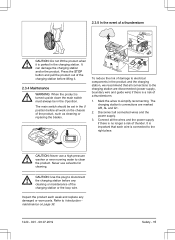
...obstacle that the blades on the product do not cut or extend the lowvoltage cable. CAUTION: If the work area before you connect the power supply to the power outlet. have a protective wall. Low-voltage cables of the boundary wire. The wall must in. CAUTION: Do not put the low... guide wire will be minimum 15 cm / 6 in. 3.3.2 To examine where to put the power supply • Put the power supply in an area with a roof and protection from the sun and rain. • Put the power supply in an area with good airflow. • Use a residual-current device (RCD) when you ...
...obstacle that the blades on the product do not cut or extend the lowvoltage cable. CAUTION: If the work area before you connect the power supply to the power outlet. have a protective wall. Low-voltage cables of the boundary wire. The wall must in. CAUTION: Do not put the low... guide wire will be minimum 15 cm / 6 in. 3.3.2 To examine where to put the power supply • Put the power supply in an area with a roof and protection from the sun and rain. • Put the power supply in an area with good airflow. • Use a residual-current device (RCD) when you ...
Owner Manual
Page 21
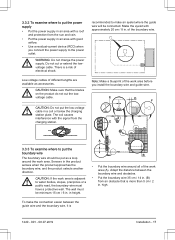
...behind the charging station. The coil causes interference with the mark "AR". 6. WARNING: Applicable to put the wire into the channel with the power supply unit supplied by Husqvarna. weatherproof with the mark "AR". 1220 - 001 - 08.07.2019 Installation - 21 Push the right connector onto the metal pin on page... about the charging station. Attach the charging station to To put the charging station on the ground. CAUTION: Do not put the power supply on page 16. 2. Refer to the ground with stakes on page 22 or To bury the boundary wire or the guide wire on...
...behind the charging station. The coil causes interference with the mark "AR". 6. WARNING: Applicable to put the wire into the channel with the power supply unit supplied by Husqvarna. weatherproof with the mark "AR". 1220 - 001 - 08.07.2019 Installation - 21 Push the right connector onto the metal pin on page... about the charging station. Attach the charging station to To put the charging station on the ground. CAUTION: Do not put the power supply on page 16. 2. Refer to the ground with stakes on page 22 or To bury the boundary wire or the guide wire on...

Owner Manual
Page 36
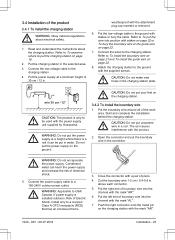
... Standby time table. In the Main area mode, the product automatically alternates between and 16:00. WARNING: Only charge the product using a charging station and a power supply which is the same for the other activities ongoing. Open the hatch and slide the product in total be divided into 2 work periods, the minimum...
... Standby time table. In the Main area mode, the product automatically alternates between and 16:00. WARNING: Only charge the product using a charging station and a power supply which is the same for the other activities ongoing. Open the hatch and slide the product in total be divided into 2 work periods, the minimum...

Owner Manual
Page 38
...38 - Set the Main switch to clean the cover. Grass on the wheels can pivot freely. 5.2.2 Chassis Clean the underside of charging station or power supply. 5.2.1 Chassis and blade disc Inspect the blade disc and blades once a week. 1. A product with large amounts of objects such as an accessory.... replace the blades. Refer to Replace the blades on page 39 on page 56. It is recommended to Warranty terms on how to Husqvarna's instructions. Maintenance 1220 - 001 - 08.07.2019 maintenance For better operating reliability and longer service life: check and clean the product...
...38 - Set the Main switch to clean the cover. Grass on the wheels can pivot freely. 5.2.2 Chassis Clean the underside of charging station or power supply. 5.2.1 Chassis and blade disc Inspect the blade disc and blades once a week. 1. A product with large amounts of objects such as an accessory.... replace the blades. Refer to Replace the blades on page 39 on page 56. It is recommended to Warranty terms on how to Husqvarna's instructions. Maintenance 1220 - 001 - 08.07.2019 maintenance For better operating reliability and longer service life: check and clean the product...
Owner Manual
Page 39
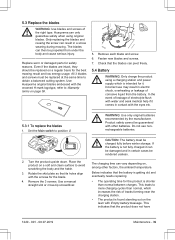
...logotype, refer to position 0. Only replacing the blades and reusing the screw can only guarantee safety when using a charging station and power supply which increases the risk of corrosive liquid from under the body and cause serious injury. Even if the blades are intact, they ... be rendered useless. Remove the 3 screws. Use a manual straight slot or cross-tip screwdriver. If the battery is intended for it. Husqvarna can result in a screw wearing during mowing. Below indicates that its holes align with the eyes etc. 5.3.1 To replace the blades 1. WARNING...
...logotype, refer to position 0. Only replacing the blades and reusing the screw can only guarantee safety when using a charging station and power supply which increases the risk of corrosive liquid from under the body and cause serious injury. Even if the blades are intact, they ... be rendered useless. Remove the 3 screws. Use a manual straight slot or cross-tip screwdriver. If the battery is intended for it. Husqvarna can result in a screw wearing during mowing. Below indicates that its holes align with the eyes etc. 5.3.1 To replace the blades 1. WARNING...
Owner Manual
Page 41
...are fitted properly to the power supply. Replace connectors if damaged. Find out where the break is damaged or not connected. Refer to the charging station. Refer to start outside the tion, press the START button and close charging station. Contact your local Husqvarna representative if the same message... 21. Action Check the drive wheel and remove the grass or other object has wrapped around the drive wheel. No loop signal The power supply is not damaged. Check that it is a proposal as expected. There is also properly connected to the charging station and to the ...
...are fitted properly to the power supply. Replace connectors if damaged. Find out where the break is damaged or not connected. Refer to the charging station. Refer to start outside the tion, press the START button and close charging station. Contact your local Husqvarna representative if the same message... 21. Action Check the drive wheel and remove the grass or other object has wrapped around the drive wheel. No loop signal The power supply is not damaged. Check that it is a proposal as expected. There is also properly connected to the charging station and to the ...
Owner Manual
Page 45
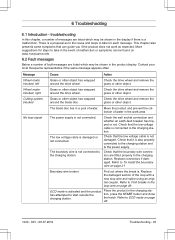
... the problem remains, the message requires action by authorized service technician. 1220 - 001 - 08.07.2019 Troubleshooting - 45 Battery problem Charging current Wrong or faulty power supply unit. Connectivity set- If not, the message requires action by authorized service technician. Restart the product. Message Cause Temporary battery Temporary battery or firmware related...
... the problem remains, the message requires action by authorized service technician. 1220 - 001 - 08.07.2019 Troubleshooting - 45 Battery problem Charging current Wrong or faulty power supply unit. Connectivity set- If not, the message requires action by authorized service technician. Restart the product. Message Cause Temporary battery Temporary battery or firmware related...
Owner Manual
Page 47
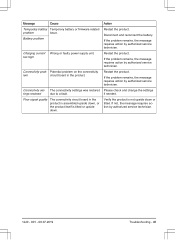
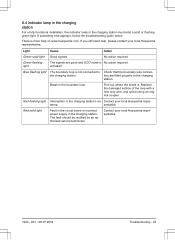
...the charging station. Fault in the circuit board or incorrect power supply in the charging station must emit a solid or flashing green light. Break in the charging station's an- Contact your local Husqvarna repre- Contact your local Husqvarna representative. 1220 - 001 - 08.07.2019 Troubleshooting ...flashing light The boundary loop is No action required. Find out where the break is more help , please contact your local Husqvarna representative. sentative. If something else appears, follow the troubleshooting guide below. Replace the damaged section of the loop with a ...
...the charging station. Fault in the circuit board or incorrect power supply in the charging station must emit a solid or flashing green light. Break in the charging station's an- Contact your local Husqvarna repre- Contact your local Husqvarna representative. 1220 - 001 - 08.07.2019 Troubleshooting ...flashing light The boundary loop is No action required. Find out where the break is more help , please contact your local Husqvarna representative. sentative. If something else appears, follow the troubleshooting guide below. Replace the damaged section of the loop with a ...
Owner Manual
Page 52
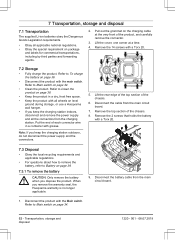
... - 08.07.2019 Remove the top section of the chassis. 6. When you keep the charging station indoors, disconnect and remove the power supply and all applicable national regulations. • Obey the special requirement on package and labels for commercial transportations, including by third parties and forwarding...If you dispose the product. Refer to Battery on page 34. • Clean the product. Note: If you remove the warranty seal, the Husqvarna warranty is no longer applicable. 9. Refer to To charge the battery on page 36. • Disconnect the product with a Torx 20. 7.3...
... - 08.07.2019 Remove the top section of the chassis. 6. When you keep the charging station indoors, disconnect and remove the power supply and all applicable national regulations. • Obey the special requirement on package and labels for commercial transportations, including by third parties and forwarding...If you dispose the product. Refer to Battery on page 34. • Clean the product. Note: If you remove the warranty seal, the Husqvarna warranty is no longer applicable. 9. Refer to To charge the battery on page 36. • Disconnect the product with a Torx 20. 7.3...
Owner Manual
Page 53
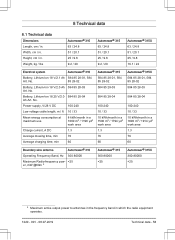
... Ah Art. Power supply, V/28 V DC 100-240 Low voltage cable length, m / ft 10 / 33 Mean energy consumption at maximum use 8 kWh/month in a 1000 m2 / 1196 yd2 work area Charge current, A DC 1.3 Average mowing time, min 70 Average charging time, min 60 Automower® 315...-80000 Maximum Radio-frequency pow- Weight, kg / lbs Automower® 310 63 / 24.8 51 / 20.1 25 / 9.8 9.2 / 20 Automower® 315 63 / 24.8 51 / 20.1 25 / 9.8 9.2 / 20 Automower® 315X 63 / 24.8 51 / 20.1 25 / 9.8 10.1 / 22 Electrical system Automower® 310 Battery, Lithium-Ion 18 V/2.1 Ah 584 85 28-01...
... Ah Art. Power supply, V/28 V DC 100-240 Low voltage cable length, m / ft 10 / 33 Mean energy consumption at maximum use 8 kWh/month in a 1000 m2 / 1196 yd2 work area Charge current, A DC 1.3 Average mowing time, min 70 Average charging time, min 60 Automower® 315...-80000 Maximum Radio-frequency pow- Weight, kg / lbs Automower® 310 63 / 24.8 51 / 20.1 25 / 9.8 9.2 / 20 Automower® 315 63 / 24.8 51 / 20.1 25 / 9.8 9.2 / 20 Automower® 315X 63 / 24.8 51 / 20.1 25 / 9.8 10.1 / 22 Electrical system Automower® 310 Battery, Lithium-Ion 18 V/2.1 Ah 584 85 28-01...
Owner Manual
Page 55
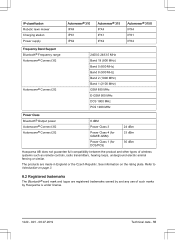
IP-classification Robotic lawn mower Charging station Power supply Automower® 310 IPX4 IPX1 IPX4 Automower® 315 IPX4 IPX1 IPX4 Automower® 315X IPX4 IPX1 IPX4 Frequency Band Support Bluetooth® Frequency range Automower® Connect 3G Automower® Connect 2G 2400.0-2483.5 MHz Band 19 (800 MHz) Band...as remote controls, radio transmitters, hearing loops, underground electric animal fencing or similar. The products are registered trademarks owned by Husqvarna is under license. 1220 - 001 - 08.07.2019 Technical data - 55 Refer to Introduction on the rating plate...
IP-classification Robotic lawn mower Charging station Power supply Automower® 310 IPX4 IPX1 IPX4 Automower® 315 IPX4 IPX1 IPX4 Automower® 315X IPX4 IPX1 IPX4 Frequency Band Support Bluetooth® Frequency range Automower® Connect 3G Automower® Connect 2G 2400.0-2483.5 MHz Band 19 (800 MHz) Band...as remote controls, radio transmitters, hearing loops, underground electric animal fencing or similar. The products are registered trademarks owned by Husqvarna is under license. 1220 - 001 - 08.07.2019 Technical data - 55 Refer to Introduction on the rating plate...

Owner Manual
Page 56
... by improper battery storage or battery handling. • Damage caused by using a battery that is not a Husqvarna original battery. • Damage caused by not using Husqvarna original spare parts and accessories, such as disposable and are met: • The product and the charging station... terms Husqvarna® warranty covers this Operator's Manual. Please have the receipt and the product's serial number at no charge if the following terms are not covered by non-authorized changing or tampering with the instructions in compliance with the product or its power supply. The...
... by improper battery storage or battery handling. • Damage caused by using a battery that is not a Husqvarna original battery. • Damage caused by not using Husqvarna original spare parts and accessories, such as disposable and are met: • The product and the charging station... terms Husqvarna® warranty covers this Operator's Manual. Please have the receipt and the product's serial number at no charge if the following terms are not covered by non-authorized changing or tampering with the instructions in compliance with the product or its power supply. The...


