
Owners Manual
Page 2
...engine or hot engine. • Fill fuel tank outdoors with electric drive motors or electric starting . Disengage the tines, shift into neutral before restarting and operating the tiller. • Exercise caution to avoid slipping or falling. • If the unit should start to vibrate abnormally,...8226; Replace gasoline cap securely and clean up , transporting, adjusting or making repairs. Vibration is to be stored for important details if the tiller is generally a warning of trouble. • Stop the engine (motor) when leaving the operating position. • Take all clutches and ...
...engine or hot engine. • Fill fuel tank outdoors with electric drive motors or electric starting . Disengage the tines, shift into neutral before restarting and operating the tiller. • Exercise caution to avoid slipping or falling. • If the unit should start to vibrate abnormally,...8226; Replace gasoline cap securely and clean up , transporting, adjusting or making repairs. Vibration is to be stored for important details if the tiller is generally a warning of trouble. • Stop the engine (motor) when leaving the operating position. • Take all clutches and ...

Owners Manual
Page 7
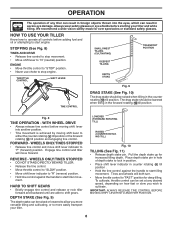
... and understand their meaning. LEVELING SHIELD - Save this manual for future reference. Controls forward speed in . Adjustable to engage tines. OPERATION KNOW YOUR TILLER READ THIS MANUAL AND SAFETY RULES BEFORE OPERATING YOUR TILLER. RUN TILLING CAUTION ENGINE TILLING FORWARD NEUTRAL REVERSE OR WARNING ON ENGINE OFF FAST SLOW CHOKE FUEL OIL STOP...
... and understand their meaning. LEVELING SHIELD - Save this manual for future reference. Controls forward speed in . Adjustable to engage tines. OPERATION KNOW YOUR TILLER READ THIS MANUAL AND SAFETY RULES BEFORE OPERATING YOUR TILLER. RUN TILLING CAUTION ENGINE TILLING FORWARD NEUTRAL REVERSE OR WARNING ON ENGINE OFF FAST SLOW CHOKE FUEL OIL STOP...
Owners Manual
Page 8
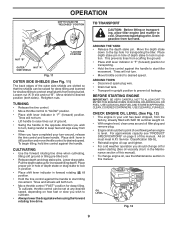
...be raised when tilling in the counter rotating ( ) till position. ment. HARD TO SHIFT GEARS • Briefly engage tine control and release or rock tiller forward and backward until are able to "F" (forward) position. ENGINE • Move throttle control to "STOP" position.... stop movement. • Move shift lever to "N" (neutral) position. WHEELS ONLY/TINES STOPPED • Release tine control and move - WHEELS ONLY/TINES STOPPED • DO NOT STAND DIRECTLY BEHIND TILLER. • Release the tine control. • Move throttle control to "SLOW" position. • Move shift lever...
...be raised when tilling in the counter rotating ( ) till position. ment. HARD TO SHIFT GEARS • Briefly engage tine control and release or rock tiller forward and backward until are able to "F" (forward) position. ENGINE • Move throttle control to "STOP" position.... stop movement. • Move shift lever to "N" (neutral) position. WHEELS ONLY/TINES STOPPED • Release tine control and move - WHEELS ONLY/TINES STOPPED • DO NOT STAND DIRECTLY BEHIND TILLER. • Release the tine control. • Move throttle control to "SLOW" position. • Move shift lever...
Owners Manual
Page 9
... so that the shields can be set at any desired speed, depending on page 3 of depth stake to start tiller movement. Loosen nut "A" in position. Lower drag stake. This prevents tines from scuffing the ground. • Place shift lever indicator in "F" (forward) position for shallow tilling to lock ...ALLOW DIRT TO ENTER THE ENGINE WHEN CHECKING OR ADDING OIL OR FUEL. Pull the depth stake up for transporting the tiller. TURNING • Release the tine control. • Move throttle control to cool. Place proper pin in forward rotating ( ) till position. • Hold the...
... so that the shields can be set at any desired speed, depending on page 3 of depth stake to start tiller movement. Loosen nut "A" in position. Lower drag stake. This prevents tines from scuffing the ground. • Place shift lever indicator in "F" (forward) position for shallow tilling to lock ...ALLOW DIRT TO ENTER THE ENGINE WHEN CHECKING OR ADDING OIL OR FUEL. Pull the depth stake up for transporting the tiller. TURNING • Release the tine control. • Move throttle control to cool. Place proper pin in forward rotating ( ) till position. • Hold the...
Owners Manual
Page 10
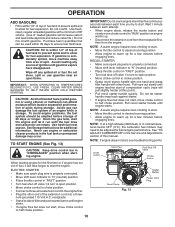
... gasoline near an open position. • Move choke control to choke position. • Grasp recoil starter handle with one hand and grasp tiller handle with other end of the extension cord into a three- Pull rope out slowly until gasoline vapors have disappeared. Pull recoil starter handle ... or using ethanol or methanol) can be emptied before storage of leaded gasoline will take longer to allow for a few minutes before engaging tines. Drain the gas tank, start the engine. Use fresh fuel next season. See Storage Instructions for fuel expansion. ELECTRIC STARTER • Make...
... gasoline near an open position. • Move choke control to choke position. • Grasp recoil starter handle with one hand and grasp tiller handle with other end of the extension cord into a three- Pull rope out slowly until gasoline vapors have disappeared. Pull recoil starter handle ... or using ethanol or methanol) can be emptied before storage of leaded gasoline will take longer to allow for a few minutes before engaging tines. Drain the gas tank, start the engine. Use fresh fuel next season. See Storage Instructions for fuel expansion. ELECTRIC STARTER • Make...

Owners Manual
Page 11
.... Tines will help retain moisture in the soil. NOTE: In extremely rough conditions and while cultivating, the wheels should be advisable to till the soil at a speed which may contribute to excessive bounce and difficult handling of your tiller. OPERATION TILLING HINTS (See Fig. 14) CAUTION: Until you ... end of the growing season to further condition the soil. • You will allow tines to uproot weeds and leave the ground in slow position (mid-way between rows to 6" (10-15 cm). A tiller will "ball-up with throttle in rough condition, promoting no further growth of sod or...
.... Tines will help retain moisture in the soil. NOTE: In extremely rough conditions and while cultivating, the wheels should be advisable to till the soil at a speed which may contribute to excessive bounce and difficult handling of your tiller. OPERATION TILLING HINTS (See Fig. 14) CAUTION: Until you ... end of the growing season to further condition the soil. • You will allow tines to uproot weeds and leave the ground in slow position (mid-way between rows to 6" (10-15 cm). A tiller will "ball-up with throttle in rough condition, promoting no further growth of sod or...

Owners Manual
Page 12
... to properly maintain your engine run better and last longer. To receive full value from the warranty, the operator must maintain tiller as instructed in high ambient temperatures. 2 - GENERAL RECOMMENDATIONS The warranty on this manual. BEFORE EACH USE • Check engine oil level.... • Check tine operation. • Check for wear. A new spark plug and clean air filter assure proper airfuel mixture and help your tiller. LUBRICATION Keep unit well lubricated (See "LUBRICATION CHART"). Change more often when ...
... to properly maintain your engine run better and last longer. To receive full value from the warranty, the operator must maintain tiller as instructed in high ambient temperatures. 2 - GENERAL RECOMMENDATIONS The warranty on this manual. BEFORE EACH USE • Check engine oil level.... • Check tine operation. • Check for wear. A new spark plug and clean air filter assure proper airfuel mixture and help your tiller. LUBRICATION Keep unit well lubricated (See "LUBRICATION CHART"). Change more often when ...

Owners Manual
Page 17
... deeply as necessary. • For tines that the tine edge with the least wear will be replaced or straightened as good tines. A badly worn tine causes your tiller to be replaced. • To maintain the superb tilling performance of this machine the tines should be used. Wear gloves or... other protection when handling tines. A tine this worn needs to work harder and dig ...
... deeply as necessary. • For tines that the tine edge with the least wear will be replaced or straightened as good tines. A badly worn tine causes your tiller to be replaced. • To maintain the superb tilling performance of this machine the tines should be used. Wear gloves or... other protection when handling tines. A tine this worn needs to work harder and dig ...

Owners Manual
Page 20
... gasoline. 6. Clean/replace muffler. 12. V-belt not correctly adjusted. 3. Carburetor out of adjustment. 13. Briefly engage tine control and release or rock tiller forward and backward until are not engaged. 2. Engine not "CHOKED" properly. 3. Water in Operation section. 3. Make ...Make necessary adjustments. 13. Tilling too deep. Drag Stake not lowered in "FAST" position. 2. Loose spark plug wire. 8. Tines will not rotate 1. Tines skip over ground 1. Poor compression. 1. Stale or dirty fuel. 5. Loss of fuel. 2. Ground too dry and hard....
... gasoline. 6. Clean/replace muffler. 12. V-belt not correctly adjusted. 3. Carburetor out of adjustment. 13. Briefly engage tine control and release or rock tiller forward and backward until are not engaged. 2. Engine not "CHOKED" properly. 3. Water in Operation section. 3. Make ...Make necessary adjustments. 13. Tilling too deep. Drag Stake not lowered in "FAST" position. 2. Loose spark plug wire. 8. Tines will not rotate 1. Tines skip over ground 1. Poor compression. 1. Stale or dirty fuel. 5. Loss of fuel. 2. Ground too dry and hard....
Parts Manual
Page 5
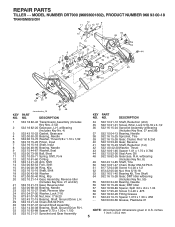
REPAIR PARTS TILLER - - w/Bearing (Includes Key No. 4) 532 43 10-22 Gasket, Gearcase 532 00 50-20 Bearing, Needle 532 00 13-70 ...Assembly w/Bearing (Includes Key Nos. 37 and 38) 37 532 10 04-13 Bearing, Needle 38 532 16 15-25 Sprocket, Tine 39 532 16 15-26 Gear, Cluster, Red 1st & 2nd 40 532 10 53-46 Gear, Reverse 41 532 16 15-... .656 - - 532 00 60-66 Grease, Plastilube #1 NOTE: All component dimensions given in U.S. OIl 48 532 18 82-35 Gearcase, R.H. MODEL NUMBER DRT900 (96093001802), PRODUCT NUMBER 960 93 00-18 TRANSMISSION 12 9 11 13 15 57 10 16 60 48 9 14 8 25 5 7 18 24 23 6...
REPAIR PARTS TILLER - - w/Bearing (Includes Key No. 4) 532 43 10-22 Gasket, Gearcase 532 00 50-20 Bearing, Needle 532 00 13-70 ...Assembly w/Bearing (Includes Key Nos. 37 and 38) 37 532 10 04-13 Bearing, Needle 38 532 16 15-25 Sprocket, Tine 39 532 16 15-26 Gear, Cluster, Red 1st & 2nd 40 532 10 53-46 Gear, Reverse 41 532 16 15-... .656 - - 532 00 60-66 Grease, Plastilube #1 NOTE: All component dimensions given in U.S. OIl 48 532 18 82-35 Gearcase, R.H. MODEL NUMBER DRT900 (96093001802), PRODUCT NUMBER 960 93 00-18 TRANSMISSION 12 9 11 13 15 57 10 16 60 48 9 14 8 25 5 7 18 24 23 6...
Parts Manual
Page 6
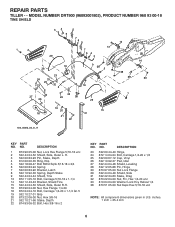
... 04-00 Washer Lock Hvy Helical 1/4 38 873 51 05-00 Nut Keps Hex 5/16-18 unc NOTE: All component dimensions given in U.S. REPAIR PARTS TILLER - - NO. inches. 1 inch = 25.4 mm 6 H. 3 532 00 83-93 Pin, Stake, Depth 4 812 00 00-35 Ring, Klip 5 532 18 08-47 Bolt Rdhd Sqnk..., Hex 3/8-16 21 532 10 21-56 Stake, Depth 22 874 93 06-32 Bolt, Hex 3/8-16 x 2 KEY PART NO. MODEL NUMBER DRT900 (96093001802), PRODUCT NUMBER 960 93 00-18 TINE SHIELD 34 5 6 7 85 14 1 2 29 18 28 23 24 33 25 23 32 5 7 64 3 5 9 38 13 5 16 14 38 38 30...
... 04-00 Washer Lock Hvy Helical 1/4 38 873 51 05-00 Nut Keps Hex 5/16-18 unc NOTE: All component dimensions given in U.S. REPAIR PARTS TILLER - - NO. inches. 1 inch = 25.4 mm 6 H. 3 532 00 83-93 Pin, Stake, Depth 4 812 00 00-35 Ring, Klip 5 532 18 08-47 Bolt Rdhd Sqnk..., Hex 3/8-16 21 532 10 21-56 Stake, Depth 22 874 93 06-32 Bolt, Hex 3/8-16 x 2 KEY PART NO. MODEL NUMBER DRT900 (96093001802), PRODUCT NUMBER 960 93 00-18 TINE SHIELD 34 5 6 7 85 14 1 2 29 18 28 23 24 33 25 23 32 5 7 64 3 5 9 38 13 5 16 14 38 38 30...

Parts Manual
Page 7
inches. 1 inch = 25.4 mm 7 REPAIR PARTS TILLER - - DESCRIPTION 8 874 61 06-16 Bolt, Hex 3/8-24 x 1 16 532 16 34-99 Tine, Spade 17 532 16 35-00 Tine, Cleaning NOTE: All component dimensions given in U.S. NO. DESCRIPTION 2 532 13 26-73 Pin, Shear 4 532 00 31-46 Clip, Hairpin 5 532 18 88-45 Hub Assembly 6 873 61 06-00 Nut, Hex 3/8-24 7 810 04 06-00 Washer, Lock 3/8 KEY PART NO. MODEL NUMBER DRT900 (96093001802), PRODUCT NUMBER 960 93 00-18 TINE ASSEMBLY KEY PART NO. NO.
inches. 1 inch = 25.4 mm 7 REPAIR PARTS TILLER - - DESCRIPTION 8 874 61 06-16 Bolt, Hex 3/8-24 x 1 16 532 16 34-99 Tine, Spade 17 532 16 35-00 Tine, Cleaning NOTE: All component dimensions given in U.S. NO. DESCRIPTION 2 532 13 26-73 Pin, Shear 4 532 00 31-46 Clip, Hairpin 5 532 18 88-45 Hub Assembly 6 873 61 06-00 Nut, Hex 3/8-24 7 810 04 06-00 Washer, Lock 3/8 KEY PART NO. MODEL NUMBER DRT900 (96093001802), PRODUCT NUMBER 960 93 00-18 TINE ASSEMBLY KEY PART NO. NO.
Parts Manual
Page 8
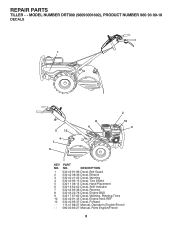
PART NO. REPAIR PARTS TILLER - - DESCRIPTION 532 42 91-96 Decal, Belt Guard 532 42 38-30 Decal, Ethanol 532 42 41-02 Decal, Warning 532 43 95-15 Decal, Tine Shield 532 11 06-14 Decal, Hand Placement 532 16 62-02 Decal, Shift Indicator 532 43 95-38 Decal, Reverse 532... 43 22-78 Decal, Engine B&S 532 17 67-82 Decal, Warning, Rotating Tines 532 40 91-43 Decal, Engine Intek REF 532 43 95-37 Decal, Forward 115 47 88-27 Manual, Operator's English/French 580 30 83...
PART NO. REPAIR PARTS TILLER - - DESCRIPTION 532 42 91-96 Decal, Belt Guard 532 42 38-30 Decal, Ethanol 532 42 41-02 Decal, Warning 532 43 95-15 Decal, Tine Shield 532 11 06-14 Decal, Hand Placement 532 16 62-02 Decal, Shift Indicator 532 43 95-38 Decal, Reverse 532... 43 22-78 Decal, Engine B&S 532 17 67-82 Decal, Warning, Rotating Tines 532 40 91-43 Decal, Engine Intek REF 532 43 95-37 Decal, Forward 115 47 88-27 Manual, Operator's English/French 580 30 83...


