
Owners Manual
Page 2
...the engine (motor) and check immediately for an extended period. exhaust fumes are dangerous. • Never operate the tiller without wearing adequate outer garments. The tines may catch in safe working condition. • Check shear pins, engine mounting bolts, and other safety protective devices... hands or feet near the unit. • Use only attachments and accessories approved by the manufacturer for Walk-Behind Powered Rotary Tillers TRAINING • Read the Owner's Manual carefully. If this symbol to point out important safety precautions. Disconnect the cord on ...
...the engine (motor) and check immediately for an extended period. exhaust fumes are dangerous. • Never operate the tiller without wearing adequate outer garments. The tines may catch in safe working condition. • Check shear pins, engine mounting bolts, and other safety protective devices... hands or feet near the unit. • Use only attachments and accessories approved by the manufacturer for Walk-Behind Powered Rotary Tillers TRAINING • Read the Owner's Manual carefully. If this symbol to point out important safety precautions. Disconnect the cord on ...

Owners Manual
Page 5
... SUPPORT BOLT Fig. 3 HANDLE HEIGHT • Handle height may be adjusted to better handle your tilling conditions (See "TINE ARRANGEMENT" in the Service and Adjustments section of cartoning material. IMPORTANT: WHEN UNPACKING AND ASSEMBLING TILLER, BE CAREFUL NOT TO STRETCH OR KINK CABLE(S). • Cut cable ties securing handles. • Slowly lift...
... SUPPORT BOLT Fig. 3 HANDLE HEIGHT • Handle height may be adjusted to better handle your tilling conditions (See "TINE ARRANGEMENT" in the Service and Adjustments section of cartoning material. IMPORTANT: WHEN UNPACKING AND ASSEMBLING TILLER, BE CAREFUL NOT TO STRETCH OR KINK CABLE(S). • Cut cable ties securing handles. • Slowly lift...

Owners Manual
Page 6
... meaning. Used when starting a cold engine. DEPTH STAKE - direction. FORWARD TINE CONTROL REVERSE TINE CONTROL DEPTH STAKE RECOIL STARTER HANDLE CHOKE CONTROL THROTTLE CONTROL TINE SHIELD TINES Fig. 4 MEETS ANSI SAFETY REQUIREMENTS Our tillers conform to start the engine. FORWARD TINE CONTROL - Engages tines in forward REVERSE TINE CONTROL - THROTTLE CONTROL - Used to the safety standards of various...
... meaning. Used when starting a cold engine. DEPTH STAKE - direction. FORWARD TINE CONTROL REVERSE TINE CONTROL DEPTH STAKE RECOIL STARTER HANDLE CHOKE CONTROL THROTTLE CONTROL TINE SHIELD TINES Fig. 4 MEETS ANSI SAFETY REQUIREMENTS Our tillers conform to start the engine. FORWARD TINE CONTROL - Engages tines in forward REVERSE TINE CONTROL - THROTTLE CONTROL - Used to the safety standards of various...

Owners Manual
Page 7
...serves as a brake to slow the tiller's forward motion to enable the tines to handle. 7 STAKE SPRING WHEEL Fig. 6 DEPTH STAKE REVERSE • With forward tine control in foreign objects thrown into the ground the deeper the tines will dig. ment. • Release reverse tine control to stop engine. Also, the... more the depth stake is regulated by the position of any tiller can result in the "OFF" (up ) position, Squeeze forward tine control to start engine. Replace the clevis pin and hairpin clip. • For normal tilling, set wheels at the ...
...serves as a brake to slow the tiller's forward motion to enable the tines to handle. 7 STAKE SPRING WHEEL Fig. 6 DEPTH STAKE REVERSE • With forward tine control in foreign objects thrown into the ground the deeper the tines will dig. ment. • Release reverse tine control to stop engine. Also, the... more the depth stake is regulated by the position of any tiller can result in the "OFF" (up ) position, Squeeze forward tine control to start engine. Replace the clevis pin and hairpin clip. • For normal tilling, set wheels at the ...

Owners Manual
Page 8
...freshness. 8 temperatures (below 32°F), the carburetor fuel mixture may occur. Wipe off the ground. • Push or pull tiller to allow tiller engine and muffler to full "CHOKE" position. Do not store, spill or use engine or carburetor cleaner products in upright position.... See Storage Instructions for additional information. Never use gasoline near an open flame. • Push tiller handles down, raising tines off any source of filler neck. CAUTION: Keep tine control in the Service and Adjustments section of this point). • Pull recoil starter handle quickly....
...freshness. 8 temperatures (below 32°F), the carburetor fuel mixture may occur. Wipe off the ground. • Push or pull tiller to allow tiller engine and muffler to full "CHOKE" position. Do not store, spill or use engine or carburetor cleaner products in upright position.... See Storage Instructions for additional information. Never use gasoline near an open flame. • Push tiller handles down, raising tines off any source of filler neck. CAUTION: Keep tine control in the Service and Adjustments section of this point). • Pull recoil starter handle quickly....

Owners Manual
Page 9
...-in the fall, remove vines and long grass to prevent them from wrapping around the tine shaft and slowing your belt(s), pulleys and tine control before tilling; To slow down the tiller, press down the rows at normal depth. 4 3 2 1 5 6 7 Fig. 9 CULTIVATING Cultivating is... destroying the weeds between passes. The proper setting of unwanted vegetation. A tiller will allow tines to negotiate than about-faces. Tines will not readily penetrate dry, hard soil which will also clear the soil of the wheels and depth stake is less wet...
...-in the fall, remove vines and long grass to prevent them from wrapping around the tine shaft and slowing your belt(s), pulleys and tine control before tilling; To slow down the tiller, press down the rows at normal depth. 4 3 2 1 5 6 7 Fig. 9 CULTIVATING Cultivating is... destroying the weeds between passes. The proper setting of unwanted vegetation. A tiller will allow tines to negotiate than about-faces. Tines will not readily penetrate dry, hard soil which will also clear the soil of the wheels and depth stake is less wet...

Owners Manual
Page 10
... "LUBRICATION CHART") . GENERAL RECOMMENDATIONS The warranty on this manual should replace the spark plug, clean or replace air filter, and check tines and belt for loose fasteners. Some adjustments will need to be checked at least once each season. • Once a year you should...• Check for wear. LUBRICATION CHART TINE CONTROL ENGINE IDLER ARM SRAEEFE3R0 OR TO 10W-30 MOTOR OIL MAINTENANCE "ENGINE" SECTION 10 To receive full value from the warranty, operator must maintain tiller as instructed in dirty or dusty conditions. A new...
... "LUBRICATION CHART") . GENERAL RECOMMENDATIONS The warranty on this manual should replace the spark plug, clean or replace air filter, and check tines and belt for loose fasteners. Some adjustments will need to be checked at least once each season. • Once a year you should...• Check for wear. LUBRICATION CHART TINE CONTROL ENGINE IDLER ARM SRAEEFE3R0 OR TO 10W-30 MOTOR OIL MAINTENANCE "ENGINE" SECTION 10 To receive full value from the warranty, operator must maintain tiller as instructed in dirty or dusty conditions. A new...
Owners Manual
Page 13
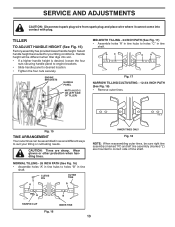
.../CULTIVATING - 12-3/4 INCH PATH (See Fig. 18) • Remove outer tines. Handle height will be different when tiller digs into contact with plug. CAUTION: Tines are mounted to suit your tilling conditions. CLEVIS PIN OUTER TINE A A INNER TINES ONLY Fig. 18 NOTE: When reassembling outer tines, be assembled in several different ways to correct side of...
.../CULTIVATING - 12-3/4 INCH PATH (See Fig. 18) • Remove outer tines. Handle height will be different when tiller digs into contact with plug. CAUTION: Tines are mounted to suit your tilling conditions. CLEVIS PIN OUTER TINE A A INNER TINES ONLY Fig. 18 NOTE: When reassembling outer tines, be assembled in several different ways to correct side of...

Owners Manual
Page 17
... or improper gap. 9. Dirty air cleaner. 3. Oil in fuel. 6. Partially plugged muffler. 5. V-belt is not engaged. 2. Engine runs but tiller won't move 1. Carburetor out of adjustment. Remove fuel tank and clean. 7. Replace spark plug or adjust gap. 9. Check oil level/change oil....adjust V-belt. 3. Loss of fuel. 2. Engine overheats 1. Ground too wet. Bad spark plug or improper gap. 4. Stale or dirty fuel. 7. Tine control is off pulley(s). Tilling too deep. 2. See "TO START ENGINE" in the Operation section. 3. Inspect V-belt. 1. Clogged fuel tank. 7....
... or improper gap. 9. Dirty air cleaner. 3. Oil in fuel. 6. Partially plugged muffler. 5. V-belt is not engaged. 2. Engine runs but tiller won't move 1. Carburetor out of adjustment. Remove fuel tank and clean. 7. Replace spark plug or adjust gap. 9. Check oil level/change oil....adjust V-belt. 3. Loss of fuel. 2. Engine overheats 1. Ground too wet. Bad spark plug or improper gap. 4. Stale or dirty fuel. 7. Tine control is off pulley(s). Tilling too deep. 2. See "TO START ENGINE" in the Operation section. 3. Inspect V-belt. 1. Clogged fuel tank. 7....

Owners Manual
Page 18
... 10 810 04 05-00 Washer Lock 5/16 11 873 22 05-00 Nut, FIn Hx 5/16-18 KEY PART NO. NO. FT900 (96083000601), PRODUCT NO. 960 83 00-05 HANDLE ASSEMBLY 3 16 1 2 4 5 6 10 11 19 29 3 20 19 29... 20 7 14 13 7 8 9 12 FT-handle_assy_5 KEY PART NO. MODEL NO. REPAIR PARTS TILLER - DESCRIPTION 12 898 00 01-29 Nut, Flange 13 532 18 08-47 Bolt, RDHD 5/16-18 x 3/4 14 532 44 ...-22 Assembly, Panel 16 532 44 07-15 Handle, RH Double Bend 19 532 18 85-62 Lever, Control, Tine 20 532 18 85-55 Pin, Pivot 29 812 00 00-59 Retainer, Ring NOTE: All component dimensions given in...
... 10 810 04 05-00 Washer Lock 5/16 11 873 22 05-00 Nut, FIn Hx 5/16-18 KEY PART NO. NO. FT900 (96083000601), PRODUCT NO. 960 83 00-05 HANDLE ASSEMBLY 3 16 1 2 4 5 6 10 11 19 29 3 20 19 29... 20 7 14 13 7 8 9 12 FT-handle_assy_5 KEY PART NO. MODEL NO. REPAIR PARTS TILLER - DESCRIPTION 12 898 00 01-29 Nut, Flange 13 532 18 08-47 Bolt, RDHD 5/16-18 x 3/4 14 532 44 ...-22 Assembly, Panel 16 532 44 07-15 Handle, RH Double Bend 19 532 18 85-62 Lever, Control, Tine 20 532 18 85-55 Pin, Pivot 29 812 00 00-59 Retainer, Ring NOTE: All component dimensions given in...

Owners Manual
Page 22
...-52 Bolt, Hex 3/8-16 x 3-1/4 3 819 13 13-11 Washer 13/32 x 13/16 x 11 5 873 90 06-00 Locknut 3/8-16 6 532 44 07-04 Shield, Tine 7 532 18 81-95 Bracket, Engine, R.H. 8 532 16 58-34 Bracket, Engine, L.H. 10 873 97 05-00 Nut, Hex 5/16-18 11 532 18 79... 20-16 Washer 9/32 x 1-1/4 x 16 Ga. 18 810 04 04-00 Washer, Lock 1/4 19 874 61 04-12 Bolt, Hex 1/4-28 x 3/4 Gr. 5 20 - - - - - REPAIR PARTS TILLER - FT900 (96083000601), PRODUCT NO. 960 83 00-05 TRANSMISSION 20 1 11 19 18 1716 11 7 10 12 KEY PART NO. inches. 1 inch = 25.4 mm 22
...-52 Bolt, Hex 3/8-16 x 3-1/4 3 819 13 13-11 Washer 13/32 x 13/16 x 11 5 873 90 06-00 Locknut 3/8-16 6 532 44 07-04 Shield, Tine 7 532 18 81-95 Bracket, Engine, R.H. 8 532 16 58-34 Bracket, Engine, L.H. 10 873 97 05-00 Nut, Hex 5/16-18 11 532 18 79... 20-16 Washer 9/32 x 1-1/4 x 16 Ga. 18 810 04 04-00 Washer, Lock 1/4 19 874 61 04-12 Bolt, Hex 1/4-28 x 3/4 Gr. 5 20 - - - - - REPAIR PARTS TILLER - FT900 (96083000601), PRODUCT NO. 960 83 00-05 TRANSMISSION 20 1 11 19 18 1716 11 7 10 12 KEY PART NO. inches. 1 inch = 25.4 mm 22

Owners Manual
Page 23
PART NO. DESCRIPTION 532 44 06-13 Decal, Logo 532 42 20-12 Decal, Logo 532 43 99-89 Decal, Logo 532 11 06-14 Decal, Hand Placement 532 15 87-00 Decal, Control Forward 532 15 87-01 Decal, Control Reverse 532 12 00-76 Decal, Warning, Rotating Tines 532 42 29-72 Decal, Tine Shield 532 40 91-43 Decal, Tank 532 43 22-78 Decal, Air Cleaner 532 43 99-64 Manual, Owner's (English) 532 43 99-65 Manual, Owner's (French) 23 REPAIR PARTS TILLER - FT900 (96083000601), PRODUCT NO. 960 83 00-05 DECALS 7 6 5 1 12 10 2 9 8 3 KEY NO. 1 2 3 5 6 7 8 9 10 12 - - - MODEL NO.
PART NO. DESCRIPTION 532 44 06-13 Decal, Logo 532 42 20-12 Decal, Logo 532 43 99-89 Decal, Logo 532 11 06-14 Decal, Hand Placement 532 15 87-00 Decal, Control Forward 532 15 87-01 Decal, Control Reverse 532 12 00-76 Decal, Warning, Rotating Tines 532 42 29-72 Decal, Tine Shield 532 40 91-43 Decal, Tank 532 43 22-78 Decal, Air Cleaner 532 43 99-64 Manual, Owner's (English) 532 43 99-65 Manual, Owner's (French) 23 REPAIR PARTS TILLER - FT900 (96083000601), PRODUCT NO. 960 83 00-05 DECALS 7 6 5 1 12 10 2 9 8 3 KEY NO. 1 2 3 5 6 7 8 9 10 12 - - - MODEL NO.


