

Owners Manual
Page 8
...deck or other attachments mounted to control engine speed. (E) ATTACHMENT CLUTCH SWITCH - Used to tractor. (B) BRAKE PEDAL - Turns the headlights on transaxle. (Z) AMMETER - Indicates a fault when the attachment clutch switch is disengaged. (D) THROTTLE CONTROL - Allows operation of the ... forward drive pedal. (K) FORWARD DRIVE PEDAL - Used to raise and lower mower or other powered attachment while in reverse. (H)* HEADLIGHT BUTTON - Indicates a starting /stopping engine and communicating status updates. (G)* REVERSE OPERATION SYSTEM (ROS) - Used for entering the ...
...deck or other attachments mounted to control engine speed. (E) ATTACHMENT CLUTCH SWITCH - Used to tractor. (B) BRAKE PEDAL - Turns the headlights on transaxle. (Z) AMMETER - Indicates a fault when the attachment clutch switch is disengaged. (D) THROTTLE CONTROL - Allows operation of the ... forward drive pedal. (K) FORWARD DRIVE PEDAL - Used to raise and lower mower or other powered attachment while in reverse. (H)* HEADLIGHT BUTTON - Indicates a starting /stopping engine and communicating status updates. (G)* REVERSE OPERATION SYSTEM (ROS) - Used for entering the ...

Owners Manual
Page 12
...freewheeling position. Use an appropriate means of your tractor. Use common sense when towing. WITH ENGINE OFF: • Press headlight button (H) once to turn headlights on for three (3) seconds. • The SmartSwitch Ignition Button (F) will only work after battery use for accurate charge indication... Charge recommended 3. See your local dealer for two (2) seconds and then stay lit until battery is charged or until headlights blink twice to turn headlights on a slope, is dangerous. TRANSMISSION ENGAGED RED YELLOW GREEN CHARGING PLUG Fig. 15 NOTE: Wait 30 minutes after ...
...freewheeling position. Use an appropriate means of your tractor. Use common sense when towing. WITH ENGINE OFF: • Press headlight button (H) once to turn headlights on for three (3) seconds. • The SmartSwitch Ignition Button (F) will only work after battery use for accurate charge indication... Charge recommended 3. See your local dealer for two (2) seconds and then stay lit until battery is charged or until headlights blink twice to turn headlights on a slope, is dangerous. TRANSMISSION ENGAGED RED YELLOW GREEN CHARGING PLUG Fig. 15 NOTE: Wait 30 minutes after ...

Owners Manual
Page 26
... VEHICLE MUST ALSO BE A 12 VOLT SYSTEM. Tighten securely • Close hood. TERMINAL COVER NEGATIVE (BLACK) CABLE POSITIVE (RED) CABLE Fig. 47 TO REPLACE LED HEADLIGHT • Raise hood. • Disconnect harness from tractor. • Install new battery with terminals in the MAINTENANCE section of fully charged battery. • Connect the...
... VEHICLE MUST ALSO BE A 12 VOLT SYSTEM. Tighten securely • Close hood. TERMINAL COVER NEGATIVE (BLACK) CABLE POSITIVE (RED) CABLE Fig. 47 TO REPLACE LED HEADLIGHT • Raise hood. • Disconnect harness from tractor. • Install new battery with terminals in the MAINTENANCE section of fully charged battery. • Connect the...

Owners Manual
Page 27
...manual. While engine is in operation, this light may also indicate a charging system failure. • The Headlight Button (H) will blink when one or both of the headlight bulbs fail. • All indicator lights will blink in the Operation section of this manual. • After...F EE CC TO REMOVE HOOD AND GRILL ASSEMBLY (See Fig. 50) • Raise hood. • Unsnap headlight wire connector. • Stand in front of tractor. HOOD HEADLIGHT WIRE CONNECTOR 07002 Fig. 50 TRANSMISSION REMOVAL/REPLACEMENT Should your transmission require removal for the correct passcode to indicate system...
...manual. While engine is in operation, this light may also indicate a charging system failure. • The Headlight Button (H) will blink when one or both of the headlight bulbs fail. • All indicator lights will blink in the Operation section of this manual. • After...F EE CC TO REMOVE HOOD AND GRILL ASSEMBLY (See Fig. 50) • Raise hood. • Unsnap headlight wire connector. • Stand in front of tractor. HOOD HEADLIGHT WIRE CONNECTOR 07002 Fig. 50 TRANSMISSION REMOVAL/REPLACEMENT Should your transmission require removal for the correct passcode to indicate system...

Owners Manual
Page 30
... "OFF". 2. Clogged mower deck vent holes from buildup 11. Frozen idler pulley. 4. Level mower deck. 3. Clean around mandrels to open vent holes. 1. Poor grass discharge Headlight(s) not working (if so equipped) 1. Replace battery. 2. Axle key missing. 1. Replace blade mandrel. 5. Allow grass to dry before stopping engine. 1. Check tires for proper air...
... "OFF". 2. Clogged mower deck vent holes from buildup 11. Frozen idler pulley. 4. Level mower deck. 3. Clean around mandrels to open vent holes. 1. Poor grass discharge Headlight(s) not working (if so equipped) 1. Replace battery. 2. Axle key missing. 1. Replace blade mandrel. 5. Allow grass to dry before stopping engine. 1. Check tires for proper air...
Parts Manual
Page 3
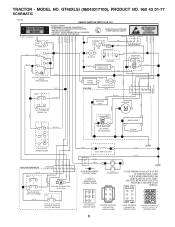
TRACTOR - GT48XLSi (96043017700), PRODUCT NO. 960 43 01-77 SCHEMATIC 3 2 1 BLACK-1 BLK/WHT-14 ORANGE-8 SCH29 (COLOR - PIN NUMBER) RED-11 SMART IGNITION SWITCH (S.I.S.) -DO NOT OPEN! -.../WHT 2 YEL/WHT 3 BLACK 4 RED 5 BLACK 6 FUEL SHUT-OFF SOLENOID (IF EQUIPPED) STATOR BLUE 2 1 ELECTRIC CLUTCH BLACK PURPLE BLACK BLACK NON-REMOVABLE CONNECTIONS REMOVABLE CONNECTIONS HEADLIGHTS NOTE: WIRING INSULATED CLIPS IF WIRING INSULATED CLIPS WERE REMOVED FOR SERVICING OF UNIT, THEY SHOULD BE RE-INSTALLED TO PROPERLY SECURE YOUR WIRING. 74...
TRACTOR - GT48XLSi (96043017700), PRODUCT NO. 960 43 01-77 SCHEMATIC 3 2 1 BLACK-1 BLK/WHT-14 ORANGE-8 SCH29 (COLOR - PIN NUMBER) RED-11 SMART IGNITION SWITCH (S.I.S.) -DO NOT OPEN! -.../WHT 2 YEL/WHT 3 BLACK 4 RED 5 BLACK 6 FUEL SHUT-OFF SOLENOID (IF EQUIPPED) STATOR BLUE 2 1 ELECTRIC CLUTCH BLACK PURPLE BLACK BLACK NON-REMOVABLE CONNECTIONS REMOVABLE CONNECTIONS HEADLIGHTS NOTE: WIRING INSULATED CLIPS IF WIRING INSULATED CLIPS WERE REMOVED FOR SERVICING OF UNIT, THEY SHOULD BE RE-INSTALLED TO PROPERLY SECURE YOUR WIRING. 74...