
Owners Manual
Page 2
...against a wall or obstruction. Material may obscure vision. Stop the blade when crossing gravel surfaces. • Do not operate the mower without proper guards, plates, grass catcher or other reproductive harm. Only use of other engine parts become extremely hot during operation and ...remain hot after handling. never run. • Disengage the self-propelled mechanism or drive clutch on mowers so equipped before and while moving backwards. • Never direct discharged material toward the operator. All slopes require extra caution. Never...
...against a wall or obstruction. Material may obscure vision. Stop the blade when crossing gravel surfaces. • Do not operate the mower without proper guards, plates, grass catcher or other reproductive harm. Only use of other engine parts become extremely hot during operation and ...remain hot after handling. never run. • Disengage the self-propelled mechanism or drive clutch on mowers so equipped before and while moving backwards. • Never direct discharged material toward the operator. All slopes require extra caution. Never...
Owners Manual
Page 3
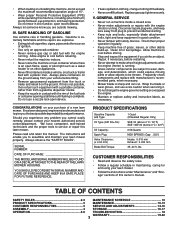
...Always observe the "SAFETY RULES". V. Frequently check components and replace with manufacturer's recommended parts, when necessary. • Mower blade is not possible, then refuel such equipment with a portable container, rather than from your vehicle before restarting. •...possible dependability and performance. Replacegascap;tightensecurely. Check their proper operation regularly. • Keep machine free of a new lawn mower. Clean oil or fuel spillage. TABLE OF CONTENTS SAFETY RULES 2-3 MAINTENANCE SCHEDULE 10 PRODUCT SPECIFICATIONS 3 MAINTENANCE 10-13 ...
...Always observe the "SAFETY RULES". V. Frequently check components and replace with manufacturer's recommended parts, when necessary. • Mower blade is not possible, then refuel such equipment with a portable container, rather than from your vehicle before restarting. •...possible dependability and performance. Replacegascap;tightensecurely. Check their proper operation regularly. • Keep machine free of a new lawn mower. Clean oil or fuel spillage. TABLE OF CONTENTS SAFETY RULES 2-3 MAINTENANCE SCHEDULE 10 PRODUCT SPECIFICATIONS 3 MAINTENANCE 10-13 ...
Owners Manual
Page 4
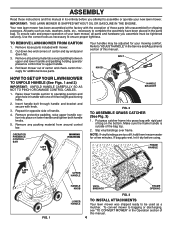
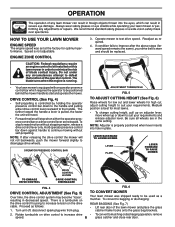
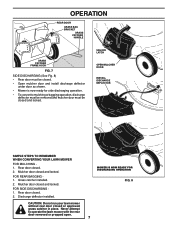
.... OPERATOR PRESENCE CONTROL BAR LIFT UP MOWING POSITION HANDLE BRACKET FIG. 2 TO ASSEMBLE GRASS CATCHER (See Fig. 3) 1. IMPORTANT: THIS LAWN MOWER IS SHIPPED WITHOUT OIL OR GASOLINE IN THE ENGINE. Your handles may be adjusted for additional loose parts. Remove protective padding, raise upper handle ...FRAME HANDLE LIFT UP FIG. 1 UPPER HANDLE HANDLE KNOB VINYL BINDINGS FRAME OPENING LOWER HANDLE FIG. 3 TO INSTALL ATTACHMENTS Your lawn mower was shipped ready to upper handle. 4. Slip vinyl bindings over frame. Insert handle bolt through handle and bracket and secure with one...
.... OPERATOR PRESENCE CONTROL BAR LIFT UP MOWING POSITION HANDLE BRACKET FIG. 2 TO ASSEMBLE GRASS CATCHER (See Fig. 3) 1. IMPORTANT: THIS LAWN MOWER IS SHIPPED WITHOUT OIL OR GASOLINE IN THE ENGINE. Your handles may be adjusted for additional loose parts. Remove protective padding, raise upper handle ...FRAME HANDLE LIFT UP FIG. 1 UPPER HANDLE HANDLE KNOB VINYL BINDINGS FRAME OPENING LOWER HANDLE FIG. 3 TO INSTALL ATTACHMENTS Your lawn mower was shipped ready to upper handle. 4. Slip vinyl bindings over frame. Insert handle bolt through handle and bracket and secure with one...
Owners Manual
Page 5
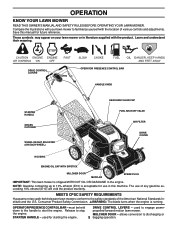
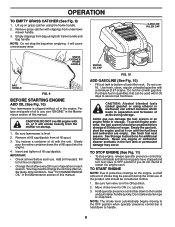
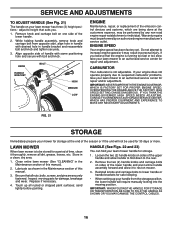
... SHUTOFF VALVE AIR FILTER DRIVE COVER HOUSING ENGINE OIL CAP WITH DIPSTICK MULCHER DOOR MUFFLER SPARK PLUG IMPORTANT: This lawn mower is shipped WITHOUT OIL OR GASOLINE in literature supplied with the location of various controls and adjustments. Consumer Product Safety ...American National Standards Institute and the U.S. MEETS CPSC SAFETY REQUIREMENTS Husqvarna rotary walk-behind power lawn mowers conform to discharging or STARTER HANDLE - used for future reference. Compare the illustrations with your lawn mower or in the engine. must be held DRIVE CONTROL LEVERS...
... SHUTOFF VALVE AIR FILTER DRIVE COVER HOUSING ENGINE OIL CAP WITH DIPSTICK MULCHER DOOR MUFFLER SPARK PLUG IMPORTANT: This lawn mower is shipped WITHOUT OIL OR GASOLINE in literature supplied with the location of various controls and adjustments. Consumer Product Safety ...American National Standards Institute and the U.S. MEETS CPSC SAFETY REQUIREMENTS Husqvarna rotary walk-behind power lawn mowers conform to discharging or STARTER HANDLE - used for future reference. Compare the illustrations with your lawn mower or in the engine. must be held DRIVE CONTROL LEVERS...
Owners Manual
Page 6
...was shipped ready to defeat the function of blade contact injury. CAUTION: Federal regulations require an engine control to be positioned behind the mower handle to minimize the risk of the operator control. Medium position is properly positioned when lever inserts into the eyes, which requires ... by holding the operator presence control bar down to the handle. If condition fails to improve after releasing the drive control the mower will stop forward motion without self-propelling. To stop when either drive control lever rearward to the handle and pulling either the ...
...was shipped ready to defeat the function of blade contact injury. CAUTION: Federal regulations require an engine control to be positioned behind the mower handle to minimize the risk of the operator control. Medium position is properly positioned when lever inserts into the eyes, which requires ... by holding the operator presence control bar down to the handle. If condition fails to improve after releasing the drive control the mower will stop forward motion without self-propelling. To stop when either drive control lever rearward to the handle and pulling either the ...
Owners Manual
Page 7
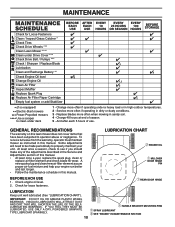
UNLOCK LATCH OPEN MULCHER DOOR INSTALL DISCHARGE DEFLECTOR SIMPLE STEPS TO REMEMBER WHEN CONVERTING YOUR LAWN MOWER FOR MULCHING 1. Mulcher door closed . 2. Rear door closed and locked. MOWER IS NOW READY FOR DISCHARGING OPERATION FIG. 8 7 Rear door closed and locked. OPERATION REAR DOOR GRASS BAG BRACKET ...• Open mulcher door and install discharge deflector under door as shown. • Mower is now ready for side discharging operation. • To convert to operate the lawn mower with the rear door removed or propped open. FOR REAR BAGGING 1. CAUTION: Do not run your...
UNLOCK LATCH OPEN MULCHER DOOR INSTALL DISCHARGE DEFLECTOR SIMPLE STEPS TO REMEMBER WHEN CONVERTING YOUR LAWN MOWER FOR MULCHING 1. Mulcher door closed . 2. Rear door closed and locked. MOWER IS NOW READY FOR DISCHARGING OPERATION FIG. 8 7 Rear door closed and locked. OPERATION REAR DOOR GRASS BAG BRACKET ...• Open mulcher door and install discharge deflector under door as shown. • Mower is now ready for side discharging operation. • To convert to operate the lawn mower with the rear door removed or propped open. FOR REAR BAGGING 1. CAUTION: Do not run your...
Owners Manual
Page 8
... without oil in the Maintenance section of 30 days or longer. Slowly pour the entire container down to change the oil more often under lawn mower handle. 3. Insert and tighten oil fill cap/dipstick. IMPORTANT: • Check oil level before storage of this manual. Add oil if needed. You may...
... without oil in the Maintenance section of 30 days or longer. Slowly pour the entire container down to change the oil more often under lawn mower handle. 3. Insert and tighten oil fill cap/dipstick. IMPORTANT: • Check oil level before storage of this manual. Add oil if needed. You may...

Owners Manual
Page 9
...8226; When using . • Keep top of engine around starter clear and clean of grass clippings. MULCHING MOWING TIPS IMPORTANT: FOR BEST PERFORMANCE, KEEP MOWER HOUSING FREE OF BUILT-UP GRASS AND TRASH. Also, the mulched grass will biodegrade quickly to collect the clippings on the right side of cut... from week to keep from overloading the engine and leaving clumps of cut path and mow slowly. Such attachments are hazardous, will damage your mower and could void your warranty. • Under certain conditions, such as very tall grass, it will be necessary to raise the height of...
...8226; When using . • Keep top of engine around starter clear and clean of grass clippings. MULCHING MOWING TIPS IMPORTANT: FOR BEST PERFORMANCE, KEEP MOWER HOUSING FREE OF BUILT-UP GRASS AND TRASH. Also, the mulched grass will biodegrade quickly to collect the clippings on the right side of cut... from week to keep from overloading the engine and leaving clumps of cut path and mow slowly. Such attachments are hazardous, will damage your mower and could void your warranty. • Under certain conditions, such as very tall grass, it will be necessary to raise the height of...
Owners Manual
Page 10
...25 HOURS 100 OR SEASON HOURS BEFORE STORAGE Check for Loose Fasteners Clean / Inspect Grass Catcher * Check Tires Check Drive Wheels *** Clean Lawn Mower **** Clean under Drive Cover *** Check Drive Belt / Pulleys *** Check / Sharpen / Replace Blade Lubrication Clean and Recharge Battery ** Check ...Muffler Replace Spark Plug Replace Air Filter Paper Cartridge Empty fuel system or add Stabilizer * (if so equipped) ** Electric-Start mowers *** Power-Propelled mowers **** Use a scraper to see if you should make any of the adjustments described in the Service and Adjustments section of this ...
...25 HOURS 100 OR SEASON HOURS BEFORE STORAGE Check for Loose Fasteners Clean / Inspect Grass Catcher * Check Tires Check Drive Wheels *** Clean Lawn Mower **** Clean under Drive Cover *** Check Drive Belt / Pulleys *** Check / Sharpen / Replace Blade Lubrication Clean and Recharge Battery ** Check ...Muffler Replace Spark Plug Replace Air Filter Paper Cartridge Empty fuel system or add Stabilizer * (if so equipped) ** Electric-Start mowers *** Power-Propelled mowers **** Use a scraper to see if you should make any of the adjustments described in the Service and Adjustments section of this ...

Owners Manual
Page 11
...any maintenance. Put wheels back in adapter and crankshaft keyway are aligned; CAUTION: Use only a replacement blade approved by turning counter-clockwise. 5. Turn lawn mower on the blade adapter. FIG. 13 TO SHARPEN BLADE (See Fig. 14) NOTE: We do not turn freely, contact a qualified service .... 13) 1. If necessary to clean the drive wheels, be sure to be sure the blade is hazardous, could damage your mower and void your mower is balanced. IMPORTANT: TO ENSURE PROPER ASSEMBLY, CENTER HOLE IN BLADE MUST ALIGN WITH STAR ON BLADE ADAPTER. 4. DRIVE WHEELS Check...
...any maintenance. Put wheels back in adapter and crankshaft keyway are aligned; CAUTION: Use only a replacement blade approved by turning counter-clockwise. 5. Turn lawn mower on the blade adapter. FIG. 13 TO SHARPEN BLADE (See Fig. 14) NOTE: We do not turn freely, contact a qualified service .... 13) 1. If necessary to clean the drive wheels, be sure to be sure the blade is hazardous, could damage your mower and void your mower is balanced. IMPORTANT: TO ENSURE PROPER ASSEMBLY, CENTER HOLE IN BLADE MUST ALIGN WITH STAR ON BLADE ADAPTER. 4. DRIVE WHEELS Check...

Owners Manual
Page 12
... but are not. • Slide blade on its side as shown and drain oil into the tube when taking reading. Give the lawn mower model number when ordering. ENGINE LUBRICATION Maintenance, repair, or replacement of the blade moves downward, sharpen the heavy end until it should be ...dry when used for damage or deterioration. Warranty repairs must be kept clean and free of engine. Disconnect spark plug wire from lawn mower or side of oil and rechecking the dipstick until the blade is empty. 1. Insert dipstick into the engine. 6. Continue adding small amounts of ...
... but are not. • Slide blade on its side as shown and drain oil into the tube when taking reading. Give the lawn mower model number when ordering. ENGINE LUBRICATION Maintenance, repair, or replacement of the blade moves downward, sharpen the heavy end until it should be ...dry when used for damage or deterioration. Warranty repairs must be kept clean and free of engine. Disconnect spark plug wire from lawn mower or side of oil and rechecking the dipstick until the blade is empty. 1. Insert dipstick into the engine. 6. Continue adding small amounts of ...

Owners Manual
Page 13
...air filter. Remove grass catcher and discharge chute assembly from accumulating. IMPORTANT: BE SURE THE GARDEN HOSE IS NOT ROUTED UNDER THE LAWN MOWER HOUSING OR ENTANGLED IN THE WHEELS. 5. CARTRIDGE 6. Start engine (as follows: 1. Replace the air filter every 100 hours of operation...whichever occurs first. Carefully remove cartridge. 3. Install cartridge, then replace cover. WATER WASHOUT FEATURE (See Fig. 18) Your lawn mower is running. NOTE: Water, grass and other debris will not run properly and may cause deterioration of this manual) and let engine run...
...air filter. Remove grass catcher and discharge chute assembly from accumulating. IMPORTANT: BE SURE THE GARDEN HOSE IS NOT ROUTED UNDER THE LAWN MOWER HOUSING OR ENTANGLED IN THE WHEELS. 5. CARTRIDGE 6. Start engine (as follows: 1. Replace the air filter every 100 hours of operation...whichever occurs first. Carefully remove cartridge. 3. Install cartridge, then replace cover. WATER WASHOUT FEATURE (See Fig. 18) Your lawn mower is running. NOTE: Water, grass and other debris will not run properly and may cause deterioration of this manual) and let engine run...
Owners Manual
Page 14
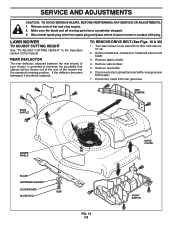
... rear gearcase. Disconnect spark plug wire from spark plug and place where it should be thrown out of the rear of your mower, is provided to minimize the possibility that objects will be replaced. SIDE BUMPER REAR BAFFLE DEBRIS SHIELD BLADE HARDENED WASHER LOCKWASHER BLADE... BOLT FIG. 19 14 DRIVE COVER FRONT BAFFLE Remove debris shield. 4. Turn lawn mower on its side with plug. SERVICE AND ADJUSTMENTS CAUTION: TO AVOID SERIOUS INJURY, BEFORE PERFORMING ANY SERVICE OR ADJUSTMENTS: 1. Remove rear baf&#...
... rear gearcase. Disconnect spark plug wire from spark plug and place where it should be thrown out of the rear of your mower, is provided to minimize the possibility that objects will be replaced. SIDE BUMPER REAR BAFFLE DEBRIS SHIELD BLADE HARDENED WASHER LOCKWASHER BLADE... BOLT FIG. 19 14 DRIVE COVER FRONT BAFFLE Remove debris shield. 4. Turn lawn mower on its side with plug. SERVICE AND ADJUSTMENTS CAUTION: TO AVOID SERIOUS INJURY, BEFORE PERFORMING ANY SERVICE OR ADJUSTMENTS: 1. Remove rear baf&#...

Owners Manual
Page 15
Remove belt from mower and discard. Route the other end of the new belt through idler assembly to front gearcase pulley. 4. and that the new belt is inside the ... pulley. 5. Be sure the new belt is 35-40 ft. Reinstall side bumper. 15. The recommended tightening torque is inside the front belt keeper. 9. Return mower to rear baffle / rear gearcase belt keeper. 13. TO REPLACE DRIVE BELT (See Figs. 19 & 20) NOTE: Always use factory approved belt to spark...
Remove belt from mower and discard. Route the other end of the new belt through idler assembly to front gearcase pulley. 4. and that the new belt is inside the ... pulley. 5. Be sure the new belt is 35-40 ft. Reinstall side bumper. 15. The recommended tightening torque is inside the front belt keeper. 9. Return mower to rear baffle / rear gearcase belt keeper. 13. TO REPLACE DRIVE BELT (See Figs. 19 & 20) NOTE: Always use factory approved belt to spark...
Owners Manual
Page 16
... if the unit will require manually locking into the mowing position. ENGINE SPEED Your engine speed has been factory set. LAWN MOWER When lawn mower is to be used for 30 days or more. Be sure that suits you believe that the engine is not adjustable. ...in handle bracket and reassemble bolt and knob and tighten securely. 3. CARBURETOR Your carburetor is running too fast or too slow, take your mower for storage at the customers expense, may result in personal injury. IMPORTANT: NEVERTAMPERWITHTHEENGINEGOVERNOR, WHICH IS FACTORY SET FOR PROPER ENGINE SPEED. Lubricate ...
... if the unit will require manually locking into the mowing position. ENGINE SPEED Your engine speed has been factory set. LAWN MOWER When lawn mower is to be used for 30 days or more. Be sure that suits you believe that the engine is not adjustable. ...in handle bracket and reassemble bolt and knob and tighten securely. 3. CARBURETOR Your carburetor is running too fast or too slow, take your mower for storage at the customers expense, may result in personal injury. IMPORTANT: NEVERTAMPERWITHTHEENGINEGOVERNOR, WHICH IS FACTORY SET FOR PROPER ENGINE SPEED. Lubricate ...

Owners Manual
Page 17
... dirt in the tank inside a building where fumes may occur. • Use fresh fuel next season. CAUTION: Never store the lawn mower with clean engine oil. (See "ENGINE" in minimizing the formation of fuel gum deposits during storage. Plastic cannot breathe, which allows condensation... to rust. IMPORTANT: NEVER COVER MOWER WHILE ENGINE AND EXHAUST AREAS ARE STILL WARM. Do not empty the gas tank and carburetor if using fuel stabilizer. NOTE: Fuel ...
... dirt in the tank inside a building where fumes may occur. • Use fresh fuel next season. CAUTION: Never store the lawn mower with clean engine oil. (See "ENGINE" in minimizing the formation of fuel gum deposits during storage. Plastic cannot breathe, which allows condensation... to rust. IMPORTANT: NEVER COVER MOWER WHILE ENGINE AND EXHAUST AREAS ARE STILL WARM. Do not empty the gas tank and carburetor if using fuel stabilizer. NOTE: Fuel ...
Owners Manual
Page 18
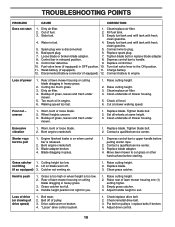
...pull 1. Grass is too high or wheel height is too low. 2. Grass catcher too full. 4. Put belt on blade worn off of mower housing. 5. Stale fuel. 3. Loose blade or broken blade adapter. 7. Control bar defective. 9. Disconnected battery connector (if equipped). 12. ...) 1. Too much grass. 3. Blade dragging in fuel. 4. not filling 2. Clean grass catcher. Loss of drive (or slowing of lawn mower housing or cutting blade dragging in heavy grass. 3. "Loose" drive control system. 1. Check/replace drive belt. 2. Dirty air filter. ...
...pull 1. Grass is too high or wheel height is too low. 2. Grass catcher too full. 4. Put belt on blade worn off of mower housing. 5. Stale fuel. 3. Loose blade or broken blade adapter. 7. Control bar defective. 9. Disconnected battery connector (if equipped). 12. ...) 1. Too much grass. 3. Blade dragging in fuel. 4. not filling 2. Clean grass catcher. Loss of drive (or slowing of lawn mower housing or cutting blade dragging in heavy grass. 3. "Loose" drive control system. 1. Check/replace drive belt. 2. Dirty air filter. ...

Owners Manual
Page 20
... have been made. Reinforced Stamped (Armor Protected) 10 Year Limited & Fabricated Limited Lifetime, Deck Warranties. Authorized Husqvarna Servicing Dealer/Center. and (d) Natural discoloration of warranty service. These Limited Warranties are NOT covered: (a) Abrasion to mower decks, including sand wear; (b) Damage to cutting equipment by way of or broken strainers; The Limited Lifetime...
... have been made. Reinforced Stamped (Armor Protected) 10 Year Limited & Fabricated Limited Lifetime, Deck Warranties. Authorized Husqvarna Servicing Dealer/Center. and (d) Natural discoloration of warranty service. These Limited Warranties are NOT covered: (a) Abrasion to mower decks, including sand wear; (b) Damage to cutting equipment by way of or broken strainers; The Limited Lifetime...

Owners Manual
Page 21
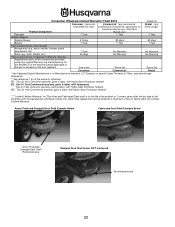
...than Rental Use) Riding Lawn Tractors: Frame, Chassis, Front Axle 5 Years No Warranty Engine* * * Transmission (if made by Husqvarna/Peerless) 3 Years No Warranty Transmission (if third party)** ** ** XLS Models only - stamped deck shell. Armor Protected Limited Warranty .... Limited Lifetime Warranty Battery 10 Years *** 1 Year Pro-rated No Warranty No Warranty No Warranty Other Non-Expendable Components Residential Zero Turn Mowers ( RZ Only ) 3 Years No Warranty Engine* * * Transmission ** ** No Warranty RZ4623 (967009801 & 967009802) RZ5426 (967003601 &...
...than Rental Use) Riding Lawn Tractors: Frame, Chassis, Front Axle 5 Years No Warranty Engine* * * Transmission (if made by Husqvarna/Peerless) 3 Years No Warranty Transmission (if third party)** ** ** XLS Models only - stamped deck shell. Armor Protected Limited Warranty .... Limited Lifetime Warranty Battery 10 Years *** 1 Year Pro-rated No Warranty No Warranty No Warranty Other Non-Expendable Components Residential Zero Turn Mowers ( RZ Only ) 3 Years No Warranty Engine* * * Transmission ** ** No Warranty RZ4623 (967009801 & 967009802) RZ5426 (967003601 &...
Owners Manual
Page 22
... warranty, parts & labor, with Hydro-Gear Distributor network. *** "Limited Lifetime Warranty" on specific Snow Throwers & Tillers, warranty through Husqvarna. ** See reference 1 (b) of the warranty statement. See to left See to left See to a maximum of two (2) decks ...any commercial, professional, institutional, agricultural, or income producing use, other than Rental Use) 1 Year Rental (any rental usage) 1 Year Robotic Mowers Robotic Mower 2 Years 90 days 90 days Battery 1 Year 1 Year 1 Year Parts & Accessories (if purchased) Accessories (e.g., grass catcher, bumper guard ...
... warranty, parts & labor, with Hydro-Gear Distributor network. *** "Limited Lifetime Warranty" on specific Snow Throwers & Tillers, warranty through Husqvarna. ** See reference 1 (b) of the warranty statement. See to left See to left See to a maximum of two (2) decks ...any commercial, professional, institutional, agricultural, or income producing use, other than Rental Use) 1 Year Rental (any rental usage) 1 Year Robotic Mowers Robotic Mower 2 Years 90 days 90 days Battery 1 Year 1 Year 1 Year Parts & Accessories (if purchased) Accessories (e.g., grass catcher, bumper guard ...


