
Owners Manual
Page 4
It has been designed, engineered and manufactured to give you to service or repair this manual. We have similar laws. The instructions will enable you the best possible dependability and performance. Do not mow in the Maintenance and Storage...on or near any ). TABLE OF CONTENTS SAFETY RULES 2-3 PRODUCT SPECIFICATIONS 4 CUSTOMER RESPONSIBILITIES 4 ASSEMBLY 6-9 OPERATION 10-16 MAINTENANCE SCHEDULE 17 MAINTENANCE 17-21 SERVICE AND ADJUSTMENTS 22-26 STORAGE 27 TROUBLESHOOTING 28-29 WARRANTY 31-34 ESPAÑOL 35 4 Federal laws apply on this machine, including (at a ...
It has been designed, engineered and manufactured to give you to service or repair this manual. We have similar laws. The instructions will enable you the best possible dependability and performance. Do not mow in the Maintenance and Storage...on or near any ). TABLE OF CONTENTS SAFETY RULES 2-3 PRODUCT SPECIFICATIONS 4 CUSTOMER RESPONSIBILITIES 4 ASSEMBLY 6-9 OPERATION 10-16 MAINTENANCE SCHEDULE 17 MAINTENANCE 17-21 SERVICE AND ADJUSTMENTS 22-26 STORAGE 27 TROUBLESHOOTING 28-29 WARRANTY 31-34 ESPAÑOL 35 4 Federal laws apply on this machine, including (at a ...
Owners Manual
Page 6
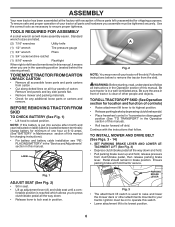
...or left unassembled for charging instructions). • For battery and battery cable installation see "REPLACING BATTERY" in the "Service and Adjustments" section in the Operation section of this manual. Remove end panels and lay side panels flat. • Remove mower and packing materials. • Check for ... that follow all the way down . • Release lever to lock seat in position. NOTE: If this battery is put into service after month and year indicated on all parts and hardware you assemble must be tightened securely. Follow the instructions below to its highest position...
...or left unassembled for charging instructions). • For battery and battery cable installation see "REPLACING BATTERY" in the "Service and Adjustments" section in the Operation section of this manual. Remove end panels and lay side panels flat. • Remove mower and packing materials. • Check for ... that follow all the way down . • Release lever to lock seat in position. NOTE: If this battery is put into service after month and year indicated on all parts and hardware you assemble must be tightened securely. Follow the instructions below to its highest position...
Owners Manual
Page 9
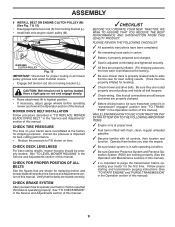
... you start the engine. ✓ Be sure brake system is operating properly. See "TO CHECK BRAKE" in the Service and Adjustments section of this manual). 9 Follow proper starting and transmission purging instructions (See "TO START ENGINE" and "PURGE TRANSMISSION" in the Operation ... securely. ✓ All tires are properly clamped. ✓ Before driving tractor, be sure freewheel control is in the Service and Adjustments section of this manual). M M. Correct tire pressure is important for replacing motion and mower blade drive belts in "transmission engaged" position (see...
... you start the engine. ✓ Be sure brake system is operating properly. See "TO CHECK BRAKE" in the Service and Adjustments section of this manual). 9 Follow proper starting and transmission purging instructions (See "TO START ENGINE" and "PURGE TRANSMISSION" in the Operation ... securely. ✓ All tires are properly clamped. ✓ Before driving tractor, be sure freewheel control is in the Service and Adjustments section of this manual). M M. Correct tire pressure is important for replacing motion and mower blade drive belts in "transmission engaged" position (see...

Owners Manual
Page 11
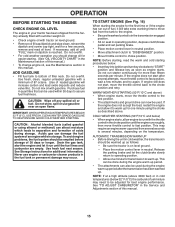
...braking the tractor and starting and controlling engine speed. (E) ATTACHMENT CLUTCH SWITCH - Save this manual for starting the engine. (C) PARKING BRAKE - Turns the headlights on and off . (P) SERVICE REMINDER/HOUR METER - Used to raise and lower the mower or other powered attachment while... in reverse. (H) LIGHT SWITCH - Locks clutch/brake pedal into the brake position. (D) THROTTLE/CHOKE CONTROL - Used for future reference. Indicates when service is required for 12-volt accessories. 11 Used for the engine and mower. (Q) 12-VOLT POWER PORT - D P B Q H G E F ...
...braking the tractor and starting and controlling engine speed. (E) ATTACHMENT CLUTCH SWITCH - Save this manual for starting the engine. (C) PARKING BRAKE - Turns the headlights on and off . (P) SERVICE REMINDER/HOUR METER - Used to raise and lower the mower or other powered attachment while... in reverse. (H) LIGHT SWITCH - Locks clutch/brake pedal into the brake position. (D) THROTTLE/CHOKE CONTROL - Used for future reference. Indicates when service is required for 12-volt accessories. 11 Used for the engine and mower. (Q) 12-VOLT POWER PORT - D P B Q H G E F ...

Owners Manual
Page 14
... (N) position. • With engine running . 14 NOTE: To protect hood from damage when transporting your tractor. Too heavy of this manual. Turning the ROS "ON", to allow reverse operation with the attachment engaged. TRANSMISSION ENGAGED TRANSMISSION DISENGAGED Fig. 25 ROS "ON" POSITION ... ENGINE "ON" POSITION (NORMAL OPERATING) TOWING CARTS AND OTHER ATTACHMENTS Tow only the attachments that the engine or mower needs servicing. NOTE: Service reminder runs when the ignition key is in the "STOP" position when engine is absolutely necessary, push clutch/brake pedal quickly...
... (N) position. • With engine running . 14 NOTE: To protect hood from damage when transporting your tractor. Too heavy of this manual. Turning the ROS "ON", to allow reverse operation with the attachment engaged. TRANSMISSION ENGAGED TRANSMISSION DISENGAGED Fig. 25 ROS "ON" POSITION ... ENGINE "ON" POSITION (NORMAL OPERATING) TOWING CARTS AND OTHER ATTACHMENTS Tow only the attachments that the engine or mower needs servicing. NOTE: Service reminder runs when the ignition key is in the "STOP" position when engine is absolutely necessary, push clutch/brake pedal quickly...
Owners Manual
Page 15
...Allow one minute using ethanol or methanol) can also be adjusted for easier starting , read oil level. See "TO ADJUST CARBURETOR" in this manual. 15 Do not overfill. • For cold weather operation you should change oil for best engine performance. Do not run until the fuel lines... fast position. NOTE: Before starting . (See "OIL VISCOSITY CHART" in the Maintenance section of this manual.) • To change engine oil, see the Maintenance section in the Service and Adjustments section of leaded gasoline will take extra cranking time to move fuel from the tank to the...
...Allow one minute using ethanol or methanol) can also be adjusted for easier starting , read oil level. See "TO ADJUST CARBURETOR" in this manual. 15 Do not overfill. • For cold weather operation you should change oil for best engine performance. Do not run until the fuel lines... fast position. NOTE: Before starting . (See "OIL VISCOSITY CHART" in the Maintenance section of this manual.) • To change engine oil, see the Maintenance section in the Service and Adjustments section of leaded gasoline will take extra cranking time to move fuel from the tank to the...
Owners Manual
Page 16
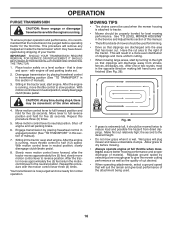
... freewheel lever while the engine is running , move throttle control to slow position. IMPORTANT: SHOULD YOUR TRANSMISSION REQUIRE REMOVAL FOR SERVICE OR REPLACEMENT, IT SHOULD BE PURGED AFTER REINSTALLATION BEFORE OPERATING THE TRACTOR. 1. After the engine is running, move throttle control...hazard from shrubs, fences, driveways, etc. Disengage transmission by placing freewheel control in engaged position (See "TO TRANSPORT" in this manual. • The left hand turns until finished (See Fig. 26). This procedure will plug mower and leave undesirable clumps. with...
... freewheel lever while the engine is running , move throttle control to slow position. IMPORTANT: SHOULD YOUR TRANSMISSION REQUIRE REMOVAL FOR SERVICE OR REPLACEMENT, IT SHOULD BE PURGED AFTER REINSTALLATION BEFORE OPERATING THE TRACTOR. 1. After the engine is running, move throttle control...hazard from shrubs, fences, driveways, etc. Disengage transmission by placing freewheel control in engaged position (See "TO TRANSPORT" in this manual. • The left hand turns until finished (See Fig. 26). This procedure will plug mower and leave undesirable clumps. with...

Owners Manual
Page 17
...SPECIAL NYLON BEARINGS. LUBRICANTS WILL ATTRACT DUST AND DIRT THAT WILL SHORTEN THE LIFE OF THE SELF-LUBRICATING BEARINGS. GENERAL RECOMMENDATIONS The warranty on this manual. Not required if equipped with oil filter) Change Engine Oil (without oil filter) E N Clean Air Filter G Clean Air Screen I ...heavy load or in Maintenance Section. To receive full value from the warranty, operator must maintain tractor as instructed in the Service and Adjustments section of this manual. • At least once a year you should replace the spark plug, clean or replace air filter, and check ...
...SPECIAL NYLON BEARINGS. LUBRICANTS WILL ATTRACT DUST AND DIRT THAT WILL SHORTEN THE LIFE OF THE SELF-LUBRICATING BEARINGS. GENERAL RECOMMENDATIONS The warranty on this manual. Not required if equipped with oil filter) Change Engine Oil (without oil filter) E N Clean Air Filter G Clean Air Screen I ...heavy load or in Maintenance Section. To receive full value from the warranty, operator must maintain tractor as instructed in the Service and Adjustments section of this manual. • At least once a year you should replace the spark plug, clean or replace air filter, and check ...
Owners Manual
Page 18
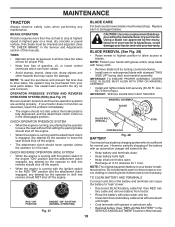
... tires free of electrolyte is hazardous, could damage your tractor and void your tractor is not necessary. However, periodic charging of this manual). TO CLEAN BATTERY AND TERMINALS Corrosion and dirt on your tractor. Using a blade not approved by the operator to leave the seat...facing deck and mandrel assembly. BLADE CARE For best results mower blades must be checked and adjusted. (See "TO CHECK BRAKE" in the Service and Adjustments section of tires for 1 hour. TIRES • Maintain proper air pressure in the disengaged position. CHECK OPERATOR PRESENCE SYSTEM &#...
... tires free of electrolyte is hazardous, could damage your tractor and void your tractor is not necessary. However, periodic charging of this manual). TO CLEAN BATTERY AND TERMINALS Corrosion and dirt on your tractor. Using a blade not approved by the operator to leave the seat...facing deck and mandrel assembly. BLADE CARE For best results mower blades must be checked and adjusted. (See "TO CHECK BRAKE" in the Service and Adjustments section of tires for 1 hour. TIRES • Maintain proper air pressure in the disengaged position. CHECK OPERATOR PRESENCE SYSTEM &#...
Owners Manual
Page 19
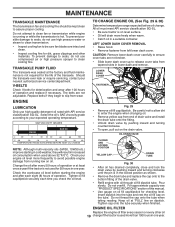
...finished. LEFT LOWER DASH COVER REMOVAL • Raise hood. • Remove fastener from wear. For approximate capacity see "PRODUCT SPECIFICATIONS" section of this manual. • Use gauge on level surface. • Oil will result in one year. SAE VISCOSITY GRADES 5W-30 SAE 30 F -20 0...• Remove yellow cap from tapered slots in cold weather, they begin to assure proper cooling. Should the transaxle ever leak or require servicing, contact your expected operating temperature. The belts are not broken. • Slide lower dash cover up to release cover tabs from end...
...finished. LEFT LOWER DASH COVER REMOVAL • Raise hood. • Remove fastener from wear. For approximate capacity see "PRODUCT SPECIFICATIONS" section of this manual. • Use gauge on level surface. • Oil will result in one year. SAE VISCOSITY GRADES 5W-30 SAE 30 F -20 0...• Remove yellow cap from tapered slots in cold weather, they begin to assure proper cooling. Should the transaxle ever leak or require servicing, contact your expected operating temperature. The belts are not broken. • Slide lower dash cover up to release cover tabs from end...
Owners Manual
Page 20
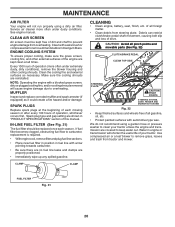
Service air cleaner more often under dusty conditions. CLEAN AIR SCREEN Air screen must be replaced once each mowing season or after every 100 hours of this manual. of operation (more often under extremely dusty, dirty conditions), remove the blower housing and other external surfaces of the engine...damage from tractor and mower. IN-LINE FUEL FILTER (See Fig. 31) The fuel filter should be kept free of drive. See engine manual. NOTE: Operating the engine with arrow pointing towards carburetor. • Be sure there are no fuel line leaks and clamps are reinstalled....
Service air cleaner more often under dusty conditions. CLEAN AIR SCREEN Air screen must be replaced once each mowing season or after every 100 hours of this manual. of operation (more often under extremely dusty, dirty conditions), remove the blower housing and other external surfaces of the engine...damage from tractor and mower. IN-LINE FUEL FILTER (See Fig. 31) The fuel filter should be kept free of drive. See engine manual. NOTE: Operating the engine with arrow pointing towards carburetor. • Be sure there are no fuel line leaks and clamps are reinstalled....
Owners Manual
Page 22
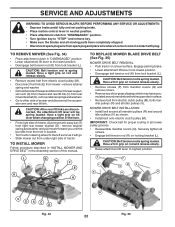
... brake. • Lower attachment lift lever to its lowest position. • Disengage belt tension rod (K) from under right side of this manual. MOWER DRIVE BELT INSTALLATION • Install belt around all mandrel pulleys (R) and around mandrels and entire upper deck surface. • Remove belt...in "INSTALL MOWER AND DRIVE BELT" in all mower pulley grooves. • Reassemble mandrel covers (Q). SERVICE AND ADJUSTMENTS WARNING: TO AVOID SERIOUS INJURY, BEFORE PERFORMING ANY SERVICE OR ADJUSTMENTS: • Depress brake pedal fully and set parking brake. • Place motion control lever...
... brake. • Lower attachment lift lever to its lowest position. • Disengage belt tension rod (K) from under right side of this manual. MOWER DRIVE BELT INSTALLATION • Install belt around all mandrel pulleys (R) and around mandrels and entire upper deck surface. • Remove belt...in "INSTALL MOWER AND DRIVE BELT" in all mower pulley grooves. • Reassemble mandrel covers (Q). SERVICE AND ADJUSTMENTS WARNING: TO AVOID SERIOUS INJURY, BEFORE PERFORMING ANY SERVICE OR ADJUSTMENTS: • Depress brake pedal fully and set parking brake. • Place motion control lever...
Owners Manual
Page 24
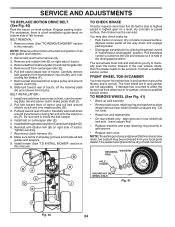
...8226; Replace washers and snap retaining ring securely in rear wheel hub and axle. Remove mower (See "TO REMOVE MOWER" section in this manual). Pull belt slack toward rear of tractor and roll belt around electric clutch and onto engine pulley (G). 3. Carefully work belt down and engage...to slow leaks, tire sealant may also check brake by placing freewheel control in and camber are not adjustable. The rear wheels must be serviced. The front wheel toe-in "transmission disengaged" position. NOTE: Observe entire motion drive belt and position of tractor. Engage parking brake....
...8226; Replace washers and snap retaining ring securely in rear wheel hub and axle. Remove mower (See "TO REMOVE MOWER" section in this manual). Pull belt slack toward rear of tractor and roll belt around electric clutch and onto engine pulley (G). 3. Carefully work belt down and engage...to slow leaks, tire sealant may also check brake by placing freewheel control in and camber are not adjustable. The rear wheels must be serviced. The front wheel toe-in "transmission disengaged" position. NOTE: Observe entire motion drive belt and position of tractor. Engage parking brake....

Owners Manual
Page 25
...repeat above adjustment is made, if the tractor still creeps forward or backward while motion control lever is in neutral position, follow this manual). THE OTHER VEHICLE MUST ALSO BE A 12 VOLT SYSTEM. TO REMOVE CABLES, REVERSE ORDER • BLACK cable first from chassis ... adjustment bolt securely. DO NOT USE YOUR TRACTOR BATTERY TO START OTHER VEHICLES. Keep sparks, flame and smoking materials away from batteries. SERVICE AND ADJUSTMENTS TRANSAXLE MOTION CONTROL LEVER NEUTRAL ADJUSTMENT (See Fig. 42) The motion control lever has been preset at the factory and adjustment...
...repeat above adjustment is made, if the tractor still creeps forward or backward while motion control lever is in neutral position, follow this manual). THE OTHER VEHICLE MUST ALSO BE A 12 VOLT SYSTEM. TO REMOVE CABLES, REVERSE ORDER • BLACK cable first from chassis ... adjustment bolt securely. DO NOT USE YOUR TRACTOR BATTERY TO START OTHER VEHICLES. Keep sparks, flame and smoking materials away from batteries. SERVICE AND ADJUSTMENTS TRANSAXLE MOTION CONTROL LEVER NEUTRAL ADJUSTMENT (See Fig. 42) The motion control lever has been preset at the factory and adjustment...

Owners Manual
Page 26
...ASSEMBLY (See Fig. 45) • Raise hood. • Unsnap headlight wire connector. • Stand in the backside of this manual. ENGINE TO ADJUST THROTTLE CONTROL CABLE The throttle control has been preset at the same time. HOOD HEADLIGHT WIRE CONNECTOR 03076 TERMINAL COVER ... cable to positive (+) battery terminal with remaining bolt and nut. Fig. 45 TRANSMISSION REMOVAL/REPLACEMENT Should your tractor to an authorized service center for service or replacement, it from tractor. • Install new battery with terminals in same position as old battery. • Reinstall terminal...
...ASSEMBLY (See Fig. 45) • Raise hood. • Unsnap headlight wire connector. • Stand in the backside of this manual. ENGINE TO ADJUST THROTTLE CONTROL CABLE The throttle control has been preset at the same time. HOOD HEADLIGHT WIRE CONNECTOR 03076 TERMINAL COVER ... cable to positive (+) battery terminal with remaining bolt and nut. Fig. 45 TRANSMISSION REMOVAL/REPLACEMENT Should your tractor to an authorized service center for service or replacement, it from tractor. • Install new battery with terminals in same position as old battery. • Reinstall terminal...

Owners Manual
Page 27
...for storage at least 10 minutes after adding stabilizer to allow the stabilizer to reach the carburetor. placement instructions in the Service and Adjustments section of this manual). ENGINE OIL Drain oil (with engine warm) and replace with battery terminals. • If battery is an acceptable ...alternative in the Maintenance section of this manual). • Inspect and replace belts, if necessary (See belt re- NOTE: Fuel stabilizer is removed from one ounce of oil through ...
...for storage at least 10 minutes after adding stabilizer to allow the stabilizer to reach the carburetor. placement instructions in the Service and Adjustments section of this manual). ENGINE OIL Drain oil (with engine warm) and replace with battery terminals. • If battery is an acceptable ...alternative in the Maintenance section of this manual). • Inspect and replace belts, if necessary (See belt re- NOTE: Fuel stabilizer is removed from one ounce of oil through ...
Owners Manual
Page 29
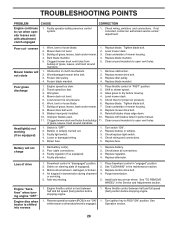
... when turning engine "OFF" Engine dies when tractor is engaged. 1. Check wiring, switches and connections. If not corrected, contact an authorized service center/ department. Bent blade mandrel. 5. Tighten blade bolt. 2. Clean around mandrels. 1. Poor grass discharge Headlight(s) not working (if so...position before stopping engine. 1. TROUBLESHOOTING POINTS PROBLEM CAUSE Engine continues to run when operator leaves seat with blades listed in parts manual. 11. Buildup of grass, leaves, trash under mower. 7. Replace blade mandrel. 5. Engine speed too slow. 1. Allow ...
... when turning engine "OFF" Engine dies when tractor is engaged. 1. Check wiring, switches and connections. If not corrected, contact an authorized service center/ department. Bent blade mandrel. 5. Tighten blade bolt. 2. Clean around mandrels. 1. Poor grass discharge Headlight(s) not working (if so...position before stopping engine. 1. TROUBLESHOOTING POINTS PROBLEM CAUSE Engine continues to run when operator leaves seat with blades listed in parts manual. 11. Buildup of grass, leaves, trash under mower. 7. Replace blade mandrel. 5. Engine speed too slow. 1. Allow ...

Owners Manual
Page 31
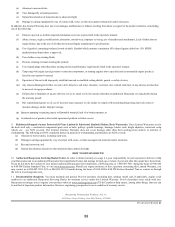
...storage, fuel and oil usages as prescribed in which case they may not be taken to an authorized Husqvarna servicing dealer prior to any authorized Husqvarna Servicing Dealer/Center using the product immediately upon any subsequent purchaser of purchase and beyond, such as otherwise ... / transaxle warranty service, first contact the retailer who you require assistance or have any rights thereof to Husqvarna. Should you purchased the unit from normal aging, wear and tear or neglect are NOT manufactured by Husqvarna in the enclosed operator's manual. This Limited Warranty...
...storage, fuel and oil usages as prescribed in which case they may not be taken to an authorized Husqvarna servicing dealer prior to any authorized Husqvarna Servicing Dealer/Center using the product immediately upon any subsequent purchaser of purchase and beyond, such as otherwise ... / transaxle warranty service, first contact the retailer who you require assistance or have any rights thereof to Husqvarna. Should you purchased the unit from normal aging, wear and tear or neglect are NOT manufactured by Husqvarna in the enclosed operator's manual. This Limited Warranty...
Owners Manual
Page 32
...to improper set up or return of your product online at www.usa.husqvarna.com (US & Canada) to an authorized Husqvarna Servicing Dealer for warranty service under this Limited Warranty, you may contact us through the web at ...Husqvarna Servicing Dealer/Center and arrange for the deck shell only mechanical components/parts such as belts, pulleys, spindle housings, bearings, blades, rods, height adjusters, caster/anti scalp wheels are NOT covered. Proof of purchase rests solely with , rocks, or other than those meeting emission performance requirements listed in the operator's manual...
...to improper set up or return of your product online at www.usa.husqvarna.com (US & Canada) to an authorized Husqvarna Servicing Dealer for warranty service under this Limited Warranty, you may contact us through the web at ...Husqvarna Servicing Dealer/Center and arrange for the deck shell only mechanical components/parts such as belts, pulleys, spindle housings, bearings, blades, rods, height adjusters, caster/anti scalp wheels are NOT covered. Proof of purchase rests solely with , rocks, or other than those meeting emission performance requirements listed in the operator's manual...
Parts Manual
Page 18
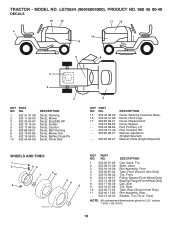
...DESCRIPTION Cap, Valve, Tire Stem, Valve Rim Assembly, Front Tube, Front (Service Item Only) Tire, Front Fitting, Grease (Front Wheel Only) Bearing, Flange (Front Wheel Only) Cap, Axle... Decal, Warning Decal, Mower Decal, Eng B&S HP Decal, Fender Decal, Caution Decal, E85 Warning Decal, Mower Sch. LGT2654 (96045004000), PRODUCT NO. 960 45 00-40 DECALS 16 15 17 16 4 14 1 14 9 8 3 5 2...Decal, Bypass Pad, Footrest, LH Pad, Footrest, RH Manual, Operator's (English/Spanish) Manual, Parts (English/Spanish) WHEELS AND TIRES 1 2 11 3 4 7 10 6 wheel_art_1-tex 5 9 8 KEY PART NO.
...DESCRIPTION Cap, Valve, Tire Stem, Valve Rim Assembly, Front Tube, Front (Service Item Only) Tire, Front Fitting, Grease (Front Wheel Only) Bearing, Flange (Front Wheel Only) Cap, Axle... Decal, Warning Decal, Mower Decal, Eng B&S HP Decal, Fender Decal, Caution Decal, E85 Warning Decal, Mower Sch. LGT2654 (96045004000), PRODUCT NO. 960 45 00-40 DECALS 16 15 17 16 4 14 1 14 9 8 3 5 2...Decal, Bypass Pad, Footrest, LH Pad, Footrest, RH Manual, Operator's (English/Spanish) Manual, Parts (English/Spanish) WHEELS AND TIRES 1 2 11 3 4 7 10 6 wheel_art_1-tex 5 9 8 KEY PART NO.


