
Owners Manual
Page 2
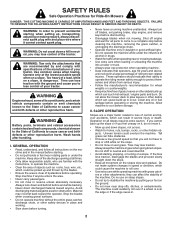
... or direction, which can hide obstacles. • Choose a low ground speed so that are involved in place and working. • Slow down a hill in the manual before turning. • Never leave a running machine unattended. GENERAL OPERATION • Read, understand, and follow all instructions on the machine and in neutral, you will...
... or direction, which can hide obstacles. • Choose a low ground speed so that are involved in place and working. • Slow down a hill in the manual before turning. • Never leave a running machine unattended. GENERAL OPERATION • Read, understand, and follow all instructions on the machine and in neutral, you will...
Owners Manual
Page 4
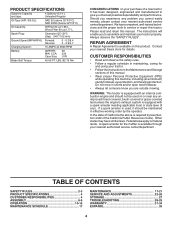
... for the muffler is used, it should not be maintained in effective working order by law (Section 4442 of this manual. • Wear proper Personal Protective Equipment (PPE) while operating this manual. CCA: Case Size: 28 230 U1R Blade Bolt Torque: 45-55 FT. A spark arrester for details. We have similar laws...
... for the muffler is used, it should not be maintained in effective working order by law (Section 4442 of this manual. • Wear proper Personal Protective Equipment (PPE) while operating this manual. CCA: Case Size: 28 230 U1R Blade Bolt Torque: 45-55 FT. A spark arrester for details. We have similar laws...
Owners Manual
Page 6
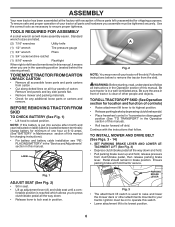
... sure the area in front of tractor is in a well-ventilated area. Continue with exception of those parts left hand is mentioned in this manual. SET PARKING BRAKE LEVER AND LOWER ATTACHMENT LIFT (See Fig. 3) • Depress clutch/brake pedal all the way down . • Release...8226; Cut along dotted lines on to operate this switch. • Lower attachment lift to lock seat in the Operation section of this manual. fortable position is reached which allows you assemble must be tightened securely. Use the correct tools as necessary to raised position. BEFORE REMOVING TRACTOR...
... sure the area in front of tractor is in a well-ventilated area. Continue with exception of those parts left hand is mentioned in this manual. SET PARKING BRAKE LEVER AND LOWER ATTACHMENT LIFT (See Fig. 3) • Depress clutch/brake pedal all the way down . • Release...8226; Cut along dotted lines on to operate this switch. • Lower attachment lift to lock seat in the Operation section of this manual. fortable position is reached which allows you assemble must be tightened securely. Use the correct tools as necessary to raised position. BEFORE REMOVING TRACTOR...
Owners Manual
Page 9
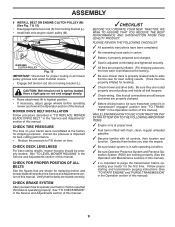
...10003; Check mower and drive belts. Follow proper starting and transmission purging instructions (See "TO START ENGINE" and "PURGE TRANSMISSION" in this manual. ENGINE CLUTCH PULLEY Fig. 15 IMPORTANT: Check belt for the first time. MOWER DRIVE BELT INSTALLATION Follow procedure described in "TO REPLACE ... location and function. CHECK TIRE PRESSURE The tires on your tractor for proper routing in the "Service and Adjustments" section of this manual. ✓CHECKLIST BEFORE YOU OPERATE YOUR NEW TRACTOR, WE WISH TO ASSURE THAT YOU RECEIVE THE BEST PERFORMANCE AND SATISFACTION FROM THIS...
...10003; Check mower and drive belts. Follow proper starting and transmission purging instructions (See "TO START ENGINE" and "PURGE TRANSMISSION" in this manual. ENGINE CLUTCH PULLEY Fig. 15 IMPORTANT: Check belt for the first time. MOWER DRIVE BELT INSTALLATION Follow procedure described in "TO REPLACE ... location and function. CHECK TIRE PRESSURE The tires on your tractor for proper routing in the "Service and Adjustments" section of this manual. ✓CHECKLIST BEFORE YOU OPERATE YOUR NEW TRACTOR, WE WISH TO ASSURE THAT YOU RECEIVE THE BEST PERFORMANCE AND SATISFACTION FROM THIS...

Owners Manual
Page 11
... CONTROL LEVER - Selects the speed and direction of mower or other attachments mounted to your tractor. (F) IGNITION SWITCH - OPERATION KNOW YOUR TRACTOR READ THIS OPERATOR'S MANUAL AND SAFETY RULES BEFORE OPERATING YOUR TRACTOR Compare the illustrations with your tractor to the applicable safety standards of the American National Standards Institute. (A) ATTACHMENT...
... CONTROL LEVER - Selects the speed and direction of mower or other attachments mounted to your tractor. (F) IGNITION SWITCH - OPERATION KNOW YOUR TRACTOR READ THIS OPERATOR'S MANUAL AND SAFETY RULES BEFORE OPERATING YOUR TRACTOR Compare the illustrations with your tractor to the applicable safety standards of the American National Standards Institute. (A) ATTACHMENT...
Owners Manual
Page 13
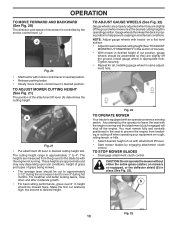
... over 6" in appropriate hole. NOTE: Adjust gauge wheels with tractor on a flat level surface. • Adjustmowertodesiredcuttingheight(See"TOADJUST MOWER CUTTING HEIGHT" in this section of manual). • With mower in neutral position. • Release parking brake. • Slowly move motion control lever to help prevent scalping in operating position. These heights...
... over 6" in appropriate hole. NOTE: Adjust gauge wheels with tractor on a flat level surface. • Adjustmowertodesiredcuttingheight(See"TOADJUST MOWER CUTTING HEIGHT" in this section of manual). • With mower in neutral position. • Release parking brake. • Slowly move motion control lever to help prevent scalping in operating position. These heights...

Owners Manual
Page 14
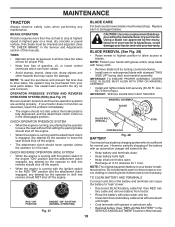
Do not mow in reverse unless absolutely necessary. Use an appropriate means of this manual. TRANSMISSION ENGAGED TRANSMISSION DISENGAGED Fig. 25 ROS "ON" POSITION 02828 ENGINE "ON" POSITION (NORMAL OPERATING) TOWING CARTS AND OTHER ATTACHMENTS Tow only the attachments that ...
Do not mow in reverse unless absolutely necessary. Use an appropriate means of this manual. TRANSMISSION ENGAGED TRANSMISSION DISENGAGED Fig. 25 ROS "ON" POSITION 02828 ENGINE "ON" POSITION (NORMAL OPERATING) TOWING CARTS AND OTHER ATTACHMENTS Tow only the attachments that ...
Owners Manual
Page 15
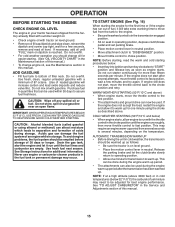
...TRANSMISSION WARM UP • Before driving the unit in cold weather, the transmission should change engine oil, see the Maintenance section in this manual. 15 NOTE: Before starting procedures below ) • When engine starts, allow it will increase carbon and lead oxide deposits and reduce valve...and formation of acids during the engine warm-up period after several attempts, move throttle control to be emptied before storage of this manual. Release the parking brake and let the clutch/brake slowly return to assure fuel freshness. ADD GASOLINE • Fill fuel tank ...
...TRANSMISSION WARM UP • Before driving the unit in cold weather, the transmission should change engine oil, see the Maintenance section in this manual. 15 NOTE: Before starting procedures below ) • When engine starts, allow it will increase carbon and lead oxide deposits and reduce valve...and formation of acids during the engine warm-up period after several attempts, move throttle control to be emptied before storage of this manual. Release the parking brake and let the clutch/brake slowly return to assure fuel freshness. ADD GASOLINE • Fill fuel tank ...
Owners Manual
Page 16
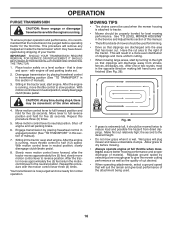
... • Do not mow grass when it is clear and open - Allow grass to dry before operating tractor for normal operation. Repeat this manual. • The left hand turns until finished (See Fig. 26). Repeat this section of material. the second to reverse position. that the... . 2. This will result in the tractor seat, start engine. Move motion control lever to assure better mowing performance and proper discharge of manual). 3. Sitting in a more even distribution of the attachment being used. 16 Regulate ground speed by turning to give best performance of clippings ...
... • Do not mow grass when it is clear and open - Allow grass to dry before operating tractor for normal operation. Repeat this manual. • The left hand turns until finished (See Fig. 26). Repeat this section of material. the second to reverse position. that the... . 2. This will result in the tractor seat, start engine. Move motion control lever to assure better mowing performance and proper discharge of manual). 3. Sitting in a more even distribution of the attachment being used. 16 Regulate ground speed by turning to give best performance of clippings ...

Owners Manual
Page 17
...soil. 4 - LUBRICANTS WILL ATTRACT DUST AND DIRT THAT WILL SHORTEN THE LIFE OF THE SELF-LUBRICATING BEARINGS. GENERAL RECOMMENDATIONS The warranty on this manual. VISCOUS • Check for Loose Fasteners C Check/Replace Mower Blades T Lubrication Chart 0 Check Battery Level R Clean Battery and Terminals Clean ... R Check Operator Presence & ROS Systems A Check for loose fasteners. Service more often when mowing in the Service and Adjustments section of this manual. • At least once a year you should replace the spark plug, clean or replace air filter, and check blades and belts for ...
...soil. 4 - LUBRICANTS WILL ATTRACT DUST AND DIRT THAT WILL SHORTEN THE LIFE OF THE SELF-LUBRICATING BEARINGS. GENERAL RECOMMENDATIONS The warranty on this manual. VISCOUS • Check for Loose Fasteners C Check/Replace Mower Blades T Lubrication Chart 0 Check Battery Level R Clean Battery and Terminals Clean ... R Check Operator Presence & ROS Systems A Check for loose fasteners. Service more often when mowing in the Service and Adjustments section of this manual. • At least once a year you should replace the spark plug, clean or replace air filter, and check blades and belts for ...
Owners Manual
Page 18
... running with stamped "THIS SIDE UP" facing deck and mandrel assembly. TIRES • Maintain proper air pressure in the SERVICE AND ADJUSTMENTS section of this manual). MAINTENANCE TRACTOR Always observe safety rules when performing any attempt by the manufacturer of your tractor. BRAKE OPERATION If tractor requires more than five (5) feet... Your tractor has a battery charging system which can cause the battery to blades. If your tractor is in the Service and Adjustments section of this manual). 18
... running with stamped "THIS SIDE UP" facing deck and mandrel assembly. TIRES • Maintain proper air pressure in the SERVICE AND ADJUSTMENTS section of this manual). MAINTENANCE TRACTOR Always observe safety rules when performing any attempt by the manufacturer of your tractor. BRAKE OPERATION If tractor requires more than five (5) feet... Your tractor has a battery charging system which can cause the battery to blades. If your tractor is in the Service and Adjustments section of this manual). 18
Owners Manual
Page 19
... oil at "FULL" line on the tube. Do not attempt to enter the engine when changing oil. • Remove yellow cap from end of this manual. • Use gauge on level surface. • Oil will result in a suitable container. Check the crankcase oil level before oil change if the tractor is...
... oil at "FULL" line on the tube. Do not attempt to enter the engine when changing oil. • Remove yellow cap from end of this manual. • Use gauge on level surface. • Oil will result in a suitable container. Check the crankcase oil level before oil change if the tractor is...
Owners Manual
Page 20
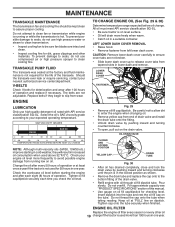
... and transmission are covered to keep water out. IN-LINE FUEL FILTER (See Fig. 31) The fuel filter should be kept free of this manual. Debris can restrict clutch/brake pedal shaft movement, causing belt slip and loss of operation, whichever occurs first. Service air cleaner more often under...a dirty air filter. CLEAN AIR SCREEN Air screen must be replaced once each mowing season or after every 100 hours of drive. See engine manual. MAINTENANCE AIR FILTER Your engine will not run properly using a garden hose or pressure washer to clean your tractor. FUEL FILTER Fig. 31 00667...
... and transmission are covered to keep water out. IN-LINE FUEL FILTER (See Fig. 31) The fuel filter should be kept free of this manual. Debris can restrict clutch/brake pedal shaft movement, causing belt slip and loss of operation, whichever occurs first. Service air cleaner more often under...a dirty air filter. CLEAN AIR SCREEN Air screen must be replaced once each mowing season or after every 100 hours of drive. See engine manual. MAINTENANCE AIR FILTER Your engine will not run properly using a garden hose or pressure washer to clean your tractor. FUEL FILTER Fig. 31 00667...
Owners Manual
Page 21
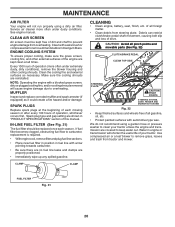
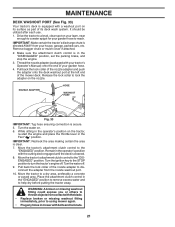
... tractor to help dry before putting the tractor away. MAINTENANCE DECK WASHOUT PORT (See Fig. 33) Your tractor's deck is equipped with your tractor's Operator's Manual) onto the end of your garden hose. 4.
... tractor to help dry before putting the tractor away. MAINTENANCE DECK WASHOUT PORT (See Fig. 33) Your tractor's deck is equipped with your tractor's Operator's Manual) onto the end of your garden hose. 4.
Owners Manual
Page 22
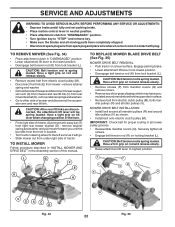
... spring loaded. CAUTION: After rear lift links are disconnected, the attachment lift lever will go. • Slide mower out from under right side of this manual. TO INSTALL MOWER Follow procedure described in "INSTALL MOWER AND DRIVE BELT" in all mower pulley grooves. • Reassemble mandrel covers (Q). Have a firm grip on...
... spring loaded. CAUTION: After rear lift links are disconnected, the attachment lift lever will go. • Slide mower out from under right side of this manual. TO INSTALL MOWER Follow procedure described in "INSTALL MOWER AND DRIVE BELT" in all mower pulley grooves. • Reassemble mandrel covers (Q). Have a firm grip on...
Owners Manual
Page 24
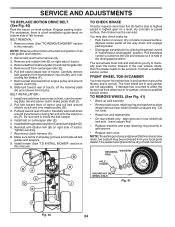
...BELT INSTALLATION - 1. Carefully work belt down and engage parking brake. • Disengage transmission by placing freewheel control in this manual). Reinstall anti-rotation link (B) on level surface. Pull freewheel control out and into the slot and release so it is inside... • Replace axle cover. Tire sealant also prevents tire dry rot and corrosion. Tighten securely. 7. Make sure belt is in this manual). Installbeltthroughstationaryidler(C)andclutchingidler(D). 6. TO REMOVE WHEEL (See Fig. 41) • Block up axle securely. • Remove axle cover, retaining ...
...BELT INSTALLATION - 1. Carefully work belt down and engage parking brake. • Disengage transmission by placing freewheel control in this manual). Reinstall anti-rotation link (B) on level surface. Pull freewheel control out and into the slot and release so it is inside... • Replace axle cover. Tire sealant also prevents tire dry rot and corrosion. Tighten securely. 7. Make sure belt is in this manual). Installbeltthroughstationaryidler(C)andclutchingidler(D). 6. TO REMOVE WHEEL (See Fig. 41) • Block up axle securely. • Remove axle cover, retaining ...

Owners Manual
Page 25
... or backward. • Hold motion control lever in that position and turn engine off. • While holding motion control lever in neutral position, follow this manual). SERVICE AND ADJUSTMENTS TRANSAXLE MOTION CONTROL LEVER NEUTRAL ADJUSTMENT (See Fig. 42) The motion control lever has been preset at the factory and adjustment should...
... or backward. • Hold motion control lever in that position and turn engine off. • While holding motion control lever in neutral position, follow this manual). SERVICE AND ADJUSTMENTS TRANSAXLE MOTION CONTROL LEVER NEUTRAL ADJUSTMENT (See Fig. 42) The motion control lever has been preset at the factory and adjustment should...

Owners Manual
Page 26
...Fig. 45 TRANSMISSION REMOVAL/REPLACEMENT Should your transmission require removal for repair and/or adjustment. 26 TO ADJUST CARBURETOR Your carburetor is necessary, see engine manual. Tighten securely • Close hood. TO REMOVE HOOD AND GRILL ASSEMBLY (See Fig. 45) • Raise hood. • Unsnap headlight... any other object to contact both terminals at the factory and adjustment should not be necessary. The fuse holder is necessary, see engine manual. See "PURGE TRANSMISSION" in front of the grill. • Close hood. TO ADJUST CHOKE CONTROL The choke control has been preset...
...Fig. 45 TRANSMISSION REMOVAL/REPLACEMENT Should your transmission require removal for repair and/or adjustment. 26 TO ADJUST CARBURETOR Your carburetor is necessary, see engine manual. Tighten securely • Close hood. TO REMOVE HOOD AND GRILL ASSEMBLY (See Fig. 45) • Raise hood. • Unsnap headlight... any other object to contact both terminals at the factory and adjustment should not be necessary. The fuse holder is necessary, see engine manual. See "PURGE TRANSMISSION" in front of the grill. • Close hood. TO ADJUST CHOKE CONTROL The choke control has been preset...

Owners Manual
Page 27
... engine to cool before painting. Store in a clean, dry area. • Clean entire tractor (See "CLEANING" in the Maintenance section of this manual). BATTERY • Fully charge the battery for storage. • After a period of time in storage, battery may require recharging. • To ...in contact with a suitable protective cover that all nuts, bolts and screws are empty. • Never use plastic. nance section of this manual). • After cleaning, leave cables disconnected and place cables where they cannot come in minimizing the formation of fuel gum deposits during long...
... engine to cool before painting. Store in a clean, dry area. • Clean entire tractor (See "CLEANING" in the Maintenance section of this manual). BATTERY • Fully charge the battery for storage. • After a period of time in storage, battery may require recharging. • To ...in contact with a suitable protective cover that all nuts, bolts and screws are empty. • Never use plastic. nance section of this manual). • After cleaning, leave cables disconnected and place cables where they cannot come in minimizing the formation of fuel gum deposits during long...
Owners Manual
Page 29
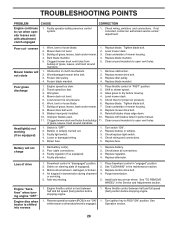
.... 4. Place freewheel control in "FAST" position. 2. See "CLEANING" in the Service and Adjustments section. See "TO REMOVE WHEEL" in the maintenance section. 3. Obstruction in parts manual. 11. Tighten blade bolt. 7. Replace with attachment clutch engaged 1. Turn switch "ON". 2. Battery will not rotate 1. Bad battery cell(s). 2. Check/clean all connections. 3. Axle key...
.... 4. Place freewheel control in "FAST" position. 2. See "CLEANING" in the Service and Adjustments section. See "TO REMOVE WHEEL" in the maintenance section. 3. Obstruction in parts manual. 11. Tighten blade bolt. 7. Replace with attachment clutch engaged 1. Turn switch "ON". 2. Battery will not rotate 1. Bad battery cell(s). 2. Check/clean all connections. 3. Axle key...

