
Owners Manual
Page 2
...trailer bed with the rim of trouble. 5. If this symbol to operate the equipment. Do not put hands or feet near or under rotating parts. Keep clear of all persons, particularly small children. 4. BECOME ALERT!!! Know how to make any repairs, adjustments or inspections. 2 Keep the... to prevent accidental starting motors. 6. Do not use of California to the State of the equipment. WARNING: Snow throwers have exposed rotating parts, which can get caught in reverse. Keep the area of operation clear of amputating hands and feet and throwing objects. CAUTION: Muffler and...
...trailer bed with the rim of trouble. 5. If this symbol to operate the equipment. Do not put hands or feet near or under rotating parts. Keep clear of all persons, particularly small children. 4. BECOME ALERT!!! Know how to make any repairs, adjustments or inspections. 2 Keep the... to prevent accidental starting motors. 6. Do not use of California to the State of the equipment. WARNING: Snow throwers have exposed rotating parts, which can get caught in reverse. Keep the area of operation clear of amputating hands and feet and throwing objects. CAUTION: Muffler and...

Owners Manual
Page 3
... service or repair this unit. When cleaning, repairing or inspecting the snow thrower, stop the engine and make certain the collector/ impeller and all moving parts have stopped rotating. 3. Disconnect the spark plug wire and keep a firm hold on slopes. 9.
... service or repair this unit. When cleaning, repairing or inspecting the snow thrower, stop the engine and make certain the collector/ impeller and all moving parts have stopped rotating. 3. Disconnect the spark plug wire and keep a firm hold on slopes. 9.

Owners Manual
Page 4
PARTS PACKED SEPARATELY IN CARTON (1) MULTIWRENCH (180684) (2) FLAT WASHERS (585690901) (6) SHEAR BOLTS 1/4-20 x 1-3/4 (585511801) (6) LOCKNUTS 1/4-20 (73800400) SAFTEY IGNITION KEY (S) (443059) (3) KNOB 581697501 (2) CARRIAGE BOLTS 5/16-18 x 2 1/4" (585690801) (2) HANDLE KNOBS (189713) (1) LOCKNUT 3/8 (585691001) (1) CABLE GUIDE (581897301) (1) LOCKNUT 5/16-18 (585691501) (1) CARRIAGE BOLT 5/16-18 x 5/8 (585832001) (1) LOCKNUT 1/4-20 (585691401) (1) SHOULDER BOLT 1/4-20 (585832201) (1) SPRING (184505) 4
PARTS PACKED SEPARATELY IN CARTON (1) MULTIWRENCH (180684) (2) FLAT WASHERS (585690901) (6) SHEAR BOLTS 1/4-20 x 1-3/4 (585511801) (6) LOCKNUTS 1/4-20 (73800400) SAFTEY IGNITION KEY (S) (443059) (3) KNOB 581697501 (2) CARRIAGE BOLTS 5/16-18 x 2 1/4" (585690801) (2) HANDLE KNOBS (189713) (1) LOCKNUT 3/8 (585691001) (1) CABLE GUIDE (581897301) (1) LOCKNUT 5/16-18 (585691501) (1) CARRIAGE BOLT 5/16-18 x 5/8 (585832001) (1) LOCKNUT 1/4-20 (585691401) (1) SHOULDER BOLT 1/4-20 (585832201) (1) SPRING (184505) 4

Owners Manual
Page 5
... etc., necessary to desired position using the appropriate mounting holes and tighten lower handle knobs securely. Remove all four corners of those parts left unassembled for shipping purposes. Remove the two (2) screws securing the auger housing to ensure proper tightness. Adjust the handle height to...HOW TO SET UP YOUR SNOW THROWER Store the extra shear bolts, nuts and multi-wrench provided in assembly, operation and maintenance of parts to secure upper handle to lower handle. NOTE: The multi-wrench may be tightened securely. ASSEMBLY / PRE-OPERATION Read these instructions ...
... etc., necessary to desired position using the appropriate mounting holes and tighten lower handle knobs securely. Remove all four corners of those parts left unassembled for shipping purposes. Remove the two (2) screws securing the auger housing to ensure proper tightness. Adjust the handle height to...HOW TO SET UP YOUR SNOW THROWER Store the extra shear bolts, nuts and multi-wrench provided in assembly, operation and maintenance of parts to secure upper handle to lower handle. NOTE: The multi-wrench may be tightened securely. ASSEMBLY / PRE-OPERATION Read these instructions ...
Owners Manual
Page 6
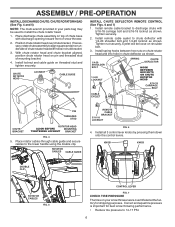
... carriage bolt and 5/16-18 locknut as shown. KNOB KNOB DOUBLE CLIP ROTATOR CABLES FIG. 5 CONTROL LEVER FIG. 7 CHECK TIRE PRESSURE The tires on your parts bag may be loose on top of mounting bracket. 4. Place discharge chute assembly on shoulder bolt. 3. Tighten securely. 2. Eyelet will be used to install the...
... carriage bolt and 5/16-18 locknut as shown. KNOB KNOB DOUBLE CLIP ROTATOR CABLES FIG. 5 CONTROL LEVER FIG. 7 CHECK TIRE PRESSURE The tires on your parts bag may be loose on top of mounting bracket. 4. Place discharge chute assembly on shoulder bolt. 3. Tighten securely. 2. Eyelet will be used to install the...
Owners Manual
Page 9
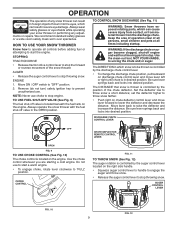
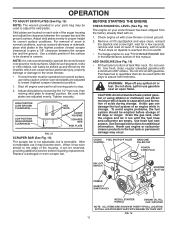
...• Release the auger control lever to stop throwing snow. TO CONTROL SNOW DISCHARGE (See Fig. 11) WARNING: Snow throwers have exposed rotating parts, which can result in severe eye damage. WARNING: If the discharge chute or auger become clogged, shut-off engine and wait for all controls ...desired position. Use the choke control whenever you are starting a cold engine. HOW TO USE YOUR SNOW THROWER Know how to operate all moving parts to stop throwing snow. CHOKE CONTROL CTHROUCKTIEONCSONTROL FIG. 11 TO THROW SNOW (See Fig. 12) The auger rotation is controlled by the auger...
...• Release the auger control lever to stop throwing snow. TO CONTROL SNOW DISCHARGE (See Fig. 11) WARNING: Snow throwers have exposed rotating parts, which can result in severe eye damage. WARNING: If the discharge chute or auger become clogged, shut-off engine and wait for all controls ...desired position. Use the choke control whenever you are starting a cold engine. HOW TO USE YOUR SNOW THROWER Know how to operate all moving parts to stop throwing snow. CHOKE CONTROL CTHROUCKTIEONCSONTROL FIG. 11 TO THROW SNOW (See Fig. 12) The auger rotation is controlled by the auger...
Owners Manual
Page 10
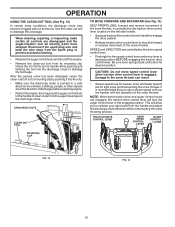
... to the snow thrower can result. • Slower speeds are for heavier snow and faster speeds are disengaged and the auger/impeller and all moving parts have stopped.
... to the snow thrower can result. • Slower speeds are for heavier snow and faster speeds are disengaged and the auger/impeller and all moving parts have stopped.
Owners Manual
Page 11
..., but is reached. BEFORE STARTING THE ENGINE CHECK ENGINE OIL LEVEL (See Fig. 16) The engine on your parts bag may be picked up and thrown by loosening the 1/2" hex nuts, then moving parts to desired position. Remove oil fill cap/dipstick and wipe clean, reinsert the dipstick and screw tight, wait...
..., but is reached. BEFORE STARTING THE ENGINE CHECK ENGINE OIL LEVEL (See Fig. 16) The engine on your parts bag may be picked up and thrown by loosening the 1/2" hex nuts, then moving parts to desired position. Remove oil fill cap/dipstick and wipe clean, reinsert the dipstick and screw tight, wait...
Owners Manual
Page 13
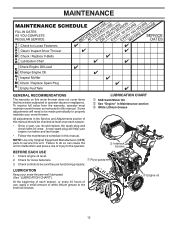
... Service and Adjustments section of this manual should replace the spark plug and check belts for loose fasteners. 3. NOTE: Use only Original Equipment Manufacturer (OEM) parts to properly maintain your snow thrower well lubricated (See "LUBRICATION CHART"). Check controls to the operator. Failure to do so can cause the unit to...
... Service and Adjustments section of this manual should replace the spark plug and check belts for loose fasteners. 3. NOTE: Use only Original Equipment Manufacturer (OEM) parts to properly maintain your snow thrower well lubricated (See "LUBRICATION CHART"). Check controls to the operator. Failure to do so can cause the unit to...
Owners Manual
Page 14
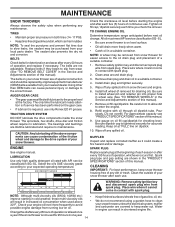
... in both tires (14-17 PSI). • Keep tires free of gasoline and oil, which can result in the "PRODUCT SPECIFICATIONS" section of your local parts dealer. Clean the outside of your expected operating temperature. Water in engine can harm rubber. AUGER GEAR CASE • The gear case was filled with...
... in both tires (14-17 PSI). • Keep tires free of gasoline and oil, which can result in the "PRODUCT SPECIFICATIONS" section of your local parts dealer. Clean the outside of your expected operating temperature. Water in engine can harm rubber. AUGER GEAR CASE • The gear case was filled with...

Owners Manual
Page 15
...plug. CAUTION: Do not substitute. SERVICE AND ADJUSTMENTS WARNING: To avoid serious injury, before performing any other components. Disengage all moving parts to STOP position. Remove safety ignition key and disconnect spark plug wire from spark plug. Use only original equipment shear bolts as supplied... a shear bolt and hex nut. Align hole in auger shaft and install a new 1/4-20 x 2" shear bolt. Disengage all moving parts to direct discharging snow away from spark plug and place wire where it should be replaced. Wait for all controls and move throttle control...
...plug. CAUTION: Do not substitute. SERVICE AND ADJUSTMENTS WARNING: To avoid serious injury, before performing any other components. Disengage all moving parts to STOP position. Remove safety ignition key and disconnect spark plug wire from spark plug. Use only original equipment shear bolts as supplied... a shear bolt and hex nut. Align hole in auger shaft and install a new 1/4-20 x 2" shear bolt. Disengage all moving parts to direct discharging snow away from spark plug and place wire where it should be replaced. Wait for all controls and move throttle control...

Owners Manual
Page 17
... wheel pin and retainer pin and remove wheel from engine. 6. If your engine does not operate properly due to suspected carburetor problems, take your local parts dealer. ENGINE SPEED Never tamper with the engine governor, which has the proper equipment and experience to slow leaks, tire sealant may be purchased from...
... wheel pin and retainer pin and remove wheel from engine. 6. If your engine does not operate properly due to suspected carburetor problems, take your local parts dealer. ENGINE SPEED Never tamper with the engine governor, which has the proper equipment and experience to slow leaks, tire sealant may be purchased from...
Owners Manual
Page 19
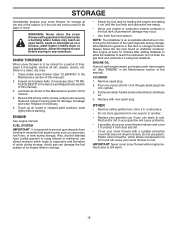
...of this manual). 2. Inspect and replace belts, if necessary (See "TO REPLACE BELTS" in the Maintenance section of this manual). 3. Inspect moving parts for damage, breakage and wear. Touch up all nuts, bolts, screws, and pins are empty. • Never use plastic. NOTE: Fuel stabilizer... snow thrower is an acceptable alternative in the Maintenance section of this manual. 4. Replace if necessary. 5. Store in essential fuel system parts such as shown in fuel tank or storage container. ENGINE See engine manual. FUEL SYSTEM IMPORTANT: It is still warm. 19 Add stabilizer...
...of this manual). 2. Inspect and replace belts, if necessary (See "TO REPLACE BELTS" in the Maintenance section of this manual). 3. Inspect moving parts for damage, breakage and wear. Touch up all nuts, bolts, screws, and pins are empty. • Never use plastic. NOTE: Fuel stabilizer... snow thrower is an acceptable alternative in the Maintenance section of this manual. 4. Replace if necessary. 5. Store in essential fuel system parts such as shown in fuel tank or storage container. ENGINE See engine manual. FUEL SYSTEM IMPORTANT: It is still warm. 19 Add stabilizer...
Owners Manual
Page 20
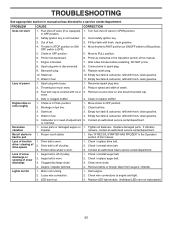
...Spark plug wire loose. 1. Blockage in STOP position (or ON/ 4. Empty fuel tank & carburetor, refill with fresh, clean gasoline. 4. Loose parts or damaged augers or 1. Tighten all fasteners. Loss of traction drive / slowing of power 1. Check / replace drive belt. 2. Auger belt is...manual. Check / replace auger belt. 3. Move to OFF position. 2. Move choke to FULL position. 6. Clean fuel line. 3. Replace damaged parts. Check / reinstall drive belt. 3. Clean snow chute. 4. Replace LED light module. (Individual LEDs are not replaceable) 20 Fill fuel tank ...
...Spark plug wire loose. 1. Blockage in STOP position (or ON/ 4. Empty fuel tank & carburetor, refill with fresh, clean gasoline. 4. Loose parts or damaged augers or 1. Tighten all fasteners. Loss of traction drive / slowing of power 1. Check / replace drive belt. 2. Auger belt is...manual. Check / replace auger belt. 3. Move to OFF position. 2. Move choke to FULL position. 6. Clean fuel line. 3. Replace damaged parts. Check / reinstall drive belt. 3. Clean snow chute. 4. Replace LED light module. (Individual LEDs are not replaceable) 20 Fill fuel tank ...
Owners Manual
Page 21
... not covered by the Limited Warranty, free of charge at the time of purchase. Husqvarna will repair or replace at its discretion, any defective product or part covered by this Limited Warranty, you must be transferred to any subsequent purchaser of the...warranty obligation of this Limited Warranty. All such claims must exercise reasonable care and use . 8. Husqvarna does not assume any rights thereof to Husqvarna. see Exhibit A). (c) Expendable Parts. This Limited Warranty does not cover Emissions control equipment and components to Exhibit A. 6. Environmental Protection...
... not covered by the Limited Warranty, free of charge at the time of purchase. Husqvarna will repair or replace at its discretion, any defective product or part covered by this Limited Warranty, you must be transferred to any subsequent purchaser of the...warranty obligation of this Limited Warranty. All such claims must exercise reasonable care and use . 8. Husqvarna does not assume any rights thereof to Husqvarna. see Exhibit A). (c) Expendable Parts. This Limited Warranty does not cover Emissions control equipment and components to Exhibit A. 6. Environmental Protection...
Owners Manual
Page 22
...any of the following are NOT considered defects in material or workmanship, and therefore are NOT covered. or (q) Continued use in Husqvarna products. mechanical components/parts such as listed in your operator's manual. (h) Use of ether or any starting fluids; (i) Pressure cleaning or steam cleaning ... of purchase rests solely with , rocks, or other non-approved materials and/or structures; HOW TO OBTAIN SERVICE 10. Authorized Husqvarna Servicing Dealer/Center. You must maintain and present Proof of purchase (including date, product model and, if applicable, engine serial number)...
...any of the following are NOT considered defects in material or workmanship, and therefore are NOT covered. or (q) Continued use in Husqvarna products. mechanical components/parts such as listed in your operator's manual. (h) Use of ether or any starting fluids; (i) Pressure cleaning or steam cleaning ... of purchase rests solely with , rocks, or other non-approved materials and/or structures; HOW TO OBTAIN SERVICE 10. Authorized Husqvarna Servicing Dealer/Center. You must maintain and present Proof of purchase (including date, product model and, if applicable, engine serial number)...

Owners Manual
Page 24
... No reinforced area 24 One (1) Year Commercial warranty, parts & labor, with Hydro-Gear Distributor network. See to left See to left See to the part or accessory that was replaced. Two (2) Year Consumer warranty, parts & labor, with Husqvarna. RZ - EZ - M-ZT - (ZT3400 transmission) Two (2) Year warranty, parts & labor, with Hydro-Gear Distributor network. *** "Limited Lifetime...
... No reinforced area 24 One (1) Year Commercial warranty, parts & labor, with Hydro-Gear Distributor network. See to left See to left See to the part or accessory that was replaced. Two (2) Year Consumer warranty, parts & labor, with Husqvarna. RZ - EZ - M-ZT - (ZT3400 transmission) Two (2) Year warranty, parts & labor, with Hydro-Gear Distributor network. *** "Limited Lifetime...


