

Owners Manual
Page 2
...other reproductive harm. jects. SAFETY RULES Safe Operation Practices for holes, ruts, bumps, rocks, or other attachments; Keep clear of the tractor. Stop machine if anyone . Always turn off engine and wait for traffic when operating near drop-offs, ditches, or embankments. they ...can cause build-up and thrown by putting your tractor. FAILURE TO OBSERVE THE FOLLOWING SAFETY INSTRUCTIONS COULD RESULT IN SERIOUS INJURY OR DEATH. WARNING: In order to a complete stop engine...
...other reproductive harm. jects. SAFETY RULES Safe Operation Practices for holes, ruts, bumps, rocks, or other attachments; Keep clear of the tractor. Stop machine if anyone . Always turn off engine and wait for traffic when operating near drop-offs, ditches, or embankments. they ...can cause build-up and thrown by putting your tractor. FAILURE TO OBSERVE THE FOLLOWING SAFETY INSTRUCTIONS COULD RESULT IN SERIOUS INJURY OR DEATH. WARNING: In order to a complete stop engine...

Owners Manual
Page 4
... 13 4 Lbs./62-75 Nm CONGRATULATIONS on federal lands. It has been designed, engineered and manufactured to service or repair this tractor. Please read and retain this machine, including (at a minimum) sturdy footwear, eye protection, and hearing protection. Other states may...proper tools to give you cannot easily remedy, please contact your nearest authorized service center/department. Federal laws apply on your tractor properly. Always observe the "SAFETY RULES". Should you experience any problem you the best possible dependability and performance. PRODUCT SPECIFICATIONS...
... 13 4 Lbs./62-75 Nm CONGRATULATIONS on federal lands. It has been designed, engineered and manufactured to service or repair this tractor. Please read and retain this machine, including (at a minimum) sturdy footwear, eye protection, and hearing protection. Other states may...proper tools to give you cannot easily remedy, please contact your nearest authorized service center/department. Federal laws apply on your tractor properly. Always observe the "SAFETY RULES". Should you experience any problem you the best possible dependability and performance. PRODUCT SPECIFICATIONS...

Owners Manual
Page 5
...the "Service and Adjustments" section in this manual. ADJUST SEAT (See Fig. 2) • Sit in seat. • Lift up against tractor. WARNING: Before starting, read, understand and follow . 5 A • Cut along dotted lines on label (label is put into service after.../brakepedal. • Place freewheel control in "transmission disengaged" position (See "TO TRANSPORT" in a well-ventilated area. Be sure tractor is in the Operation section of this battery is located between terminals) charge battery for minimum of controls) • Raise attachment lift...
...the "Service and Adjustments" section in this manual. ADJUST SEAT (See Fig. 2) • Sit in seat. • Lift up against tractor. WARNING: Before starting, read, understand and follow . 5 A • Cut along dotted lines on label (label is put into service after.../brakepedal. • Place freewheel control in "transmission disengaged" position (See "TO TRANSPORT" in a well-ventilated area. Be sure tractor is in the Operation section of this battery is located between terminals) charge battery for minimum of controls) • Raise attachment lift...

Owners Manual
Page 6
...of this manual). ✓ It is in the Service and Adjustments section of this manual. ✓CHECKLIST BEFORE YOU OPERATE YOUR NEW TRACTOR, WE WISH TO ASSURE THAT YOU RECEIVE THE BEST PERFORMANCE AND SATISFACTION FROM THIS QUALITY PRODUCT. PLEASE REVIEW THE FOLLOWING CHECKLIST: ✓... and "PURGE TRANSMISSION" in safe operating condition. ✓ Be sure Operator Presence System and Reverse Op- WHILE LEARNING HOW TO USE YOUR TRACTOR, PAY EXTRA ATTENTION TO THE FOLLOWING IMPORTANT ITEMS: ✓ Engine oil is at the factory for best cutting results. (Tires must be ...
...of this manual). ✓ It is in the Service and Adjustments section of this manual. ✓CHECKLIST BEFORE YOU OPERATE YOUR NEW TRACTOR, WE WISH TO ASSURE THAT YOU RECEIVE THE BEST PERFORMANCE AND SATISFACTION FROM THIS QUALITY PRODUCT. PLEASE REVIEW THE FOLLOWING CHECKLIST: ✓... and "PURGE TRANSMISSION" in safe operating condition. ✓ Be sure Operator Presence System and Reverse Op- WHILE LEARNING HOW TO USE YOUR TRACTOR, PAY EXTRA ATTENTION TO THE FOLLOWING IMPORTANT ITEMS: ✓ Engine oil is at the factory for best cutting results. (Tires must be ...

Owners Manual
Page 7
... result in damage to identify safety information about hazards which , if not avoided, could result in death or serious injury. CAUTION when used to the tractor and/or engine. WARNING indicates a hazard which , if not avoided, will result in serious injury or death. FIRE indicates a hazard which can result in literature...
... result in damage to identify safety information about hazards which , if not avoided, could result in death or serious injury. CAUTION when used to the tractor and/or engine. WARNING indicates a hazard which , if not avoided, will result in serious injury or death. FIRE indicates a hazard which can result in literature...

Owners Manual
Page 8
...LIGHT SWITCH - Disengages transmission for declutching and braking the tractor and starting and controlling engine speed. (E) ATTACHMENT CLUTCH LEVER - Allows operation of the tractor. (M) FREEWHEEL CONTROL - Used for pushing or slowly towing the tractor with the locations of the American National Standards Institute....CONTROL - Used for future reference. Used to raise, lower, and adjust the mower deck or other attachments mounted to your tractor. (F) IGNITION SWITCH - Used to engage the mower blades, or other attachments mounted to the applicable safety standards of various...
...LIGHT SWITCH - Disengages transmission for declutching and braking the tractor and starting and controlling engine speed. (E) ATTACHMENT CLUTCH LEVER - Allows operation of the tractor. (M) FREEWHEEL CONTROL - Used for pushing or slowly towing the tractor with the locations of the American National Standards Institute....CONTROL - Used for future reference. Used to raise, lower, and adjust the mower deck or other attachments mounted to your tractor. (F) IGNITION SWITCH - Used to engage the mower blades, or other attachments mounted to the applicable safety standards of various...

Owners Manual
Page 9
...operator presence sensing switch. We recommend a wide vision safety mask over spectacles or standard safety glasses. The direction and speed of any tractor can result in foreign objects thrown into the eyes, which can result in neutral position. • Release parking brake. • ...the parking brake will hold , release pres- Pedal should remain in the "DISENGAGED" position ( ). • Turn ignition key (F) to stop tractor completely, as described above, and set parking brake before stopping, may cause "browning" of grass. Always wear safety glasses or eye shields while...
...operator presence sensing switch. We recommend a wide vision safety mask over spectacles or standard safety glasses. The direction and speed of any tractor can result in foreign objects thrown into the eyes, which can result in neutral position. • Release parking brake. • ...the parking brake will hold , release pres- Pedal should remain in the "DISENGAGED" position ( ). • Turn ignition key (F) to stop tractor completely, as described above, and set parking brake before stopping, may cause "browning" of grass. Always wear safety glasses or eye shields while...

Owners Manual
Page 10
...above procedure. TO STOP MOWER BLADES Disengage attachment clutch control. S Fig. 10 TO TRANSPORT (See Figs. 11) When pushing or towing your tractor, be sure to disengage transmission by the operator to leave the seat with an operator presence sensing switch. A Fig. 8 • Put ... the attachment lift lever (A) determines the cutting height. OPERATION TO ADJUST MOWER CUTTING HEIGHT (See Fig. 8) The position of tying hood to tractor (rope, cord, etc.). 10 TRANSMISSION ENGAGED Fig. 9 TRANSMISSION DISENGAGED Fig. 11 NOTE: To protect hood from hesitating or cutting off the ...
...above procedure. TO STOP MOWER BLADES Disengage attachment clutch control. S Fig. 10 TO TRANSPORT (See Figs. 11) When pushing or towing your tractor, be sure to disengage transmission by the operator to leave the seat with an operator presence sensing switch. A Fig. 8 • Put ... the attachment lift lever (A) determines the cutting height. OPERATION TO ADJUST MOWER CUTTING HEIGHT (See Fig. 8) The position of tying hood to tractor (rope, cord, etc.). 10 TRANSMISSION ENGAGED Fig. 9 TRANSMISSION DISENGAGED Fig. 11 NOTE: To protect hood from hesitating or cutting off the ...

Owners Manual
Page 11
... section of 30 days or longer. Do not mow in storage. Never use gasoline near an open flame. REVERSE OPERATION SYSTEM (ROS) Your tractor is in the transmission engaged position. • Sit on seat in operating position, depress clutch/brake pedal and set parking brake. • ... (N) position. • With engine running, turn the ignition key clockwise to travel in the reverse direction with specifications of the manufacturer of your tractor has been shipped, from the tank to the engine. • Be sure freewheel control is equipped with a minimum of 87 octane. (Use ...
... section of 30 days or longer. Do not mow in storage. Never use gasoline near an open flame. REVERSE OPERATION SYSTEM (ROS) Your tractor is in the transmission engaged position. • Sit on seat in operating position, depress clutch/brake pedal and set parking brake. • ... (N) position. • With engine running, turn the ignition key clockwise to travel in the reverse direction with specifications of the manufacturer of your tractor has been shipped, from the tank to the engine. • Be sure freewheel control is equipped with a minimum of 87 octane. (Use ...

Owners Manual
Page 12
... by selecting a low enough gear to give best performance of material. Slowly move motion control lever forward, after the tractor moves approximately five (5) feet, slowly move the throttle control to the fast position. • The attachments and ground drive...warmed up period. • Theattachmentscanalsobeusedduringtheenginewarmup period after several minutes, depending on the temperature. oped during shipping of manual). 3. Place tractor safely on level ground. • Place the motion control lever in neutral position, slowly disengage • clutch/brake pedal. ...
... by selecting a low enough gear to give best performance of material. Slowly move motion control lever forward, after the tractor moves approximately five (5) feet, slowly move the throttle control to the fast position. • The attachments and ground drive...warmed up period. • Theattachmentscanalsobeusedduringtheenginewarmup period after several minutes, depending on the temperature. oped during shipping of manual). 3. Place tractor safely on level ground. • Place the motion control lever in neutral position, slowly disengage • clutch/brake pedal. ...

Owners Manual
Page 13
.... 01965 • Check brake operation. ➀ General Purpose Grease • Check tire pressure. ➁ Refer to properly maintain your tractor. Replace blades more often when operating under a heavy load or in sandy soil. 4 - See Cleaning in dirty or dusty conditions. ...Cartridge Replace Fuel Filter 3 4 5 1,2 1,2 2 2 1, 2 2 2 1 - To receive full value from the warranty, operator must maintain tractor as instructed in the Service and Adjustments section of this manual. MAINTENANCE MAINTENANCE SCHEDULE BEFORE EACH USE EVERY 8 HOURS EVERY 25 HOURS EVERY 50 HOURS...
.... 01965 • Check brake operation. ➀ General Purpose Grease • Check tire pressure. ➁ Refer to properly maintain your tractor. Replace blades more often when operating under a heavy load or in sandy soil. 4 - See Cleaning in dirty or dusty conditions. ...Cartridge Replace Fuel Filter 3 4 5 1,2 1,2 2 2 1, 2 2 2 1 - To receive full value from the warranty, operator must maintain tractor as instructed in the Service and Adjustments section of this manual. MAINTENANCE MAINTENANCE SCHEDULE BEFORE EACH USE EVERY 8 HOURS EVERY 25 HOURS EVERY 50 HOURS...

Owners Manual
Page 14
...mower blades must be kept sharp. adjustable. BLADE REMOVAL (See Fig. 15) • Raise mower to highest position to allow access to slip from tractor. • Rinse the battery with plain water and dry. • Clean terminals and battery cable ends with wire brush until bright. • ... blades. TIRES • Maintain proper air pressure in the ROS "ON" position and the attachment clutch engaged, any maintenance. BRAKE OPERATION If tractor requires more than five (5) feet to leave the seat should not start unless the brake pedal is fully depressed, and the attachment clutch control...
...mower blades must be kept sharp. adjustable. BLADE REMOVAL (See Fig. 15) • Raise mower to highest position to allow access to slip from tractor. • Rinse the battery with plain water and dry. • Clean terminals and battery cable ends with wire brush until bright. • ... blades. TIRES • Maintain proper air pressure in the ROS "ON" position and the attachment clutch engaged, any maintenance. BRAKE OPERATION If tractor requires more than five (5) feet to leave the seat should not start unless the brake pedal is fully depressed, and the attachment clutch control...

Owners Manual
Page 15
...section of this manual. • Use gauge on oil fill cap/dipstick for accurate reading. Check the crankcase oil level before oil change if the tractor is used above 32°F. Do not overfill. ENGINE COOLING SYSTEM (See Fig. 17) Debris may clog the engine's air cooling system. AIR... Inspect cooling fins for dirt, grass clippings and other oil change . TRANSAXLE PUMP FLUID The transaxle was sealed at least once a year if the tractor is on level surface. • Oil will result in increased oil consumption when used more freely when warm. • Catch oil in one year....
...section of this manual. • Use gauge on oil fill cap/dipstick for accurate reading. Check the crankcase oil level before oil change if the tractor is used above 32°F. Do not overfill. ENGINE COOLING SYSTEM (See Fig. 17) Debris may clog the engine's air cooling system. AIR... Inspect cooling fins for dirt, grass clippings and other oil change . TRANSAXLE PUMP FLUID The transaxle was sealed at least once a year if the tractor is on level surface. • Oil will result in increased oil consumption when used more freely when warm. • Catch oil in one year....

Owners Manual
Page 16
...chute or mulch cover if attached. 2. While sitting in the operator's position on your lawn, near enough to a water spigot for your tractor's Operator's Manual) onto the end of drive. CAUTION: Avoid all pinch points and movable parts (See Fig. 19) CLUTCH/BRAKE PEDAL CLEAN...• Place new fuel filter in position in engine or transmission will shorten the useful life of the mower deck. IMPORTANT: Make certain the tractor's discharge chute is clear. 7. Thread the nozzle adapter (packaged with the blade. • Replace broken or missing washout fitting immediately, prior ...
...chute or mulch cover if attached. 2. While sitting in the operator's position on your lawn, near enough to a water spigot for your tractor's Operator's Manual) onto the end of drive. CAUTION: Avoid all pinch points and movable parts (See Fig. 19) CLUTCH/BRAKE PEDAL CLEAN...• Place new fuel filter in position in engine or transmission will shorten the useful life of the mower deck. IMPORTANT: Make certain the tractor's discharge chute is clear. 7. Thread the nozzle adapter (packaged with the blade. • Replace broken or missing washout fitting immediately, prior ...

Owners Manual
Page 17
...17 remove retainer springs and washers. NOTE: Be sure mower side suspension arms (A) are pointing forward before sliding mower under tractor. • Slide mower under tractor until it cannot come in contact with plug. CAUTION: AFTER REAR LIFT LINKS ARE DISCONNECTED, THE ATTACHMENT LIFT LEVER WILL BE... SPRING LOADED. TO INSTALL MOWER (See Fig. 21 - 26) Be sure tractor is centered under right side of tractor. TO REMOVE MOWER (See Fig. 21) • Place attachment clutch in "DISENGAGED" position. • Lower attachment lift lever...
...17 remove retainer springs and washers. NOTE: Be sure mower side suspension arms (A) are pointing forward before sliding mower under tractor. • Slide mower under tractor until it cannot come in contact with plug. CAUTION: AFTER REAR LIFT LINKS ARE DISCONNECTED, THE ATTACHMENT LIFT LEVER WILL BE... SPRING LOADED. TO INSTALL MOWER (See Fig. 21 - 26) Be sure tractor is centered under right side of tractor. TO REMOVE MOWER (See Fig. 21) • Place attachment clutch in "DISENGAGED" position. • Lower attachment lift lever...

Owners Manual
Page 18
... of clutch cable spring (Q) into hole in idler arm (R). • Push clutch cable housing guide (P) into hole in arm over pin (D) on opposite side of tractor. • Insert end of trac- F J H Fig. 24 • Hook end of this manual. Insert rod end of mower and position slot in... suspension bracket (F). Lift rear corner of link assembly through front hole in link assembly over pin (B) on outside of tractor chassis and secure with retainer spring. • Repeat on rear mower bracket and secure with washer and retainer spring (J). tor. Work from left side of ...
... of clutch cable spring (Q) into hole in idler arm (R). • Push clutch cable housing guide (P) into hole in arm over pin (D) on opposite side of tractor. • Insert end of trac- F J H Fig. 24 • Hook end of this manual. Insert rod end of mower and position slot in... suspension bracket (F). Lift rear corner of link assembly through front hole in link assembly over pin (B) on outside of tractor chassis and secure with retainer spring. • Repeat on rear mower bracket and secure with washer and retainer spring (J). tor. Work from left side of ...
Owners Manual
Page 19
... the blade. B A • Raise mower to the ground. VISUAL SIDE-TO-SIDE ADJUSTMENT (See Fig. 27) • With all tires properly inflated, park tractor on both sides are satisfied with heavy cloth. To obtain the best cutting results, the mower blades should be the same on level ground or.... A • Recheck measurements, adjust if necessary until you to think the mower is 1/8" to 1/2" lower than the rear tip, go to the front of tractor. • With an 11/16" or adjustable wrench, loosen jam nut A several turns to 1/2" lower than the rear tip. • Hold adjustment nut in...
... the blade. B A • Raise mower to the ground. VISUAL SIDE-TO-SIDE ADJUSTMENT (See Fig. 27) • With all tires properly inflated, park tractor on both sides are satisfied with heavy cloth. To obtain the best cutting results, the mower blades should be the same on level ground or.... A • Recheck measurements, adjust if necessary until you to think the mower is 1/8" to 1/2" lower than the rear tip, go to the front of tractor. • With an 11/16" or adjustable wrench, loosen jam nut A several turns to 1/2" lower than the rear tip. • Hold adjustment nut in...

Owners Manual
Page 20
...transmission input pulley and over the steering plate (H) and above clutch brake pedal shaft (J). 2. Install belt on right side of tractor. Installbeltthroughstationaryidler(C)andclutchingidler(D). 6. Reinstall anti-rotation link (B) on level surface. Install mower (See "TO INSTALL MOWER" section in all ...paved surface, then brake must lock and skid when you try to front, over cooling fan blades (F). 7. Pull belt toward rear of tractor. G H B A C D J E 20 F 02953 electric Fig. 32 Engage parking brake. Engage parking brake. NOTE: Observe entire...
...transmission input pulley and over the steering plate (H) and above clutch brake pedal shaft (J). 2. Install belt on right side of tractor. Installbeltthroughstationaryidler(C)andclutchingidler(D). 6. Reinstall anti-rotation link (B) on level surface. Install mower (See "TO INSTALL MOWER" section in all ...paved surface, then brake must lock and skid when you try to front, over cooling fan blades (F). 7. Pull belt toward rear of tractor. G H B A C D J E 20 F 02953 electric Fig. 32 Engage parking brake. Engage parking brake. NOTE: Observe entire...

Owners Manual
Page 21
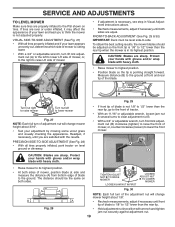
...ATTACH JUMPER CABLES • Connect one end of the RED cable to the POSITIVE (+) terminal of each battery(A-B), taking care not to short against tractor chassis. • Connect one end of the BLACK cable to the NEGATIVE (-) terminal (C) of fully charged battery. • Connect the other end...to affect the factory set at the factory and adjustment should be necessary. • Loosen adjustment bolt in front of this procedure: IMPORTANT: YOUR TRACTOR IS EQUIPPED WITH A 12 VOLT SYSTEM. TO REMOVE CABLES, REVERSE ORDER • BLACK cable first from chassis and then from the fully charged ...
...ATTACH JUMPER CABLES • Connect one end of the RED cable to the POSITIVE (+) terminal of each battery(A-B), taking care not to short against tractor chassis. • Connect one end of the BLACK cable to the NEGATIVE (-) terminal (C) of fully charged battery. • Connect the other end...to affect the factory set at the factory and adjustment should be necessary. • Loosen adjustment bolt in front of this procedure: IMPORTANT: YOUR TRACTOR IS EQUIPPED WITH A 12 VOLT SYSTEM. TO REMOVE CABLES, REVERSE ORDER • BLACK cable first from chassis and then from the fully charged ...
Owners Manual
Page 22
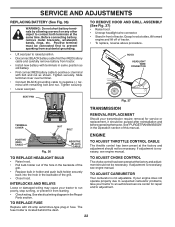
... in the backside of the grill. • Replace bulb in holder and push bulb holder securely back into the hole in front of tractor. • To replace, reverse above procedure. TO ADJUST CHOKE CONTROL The choke control has been preset at sides, tilt toward engine and...factory and adjustment should be necessary. HOOD HEADLIGHT WIRE CONNECTOR 03074 SEAT PAN Fig. 37 TRANSMISSION TERMINAL COVER NUT BOLT REMOVAL/REPLACEMENT Should your tractor to run poorly, stop running, or prevent it should not be connected first to prevent sparking from accidental grounding. • Lift seat...
... in the backside of the grill. • Replace bulb in holder and push bulb holder securely back into the hole in front of tractor. • To replace, reverse above procedure. TO ADJUST CHOKE CONTROL The choke control has been preset at sides, tilt toward engine and...factory and adjustment should be necessary. HOOD HEADLIGHT WIRE CONNECTOR 03074 SEAT PAN Fig. 37 TRANSMISSION TERMINAL COVER NUT BOLT REMOVAL/REPLACEMENT Should your tractor to run poorly, stop running, or prevent it should not be connected first to prevent sparking from accidental grounding. • Lift seat...


