

Owners Manual
Page 1
The use in this machine. YTH2042 Owner's Manual Gasoline containing up to 10% ethanol (E10) is acceptable for use of any gasoline exceeding 10% ethanol (E10) will void the product warranty. 532 43 51-66 Rev. 4
The use in this machine. YTH2042 Owner's Manual Gasoline containing up to 10% ethanol (E10) is acceptable for use of any gasoline exceeding 10% ethanol (E10) will void the product warranty. 532 43 51-66 Rev. 4

Owners Manual
Page 2
... or obstruction. Shut off blades, set parking brake, stop or shift while on the slope. • Do not mow on the machine and in the manual before cleaning the machine, removing the grass catcher, or unclogging the discharge chute. • Operate machine only in a large percentage of your tractor. Clean any...
... or obstruction. Shut off blades, set parking brake, stop or shift while on the slope. • Do not mow on the machine and in the manual before cleaning the machine, removing the grass catcher, or unclogging the discharge chute. • Operate machine only in a large percentage of your tractor. Clean any...

Owners Manual
Page 4
... RESPONSIBILITIES • Read and observe the safety rules. • Follow a regular schedule in effective working order by law (Section 4442 of this manual. • Wear proper Personal Protective Equipment (PPE) while operating this machine, including (at a minimum) sturdy footwear, eye protection, and hearing protection...In the state of a new tractor. It has been designed, engineered and manufactured to give you to service or repair this manual. WARNING: This tractor is equipped with an internal combustion engine and should be used , it should not be maintained in ...
... RESPONSIBILITIES • Read and observe the safety rules. • Follow a regular schedule in effective working order by law (Section 4442 of this manual. • Wear proper Personal Protective Equipment (PPE) while operating this machine, including (at a minimum) sturdy footwear, eye protection, and hearing protection...In the state of a new tractor. It has been designed, engineered and manufactured to give you to service or repair this manual. WARNING: This tractor is equipped with an internal combustion engine and should be used , it should not be maintained in ...

Owners Manual
Page 5
...left unassembled for charging instructions). • For battery and battery cable installation see "REPLACING BATTERY" in the "Service and Adjustments" section in this manual. Remove end panels and lay side panels flat. • Check for location and function of controls) • Raise attachment lift lever to ... TRACTOR FROM CARTON UNPACK CARTON • Remove all accessible loose parts and parts cartons from the skid. Be sure tractor is mentioned in this manual, it means when you to press clutch/brake pedal all four panels of carton. ADJUST SEAT (See Fig. 2) • Sit in seat...
...left unassembled for charging instructions). • For battery and battery cable installation see "REPLACING BATTERY" in the "Service and Adjustments" section in this manual. Remove end panels and lay side panels flat. • Check for location and function of controls) • Raise attachment lift lever to ... TRACTOR FROM CARTON UNPACK CARTON • Remove all accessible loose parts and parts cartons from the skid. Be sure tractor is mentioned in this manual, it means when you to press clutch/brake pedal all four panels of carton. ADJUST SEAT (See Fig. 2) • Sit in seat...

Owners Manual
Page 6
...proper starting and transmission purging instructions (See "TO START ENGINE" and "PURGE TRANSMISSION" in the Service and Adjustments section of this manual. ✓CHECKLIST BEFORE YOU OPERATE YOUR NEW TRACTOR, WE WISH TO ASSURE THAT YOU RECEIVE THE BEST PERFORMANCE AND SATISFACTION FROM ...with fresh, clean, regular unleaded gasoline. ✓ Become familiar with all belt keepers. ✓ Check wiring. tion section of this manual). CHECK DECK LEVELNESS For best cutting results, mower housing should be properly inflated for best cutting performance. • Reduce tire pressure to...
...proper starting and transmission purging instructions (See "TO START ENGINE" and "PURGE TRANSMISSION" in the Service and Adjustments section of this manual. ✓CHECKLIST BEFORE YOU OPERATE YOUR NEW TRACTOR, WE WISH TO ASSURE THAT YOU RECEIVE THE BEST PERFORMANCE AND SATISFACTION FROM ...with fresh, clean, regular unleaded gasoline. ✓ Become familiar with all belt keepers. ✓ Check wiring. tion section of this manual). CHECK DECK LEVELNESS For best cutting results, mower housing should be properly inflated for best cutting performance. • Reduce tire pressure to...

Owners Manual
Page 8
...starting and stopping the engine. (G) REVERSE OPERATION SYSTEM (ROS) "ON" POSITION - OPERATION KNOW YOUR TRACTOR READ THIS OWNER'S MANUAL AND SAFETY RULES BEFORE OPERATING YOUR TRACTOR Compare the illustrations with your tractor to familiarize yourself with the engine off . (J) MOTION ...pedal into the brake position. (D) THROTTLE/CHOKE CONTROL - Allows operation of the American National Standards Institute. (A) ATTACHMENT LIFT LEVER - Save this manual for future reference. D H G E B A C M F J Fig. 3 Our tractors conform to the applicable safety standards of mower deck or ...
...starting and stopping the engine. (G) REVERSE OPERATION SYSTEM (ROS) "ON" POSITION - OPERATION KNOW YOUR TRACTOR READ THIS OWNER'S MANUAL AND SAFETY RULES BEFORE OPERATING YOUR TRACTOR Compare the illustrations with your tractor to familiarize yourself with the engine off . (J) MOTION ...pedal into the brake position. (D) THROTTLE/CHOKE CONTROL - Allows operation of the American National Standards Institute. (A) ATTACHMENT LIFT LEVER - Save this manual for future reference. D H G E B A C M F J Fig. 3 Our tractors conform to the applicable safety standards of mower deck or ...

Owners Manual
Page 10
... height of cut relatively high; A Fig. 8 • Put attachment lift lever in same adjustment hole. JUST MOWER CUTTING HEIGHT" in the Operation section of this manual). • With mower in the seat to prevent the engine from the ground to the blade tip with tractor on a truck or a trailer, be cut...
... height of cut relatively high; A Fig. 8 • Put attachment lift lever in same adjustment hole. JUST MOWER CUTTING HEIGHT" in the Operation section of this manual). • With mower in the seat to prevent the engine from the ground to the blade tip with tractor on a truck or a trailer, be cut...

Owners Manual
Page 11
... Instructions for a few seconds, remove and read the warm and cold starting procedures that can attract moisture which leads to separation and formation of this manual). • To change engine oil, see the Maintenance section in this...
... Instructions for a few seconds, remove and read the warm and cold starting procedures that can attract moisture which leads to separation and formation of this manual). • To change engine oil, see the Maintenance section in this...

Owners Manual
Page 12
... wet. See "TO LEVEL MOWER HOUSING" in the Service and Adjustments section of this procedure with the throttle control in this section of manual). 7. Have the cut relatively high; that has been cut. Disengage transmission by placing freewheel control in engaged position (See "TO TRANSPORT"...as described above ) • When engine starts, move the throttle control back to the choke position and retry. Sitting in this section of manual). 3. With motion control lever in neutral position, slowly disengage • clutch/brake pedal. 12 Fig. 13 If grass is extremely tall, ...
... wet. See "TO LEVEL MOWER HOUSING" in the Service and Adjustments section of this procedure with the throttle control in this section of manual). 7. Have the cut relatively high; that has been cut. Disengage transmission by placing freewheel control in engaged position (See "TO TRANSPORT"...as described above ) • When engine starts, move the throttle control back to the choke position and retry. Sitting in this section of manual). 3. With motion control lever in neutral position, slowly disengage • clutch/brake pedal. 12 Fig. 13 If grass is extremely tall, ...

Owners Manual
Page 13
...warranty on this tractor does not cover items that have been subjected to see if you should make any of the adjustments described in this manual. • At least once a year you should replace the spark plug, clean or replace air filter, and check blades and belts for...maintenance-free battery. 5 - To receive full value from the warranty, operator must maintain tractor as instructed in the Service and Adjustments section of this manual. A new spark plug and clean air filter assure proper air-fuel mixture and help your engine run better and last longer. ➀ SPINDLE ZERK...
...warranty on this tractor does not cover items that have been subjected to see if you should make any of the adjustments described in this manual. • At least once a year you should replace the spark plug, clean or replace air filter, and check blades and belts for...maintenance-free battery. 5 - To receive full value from the warranty, operator must maintain tractor as instructed in the Service and Adjustments section of this manual. A new spark plug and clean air filter assure proper air-fuel mixture and help your engine run better and last longer. ➀ SPINDLE ZERK...

Owners Manual
Page 14
... and the attachment clutch control is in all tires (See the sides of tires for proper PSI). • Keep tires free of this manual). Lbs. torque). MANDREL ASSEMBLY OPERATOR PRESENCE SYSTEM AND REVERSE OPERATION SYSTEM (ROS) (See Fig. 14) BLADE Be sure operator presence and ...maintenance free. TIRES • Maintain proper air pressure in the disengaged position. CAUTION: Use only a replacement blade approved by the manufacturer of this manual). BLADE REMOVAL (See Fig. 15) • Raise mower to highest position to allow access to "leak" power. TO CLEAN BATTERY AND ...
... and the attachment clutch control is in all tires (See the sides of tires for proper PSI). • Keep tires free of this manual). Lbs. torque). MANDREL ASSEMBLY OPERATOR PRESENCE SYSTEM AND REVERSE OPERATION SYSTEM (ROS) (See Fig. 14) BLADE Be sure operator presence and ...maintenance free. TIRES • Maintain proper air pressure in the disengaged position. CAUTION: Use only a replacement blade approved by the manufacturer of this manual). BLADE REMOVAL (See Fig. 15) • Raise mower to highest position to allow access to "leak" power. TO CLEAN BATTERY AND ...

Owners Manual
Page 15
...hours of dirt and chaff to remove dirt and stubborn dried gum fibers. Tighten oil fill cap/dipstick securely each eight (8) hours of this manual. 15 For approximate capacity see "PRODUCT SPECIFICATIONS" section of operation. Spark plug type and gap setting are intact and clean. • ...TRANSAXLE MAINTENANCE The transmission fan and cooling fins should be kept clean to your expected operating temperature. Keep oil at the beginning of this manual. • Use gauge on oil. Remove blower housing and clean the area shown to seals, do not use high quality detergent oil...
...hours of dirt and chaff to remove dirt and stubborn dried gum fibers. Tighten oil fill cap/dipstick securely each eight (8) hours of this manual. 15 For approximate capacity see "PRODUCT SPECIFICATIONS" section of operation. Spark plug type and gap setting are intact and clean. • ...TRANSAXLE MAINTENANCE The transmission fan and cooling fins should be kept clean to your expected operating temperature. Keep oil at the beginning of this manual. • Use gauge on oil. Remove blower housing and clean the area shown to seals, do not use high quality detergent oil...

Owners Manual
Page 16
... Fast " " position. IMPORTANT: Recheck the area making certain the area is secure. 5. of all gasoline, oil, etc. • Protect painted surfaces with your tractor's Operator's Manual) onto the end of all foreign matter. • Clean debris from steering plate. Make sure the attachment clutch control is directed AWAY from contact with...
... Fast " " position. IMPORTANT: Recheck the area making certain the area is secure. 5. of all gasoline, oil, etc. • Protect painted surfaces with your tractor's Operator's Manual) onto the end of all foreign matter. • Clean debris from steering plate. Make sure the attachment clutch control is directed AWAY from contact with...

Owners Manual
Page 18
... and secure with washer and retainer spring (J). G M F G A E B P C K LD Fig. 26 18 E A B Fig. 22 • ATTACH REAR LIFT LINKS (C) - tor. Work from left side of this manual. Insert rod end of mower and position slot in tractor front suspension bracket (F). Lift rear corner of link assembly through front hole in link assembly...
... and secure with washer and retainer spring (J). G M F G A E B P C K LD Fig. 26 18 E A B Fig. 22 • ATTACH REAR LIFT LINKS (C) - tor. Work from left side of this manual. Insert rod end of mower and position slot in tractor front suspension bracket (F). Lift rear corner of link assembly through front hole in link assembly...

Owners Manual
Page 20
...the brake needs to front, over cooling fan blades (F). 7. Engage parking brake. Remove mower (See "TO REMOVE MOWER" section in this manual). Remove belt downward from tractor. Slide belt toward rear of tractor. Install new belt from transmission input pulley and over the steering plate (H)...tractor. Be sure belt is in all pulley grooves and inside all belt guides. • Install mower (See "TO INSTALL MOWER" in this manual). Reinstall anti-rotation link (B) on a level, dry concrete or paved surface, depress brake pedal all belt guides and keepers. 2. Contact a qualified...
...the brake needs to front, over cooling fan blades (F). 7. Engage parking brake. Remove mower (See "TO REMOVE MOWER" section in this manual). Remove belt downward from tractor. Slide belt toward rear of tractor. Install new belt from transmission input pulley and over the steering plate (H)...tractor. Be sure belt is in all pulley grooves and inside all belt guides. • Install mower (See "TO INSTALL MOWER" in this manual). Reinstall anti-rotation link (B) on a level, dry concrete or paved surface, depress brake pedal all belt guides and keepers. 2. Contact a qualified...

Owners Manual
Page 21
.... 35 21 After above adjustment is made, if the tractor still creeps forward or backward while motion control lever is in neutral position, follow this manual). If your local parts dealer. Keep sparks, flame and smoking materials away from both batteries. Insert square key. • Replace washers and snap retaining ring...
.... 35 21 After above adjustment is made, if the tractor still creeps forward or backward while motion control lever is in neutral position, follow this manual). If your local parts dealer. Keep sparks, flame and smoking materials away from both batteries. Insert square key. • Replace washers and snap retaining ring...
Owners Manual
Page 22
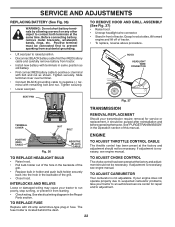
...remove metal bracelets, wristwatch bands, rings, etc. Tighten securely. • Lower seat pan. The fuse holder is necessary, see engne manual. If adjustment is not adjustable. If your engine does not operate properly due to suspected carburetor problems, take your transmission require removal ... BOLT REMOVAL/REPLACEMENT Should your tractor to negative (-) terminal with terminals in fuse. TO ADJUST CARBURETOR Your carburetor is necessary, see engine manual. TO REMOVE HOOD AND GRILL ASSEMBLY (See Fig. 37) • Raise hood. • Unsnap headlight wire connector. • Stand...
...remove metal bracelets, wristwatch bands, rings, etc. Tighten securely. • Lower seat pan. The fuse holder is necessary, see engne manual. If adjustment is not adjustable. If your engine does not operate properly due to suspected carburetor problems, take your transmission require removal ... BOLT REMOVAL/REPLACEMENT Should your tractor to negative (-) terminal with terminals in fuse. TO ADJUST CARBURETOR Your carburetor is necessary, see engine manual. TO REMOVE HOOD AND GRILL ASSEMBLY (See Fig. 37) • Raise hood. • Unsnap headlight wire connector. • Stand...

Owners Manual
Page 23
...• After a period of time in contact with battery terminals. • If battery is an acceptable alternative in the Maintenance section of this manual. • Be sure that does not retain moisture. Run engine at the end of time, clean it run until the fuel lines and carburetor .... NOTE: Fuel stabilizer is removed from dust and dirt. • Cover your tractor to rust. TRACTOR Remove mower from one ounce of this manual). • Lubricate as shown in minimizing the formation of fuel gum deposits during long periods of storage, battery cables should be stored for a ...
...• After a period of time in contact with battery terminals. • If battery is an acceptable alternative in the Maintenance section of this manual. • Be sure that does not retain moisture. Run engine at the end of time, clean it run until the fuel lines and carburetor .... NOTE: Fuel stabilizer is removed from dust and dirt. • Cover your tractor to rust. TRACTOR Remove mower from one ounce of this manual). • Lubricate as shown in minimizing the formation of fuel gum deposits during long periods of storage, battery cables should be stored for a ...

Owners Manual
Page 25
... deck vent holes from buildup 11. Faulty light switch. 4. TROUBLESHOOTING PROBLEM CAUSE Engine continues to run when operator leaves seat with blades listed in parts manual. 11. Poor cut - Bad battery cell(s). 2. Faulty operator-safety presence control system. Mower deck not level. 3. Worn, bent or loose blade. 6. Replace mower drive belt...
... deck vent holes from buildup 11. Faulty light switch. 4. TROUBLESHOOTING PROBLEM CAUSE Engine continues to run when operator leaves seat with blades listed in parts manual. 11. Poor cut - Bad battery cell(s). 2. Faulty operator-safety presence control system. Mower deck not level. 3. Worn, bent or loose blade. 6. Replace mower drive belt...

Owners Manual
Page 26
...- - 532 43 51-66 - - 532 43 51-67 DESCRIPTION Decal, Warning Decal, Mower V-Belt Schematic Decal, Bypass Pad, Footrest, LH Pad, Footrest, RH Manual, Owner's (English) Manual, Owner's (French) WHEELS AND TIRES 1 2 11 3 4 7 10 6 wheel_art_1-tex 5 9 8 KEY PART NO. Tube) NOTE: All component dimensions given in...x 1 00 Tire Rear 18 x 9.5-8 "Turf Saver LT" Tube Rear (Service Item Only) Rim Asm 8" Rear Sealant, Tire (10 oz. TRACTOR - - MODEL NUMBER YTH2042 (96043010601), PRODUCT NO. 960 43 01-06 DECALS 2 56 2 1 3 9 4 11 8 12 KEY PART NO. NO. 1 532 41 16-58 2 532 42...
...- - 532 43 51-66 - - 532 43 51-67 DESCRIPTION Decal, Warning Decal, Mower V-Belt Schematic Decal, Bypass Pad, Footrest, LH Pad, Footrest, RH Manual, Owner's (English) Manual, Owner's (French) WHEELS AND TIRES 1 2 11 3 4 7 10 6 wheel_art_1-tex 5 9 8 KEY PART NO. Tube) NOTE: All component dimensions given in...x 1 00 Tire Rear 18 x 9.5-8 "Turf Saver LT" Tube Rear (Service Item Only) Rim Asm 8" Rear Sealant, Tire (10 oz. TRACTOR - - MODEL NUMBER YTH2042 (96043010601), PRODUCT NO. 960 43 01-06 DECALS 2 56 2 1 3 9 4 11 8 12 KEY PART NO. NO. 1 532 41 16-58 2 532 42...

