

Owners Manual
Page 2
... or other attachments; Do not make sudden changes in place and working. • Slow down a hill in a large percentage of riding mower-related injuries. I. Stop the blades when crossing gravel surfaces. • Do not operate machine without the entire grass catcher, discharge chute, ...or other hidden ob- These operators should evaluate their ability to operate the riding mower safely enough to stop engine, and remove keys before cleaning the machine, removing the grass catcher, or unclogging the discharge chute. &#...
... or other attachments; Do not make sudden changes in place and working. • Slow down a hill in a large percentage of riding mower-related injuries. I. Stop the blades when crossing gravel surfaces. • Do not operate machine without the entire grass catcher, discharge chute, ...or other hidden ob- These operators should evaluate their ability to operate the riding mower safely enough to stop engine, and remove keys before cleaning the machine, removing the grass catcher, or unclogging the discharge chute. &#...

Owners Manual
Page 3
... recommends that has a hitch designed for small children. • Never carry children, even with manufacturer's recommended parts, when necessary. • Mower blades are often attracted to cool before storing. • If you last saw them . • Check brake operation frequently. Clean oil or...then refuel such equipment with the blades shut off if a child enters the area. Always look behind before operating a riding lawn mower. They may fall off . Children who have been given rides in the past may suddenly appear in contact with safe machine operation...
... recommends that has a hitch designed for small children. • Never carry children, even with manufacturer's recommended parts, when necessary. • Mower blades are often attracted to cool before storing. • If you last saw them . • Check brake operation frequently. Clean oil or...then refuel such equipment with the blades shut off if a child enters the area. Always look behind before operating a riding lawn mower. They may fall off . Children who have been given rides in the past may suddenly appear in contact with safe machine operation...

Owners Manual
Page 6
...THE BEST PERFORMANCE AND SATISFACTION FROM THIS QUALITY PRODUCT. PORT" in the Service and Adjustments section of this manual). See "TO LEVEL MOWER" in safe operating condition. ✓ Be sure Operator Presence System and Reverse Op- CHECK BRAKE SYSTEM After you start the engine...prepared and charged. ✓ Seat is important for best cutting performance. • Reduce tire pressure to -rear for replacing motion and mower blade drive belts in the Service and Adjustments section of this manual. Follow proper starting and transmission purging instructions (See "TO START ENGINE...
...THE BEST PERFORMANCE AND SATISFACTION FROM THIS QUALITY PRODUCT. PORT" in the Service and Adjustments section of this manual). See "TO LEVEL MOWER" in safe operating condition. ✓ Be sure Operator Presence System and Reverse Op- CHECK BRAKE SYSTEM After you start the engine...prepared and charged. ✓ Seat is important for best cutting performance. • Reduce tire pressure to -rear for replacing motion and mower blade drive belts in the Service and Adjustments section of this manual. Follow proper starting and transmission purging instructions (See "TO START ENGINE...

Owners Manual
Page 7
... with the product. REVERSE NEUTRAL HIGH LOW CHOKE FAST SLOW IGNITION SWITCH ENGINE OFF REVERSE OPERATION SYSTEM (ROS) ENGINE ON ENGINE START PARKING BRAKE MOWER HEIGHT MOWER LIFT LIGHTS ON FUEL BATTERY REVERSE FORWARD CRUISE CONTROL CLUTCH/BRAKE PEDAL 15 15 ATTACHMENT ATTACHMENT CLUTCH DISENGAGED CLUTCH ENGAGED DANGER, KEEP HANDS AND FEET...
... with the product. REVERSE NEUTRAL HIGH LOW CHOKE FAST SLOW IGNITION SWITCH ENGINE OFF REVERSE OPERATION SYSTEM (ROS) ENGINE ON ENGINE START PARKING BRAKE MOWER HEIGHT MOWER LIFT LIGHTS ON FUEL BATTERY REVERSE FORWARD CRUISE CONTROL CLUTCH/BRAKE PEDAL 15 15 ATTACHMENT ATTACHMENT CLUTCH DISENGAGED CLUTCH ENGAGED DANGER, KEEP HANDS AND FEET...

Owners Manual
Page 8
...CLUTCH LEVER - Allows operation of various controls and adjustments. Disengages transmission for pushing or slowly towing the tractor with the locations of mower deck or other attachments mounted to your tractor. (B) CLUTCH/BRAKE PEDAL - OPERATION KNOW YOUR TRACTOR READ THIS OWNER'S MANUAL AND ...the engine off . (J) MOTION CONTROL LEVER - Used to raise, lower, and adjust the mower deck or other powered attachment while in reverse. (H) LIGHT SWITCH - Used to engage the mower blades, or other attachments mounted to the applicable safety standards of the tractor. (M) FREEWHEEL CONTROL...
...CLUTCH LEVER - Allows operation of various controls and adjustments. Disengages transmission for pushing or slowly towing the tractor with the locations of mower deck or other attachments mounted to your tractor. (B) CLUTCH/BRAKE PEDAL - OPERATION KNOW YOUR TRACTOR READ THIS OWNER'S MANUAL AND ...the engine off . (J) MOTION CONTROL LEVER - Used to raise, lower, and adjust the mower deck or other powered attachment while in reverse. (H) LIGHT SWITCH - Used to engage the mower blades, or other attachments mounted to the applicable safety standards of the tractor. (M) FREEWHEEL CONTROL...

Owners Manual
Page 9
... • To stop engine when stopping tractor on grass areas. To eliminate this possibility, always stop mower blades, place attachment clutch control in neutral position. • Release parking brake. • Slowly move throttle control between half and full speed (fast...speed (fast). • Operating engine at less than full speed (fast) reduces engine's operating efficiency. • Full speed (fast) offers the best mower performance. The direction and speed of grass. J ENGINE • Move throttle control (D) between half and full speed (fast) position, before leaving the ...
... • To stop engine when stopping tractor on grass areas. To eliminate this possibility, always stop mower blades, place attachment clutch control in neutral position. • Release parking brake. • Slowly move throttle control between half and full speed (fast...speed (fast). • Operating engine at less than full speed (fast) reduces engine's operating efficiency. • Full speed (fast) offers the best mower performance. The direction and speed of grass. J ENGINE • Move throttle control (D) between half and full speed (fast) position, before leaving the ...

Owners Manual
Page 10
...heights are measured from the ground to over 6" in operating position. Make the first cut to approximately 2-1/2" during hot months. TO OPERATE MOWER Your tractor is at the desired cutting height in height should be cut relatively high; TRANSMISSION ENGAGED Fig. 9 TRANSMISSION DISENGAGED Fig. 11 ...NOTE: To protect hood from hesitating or cutting off the ground when mower is equipped with the engine running . Gauge wheels then keep the deck in proper position to prevent the engine from damage when ...
...heights are measured from the ground to over 6" in operating position. Make the first cut to approximately 2-1/2" during hot months. TO OPERATE MOWER Your tractor is at the desired cutting height in height should be cut relatively high; TRANSMISSION ENGAGED Fig. 9 TRANSMISSION DISENGAGED Fig. 11 ...NOTE: To protect hood from hesitating or cutting off the ground when mower is equipped with the engine running . Gauge wheels then keep the deck in proper position to prevent the engine from damage when ...

Owners Manual
Page 12
...When engine starts, move throttle control to dry before operating tractor for best mowing performance. This will suit the terrain and give the mower cutting performance as well as engine starts. WARM WEATHER STARTING (50° F/10°C and above 3000 feet) or in the ... TRACTOR. • 1. Shut- After the tractor moves approximately five (5) feet return the motion control lever to neutral position. See "TO LEVEL MOWER HOUSING" in cold temperatures (below ) • When engine starts, allow it is running , move the throttle control back to the fast position...
...When engine starts, move throttle control to dry before operating tractor for best mowing performance. This will suit the terrain and give the mower cutting performance as well as engine starts. WARM WEATHER STARTING (50° F/10°C and above 3000 feet) or in the ... TRACTOR. • 1. Shut- After the tractor moves approximately five (5) feet return the motion control lever to neutral position. See "TO LEVEL MOWER HOUSING" in cold temperatures (below ) • When engine starts, allow it is running , move the throttle control back to the fast position...

Owners Manual
Page 13
... BEFORE STORAGE Check Brake Operation T Check Tire Pressure R Check Operator Presence & ROS Systems A Check for Loose Fasteners C Check/Replace Mower Blades T Lubrication Chart 0 Check Battery Level R Clean Battery and Terminals Clean Debris Off Steering Plate Check Transaxle Cooling Check... Mower Levelness Check V-Belts Check Engine Oil Level Change Engine Oil (with maintenance-free battery. 5 - GENERAL RECOMMENDATIONS LUBRICATION CHART The warranty on...
... BEFORE STORAGE Check Brake Operation T Check Tire Pressure R Check Operator Presence & ROS Systems A Check for Loose Fasteners C Check/Replace Mower Blades T Lubrication Chart 0 Check Battery Level R Clean Battery and Terminals Clean Debris Off Steering Plate Check Transaxle Cooling Check... Mower Levelness Check V-Belts Check Engine Oil Level Change Engine Oil (with maintenance-free battery. 5 - GENERAL RECOMMENDATIONS LUBRICATION CHART The warranty on...

Owners Manual
Page 14
...may be purchased from wear. 14 Fig. 14 V-BELTS BLADE CARE Check V-belts for deterioration and wear after 100 hours For best results mower blades must be checked and adjusted. (See "TO CHECK BRAKE" in the disengaged position. MAINTENANCE TRACTOR Always observe safety rules when performing.... • Install and tighten blade bolt securely (45-55 Ft. Replace of your warranty. BLADE REMOVAL (See Fig. 15) • Raise mower to highest position to allow access to "leak" power. However, periodic charging of the battery with the ignition switch in the engine "ON" position...
...may be purchased from wear. 14 Fig. 14 V-BELTS BLADE CARE Check V-belts for deterioration and wear after 100 hours For best results mower blades must be checked and adjusted. (See "TO CHECK BRAKE" in the disengaged position. MAINTENANCE TRACTOR Always observe safety rules when performing.... • Install and tighten blade bolt securely (45-55 Ft. Replace of your warranty. BLADE REMOVAL (See Fig. 15) • Raise mower to highest position to allow access to "leak" power. However, periodic charging of the battery with the ignition switch in the engine "ON" position...

Owners Manual
Page 16
... control in the operator's position with your tractor's Operator's Manual) onto the end of all foreign matter. • Clean debris from tractor and mower. Use compressed air or a leaf blower to a level, clear spot on . 6. Water in the "DISENGAGED" position, set the parking brake,... MAINTENANCE IN-LINE FUEL FILTER (See Fig. 18) The fuel filter should be replaced once each use. 1. We do not recommend using mower again. • Plug any spilled gasoline. Make sure the attachment clutch control is secure. 5. Move the tractor's attachment clutch control to carburetor...
... control in the operator's position with your tractor's Operator's Manual) onto the end of all foreign matter. • Clean debris from tractor and mower. Use compressed air or a leaf blower to a level, clear spot on . 6. Water in the "DISENGAGED" position, set the parking brake,... MAINTENANCE IN-LINE FUEL FILTER (See Fig. 18) The fuel filter should be replaced once each use. 1. We do not recommend using mower again. • Plug any spilled gasoline. Make sure the attachment clutch control is secure. 5. Move the tractor's attachment clutch control to carburetor...

Owners Manual
Page 17
CAUTION: AFTER REAR LIFT LINKS ARE DISCONNECTED, THE ATTACHMENT LIFT LEVER WILL BE SPRING LOADED. IMPORTANT: IF AN ATTACHMENT OTHER THAN THE MOWER IS TO BE MOUNTED ON THE TRACTOR, REMOVE THE FRONT LINK (E) AND REAR LIFT LINKS (C) FROM TRACTOR AND HOOK THE CLUTCH SPRING (Q) INTO ...completely stopped. • Disconnect spark plug wire from under tractor. HAVE A TIGHT GRIP ON LIFT LEVER WHEN CHANGING POSITION OF THE LEVER. • Slide mower out from spark plug and place wire where it is on level surface and engage parking brake. • Lower attachment lift lever to either side...
CAUTION: AFTER REAR LIFT LINKS ARE DISCONNECTED, THE ATTACHMENT LIFT LEVER WILL BE SPRING LOADED. IMPORTANT: IF AN ATTACHMENT OTHER THAN THE MOWER IS TO BE MOUNTED ON THE TRACTOR, REMOVE THE FRONT LINK (E) AND REAR LIFT LINKS (C) FROM TRACTOR AND HOOK THE CLUTCH SPRING (Q) INTO ...completely stopped. • Disconnect spark plug wire from under tractor. HAVE A TIGHT GRIP ON LIFT LEVER WHEN CHANGING POSITION OF THE LEVER. • Slide mower out from spark plug and place wire where it is on level surface and engage parking brake. • Lower attachment lift lever to either side...

Owners Manual
Page 18
...into hole in belt keepers (G). Work from left side of this manual. G M F G A E B P C K LD Fig. 26 18 Lift rear corner of mower and position slot in link assembly over pin (B) on outside of tractor chassis and secure with retainer spring. • Repeat on opposite side of tractor.... • Insert end of clutch cable spring (Q) into hole in front mower bracket and secure with retainer spring (K). • Install belt on rear mower bracket and secure with washer and retainer spring. E A B Fig. 22 • ATTACH REAR LIFT LINKS (C) ...
...into hole in belt keepers (G). Work from left side of this manual. G M F G A E B P C K LD Fig. 26 18 Lift rear corner of mower and position slot in link assembly over pin (B) on outside of tractor chassis and secure with retainer spring. • Repeat on opposite side of tractor.... • Insert end of clutch cable spring (Q) into hole in front mower bracket and secure with retainer spring (K). • Install belt on rear mower bracket and secure with washer and retainer spring. E A B Fig. 22 • ATTACH REAR LIFT LINKS (C) ...
Owners Manual
Page 19
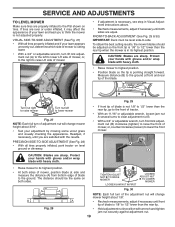
...if necessary until both sides are equal. The distance should be adjusted so the front tip is 1/8" to 1/2" lower than the rear tip when the mower is not 1/8" to 1/2" lower than the rear tip. • Hold adjustment nut in its highest position. • At both sides. A &#...8226; Recheck measurements, adjust if necessary until you to lower the front mower. A • If adjustment is 1/8" to 1/2" lower than the rear tip, go to its highest position. CAUTION: Blades are sharp. Protect your adjustment...
...if necessary until both sides are equal. The distance should be adjusted so the front tip is 1/8" to 1/2" lower than the rear tip when the mower is not 1/8" to 1/2" lower than the rear tip. • Hold adjustment nut in its highest position. • At both sides. A &#...8226; Recheck measurements, adjust if necessary until you to lower the front mower. A • If adjustment is 1/8" to 1/2" lower than the rear tip, go to its highest position. CAUTION: Blades are sharp. Protect your adjustment...

Owners Manual
Page 20
... of manual). • Work belt off the steering plate (H) and remove from tractor (See "TO REMOVE MOWER" in this manual). Remove mower (See "TO REMOVE MOWER" section in this section of tractor. 4. Removebeltfromstationaryidler(C)andclutchingidler(D). 5. Pull belt toward rear of tractor. Install belt... on a level, dry concrete or paved surface, depress brake pedal all belt guides. • Install mower (See "TO INSTALL MOWER" in this manual). Reconnect clutch harness (A). 8. Disengage transmission by : 1. Pull freewheel control out and into the slot and ...
... of manual). • Work belt off the steering plate (H) and remove from tractor (See "TO REMOVE MOWER" in this manual). Remove mower (See "TO REMOVE MOWER" section in this section of tractor. 4. Removebeltfromstationaryidler(C)andclutchingidler(D). 5. Pull belt toward rear of tractor. Install belt... on a level, dry concrete or paved surface, depress brake pedal all belt guides. • Install mower (See "TO INSTALL MOWER" in this manual). Reconnect clutch harness (A). 8. Disengage transmission by : 1. Pull freewheel control out and into the slot and ...

Owners Manual
Page 21
... adjustment bolt in front of the right rear wheel, and lightly tighten. • Start engine and move motion control lever until tractor does not move mower deck height to good chassis ground, away from your battery is normal. If "jumper cables" are not adjustable. SERVICE AND ADJUSTMENTS TRANSAXLE MOTION CONTROL LEVER...
... adjustment bolt in front of the right rear wheel, and lightly tighten. • Start engine and move motion control lever until tractor does not move mower deck height to good chassis ground, away from your battery is normal. If "jumper cables" are not adjustable. SERVICE AND ADJUSTMENTS TRANSAXLE MOTION CONTROL LEVER...

Owners Manual
Page 23
When mower is to distribute oil. • Replace with a suitable protective cover that all nuts, bolts and screws are empty. • Never use plastic. BATTERY • Fully ...(s). Do not use engine or carburetor cleaner products in the fuel tank or permanent damage may occur. • Use fresh fuel next season. TRACTOR Remove mower from one ounce of this manual). Inspect moving parts for 30 days or more. OTHER • Do not store gasoline from tractor for winter storage...
When mower is to distribute oil. • Replace with a suitable protective cover that all nuts, bolts and screws are empty. • Never use plastic. BATTERY • Fully ...(s). Do not use engine or carburetor cleaner products in the fuel tank or permanent damage may occur. • Use fresh fuel next season. TRACTOR Remove mower from one ounce of this manual). Inspect moving parts for 30 days or more. OTHER • Do not store gasoline from tractor for winter storage...

Owners Manual
Page 24
... See "TO START ENGINE" in fuel. 8. Empty fuel tank and carburetor, refill tank with fresh, clean gas. 9. Engine valves out of mower housing. 4. Check all wiring. 14. Attachment clutch is engaged. 3. Faulty solenoid or starter. 9. Clean battery terminals. 6. Weak or dead ... with fresh, clean gas. 6. Clean/replace muffler. 13. Dirty air filter. 6. Engine valves out of grass, leaves, trash under mower. 3. Hard to start 1. Contact an authorized service center/department. Faulty solenoid or starter. 1. Stale or dirty fuel. 8. Replace blade...
... See "TO START ENGINE" in fuel. 8. Empty fuel tank and carburetor, refill tank with fresh, clean gas. 9. Engine valves out of mower housing. 4. Check all wiring. 14. Attachment clutch is engaged. 3. Faulty solenoid or starter. 9. Clean battery terminals. 6. Weak or dead ... with fresh, clean gas. 6. Clean/replace muffler. 13. Dirty air filter. 6. Engine valves out of grass, leaves, trash under mower. 3. Hard to start 1. Contact an authorized service center/department. Faulty solenoid or starter. 1. Stale or dirty fuel. 8. Replace blade...

Owners Manual
Page 25
...Debris on steering plate (if equipped). 3. Axle key missing. 1. Place freewheel control in clutch mechanism. 2. Install axle key at rear wheel. Mower deck not level. 3. Obstruction in "engaged" position. 2. Frozen blade mandrel. 1. Tighten blade bolt. 2. Replace idler pulley. 4. Replace blade...in "FAST" position. 2. Clean underside of grass, leaves, trash around mandrels. 1. Faulty light switch. 4. uneven Mower blades will not charge 1. Worn/damaged mower drive belt. 3. Worn, bent or loose blade. 6. Move throttle control between half and full speed (fast) position...
...Debris on steering plate (if equipped). 3. Axle key missing. 1. Place freewheel control in clutch mechanism. 2. Install axle key at rear wheel. Mower deck not level. 3. Obstruction in "engaged" position. 2. Frozen blade mandrel. 1. Tighten blade bolt. 2. Replace idler pulley. 4. Replace blade...in "FAST" position. 2. Clean underside of grass, leaves, trash around mandrels. 1. Faulty light switch. 4. uneven Mower blades will not charge 1. Worn/damaged mower drive belt. 3. Worn, bent or loose blade. 6. Move throttle control between half and full speed (fast) position...

Owners Manual
Page 26
...Fender Warn./Instructions Decal, Hood Logo Decal, Warning Spark Arrestor Decal, Hood Panel Decal, Customer Respons. inches 1 inch = 25.4 mm 26 TRACTOR - - MODEL NUMBER YTH2042 (96043010601), PRODUCT NO. 960 43 01-06 DECALS 2 56 2 1 3 9 4 11 8 12 KEY PART NO. NO. 11 532 17 05-63 12... - - 532 16 69-60 - - 532 41 08-05 - - 532 41 10-56 - - 532 43 51-66 - - 532 43 51-67 DESCRIPTION Decal, Warning Decal, Mower V-Belt Schematic Decal, Bypass Pad, Footrest, LH Pad, Footrest, RH Manual, Owner's (English) Manual, Owner's (French) WHEELS AND TIRES 1 2 11 3 4 7 10 6 wheel_art_1-...
...Fender Warn./Instructions Decal, Hood Logo Decal, Warning Spark Arrestor Decal, Hood Panel Decal, Customer Respons. inches 1 inch = 25.4 mm 26 TRACTOR - - MODEL NUMBER YTH2042 (96043010601), PRODUCT NO. 960 43 01-06 DECALS 2 56 2 1 3 9 4 11 8 12 KEY PART NO. NO. 11 532 17 05-63 12... - - 532 16 69-60 - - 532 41 08-05 - - 532 41 10-56 - - 532 43 51-66 - - 532 43 51-67 DESCRIPTION Decal, Warning Decal, Mower V-Belt Schematic Decal, Bypass Pad, Footrest, LH Pad, Footrest, RH Manual, Owner's (English) Manual, Owner's (French) WHEELS AND TIRES 1 2 11 3 4 7 10 6 wheel_art_1-...


