Instruction Manual
Page 2
...INSTRUCTION MANUAL- and the logo are registered trademarks of your time to thank you for making your IC-V8000 your IC-V8000. many, France, Spain, Russia and/or other countries. With proper care, this Icom product. D FEATURES ❍ 75 W* of personal injury, fire or electric shock....❍ Tone squelch, DTCS squelch standard ❍ Dual color (amber & green) LCD backlight ❍ Remote control microphone available (optional for some versions) ❍ Optional DTMF decoder i IMPORTANT READ ALL INSTRUCTIONS carefully and completely before using the transceiver.
...INSTRUCTION MANUAL- and the logo are registered trademarks of your time to thank you for making your IC-V8000 your IC-V8000. many, France, Spain, Russia and/or other countries. With proper care, this Icom product. D FEATURES ❍ 75 W* of personal injury, fire or electric shock....❍ Tone squelch, DTCS squelch standard ❍ Dual color (amber & green) LCD backlight ❍ Remote control microphone available (optional for some versions) ❍ Optional DTMF decoder i IMPORTANT READ ALL INSTRUCTIONS carefully and completely before using the transceiver.

Instruction Manual
Page 3
... operate the transceiver while dri- NEVER operate or touch the transceiver with temperatures below -10°C (+14˚F) or above +60°C (+140˚F). USE Icom microphones only (supplied or optional). Extreme caution should be hindered or where it continuously for Human Radio frequency Electromagnetic Fields (OET Bulletin 65) RWARNING! NEVER connect... less may damage the transceiver if attached. This will ruin the transceiver. When the transceiver's power is OFF, the vehicle's battery will become exhausted. ufacturer's microphones have any liquids.
... operate the transceiver while dri- NEVER operate or touch the transceiver with temperatures below -10°C (+14˚F) or above +60°C (+140˚F). USE Icom microphones only (supplied or optional). Extreme caution should be hindered or where it continuously for Human Radio frequency Electromagnetic Fields (OET Bulletin 65) RWARNING! NEVER connect... less may damage the transceiver if attached. This will ruin the transceiver. When the transceiver's power is OFF, the vehicle's battery will become exhausted. ufacturer's microphones have any liquids.
Instruction Manual
Page 4
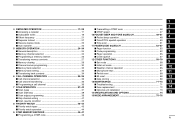
...64257;rst contact IV Repeater operation V Programming memory VI 1 PANEL DESCRIPTION 1-8 Front panel 1 Function display 3 Rear panel 5 Microphone (HM-133V 6 Microphone keypad 7 2 SETTING A FREQUENCY 9-12 Preparation 9 Using the tuning dial 9 Using the keypad 10 Using the [Y]/[Z] keys ... w t y e r q DC power cable (3 m 1 w Mobile mounting bracket 1 e Microphone (HM-133V 1 r Fuse (20 A 1 t Mounting screws, nuts and washers 1 set y Microphone hanger 1 *HM-118N HAND MICROPHONE or HM-118TN/TAN DTMF MICROPHONE supplied versions are also available. †Depending on version.
...64257;rst contact IV Repeater operation V Programming memory VI 1 PANEL DESCRIPTION 1-8 Front panel 1 Function display 3 Rear panel 5 Microphone (HM-133V 6 Microphone keypad 7 2 SETTING A FREQUENCY 9-12 Preparation 9 Using the tuning dial 9 Using the keypad 10 Using the [Y]/[Z] keys ... w t y e r q DC power cable (3 m 1 w Mobile mounting bracket 1 e Microphone (HM-133V 1 r Fuse (20 A 1 t Mounting screws, nuts and washers 1 set y Microphone hanger 1 *HM-118N HAND MICROPHONE or HM-118TN/TAN DTMF MICROPHONE supplied versions are also available. †Depending on version.
Instruction Manual
Page 5
... programming 52 7 Pager operation 55 Code squelch 57 8 12 OTHER FUNCTIONS 58-70 Set mode 58 9 Initial set mode 62 Weather channel operation 65 10 Microphone keys 67 11 Partial reset 68 All reset 68 12 Data cloning 69 13 MAINTENANCE 71-73 13 Troubleshooting 71 Fuse replacement 72 14 Optional...
... programming 52 7 Pager operation 55 Code squelch 57 8 12 OTHER FUNCTIONS 58-70 Set mode 58 9 Initial set mode 62 Weather channel operation 65 10 Microphone keys 67 11 Partial reset 68 All reset 68 12 Data cloning 69 13 MAINTENANCE 71-73 13 Troubleshooting 71 Fuse replacement 72 14 Optional...
Instruction Manual
Page 8
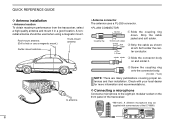
Strip the cable jacket and soft solder. A different microphone may be used when using a magnetic mount. Roof-mount antenna (Drill a hole or use a magnetic mount.) Trunk...8260;8 in a good location. Check with some versions of the transceiver. *HM-133V; Soft solder the center conductor. D Connecting a microphone Connect a microphone to the eight-pin modular socket on and solder it in ) NOTE: There are many publications covering proper antennas and their installation. QUICK ... as shown at left. III solder solder e Slide the connector body on the front panel of the IC-V8000.
Strip the cable jacket and soft solder. A different microphone may be used when using a magnetic mount. Roof-mount antenna (Drill a hole or use a magnetic mount.) Trunk...8260;8 in a good location. Check with some versions of the transceiver. *HM-133V; Soft solder the center conductor. D Connecting a microphone Connect a microphone to the eight-pin modular socket on and solder it in ) NOTE: There are many publications covering proper antennas and their installation. QUICK ... as shown at left. III solder solder e Slide the connector body on the front panel of the IC-V8000.

Instruction Manual
Page 12
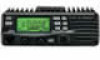
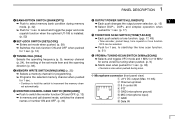
... SET LOCK LOW DUP MONI ANM MW S.MW e BANK OPT r t yu i o Speaker q POWER SWITCH [PWR] Turns power ON and OFF when pushed for 1 sec. (p. 44) 1 e MICROPHONE CONNECTOR Connects the supplied...
... SET LOCK LOW DUP MONI ANM MW S.MW e BANK OPT r t yu i o Speaker q POWER SWITCH [PWR] Turns power ON and OFF when pushed for 1 sec. (p. 44) 1 e MICROPHONE CONNECTOR Connects the supplied...
Instruction Manual
Page 13
... for 1 sec. (p. 38) • Cancels a scan when pushed during memory mode. (p. 32) ➥ Push for 1 sec. D Microphone connector (front panel view) q +8 V DC output (Max. 10 mA) w Channel up/down e 8 V control IN q i r PTT t GND (microphone ground) y MIC (microphone input) u GND i Data IN 2 to switch the monitor function ON and OFF. (p. 13) ➥ In memory...
... for 1 sec. (p. 38) • Cancels a scan when pushed during memory mode. (p. 32) ➥ Push for 1 sec. D Microphone connector (front panel view) q +8 V DC output (Max. 10 mA) w Channel up/down e 8 V control IN q i r PTT t GND (microphone ground) y MIC (microphone input) u GND i Data IN 2 to switch the monitor function ON and OFF. (p. 13) ➥ In memory...

Instruction Manual
Page 14
.... (p. 45) 3 r BUSY INDICATOR (p. 13) ➥ Appears when a signal is being received or the squelch is open. ➥ Flashes while the monitor function is activated via microphone control.
.... (p. 45) 3 r BUSY INDICATOR (p. 13) ➥ Appears when a signal is being received or the squelch is open. ➥ Flashes while the monitor function is activated via microphone control.
Instruction Manual
Page 17
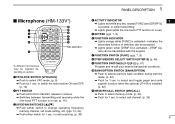
...-133V*) !1 q !0 w o e i u r y Mic element t *A different microphone may be accessed. ➥ Lights green when [DTMF-S] is in use . (p. 16) e UP/DOWN SWITCHES [Y]/[Z] ➥ Push either switch to transmit; release to receive. ➥ ...
...-133V*) !1 q !0 w o e i u r y Mic element t *A different microphone may be accessed. ➥ Lights green when [DTMF-S] is in use . (p. 16) e UP/DOWN SWITCHES [Y]/[Z] ➥ Push either switch to transmit; release to receive. ➥ ...

Instruction Manual
Page 18
... the appropriate (p. 15) Turns the DTCS pocket beep function ON. Selects mid. Selects low output power Selects minus duplex operation. Selects simplex operation. 1 PANEL DESCRIPTION Microphone keypad KEY FUNCTION SECONDARY FUNCTION ( +key) Switches between opening and closing the In memory mode switches the channel names squelch. (p. 13) or number indication ON...
... the appropriate (p. 15) Turns the DTCS pocket beep function ON. Selects mid. Selects low output power Selects minus duplex operation. Selects simplex operation. 1 PANEL DESCRIPTION Microphone keypad KEY FUNCTION SECONDARY FUNCTION ( +key) Switches between opening and closing the In memory mode switches the channel names squelch. (p. 13) or number indication ON...
Instruction Manual
Page 20
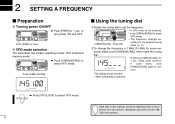
... 1sec. Push [PWR] for 1 sec. to the selected tuning steps. (p. 11) wTo change the frequency in this manual, sections beginning with a microphone icon (as above), designate operation via the HM133V microphone. If scan starts, push [V/MHz(SCAN)] again to select VFO mode. cel it. D VFO mode selection The transceiver has 2 basic operating...
... 1sec. Push [PWR] for 1 sec. to the selected tuning steps. (p. 11) wTo change the frequency in this manual, sections beginning with a microphone icon (as above), designate operation via the HM133V microphone. If scan starts, push [V/MHz(SCAN)] again to select VFO mode. cel it. D VFO mode selection The transceiver has 2 basic operating...

Instruction Manual
Page 22
... [Y] or [Z] to enter set mode. The following tuning steps are the minimum frequency change increments when you rotate the tuning dial or push [Y]/[Z] on the microphone. z Push [VFO/LOCK] to select VFO mode, if necessary. e Push [SET(LOCK)] or [MW(S.MW)] several times until "TS" appears as shown at left. 2 SETTING...
... [Y] or [Z] to enter set mode. The following tuning steps are the minimum frequency change increments when you rotate the tuning dial or push [Y]/[Z] on the microphone. z Push [VFO/LOCK] to select VFO mode, if necessary. e Push [SET(LOCK)] or [MW(S.MW)] several times until "TS" appears as shown at left. 2 SETTING...
Instruction Manual
Page 23
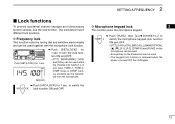
...[FUNC] then [SQLZ D(16KEY-L)] to turn the lock function ON and OFF. • [PTT], [MONI(ANM)], [VOL] and [SQL] can be transmitted from the microphone. ➥ Push [VFO/LOCK] for 1 sec. SETTING A FREQUENCY 2 Lock functions To prevent accidental channel changes and unnecessary function access, use . D Frequency lock This ... is turned OFF then ON again. 12 Also, TONE-1, TONE-2, DTMF tones or DTMF memory contents can be used together with the microphone lock function. Push [SET(LOCK)] for 1 sec. to switch the VFO/LOCK lock function ON and OFF. The transceiver has 2 different lock...
...[FUNC] then [SQLZ D(16KEY-L)] to turn the lock function ON and OFF. • [PTT], [MONI(ANM)], [VOL] and [SQL] can be transmitted from the microphone. ➥ Push [VFO/LOCK] for 1 sec. SETTING A FREQUENCY 2 Lock functions To prevent accidental channel changes and unnecessary function access, use . D Frequency lock This ... is turned OFF then ON again. 12 Also, TONE-1, TONE-2, DTMF tones or DTMF memory contents can be used together with the microphone lock function. Push [SET(LOCK)] for 1 sec. to switch the VFO/LOCK lock function ON and OFF. The transceiver has 2 different lock...

Instruction Manual
Page 25
... The transceiver has an RF attenuator related to 10 dB (approx.) between 12 o'clock and fully clockwise position. • When setting the squelch from the microphone, a level greater than '19' activates the squelch attenuator. Noise squelch Squelch threshold Squelch is obtained at maximum setting. 3 ➥ Rotate [SQL] clockwise past the 12...
... The transceiver has an RF attenuator related to 10 dB (approx.) between 12 o'clock and fully clockwise position. • When setting the squelch from the microphone, a level greater than '19' activates the squelch attenuator. Noise squelch Squelch threshold Squelch is obtained at maximum setting. 3 ➥ Rotate [SQL] clockwise past the 12...
Instruction Manual
Page 26
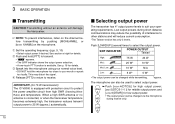
... close to your mouth or speak too loudly. e Speak into the microphone using your operating requirements. r Release [PTT] to return to select the output power. IMPORTANT! (for 75 W transmission): The IC-V8000 is connected, or when the transceiver temperature becomes extremely high, the transceiver reduces transmit ...transmitting. *approx. NOTE: To prevent interference, listen on the channel before transmitting by pushing [MONI(ANM)], or [MONI 1(ANM)] on the microphone. See section at right for low output power. • The output power can be used to transmit. • "$" appears. • ...
... close to your mouth or speak too loudly. e Speak into the microphone using your operating requirements. r Release [PTT] to return to select the output power. IMPORTANT! (for 75 W transmission): The IC-V8000 is connected, or when the transceiver temperature becomes extremely high, the transceiver reduces transmit ...transmitting. *approx. NOTE: To prevent interference, listen on the channel before transmitting by pushing [MONI(ANM)], or [MONI 1(ANM)] on the microphone. See section at right for low output power. • The output power can be used to transmit. • "$" appears. • ...
Instruction Manual
Page 31
See p. 45 for ring tone when calling, etc. Push , then push desired keys. z Push [FUNC]. D 1750 Hz tone The microphone has 1750 Hz tone capability, used for details. TONE-1 • The function indicator lights orange. 4 x Push [M(TONE-1)] to transmit a 1750 Hz tone TONE-2 call signal ...
See p. 45 for ring tone when calling, etc. Push , then push desired keys. z Push [FUNC]. D 1750 Hz tone The microphone has 1750 Hz tone capability, used for details. TONE-1 • The function indicator lights orange. 4 x Push [M(TONE-1)] to transmit a 1750 Hz tone TONE-2 call signal ...
Instruction Manual
Page 37
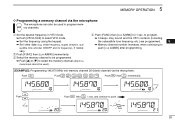
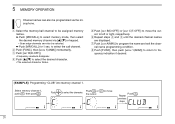
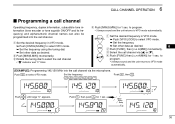
...to select VFO mode. ➥ Set the frequency using the keypad. ➥ Set other data (e.g. MEMORY OPERATION 5 D Programming a memory channel via the microphone. sary. to program. ➥ 3 beeps may sound and the VFO contents (including the subaudible tone frequency, etc.) are programmed. 5 ➥ Memory ...used to push [CLR A(MW)] after programming. [EXAMPLE]: Programming 145.870 MHz into memory channel 20 (blank channel) via the microphone The microphone can also be used ). z Set the desired frequency in VFO mode. ➥ Push [VFO/LOCK] to push " " Beep " Beep "...
...to select VFO mode. ➥ Set the frequency using the keypad. ➥ Set other data (e.g. MEMORY OPERATION 5 D Programming a memory channel via the microphone. sary. to program. ➥ 3 beeps may sound and the VFO contents (including the subaudible tone frequency, etc.) are programmed. 5 ➥ Memory ...used to push [CLR A(MW)] after programming. [EXAMPLE]: Programming 145.870 MHz into memory channel 20 (blank channel) via the microphone The microphone can also be used ). z Set the desired frequency in VFO mode. ➥ Push [VFO/LOCK] to push " " Beep " Beep "...
Instruction Manual
Page 42
... be assigned memory names. ➥ Push [MR/CALL] to select the call channel. to select memory mode, then select the desired memory channel via the microphone. b Push [SET B(D-OFF)] or [ENT C(T-OFF)] to move Push .
... be assigned memory names. ➥ Push [MR/CALL] to select the call channel. to select memory mode, then select the desired memory channel via the microphone. b Push [SET B(D-OFF)] or [ENT C(T-OFF)] to move Push .
Instruction Manual
Page 47
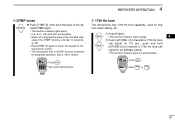
.... q Set the desired frequency in VFO mode. z Set the desired frequency in VFO mode. ➥ Push [V/MHz(SCAN)] to select the call channel via the microphone. MW x Push [FUNC], then [CLR A(MW)] momentarily. 6 c Select the call channel • "M" indicator and "C" blink. to program. • 3 beeps sound and the unit returns to...
.... q Set the desired frequency in VFO mode. z Set the desired frequency in VFO mode. ➥ Push [V/MHz(SCAN)] to select the call channel via the microphone. MW x Push [FUNC], then [CLR A(MW)] momentarily. 6 c Select the call channel • "M" indicator and "C" blink. to program. • 3 beeps sound and the unit returns to...
Instruction Manual
Page 51
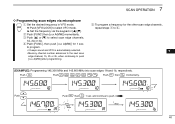
... edge channels, 1A, 2A or 3A. Push Push then " " Beep " Beep " Beep " ➠ 1 sec. and continue to select VFO mode. ➥ Set the frequency via microphone z Set the desired frequency in VFO mode. Push Push Push then momentarily. SCAN OPERATION 7 D Programming scan edges via the keypad or [Y]/[Z]. MW ➥ Push [VFO...
... edge channels, 1A, 2A or 3A. Push Push then " " Beep " Beep " Beep " ➠ 1 sec. and continue to select VFO mode. ➥ Set the frequency via microphone z Set the desired frequency in VFO mode. Push Push Push then momentarily. SCAN OPERATION 7 D Programming scan edges via the keypad or [Y]/[Z]. MW ➥ Push [VFO...