
User Manual English
Page 2
...new standard in Smart TVs 5 Get the most out of your new TV 5 Installing the stand(s) or wall-mount bracket 7 Installing the stand(s 7 24" model 7 32" model 8 48" model 9 Installing a wall-mount bracket 11 TV components 14 Package contents 14 Front features 14 Side jacks 15 Back jacks 17 Remote control 19 What... connection should I use 21 Connecting a cable or satellite box 22 HDMI (best 22 24" or 32" model 22 48"model 23 AV (good 24 24" or 32" model 24 48" model 25 Coaxial (good 26 24" or 32" model 26 48" model 27 Connecting an antenna or cable TV (no box 28 24" or 32...
...new standard in Smart TVs 5 Get the most out of your new TV 5 Installing the stand(s) or wall-mount bracket 7 Installing the stand(s 7 24" model 7 32" model 8 48" model 9 Installing a wall-mount bracket 11 TV components 14 Package contents 14 Front features 14 Side jacks 15 Back jacks 17 Remote control 19 What... connection should I use 21 Connecting a cable or satellite box 22 HDMI (best 22 24" or 32" model 22 48"model 23 AV (good 24 24" or 32" model 24 48" model 25 Coaxial (good 26 24" or 32" model 26 48" model 27 Connecting an antenna or cable TV (no box 28 24" or 32...
User Manual English
Page 3
...24" or 32" model 34 48" model 35 AV (good 36 24" or 32" model 36 48" model 37 Connecting a computer 38 24" or 32" model 38 48" model 39 Connecting a USB flash drive 40 24" or 32" model 40 48" model 41 Connecting headphones 42 24" or 32" model 42 48" model 43 Connecting external speakers... or a sound bar 44 Digital optical audio jack 44 24" or 32" model 44 48" model 45 ARC jack 46 24" or 32" model 46 48" model 47 Connecting a home theater system with multiple devices 48 Connecting power 49 Installing remote control batteries 50 Aiming the ...
...24" or 32" model 34 48" model 35 AV (good 36 24" or 32" model 36 48" model 37 Connecting a computer 38 24" or 32" model 38 48" model 39 Connecting a USB flash drive 40 24" or 32" model 40 48" model 41 Connecting headphones 42 24" or 32" model 42 48" model 43 Connecting external speakers... or a sound bar 44 Digital optical audio jack 44 24" or 32" model 44 48" model 45 ARC jack 46 24" or 32" model 46 48" model 47 Connecting a home theater system with multiple devices 48 Connecting power 49 Installing remote control batteries 50 Aiming the ...
User Manual English
Page 5
... settings 79 Auto power off settings 79 Configure parental controls 79 Creating a parental control PIN 79 Blocking Movie Store, TV Store, and News (US TV models only 80 Blocking Broadcast TV shows 80 What happens when a TV show is blocked 82 Changing the parental control PIN 83 Resetting parental controls 83...
... settings 79 Auto power off settings 79 Configure parental controls 79 Creating a parental control PIN 79 Blocking Movie Store, TV Store, and News (US TV models only 80 Blocking Broadcast TV shows 80 What happens when a TV show is blocked 82 Changing the parental control PIN 83 Resetting parental controls 83...
User Manual English
Page 6
Contents Troubleshooting 92 FAQ 92 Video and audio 92 Remote control 95 General 96 Roku 97 Network 97 CEC-compatible devices 98 Specifications 100 24" model 100 32" model 101 48" model 102 Legal notices 103 One-year limited warranty - Insignia Televisions 107 vi www.insigniaproducts.com
Contents Troubleshooting 92 FAQ 92 Video and audio 92 Remote control 95 General 96 Roku 97 Network 97 CEC-compatible devices 98 Specifications 100 24" model 100 32" model 101 48" model 102 Legal notices 103 One-year limited warranty - Insignia Televisions 107 vi www.insigniaproducts.com
User Manual English
Page 13
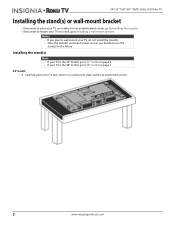
... surface to protect the screen. 7 www.insigniaproducts.com Installing the stand(s) Note • If your TV is the 32" model, go to 32" model on page 8. • If your TV is the 48" model, go to use the stand(s) in case you decide to Installing a wall-mount bracket. 24"/32" 720P, 48" 1080P... on a table or in an entertainment center, go to Installing the stand(s). • If you want to mount your TV on a wall, go to 48" model on page 9. 24" model 1 Carefully place your TV, do not install the stand(s). • Store the stand(s) and stand screws in the future.
... surface to protect the screen. 7 www.insigniaproducts.com Installing the stand(s) Note • If your TV is the 32" model, go to 32" model on page 8. • If your TV is the 48" model, go to use the stand(s) in case you decide to Installing a wall-mount bracket. 24"/32" 720P, 48" 1080P... on a table or in an entertainment center, go to Installing the stand(s). • If you want to mount your TV on a wall, go to 48" model on page 9. 24" model 1 Carefully place your TV, do not install the stand(s). • Store the stand(s) and stand screws in the future.
User Manual English
Page 14
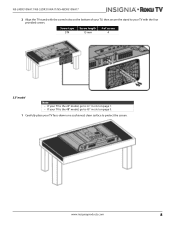
www.insigniaproducts.com 8 Screw type Screw length # of screws ST4 15 mm 4 32" model Note • If your TV is the 24" model, go to 24" model on page 7. • If your TV is the 48" model, go to 48" model on page 9. 1 Carefully place your TV with the screw holes on the bottom of your TV, then secure the stand to your TV face-down on a cushioned, clean surface to protect the screen. NS-24ER310NA17/NS-32DR310NA17/NS-48DR510NA17 2 Align the TV stand with the four provided screws.
www.insigniaproducts.com 8 Screw type Screw length # of screws ST4 15 mm 4 32" model Note • If your TV is the 24" model, go to 24" model on page 7. • If your TV is the 48" model, go to 48" model on page 9. 1 Carefully place your TV with the screw holes on the bottom of your TV, then secure the stand to your TV face-down on a cushioned, clean surface to protect the screen. NS-24ER310NA17/NS-32DR310NA17/NS-48DR510NA17 2 Align the TV stand with the four provided screws.
User Manual English
Page 15
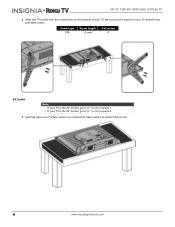
Screw type Screw length # of your TV with the screw holes on the bottom of screws ST4 15 mm 4 48" model Note • If your TV is the 24" model, go to 24" model on page 7. • If your TV is the 32" model, go to 32" model on page 8. 1 Carefully place your TV face-down on a cushioned, clean surface to your TV, then secure the stands to protect the screen. 9 www.insigniaproducts.com 24"/32" 720P, 48" 1080P, 60Hz, LED Roku TV 2 Align the TV stands with the four provided screws.
Screw type Screw length # of your TV with the screw holes on the bottom of screws ST4 15 mm 4 48" model Note • If your TV is the 24" model, go to 24" model on page 7. • If your TV is the 32" model, go to 32" model on page 8. 1 Carefully place your TV face-down on a cushioned, clean surface to your TV, then secure the stands to protect the screen. 9 www.insigniaproducts.com 24"/32" 720P, 48" 1080P, 60Hz, LED Roku TV 2 Align the TV stands with the four provided screws.
User Manual English
Page 17
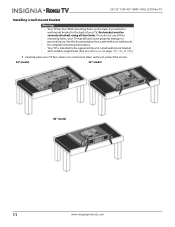
... by a UL Listed wall mount bracket with your wall mount for complete mounting instructions. • Your TV is intended to protect the screen. 24" model 32" model 48" model 11 www.insigniaproducts.com See the documentation that came with suitable weight/load. (See Miscellaneous on page 100, 101, or 102.) 1 Carefully place your...
... by a UL Listed wall mount bracket with your wall mount for complete mounting instructions. • Your TV is intended to protect the screen. 24" model 32" model 48" model 11 www.insigniaproducts.com See the documentation that came with suitable weight/load. (See Miscellaneous on page 100, 101, or 102.) 1 Carefully place your...
User Manual English
Page 18
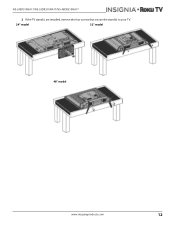
NS-24ER310NA17/NS-32DR310NA17/NS-48DR510NA17 2 If the TV stand(s) are installed, remove the four screws that secure the stand(s) to your TV. 24" model 32" model 48" model www.insigniaproducts.com 12
NS-24ER310NA17/NS-32DR310NA17/NS-48DR510NA17 2 If the TV stand(s) are installed, remove the four screws that secure the stand(s) to your TV. 24" model 32" model 48" model www.insigniaproducts.com 12
User Manual English
Page 19
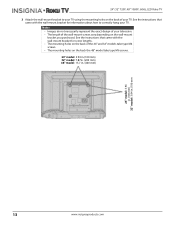
... lengths. • The mounting holes on the back of the 24" and 32" models take type M6 screws. 24" model: 3.94 in.(100 mm) 32" model: 7.87in. (200 mm) 48" model: 15.7 in. (400 mm) 24" model: 3.94 in.(100 mm) 32" model: 3.94 in.(100 mm 13 www.insigniaproducts.com See the instructions that came... using the mounting holes on the back of your television. • The length of the wall-mount screws vary depending on the back the 48" model take type M4 screws. • The mounting holes on the wall-mount bracket you purchased. 24"/32" 720P, 48" 1080P, 60Hz, LED Roku TV 3 Attach...
... lengths. • The mounting holes on the back of the 24" and 32" models take type M6 screws. 24" model: 3.94 in.(100 mm) 32" model: 7.87in. (200 mm) 48" model: 15.7 in. (400 mm) 24" model: 3.94 in.(100 mm) 32" model: 3.94 in.(100 mm 13 www.insigniaproducts.com See the instructions that came... using the mounting holes on the back of your television. • The length of the wall-mount screws vary depending on the back the 48" model take type M4 screws. • The mounting holes on the wall-mount bracket you purchased. 24"/32" 720P, 48" 1080P, 60Hz, LED Roku TV 3 Attach...

User Manual English
Page 20
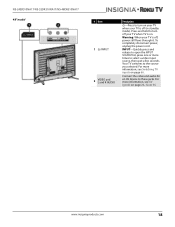
www.insigniaproducts.com 14 Do not block. See Status light on page 64. NS-24ER310NA17/NS-32DR310NA17/NS-48DR510NA17 TV components Your TV has built-in controls for adjusting basic settings and several sets of jacks for connecting devices to your TV. This ... (2 AAA) • TV stand(s) • 24" (1) • 32" or 48" (2) • Screws (4) • Power cord • Quick Setup Guide • Important Information Front features 24" model 32" or 48" model # Item Remote control 1 sensor 2 Status indicator Description Receives signals from the remote control.
www.insigniaproducts.com 14 Do not block. See Status light on page 64. NS-24ER310NA17/NS-32DR310NA17/NS-48DR510NA17 TV components Your TV has built-in controls for adjusting basic settings and several sets of jacks for connecting devices to your TV. This ... (2 AAA) • TV stand(s) • 24" (1) • 32" or 48" (2) • Screws (4) • Power cord • Quick Setup Guide • Important Information Front features 24" model 32" or 48" model # Item Remote control 1 sensor 2 Status indicator Description Receives signals from the remote control.

User Manual English
Page 21
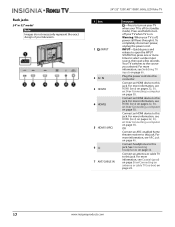
... and listen to TV audio through external speakers. Side jacks Note Images do not necessarily represent the exact design of your television. 24" or 32" model 24"/32" 720P, 48" 1080P, 60Hz, LED Roku TV # Item Description 1 RESET Press and hold reset for 15 seconds for an AV device to these...
... and listen to TV audio through external speakers. Side jacks Note Images do not necessarily represent the exact design of your television. 24" or 32" model 24"/32" 720P, 48" 1080P, 60Hz, LED Roku TV # Item Description 1 RESET Press and hold reset for 15 seconds for an AV device to these...
User Manual English
Page 22
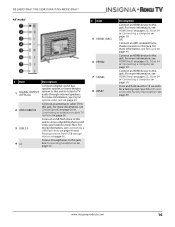
... 44. 2 ANT/CABLE IN Connect an antenna or cable TV to TV audio through external speakers. Connect an HDMI device to music files. NS-24ER310NA17/NS-32DR310NA17/NS-48DR510NA17 48" model # Item Description Connect a digital sound bar, speaker system, or home theater 1 DIGITAL OUTPUT (OPTICAL) system to this jack to listen to this jack...
... 44. 2 ANT/CABLE IN Connect an antenna or cable TV to TV audio through external speakers. Connect an HDMI device to music files. NS-24ER310NA17/NS-32DR310NA17/NS-48DR510NA17 48" model # Item Description Connect a digital sound bar, speaker system, or home theater 1 DIGITAL OUTPUT (OPTICAL) system to this jack to listen to this jack...
User Manual English
Page 23
... power cord. For more information, see HDMI (best) on pages 22, 30, or 34 or Connecting a computer on page 38. Back jacks 24" or 32" model Note Images do not necessarily represent the exact design of your television. 24"/32" 720P, 48" 1080P, 60Hz, LED Roku TV # Item 1 /INPUT 2 AC IN...
... power cord. For more information, see HDMI (best) on pages 22, 30, or 34 or Connecting a computer on page 38. Back jacks 24" or 32" model Note Images do not necessarily represent the exact design of your television. 24"/32" 720P, 48" 1080P, 60Hz, LED Roku TV # Item 1 /INPUT 2 AC IN...
User Manual English
Page 24
NS-24ER310NA17/NS-32DR310NA17/NS-48DR510NA17 48" model # Item 1 /INPUT 2 VIDEO and L and R AUDIO Description -Press to turn off your TV when TV is off (in standby mode). For more information, see AV (...
NS-24ER310NA17/NS-32DR310NA17/NS-48DR510NA17 48" model # Item 1 /INPUT 2 VIDEO and L and R AUDIO Description -Press to turn off your TV when TV is off (in standby mode). For more information, see AV (...

User Manual English
Page 28
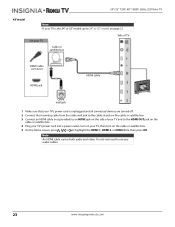
... connect your cable or satellite box using: • HDMI (best) • AV (good) • Coaxial (good) HDMI (best) 24" or 32" model Note If your TV is unplugged and all connected devices are turned off. 2 Connect the incoming cable from the cable wall jack to the cable...type. www.insigniaproducts.com 22 Note Images do not need to highlight the HDMI 1, HDMI 2, or HDMI 3 tile, then press OK. NS-24ER310NA17/NS-32DR310NA17/NS-48DR510NA17 Connecting a cable or satellite box Many cable or satellite TV boxes have more information, see What connection should use any audio cables.
... connect your cable or satellite box using: • HDMI (best) • AV (good) • Coaxial (good) HDMI (best) 24" or 32" model Note If your TV is unplugged and all connected devices are turned off. 2 Connect the incoming cable from the cable wall jack to the cable...type. www.insigniaproducts.com 22 Note Images do not need to highlight the HDMI 1, HDMI 2, or HDMI 3 tile, then press OK. NS-24ER310NA17/NS-32DR310NA17/NS-48DR510NA17 Connecting a cable or satellite box Many cable or satellite TV boxes have more information, see What connection should use any audio cables.
User Manual English
Page 29
... If your TV, then turn on page 22. You do not need to 24" or 32" model on the cable or satellite box. 5 On the Home screen, press or to highlight the HDMI 1, HDMI 2, or HDMI 3 tile, then press OK. On your ... OUT jack on the cable or satellite box. 4 Plug your TV's power cord into a power outlet, turn on your TV is the 24" or 32" model, go to use any audio cables. 23 www.insigniaproducts.com Note An HDMI cable carries both audio and video.
... If your TV, then turn on page 22. You do not need to 24" or 32" model on the cable or satellite box. 5 On the Home screen, press or to highlight the HDMI 1, HDMI 2, or HDMI 3 tile, then press OK. On your ... OUT jack on the cable or satellite box. 4 Plug your TV's power cord into a power outlet, turn on your TV is the 24" or 32" model, go to use any audio cables. 23 www.insigniaproducts.com Note An HDMI cable carries both audio and video.
User Manual English
Page 30
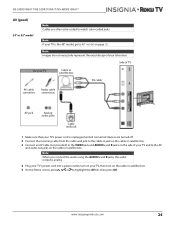
...TV, then turn on page 25. Note When you connect the audio using the AUDIO L and R jacks, the audio output is the 48" model, go to 48" model on the cable or satellite box. 5 On the Home screen, press or to highlight the AV tile, then press OK. www.insigniaproducts.com 24... Note Images do not necessarily represent the exact design of your television. NS-24ER310NA17/NS-32DR310NA17/NS-48DR510NA17 AV (good) 24" or 32" model Note Cables are turned off. 2 Connect the incoming cable from the cable wall jack to the cable-in jack on the...
...TV, then turn on page 25. Note When you connect the audio using the AUDIO L and R jacks, the audio output is the 48" model, go to 48" model on the cable or satellite box. 5 On the Home screen, press or to highlight the AV tile, then press OK. www.insigniaproducts.com 24... Note Images do not necessarily represent the exact design of your television. NS-24ER310NA17/NS-32DR310NA17/NS-48DR510NA17 AV (good) 24" or 32" model Note Cables are turned off. 2 Connect the incoming cable from the cable wall jack to the cable-in jack on the...
User Manual English
Page 31
... connect the audio using the AUDIO L and R jacks, the audio output is the 24" or 32" model, go to 24" or 32" model on page 24. 24"/32" 720P, 48" 1080P, 60Hz, LED Roku TV 48" model Note If your TV is analog. 4 Plug your TV's power cord into a power outlet, turn on...
... connect the audio using the AUDIO L and R jacks, the audio output is the 24" or 32" model, go to 24" or 32" model on page 24. 24"/32" 720P, 48" 1080P, 60Hz, LED Roku TV 48" model Note If your TV is analog. 4 Plug your TV's power cord into a power outlet, turn on...

User Manual English
Page 32
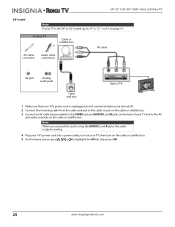
...cable connector ANT/CABLE IN jack Cable wall jack Back of TV Coaxial cable 1 Make sure that your TV's power cord is the 48" model, go to 48" model on page 61. 6 On the Home screen, press or to highlight the Antenna TV tile, then press OK. Notes • Use a... a power outlet, turn on your television. See Setting up the TV tuner to watch broadcast TV. www.insigniaproducts.com 26 NS-24ER310NA17/NS-32DR310NA17/NS-48DR510NA17 Coaxial (good) 24" or 32" model Note If your TV is unplugged and all connected devices are turned off. 2 Connect the incoming cable from radio waves. ...
...cable connector ANT/CABLE IN jack Cable wall jack Back of TV Coaxial cable 1 Make sure that your TV's power cord is the 48" model, go to 48" model on page 61. 6 On the Home screen, press or to highlight the Antenna TV tile, then press OK. Notes • Use a... a power outlet, turn on your television. See Setting up the TV tuner to watch broadcast TV. www.insigniaproducts.com 26 NS-24ER310NA17/NS-32DR310NA17/NS-48DR510NA17 Coaxial (good) 24" or 32" model Note If your TV is unplugged and all connected devices are turned off. 2 Connect the incoming cable from radio waves. ...


