
Integration Guide
Page 2
.../NUCSupport. Per informazioni relative alla conformita normativa, andare all'indirizzo: http://www.intel.com/support/it . ;XO URL l.t < http://www.intel.com/NUCSupport. IRMO 3 4 / http://www.intel.com/NUCSupport. Aby uzyskad informacje dotyczace zgodnogci z przepisami, odwiedi strong: http://www.intel.com/support/motherboards/desktop/sb/CS-O34O57.htm. Pour telecharger les derniers pilotes et mises a jour...
.../NUCSupport. Per informazioni relative alla conformita normativa, andare all'indirizzo: http://www.intel.com/support/it . ;XO URL l.t < http://www.intel.com/NUCSupport. IRMO 3 4 / http://www.intel.com/NUCSupport. Aby uzyskad informacje dotyczace zgodnogci z przepisami, odwiedi strong: http://www.intel.com/support/motherboards/desktop/sb/CS-O34O57.htm. Pour telecharger les derniers pilotes et mises a jour...
User Guide
Page 3
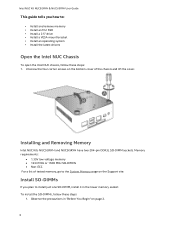
...tested memory, go to the System Memory page on the Support site: Install SO-DIMMs If you how to install just one SO-DIMM, install it in "Before You Begin" on page 2. 3 Installing and Removing Memory Intel NUC Kits NUC5i3RYH and NUC5i5RYH have two 204-pin DDR3L SO-DIMM sockets.... Intel NUC Kit NUC5i3RYH & NUC5i5RYH User Guide This guide tells you plan to : • Install and remove memory • Install an...
...tested memory, go to the System Memory page on the Support site: Install SO-DIMMs If you how to install just one SO-DIMM, install it in "Before You Begin" on page 2. 3 Installing and Removing Memory Intel NUC Kits NUC5i3RYH and NUC5i5RYH have two 204-pin DDR3L SO-DIMM sockets.... Intel NUC Kit NUC5i3RYH & NUC5i5RYH User Guide This guide tells you plan to : • Install and remove memory • Install an...
User Guide
Page 4
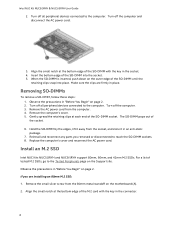
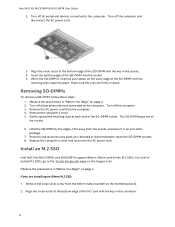
...SO-DIMM, follow these steps: 1. Turn off all peripheral devices connected to the Tested Peripherals page on the motherboard (A). 2. Install an M.2 SSD Intel NUC Kits NUC5i3RYH and NUC5i5RYH support 80mm, 60mm, and 42mm M.2 SSDs. Remove the small silver screw from the 80mm metal standoff on the...it in "Before You Begin" on page 2. 2. For a list of the SO-DIMM until the retaining clips snap into the socket. 5. Intel NUC Kit NUC5i3RYH & NUC5i5RYH User Guide 2. Turn off all peripheral devices connected to reach the SO-DIMM sockets. 8. Align the small notch at the bottom edge ...
...SO-DIMM, follow these steps: 1. Turn off all peripheral devices connected to the Tested Peripherals page on the motherboard (A). 2. Install an M.2 SSD Intel NUC Kits NUC5i3RYH and NUC5i5RYH support 80mm, 60mm, and 42mm M.2 SSDs. Remove the small silver screw from the 80mm metal standoff on the...it in "Before You Begin" on page 2. 2. For a list of the SO-DIMM until the retaining clips snap into the socket. 5. Intel NUC Kit NUC5i3RYH & NUC5i5RYH User Guide 2. Turn off all peripheral devices connected to reach the SO-DIMM sockets. 8. Align the small notch at the bottom edge ...
User Guide
Page 5
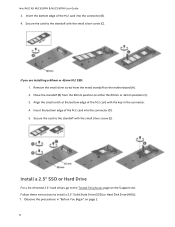
... of the M.2 card with the small silver screw (C). Remove the small silver screw from the 80mm position to the Tested Peripherals page on the Support site. Intel NUC Kit NUC5i3RYH & NUC5i5RYH User Guide 3. Insert the bottom edge of tested 2.5" hard drives, go to either the 60mm or 42mm position (C). 3. Install a 2.5" SSD or Hard...
... of the M.2 card with the small silver screw (C). Remove the small silver screw from the 80mm position to the Tested Peripherals page on the Support site. Intel NUC Kit NUC5i3RYH & NUC5i5RYH User Guide 3. Insert the bottom edge of tested 2.5" hard drives, go to either the 60mm or 42mm position (C). 3. Install a 2.5" SSD or Hard...

User Guide
Page 8
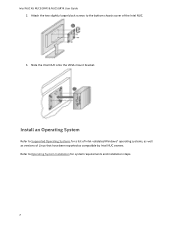
Install an Operating System Refer to Supported Operating Systems for system requirements and installation steps. 8 Refer to the bottom chassis cover of Linux that have been reported as compatible by Intel NUC owners. Slide the Intel NUC onto the VESA mount bracket. Attach the two slightly larger black screws to Operating System Installation for a list of Intel-validated Windows* operating systems, as well as versions of the Intel NUC. 3. Intel NUC Kit NUC5i3RYH & NUC5i5RYH User Guide 2.
Install an Operating System Refer to Supported Operating Systems for system requirements and installation steps. 8 Refer to the bottom chassis cover of Linux that have been reported as compatible by Intel NUC owners. Slide the Intel NUC onto the VESA mount bracket. Attach the two slightly larger black screws to Operating System Installation for a list of Intel-validated Windows* operating systems, as well as versions of the Intel NUC. 3. Intel NUC Kit NUC5i3RYH & NUC5i5RYH User Guide 2.

Integration Guide
Page 2
... http://www.intel.com/support/it . ;XO URL l.t < http://www.intel.com/NUCSupport. For a list of tested memory, go to: http://www.intel.com/NUCSupport. -iwz http://www.intel.com/support/cn/motherboards/desktop/sb/CS-034057.htm. ZR5ARAIKYAVI WIC http://www.intel.com/support/tw/motherboards/...de unidades de estado solid° M.2 probadas, visite: http://www.intel.com/NUCSupport. http://www.intel.com/jp/support/nnotherboards/desktop/sb/CS-O34O57.htm. -TJ TS2r'RE €I A` 01gt1- 1Al 2 : http://www.intel.com/NUCSupport. Pour telecharger les derniers pilotes et mises a jour de...
... http://www.intel.com/support/it . ;XO URL l.t < http://www.intel.com/NUCSupport. For a list of tested memory, go to: http://www.intel.com/NUCSupport. -iwz http://www.intel.com/support/cn/motherboards/desktop/sb/CS-034057.htm. ZR5ARAIKYAVI WIC http://www.intel.com/support/tw/motherboards/...de unidades de estado solid° M.2 probadas, visite: http://www.intel.com/NUCSupport. http://www.intel.com/jp/support/nnotherboards/desktop/sb/CS-O34O57.htm. -TJ TS2r'RE €I A` 01gt1- 1Al 2 : http://www.intel.com/NUCSupport. Pour telecharger les derniers pilotes et mises a jour de...

User Guide
Page 3
... You Begin" on the Support site: Install SO-DIMMs If you how to: • Install and remove memory • Install an M.2 SSD • Install a VESA mount bracket • Install an operating system • Install the latest drivers Open the Intel NUC Chassis To open the Intel NUC chassis, follow these steps...DIMMs Non-ECC For a list of the chassis and lift the cover. Installing and Removing Memory Intel NUC Kits NUC5i3RYK and NUC5i5RYK have two 204-pin DDR3L SO-DIMM sockets. Intel NUC Kit NUC5i3RYK & NUC5i5RYK User Guide This guide tells you plan to install just one SO-DIMM, ...
... You Begin" on the Support site: Install SO-DIMMs If you how to: • Install and remove memory • Install an M.2 SSD • Install a VESA mount bracket • Install an operating system • Install the latest drivers Open the Intel NUC Chassis To open the Intel NUC chassis, follow these steps...DIMMs Non-ECC For a list of the chassis and lift the cover. Installing and Removing Memory Intel NUC Kits NUC5i3RYK and NUC5i5RYK have two 204-pin DDR3L SO-DIMM sockets. Intel NUC Kit NUC5i3RYK & NUC5i5RYK User Guide This guide tells you plan to install just one SO-DIMM, ...
User Guide
Page 4
Observe the precautions in place. Replace the computer's cover and reconnect the AC power cord. Install an M.2 SSD Intel NUC Kits NUC5i3RYK and NUC5i5RYK support 80mm, 60mm, and 42mm M.2 SSDs. Insert the bottom edge of the SO-DIMM into place. The SO-DIMM pops out of tested M.2 SSDs,... it in the socket. 4. Observe the precautions in the connector. 4 Turn off all peripheral devices connected to the Tested Peripherals page on the Support site. Align the small notch at the bottom edge of the SO-DIMM until the retaining clips snap into the socket. 5. Remove the AC ...
Observe the precautions in place. Replace the computer's cover and reconnect the AC power cord. Install an M.2 SSD Intel NUC Kits NUC5i3RYK and NUC5i5RYK support 80mm, 60mm, and 42mm M.2 SSDs. Insert the bottom edge of the SO-DIMM into place. The SO-DIMM pops out of tested M.2 SSDs,... it in the socket. 4. Observe the precautions in the connector. 4 Turn off all peripheral devices connected to the Tested Peripherals page on the Support site. Align the small notch at the bottom edge of the SO-DIMM until the retaining clips snap into the socket. 5. Remove the AC ...
User Guide
Page 7
Install an Operating System Refer to Operating System Installation for a list of Intel-validated Windows* operating systems, as well as versions of the Intel NUC. 3. Refer to Supported Operating Systems for system requirements and installation steps. 7 Intel NUC Kit NUC5i3RYK & NUC5i5RYK User Guide 2. Slide the Intel NUC onto the VESA mount bracket. Attach the two slightly larger black screws to the bottom chassis cover of Linux that have been reported as compatible by Intel NUC owners.
Install an Operating System Refer to Operating System Installation for a list of Intel-validated Windows* operating systems, as well as versions of the Intel NUC. 3. Refer to Supported Operating Systems for system requirements and installation steps. 7 Intel NUC Kit NUC5i3RYK & NUC5i5RYK User Guide 2. Slide the Intel NUC onto the VESA mount bracket. Attach the two slightly larger black screws to the bottom chassis cover of Linux that have been reported as compatible by Intel NUC owners.

User Guide
Page 3
...M.2 SSD • Install a 2.5" drive • Install a VESA mount bracket • Install an operating system • Install the latest drivers Open the Intel NUC Chassis To open the Intel NUC chassis, follow these steps: 1. Observe the precautions in the lower memory socket. To install the SO-DIMMs, follow these steps: 1. Memory requirements...and lift the cover. Unscrew the four corner screws on the bottom cover of tested memory, go to the System Memory page on the Support site: Install SO-DIMMs If you how to install just one SO-DIMM, install it in "Before You Begin" on page 2. 3
...M.2 SSD • Install a 2.5" drive • Install a VESA mount bracket • Install an operating system • Install the latest drivers Open the Intel NUC Chassis To open the Intel NUC chassis, follow these steps: 1. Observe the precautions in the lower memory socket. To install the SO-DIMMs, follow these steps: 1. Memory requirements...and lift the cover. Unscrew the four corner screws on the bottom cover of tested memory, go to the System Memory page on the Support site: Install SO-DIMMs If you how to install just one SO-DIMM, install it in "Before You Begin" on page 2. 3

User Guide
Page 4
...connected to reach the SO-DIMM sockets. 8. The SO-DIMM pops out of the SO-DIMM with the Intel NUC Kits NUC5i3MYHE and NUC5i5MYHE in all peripheral devices connected to : http://www.intel.com/support/wireless/wlan. 4 When the SO-DIMM is inserted, push down on the outer edge of any parts... you removed or disconnected to the computer. Gently spread the retaining clips at the bottom edge of the socket. 6. Turn off all regions: Intel® Dual Band ...
...connected to reach the SO-DIMM sockets. 8. The SO-DIMM pops out of the SO-DIMM with the Intel NUC Kits NUC5i3MYHE and NUC5i5MYHE in all peripheral devices connected to : http://www.intel.com/support/wireless/wlan. 4 When the SO-DIMM is inserted, push down on the outer edge of any parts... you removed or disconnected to the computer. Gently spread the retaining clips at the bottom edge of the socket. 6. Turn off all regions: Intel® Dual Band ...

User Guide
Page 7
... in the connector. 3. Insert the bottom edge of the M.2 card into the connector (B). 7 Attach the antenna leads to the Tested Peripherals page on the Support site. Insert the bottom edge of the M.2 card into the connector (C). 5. Observe the precautions in the connector. 4. For a list of the M.2 card...from the 42mm position (B). 3. Secure the card to the standoff with the key in "Before You Begin" on the wireless card (E). Intel NUC Kit NUC5i3MYHE & NUC5i5MYHE User Guide 8. Remove the standoff from the 80mm metal standoff on the motherboard (A). 2. Install an M.2 SSD...
... in the connector. 3. Insert the bottom edge of the M.2 card into the connector (B). 7 Attach the antenna leads to the Tested Peripherals page on the Support site. Insert the bottom edge of the M.2 card into the connector (C). 5. Observe the precautions in the connector. 4. For a list of the M.2 card...from the 42mm position (B). 3. Secure the card to the standoff with the key in "Before You Begin" on the wireless card (E). Intel NUC Kit NUC5i3MYHE & NUC5i5MYHE User Guide 8. Remove the standoff from the 80mm metal standoff on the motherboard (A). 2. Install an M.2 SSD...
User Guide
Page 8
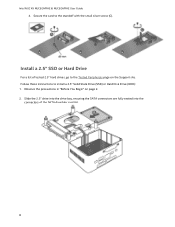
Intel NUC Kit NUC5i3MYHE & NUC5i5MYHE User Guide 4. Secure the card to install a 2.5" Solid State Drive (SSD) or Hard Disk Drive (HDD): 1. Observe the precautions in "Before You Begin" on the Support site. Slide the 2.5" drive into the drive bay, ensuring the SATA connectors are fully seated into the connectors of tested 2.5" hard drives, go to the Tested Peripherals page on page 2. 2. Follow these instructions to the standoff with the small silver screw (C). Install a 2.5" SSD or Hard Drive For a list of the SATA daughter card (A). 8
Intel NUC Kit NUC5i3MYHE & NUC5i5MYHE User Guide 4. Secure the card to install a 2.5" Solid State Drive (SSD) or Hard Disk Drive (HDD): 1. Observe the precautions in "Before You Begin" on the Support site. Slide the 2.5" drive into the drive bay, ensuring the SATA connectors are fully seated into the connectors of tested 2.5" hard drives, go to the Tested Peripherals page on page 2. 2. Follow these instructions to the standoff with the small silver screw (C). Install a 2.5" SSD or Hard Drive For a list of the SATA daughter card (A). 8
User Guide
Page 11
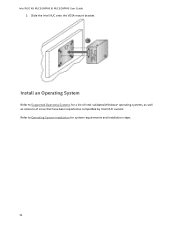
Refer to Supported Operating Systems for system requirements and installation steps. 11 Intel NUC Kit NUC5i3MYHE & NUC5i5MYHE User Guide 3. Install an Operating System Refer to Operating System Installation for a list of Intel-validated Windows* operating systems, as well as versions of Linux that have been reported as compatible by Intel NUC owners. Slide the Intel NUC onto the VESA mount bracket.
Refer to Supported Operating Systems for system requirements and installation steps. 11 Intel NUC Kit NUC5i3MYHE & NUC5i5MYHE User Guide 3. Install an Operating System Refer to Operating System Installation for a list of Intel-validated Windows* operating systems, as well as versions of Linux that have been reported as compatible by Intel NUC owners. Slide the Intel NUC onto the VESA mount bracket.

Integration Guide
Page 2
... http://www.intel.com/support/pt/motherboards/desktop/sb/CS-034057.htm. http://www.intel.com/support/wireless/wlan. 2M http://www.intel.com/support/wireless/wlan. Pour davantage d'informations sur les cartes sans fil, accedez a : http://www.intel.com/support/wireless/wlan....sugli adattatori wireless, andare all'indirizzo: http://www.intel.com/p/it_IT/support/wireless. 9 -f 7 0.7* / -0)P writ, AiDURIA*RR LT< to : http://www.intel.com/NUCSupport. LH g 5 Erg o 01 . 81-11-1Al 2: http://www.intel.com/p/ko_KR/support/wireless. E-F@ xlcAlGIIA1 ?!V° DE3815TYKE Ellfl 2Isl%'±...
... http://www.intel.com/support/pt/motherboards/desktop/sb/CS-034057.htm. http://www.intel.com/support/wireless/wlan. 2M http://www.intel.com/support/wireless/wlan. Pour davantage d'informations sur les cartes sans fil, accedez a : http://www.intel.com/support/wireless/wlan....sugli adattatori wireless, andare all'indirizzo: http://www.intel.com/p/it_IT/support/wireless. 9 -f 7 0.7* / -0)P writ, AiDURIA*RR LT< to : http://www.intel.com/NUCSupport. LH g 5 Erg o 01 . 81-11-1Al 2: http://www.intel.com/p/ko_KR/support/wireless. E-F@ xlcAlGIIA1 ?!V° DE3815TYKE Ellfl 2Isl%'±...

User Guide
Page 3
... Kit DE3815TYKHE has one 204-pin DDR3L SO-DIMM socket. Intel NUC Kit DE3815TYKHE User Guide This guide tells you how to the System Memory page on page ... Non-ECC For a list of the chassis and lift the cover (B). Observe the precautions in "Before You Begin" on the Support site. Unscrew the two screws (A) on the front panel of tested memory, go to : • Install and remove memory • ...; Attach the VESA mount bracket • Install an operating system • Install the latest drivers Open the Intel NUC Chassis To open the Intel NUC chassis, follow these steps: 1.
... Kit DE3815TYKHE has one 204-pin DDR3L SO-DIMM socket. Intel NUC Kit DE3815TYKHE User Guide This guide tells you how to the System Memory page on page ... Non-ECC For a list of the chassis and lift the cover (B). Observe the precautions in "Before You Begin" on the Support site. Unscrew the two screws (A) on the front panel of tested memory, go to : • Install and remove memory • ...; Attach the VESA mount bracket • Install an operating system • Install the latest drivers Open the Intel NUC Chassis To open the Intel NUC chassis, follow these steps: 1.

User Guide
Page 4
... to the computer. Reinstall and reconnect any other wireless adapter with the key in the socket. 4. Turn off all peripheral devices connected to : http://www.intel.com/support/wireless/wlan. 4 The SO-DIMM pops out of the SO-DIMM into place. Replace the computer's cover and reconnect the AC power cord. When...
... to the computer. Reinstall and reconnect any other wireless adapter with the key in the socket. 4. Turn off all peripheral devices connected to : http://www.intel.com/support/wireless/wlan. 4 The SO-DIMM pops out of the SO-DIMM into place. Replace the computer's cover and reconnect the AC power cord. When...
User Guide
Page 7
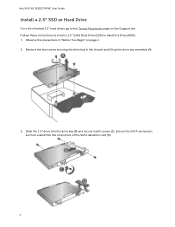
Intel NUC Kit DE3815TYKHE User Guide Install a 2.5" SSD or Hard Drive For a list of the SATA daughter card (D). 7 Slide the 2.5" drive into the connectors of tested 2.5" ... precautions in the chassis and lift up the drive bay assembly (A). 3. Remove the two screws securing the drive bay in "Before You Begin" on the Support site.
Intel NUC Kit DE3815TYKHE User Guide Install a 2.5" SSD or Hard Drive For a list of the SATA daughter card (D). 7 Slide the 2.5" drive into the connectors of tested 2.5" ... precautions in the chassis and lift up the drive bay assembly (A). 3. Remove the two screws securing the drive bay in "Before You Begin" on the Support site.

User Guide
Page 10
Intel NUC Kit DE3815TYKHE User Guide 2. Refer to the bottom chassis cover of Linux that have been reported as compatible by Intel NUC owners. Attach the two slightly larger black screws to Operating System Installation for a list of Intel-validated Windows* operating systems, as well as versions of the Intel NUC. 3. Slide the Intel NUC onto the VESA mount bracket. Install an Operating System Refer to Supported Operating Systems for system requirements and installation steps. 10
Intel NUC Kit DE3815TYKHE User Guide 2. Refer to the bottom chassis cover of Linux that have been reported as compatible by Intel NUC owners. Attach the two slightly larger black screws to Operating System Installation for a list of Intel-validated Windows* operating systems, as well as versions of the Intel NUC. 3. Slide the Intel NUC onto the VESA mount bracket. Install an Operating System Refer to Supported Operating Systems for system requirements and installation steps. 10

Integration Guide
Page 2
... " gesetzlichen Bestimmungen moglicherweise nicht eingehalten. For questions related to safety hazards. Eine Liste getesteter 2,5-Zoll-Festplatten erhalten Sie unter http://www.intel.com/support/de/motherboards/desIctop/sb/CS-034057.htm. LH g 5 2J El Erg O1g. Die alctuellen Treiber and BIOS-Updates konnen Sie hier...sea posible, se deben reciclar las baterfas. Pour obtenir une liste des disques durs de 2,5 pouces testes, accedez a : http://www.intel.com/support/fr/motherboards/desktop/sb/CS-034057.htm. Olt07 -t•I -MO Tti 01 Ei 21011 1!3 DN2820FYK QE doll EFE TLi 01 ff...
... " gesetzlichen Bestimmungen moglicherweise nicht eingehalten. For questions related to safety hazards. Eine Liste getesteter 2,5-Zoll-Festplatten erhalten Sie unter http://www.intel.com/support/de/motherboards/desIctop/sb/CS-034057.htm. LH g 5 2J El Erg O1g. Die alctuellen Treiber and BIOS-Updates konnen Sie hier...sea posible, se deben reciclar las baterfas. Pour obtenir une liste des disques durs de 2,5 pouces testes, accedez a : http://www.intel.com/support/fr/motherboards/desktop/sb/CS-034057.htm. Olt07 -t•I -MO Tti 01 Ei 21011 1!3 DN2820FYK QE doll EFE TLi 01 ff...


