

User Guide
Page 17
...18 Figure 8. Lifting the Socket Handle 20 Figure 9. Installing the Processor 21 Figure 12. Replacing the Backup Battery (S5000VSASATA/S5000VSASATAR shown) ....... 25 Intel® Server Board S5000VSA User's Guide xvii Back Panel Connectors 8 Figure 5. Password Clear Jumper 15 Figure 6. Open the Load Plate 20... the Heat Sink 22 Figure 14. Removing the Protective Socket Cover 21 Figure 13. List of Figures Figure 1. Server Board Connector and Component Locations 6 Figure 3. Removing the Shipping Cover 21 Figure 11. Intel® Server Board S5000VSA 1 Figure 2.
...18 Figure 8. Lifting the Socket Handle 20 Figure 9. Installing the Processor 21 Figure 12. Replacing the Backup Battery (S5000VSASATA/S5000VSASATAR shown) ....... 25 Intel® Server Board S5000VSA User's Guide xvii Back Panel Connectors 8 Figure 5. Password Clear Jumper 15 Figure 6. Open the Load Plate 20... the Heat Sink 22 Figure 14. Removing the Protective Socket Cover 21 Figure 13. List of Figures Figure 1. Server Board Connector and Component Locations 6 Figure 3. Removing the Shipping Cover 21 Figure 11. Intel® Server Board S5000VSA 1 Figure 2.
User Guide
Page 20
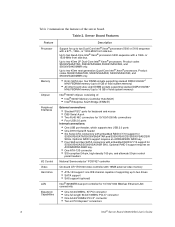
...-X* connector • Two x4 PCI Express* connectors 2 Intel® Server Board S5000VSA User's Guide Up to two 45nm 2P Dual-Core Intel® Xeon® processors. Optional RAID 5 support requires an AXXRAKSW5 RAID key. • Four SAS and two SATA connectors with embedded RAID 0/1/10 support for S5000VSASATA/S5000VSASATAR and S5000VSASCSI/S5000VSASCSIR SKUs. Table 2. Optional RAID...
...-X* connector • Two x4 PCI Express* connectors 2 Intel® Server Board S5000VSA User's Guide Up to two 45nm 2P Dual-Core Intel® Xeon® processors. Optional RAID 5 support requires an AXXRAKSW5 RAID key. • Four SAS and two SATA connectors with embedded RAID 0/1/10 support for S5000VSASATA/S5000VSASATAR and S5000VSASCSI/S5000VSASCSIR SKUs. Table 2. Optional RAID...
User Guide
Page 21
... four disk drives and does not provide RAID support. • Enhanced supports six disk drives and is attached between this connector on the server board when a cable is required for up to either Legacy or Enhanced. For RAID 0, 1, and 10, enclosure management is provided through the... SAS model provides both SATA and SAS models. The SATA model has order code S5000VSASATA/S5000VSASATAR. When the enhanced mode is enabled, the "SATA Mode" option can choose to configure RAID. The Intel® Embedded Server RAID Technology II feature provides RAID modes 0, 1, and 10. the SATA model ...
... four disk drives and does not provide RAID support. • Enhanced supports six disk drives and is attached between this connector on the server board when a cable is required for up to either Legacy or Enhanced. For RAID 0, 1, and 10, enclosure management is provided through the... SAS model provides both SATA and SAS models. The SATA model has order code S5000VSASATA/S5000VSASATAR. When the enhanced mode is enabled, the "SATA Mode" option can choose to configure RAID. The Intel® Embedded Server RAID Technology II feature provides RAID modes 0, 1, and 10. the SATA model ...

User Guide
Page 29
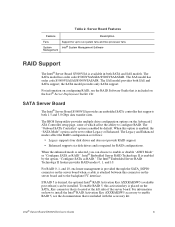
... the SATA ports. • The Intel® Server Board S5000VSASAS/S5000VSASASR provides four SAS ports and one IDE connection. Power Supply A minimum of 5V standby current or the board will not boot. The four SAS ports are near the front left side of the server board purchased. • The Intel® Server Board S5000VSASATA/S5000VSASATAR provides six SATA ports and one...
... the SATA ports. • The Intel® Server Board S5000VSASAS/S5000VSASASR provides four SAS ports and one IDE connection. Power Supply A minimum of 5V standby current or the board will not boot. The four SAS ports are near the front left side of the server board purchased. • The Intel® Server Board S5000VSASATA/S5000VSASATAR provides six SATA ports and one...

User Guide
Page 38
.... When the DIMM is pointing to the open position. 7. Make sure the clips are pushed outward to the key in place. 20 "Intel® Server Board S5000VSA User's Guide" Installing Memory (S5000VSASATA/S5000VSASATAR shown) 6. The arrow in the inset in Figure 7 is inserted, push down on the bottom edge of the DIMM socket(s) are firmly...
.... When the DIMM is pointing to the open position. 7. Make sure the clips are pushed outward to the key in place. 20 "Intel® Server Board S5000VSA User's Guide" Installing Memory (S5000VSASATA/S5000VSASATAR shown) 6. The arrow in the inset in Figure 7 is inserted, push down on the bottom edge of the DIMM socket(s) are firmly...

User Guide
Page 45
Turn off all peripheral devices connected to the server. AF000183 Figure 14. Replacing the Backup Battery (S5000VSASATA/ S5000VSASATAR shown) 7. Remove the new lithium battery from its package, and, being careful to local ordinance. 8. "Intel® Server Board S5000VSA User's Guide" 27 1. Gently push down on removing the server's cover. 5. Remove the battery from its socket. Run Setup to...
Turn off all peripheral devices connected to the server. AF000183 Figure 14. Replacing the Backup Battery (S5000VSASATA/ S5000VSASATAR shown) 7. Remove the new lithium battery from its package, and, being careful to local ordinance. 8. "Intel® Server Board S5000VSA User's Guide" 27 1. Gently push down on removing the server's cover. 5. Remove the battery from its socket. Run Setup to...


