
User Guide
Page 41
...Installations and Upgrades 8. Figure 26. Slide the power supply forward (see letter "D") and then lift out of the drive tray assembly. Note: You may need to remove cable ties securing power cables to the system (see ...system (see letter "C"). Disconnect the power cables from the main power and CPU power connectors on the system board (see letter "A" in the following figure). Disconnect the power cables from all installed hard drives (see letter "B"). Note: Drive tray assembly removed for illustrative purposes. Removing Faulty Power Supply Intel® Entry Storage System SS4200...
...Installations and Upgrades 8. Figure 26. Slide the power supply forward (see letter "D") and then lift out of the drive tray assembly. Note: You may need to remove cable ties securing power cables to the system (see ...system (see letter "C"). Disconnect the power cables from the main power and CPU power connectors on the system board (see letter "A" in the following figure). Disconnect the power cables from all installed hard drives (see letter "B"). Note: Drive tray assembly removed for illustrative purposes. Removing Faulty Power Supply Intel® Entry Storage System SS4200...
User Guide
Page 43
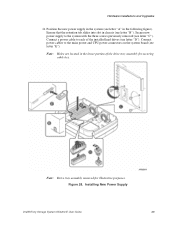
.... Installing New Power Supply Intel® Entry Storage System SS4200-E User Guide 29 Connect a power cable to the main power and CPU power connectors on the system board (see letter "B"). Secure new power supply to the system with the three screws previously removed (see letter "A" in the system (see letter "C"). Figure 28. Hardware Installations and Upgrades 11. Position the new...
.... Installing New Power Supply Intel® Entry Storage System SS4200-E User Guide 29 Connect a power cable to the main power and CPU power connectors on the system board (see letter "B"). Secure new power supply to the system with the three screws previously removed (see letter "A" in the system (see letter "C"). Figure 28. Hardware Installations and Upgrades 11. Position the new...