Fingerprint Developer's Guide (old)
Page 84
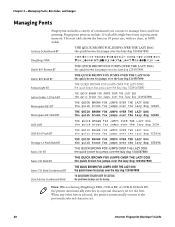
... Images Managing Fonts Fingerprint includes a variety of commands you can use to a special character set . 68 Intermec Fingerprint Developer's Guide Century Schoolbook BT DingDings SWA Dutch 801 Roman BT Dutch 801 Bold BT Futura Light BT Letter Gothic 12 Pitch BT Monospace 821 BT Monospace 821 Bold BT OCR-A BT OCR-B 10...
... Images Managing Fonts Fingerprint includes a variety of commands you can use to a special character set . 68 Intermec Fingerprint Developer's Guide Century Schoolbook BT DingDings SWA Dutch 801 Roman BT Dutch 801 Bold BT Futura Light BT Letter Gothic 12 Pitch BT Monospace 821 BT Monospace 821 Bold BT OCR-A BT OCR-B 10...

Printer 802.11 Radio Interface Kit Installation Instructions
Page 3
... on these Intermec printers: • PD41 • PD42 • PF2i • PF4i • PM4i • PX4i • PX6i What You Get Antenna SDIO board assembly Cable tie (2) M3x8mm screw (PF2i, PF4i, PM4i, PX4i, and PX6i kits only) Antenna cable assembly 802.11 and MAC address labels Light pipe What... You Need • An Intermec PD41 or PD42 printer running Fingerprint v10.6.0 or later or IPL v2.77.0 or later Or, an Intermec PF2i, PF4i, PM4i, PX4i, or PX6i printer running Fingerprint v8.77.0 or...
... on these Intermec printers: • PD41 • PD42 • PF2i • PF4i • PM4i • PX4i • PX6i What You Get Antenna SDIO board assembly Cable tie (2) M3x8mm screw (PF2i, PF4i, PM4i, PX4i, and PX6i kits only) Antenna cable assembly 802.11 and MAC address labels Light pipe What... You Need • An Intermec PD41 or PD42 printer running Fingerprint v10.6.0 or later or IPL v2.77.0 or later Or, an Intermec PF2i, PF4i, PM4i, PX4i, or PX6i printer running Fingerprint v8.77.0 or...

Printer 802.11 Radio Interface Kit Installation Instructions
Page 10
...SDIO board assembly. 11 Use the other end of the light pipe into the back plate. 5 Insert the SDIO board assembly into the 44-pin connector. 6 (PD41 and PD42 only) Route the antenna cable behind the real-time clock...that shipped with the kit. 8 Install the other cable tie to secure the antenna cable and the light pipe to the printer as shown. 12 Trim the excess from the cable tie. 13 Close the ... Connect the antenna to the antenna connector on the back plate and tighten the nut. 9 Insert the light pipe through the back plate, and press the end of the antenna cable on the back plate. 10...
...SDIO board assembly. 11 Use the other end of the light pipe into the back plate. 5 Insert the SDIO board assembly into the 44-pin connector. 6 (PD41 and PD42 only) Route the antenna cable behind the real-time clock...that shipped with the kit. 8 Install the other cable tie to secure the antenna cable and the light pipe to the printer as shown. 12 Trim the excess from the cable tie. 13 Close the ... Connect the antenna to the antenna connector on the back plate and tighten the nut. 9 Insert the light pipe through the back plate, and press the end of the antenna cable on the back plate. 10...

PD41 and PD42 Commercial Printer User's Manual
Page 33
... test labels 1 Turn off the printer. 2 Load media and ribbon (if necessary). SELECT MEDIA GAP SELECT MEDIA MARK SELECT MEDIA CONTINUOUS PD41 and PD42 Commercial Printer User's Manual 19 Using the Printer 6 Load media in the printer For help see "Loading Media for TearOff Printing" on page 11... switch. For help , see , "Loading Media" on page 11 and "Loading Thermal Transfer Ribbon" on the screen. After approximately ten seconds, the printer screen lights up, runs a media setup routine, enters Testmode, and three of the LEDs start to flash one at a time (green, red, and then blue). 5...
... test labels 1 Turn off the printer. 2 Load media and ribbon (if necessary). SELECT MEDIA GAP SELECT MEDIA MARK SELECT MEDIA CONTINUOUS PD41 and PD42 Commercial Printer User's Manual 19 Using the Printer 6 Load media in the printer For help see "Loading Media for TearOff Printing" on page 11... switch. For help , see , "Loading Media" on page 11 and "Loading Thermal Transfer Ribbon" on the screen. After approximately ten seconds, the printer screen lights up, runs a media setup routine, enters Testmode, and three of the LEDs start to flash one at a time (green, red, and then blue). 5...
PD41 and PD42 Commercial Printer User's Manual
Page 83
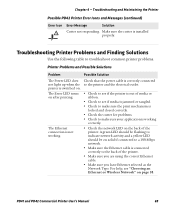
...Solutions Use the following table to troubleshoot common printer problems. Printer Problems and Possible Solutions Problem Possible Solution The Power LED does not light up when the printer is connected correctly to the back of media or ribbon. • Check to a 100 Mbps network. &#...8226; Make sure the Ethernet cable is switched on the back of the printer. PD41 and PD42 Commercial Printer User's Manual 69 Troubleshooting and Maintaining the Printer Possible PD42 Printer Error Icons and Messages (continued) Error Icon Error Message Solution Cutter not responding. The Error ...
...Solutions Use the following table to troubleshoot common printer problems. Printer Problems and Possible Solutions Problem Possible Solution The Power LED does not light up when the printer is connected correctly to the back of media or ribbon. • Check to a 100 Mbps network. &#...8226; Make sure the Ethernet cable is switched on the back of the printer. PD41 and PD42 Commercial Printer User's Manual 69 Troubleshooting and Maintaining the Printer Possible PD42 Printer Error Icons and Messages (continued) Error Icon Error Message Solution Cutter not responding. The Error ...
PD41 and PD42 Commercial Printer User's Manual
Page 85
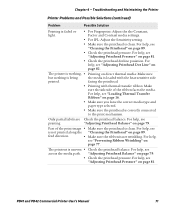
.... Only partial labels are Check the printhead balance. The printout is clean. PD41 and PD42 Commercial Printer User's Manual 71 Troubleshooting and Maintaining the Printer Printer Problems and Possible Solutions (continued) Problem Possible Solution Printing is faded or light. • For Fingerprint: Adjust the the Constant, Factor and Contrast media settings. •...
.... Only partial labels are Check the printhead balance. The printout is clean. PD41 and PD42 Commercial Printer User's Manual 71 Troubleshooting and Maintaining the Printer Printer Problems and Possible Solutions (continued) Problem Possible Solution Printing is faded or light. • For Fingerprint: Adjust the the Constant, Factor and Contrast media settings. •...

PD41 and PD42 Commercial Printer User's Manual
Page 88
After approximately ten seconds, the printer screen lights up, runs a media setup routine, enters Testmode, and three of media appears on the Power switch. Using Testmode Testmode is a simple linear sequence which requires ... MEDIA MARK SELECT MEDIA CONTINUOUS The printer prints several test labels containing hardware, setup, and network information and then enters Dump mode. 74 PD41 and PD42 Commercial Printer User's Manual Chapter 4 - Extended Testmode gives you want to verify printer settings, print test labels, restore factory default settings, or enter Dump mode...
After approximately ten seconds, the printer screen lights up, runs a media setup routine, enters Testmode, and three of media appears on the Power switch. Using Testmode Testmode is a simple linear sequence which requires ... MEDIA MARK SELECT MEDIA CONTINUOUS The printer prints several test labels containing hardware, setup, and network information and then enters Dump mode. 74 PD41 and PD42 Commercial Printer User's Manual Chapter 4 - Extended Testmode gives you want to verify printer settings, print test labels, restore factory default settings, or enter Dump mode...