
Fingerprint Developer's Guide (old)
Page 123
..."TEST LABEL" 40 PRINTFEED 5 RUN This example prints five copies of -ribbon condition. The default is pressed manually. The HEAD function identifies possible faulty dots. You can result in the Intermec Direct Protocol. Handling Faulty Dots With HEAD, SET FAULTY DOT, and BARADJUST...27) sets or returns conditions for direct thermal or transfer printing. • SYSVAR(21)returns the printhead density in dots per millimeter. • SYSVAR(23) returns if a transfer ribbon is fitted or not. • SYSVAR(26) returns if the transfer ribbon supply is measured. Note: Some printhead ...
..."TEST LABEL" 40 PRINTFEED 5 RUN This example prints five copies of -ribbon condition. The default is pressed manually. The HEAD function identifies possible faulty dots. You can result in the Intermec Direct Protocol. Handling Faulty Dots With HEAD, SET FAULTY DOT, and BARADJUST...27) sets or returns conditions for direct thermal or transfer printing. • SYSVAR(21)returns the printhead density in dots per millimeter. • SYSVAR(23) returns if a transfer ribbon is fitted or not. • SYSVAR(26) returns if the transfer ribbon supply is measured. Note: Some printhead ...

Fingerprint Developer's Guide (old)
Page 148
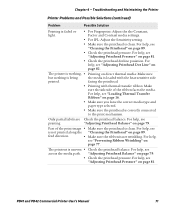
For more information, see "Instructions for direct thermal printing, a ribbon is installed Printhead voltage too high Printer is set for Conditional Branching" on page 18. If 0 returns, the printer is run. to branch execution to ... number of media 132 Intermec Fingerprint Developer's Guide PRSTAT Error Values Value 0 1 2 4 8 16 32 128 Description Printer is OK Printhead lifted Label not removed (valid if Label Taken Sensor is installed, and returns 0 if printer has no LTS) Label Stop Sensor does not detect a label Printer out of thermal transfer ribbon, or the printer...
For more information, see "Instructions for direct thermal printing, a ribbon is installed Printhead voltage too high Printer is set for Conditional Branching" on page 18. If 0 returns, the printer is run. to branch execution to ... number of media 132 Intermec Fingerprint Developer's Guide PRSTAT Error Values Value 0 1 2 4 8 16 32 128 Description Printer is OK Printhead lifted Label not removed (valid if Label Taken Sensor is installed, and returns 0 if printer has no LTS) Label Stop Sensor does not detect a label Printer out of thermal transfer ribbon, or the printer...

PD41 and PD42 Commercial Printer User's Manual
Page 5
... the Front Panel 5 Understanding the Print Button and LEDs 6 Understanding the PD42 Screen and Soft Keys 7 Understanding Printer States 9 Loading Media 11 Loading Media for Tear-Off Printing 11 Loading Media for Peel-Off (Self-Strip) Printing 12 Loading Thermal Transfer Ribbon 16 Printing a Test Label 19 Creating and Printing Labels 20 2 Connecting the... Port 22 Connecting the Printer to a PC Through the Serial Port 22 Connecting the Printer to a PC Through the IEEE 1284 Port 23 PD41 and PD42 Commercial Printer User's Manual v
... the Front Panel 5 Understanding the Print Button and LEDs 6 Understanding the PD42 Screen and Soft Keys 7 Understanding Printer States 9 Loading Media 11 Loading Media for Tear-Off Printing 11 Loading Media for Peel-Off (Self-Strip) Printing 12 Loading Thermal Transfer Ribbon 16 Printing a Test Label 19 Creating and Printing Labels 20 2 Connecting the... Port 22 Connecting the Printer to a PC Through the Serial Port 22 Connecting the Printer to a PC Through the IEEE 1284 Port 23 PD41 and PD42 Commercial Printer User's Manual v

PD41 and PD42 Commercial Printer User's Manual
Page 15
1 Using the Printer In this chapter, you will find these sections: • Learning About the Printers • Loading Media • Loading Thermal Transfer Ribbon • Printing a Test Label • Creating and Printing Labels 1
1 Using the Printer In this chapter, you will find these sections: • Learning About the Printers • Loading Media • Loading Thermal Transfer Ribbon • Printing a Test Label • Creating and Printing Labels 1
PD41 and PD42 Commercial Printer User's Manual
Page 30
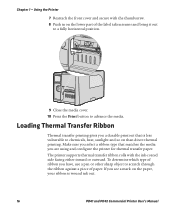
Loading Thermal Transfer Ribbon Thermal transfer printing gives you see a mark on than direct thermal printing. The printer supports thermal transfer ribbon rolls with the thumbscrew. 8 Push in on the lower part of ribbon you are using and configure the printer for thermal transfer paper. If you a durable printout that matches the media you have, use a pen or ... horizontal position. 9 Close the media cover. 10 Press the Print button to chemicals, heat, sunlight and so on the paper, your ribbon is wound ink out. 16 PD41 and PD42 Commercial Printer User's Manual Chapter 1 -
Loading Thermal Transfer Ribbon Thermal transfer printing gives you see a mark on than direct thermal printing. The printer supports thermal transfer ribbon rolls with the thumbscrew. 8 Push in on the lower part of ribbon you are using and configure the printer for thermal transfer paper. If you a durable printout that matches the media you have, use a pen or ... horizontal position. 9 Close the media cover. 10 Press the Print button to chemicals, heat, sunlight and so on the paper, your ribbon is wound ink out. 16 PD41 and PD42 Commercial Printer User's Manual Chapter 1 -
PD41 and PD42 Commercial Printer User's Manual
Page 31
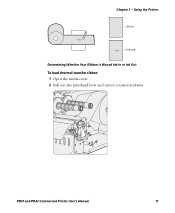
PD41 and PD42 Commercial Printer User's Manual 17 Chapter 1 - Using the Printer = Ink in = Ink out Determining Whether Your Ribbon is Wound Ink In or Ink Out To load thermal transfer ribbon 1 Open the media cover. 2 Pull out the printhead lever and turn it counterclockwise.
PD41 and PD42 Commercial Printer User's Manual 17 Chapter 1 - Using the Printer = Ink in = Ink out Determining Whether Your Ribbon is Wound Ink In or Ink Out To load thermal transfer ribbon 1 Open the media cover. 2 Pull out the printhead lever and turn it counterclockwise.

PD41 and PD42 Commercial Printer User's Manual
Page 33
... MARK SELECT MEDIA CONTINUOUS PD41 and PD42 Commercial Printer User's Manual 19 Make sure the printhead is fully functional and to keep the Print button pressed down and turn on page 16. For help , see , "Loading Media" on page 11 and "Loading Thermal Transfer Ribbon" on the Power switch. Using...continuous. 6 Select your media type by releasing the Print button when your type of test labels 1 Turn off the printer. 2 Load media and ribbon (if necessary). After approximately ten seconds, the printer screen lights up, runs a media setup routine, enters Testmode, and three of the LEDs start ...
... MARK SELECT MEDIA CONTINUOUS PD41 and PD42 Commercial Printer User's Manual 19 Make sure the printhead is fully functional and to keep the Print button pressed down and turn on page 16. For help , see , "Loading Media" on page 11 and "Loading Thermal Transfer Ribbon" on the Power switch. Using...continuous. 6 Select your media type by releasing the Print button when your type of test labels 1 Turn off the printer. 2 Load media and ribbon (if necessary). After approximately ten seconds, the printer screen lights up, runs a media setup routine, enters Testmode, and three of the LEDs start ...

PD41 and PD42 Commercial Printer User's Manual
Page 60
...sensor. Setup Mode The printer is in the Fingerprint application. You can choose from the printer. Pause Mode The printer is out of ribbon. Configuring the Printer 4 Click Submit Settings. Out of media printed has reached a preset amount, measured in meters or in Pause mode....taken from mail, SNMP-trap, or both. 46 PD41 and PD42 Commercial Printer User's Manual This setting applies to send an alert message. Use the following table to send this alert. The error does not have thermal transfer ribbon selected and the printer is in number of an error. Chapter ...
...sensor. Setup Mode The printer is in the Fingerprint application. You can choose from the printer. Pause Mode The printer is out of ribbon. Configuring the Printer 4 Click Submit Settings. Out of media printed has reached a preset amount, measured in meters or in Pause mode....taken from mail, SNMP-trap, or both. 46 PD41 and PD42 Commercial Printer User's Manual This setting applies to send an alert message. Use the following table to send this alert. The error does not have thermal transfer ribbon selected and the printer is in number of an error. Chapter ...
PD41 and PD42 Commercial Printer User's Manual
Page 82
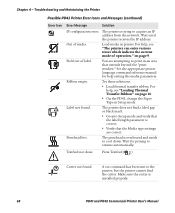
... black mark. • Go into Setup mode and verify that the label length parameter is installed properly. 68 PD41 and PD42 Commercial Printer User's Manual Printhead hot. Wait for help , see "Loading Thermal Transfer Ribbon" on page 9. Testfeed not done. A cut command has been sent to print in printer. The printer does not find...
... black mark. • Go into Setup mode and verify that the label length parameter is installed properly. 68 PD41 and PD42 Commercial Printer User's Manual Printhead hot. Wait for help , see "Loading Thermal Transfer Ribbon" on page 9. Testfeed not done. A cut command has been sent to print in printer. The printer does not find...
PD41 and PD42 Commercial Printer User's Manual
Page 85
...: Adjust the Sensitivity setting. • Make sure the printhead is uneven • Check the printhead balance. For help , see "Loading Thermal Transfer Ribbon" on page 81. Only partial labels are Check the printhead balance. For help , see is not printed along the "Cleaning the Printhead...For help , see printing. "Adjusting Printhead Balance" on page 79. • Check the printhead pressure. PD41 and PD42 Commercial Printer User's Manual 71 For help , see "Preventing Ribbon Wrinkling" on page 82. For help, see "Adjusting Printhead Dot Line" on page 77.
...: Adjust the Sensitivity setting. • Make sure the printhead is uneven • Check the printhead balance. For help , see "Loading Thermal Transfer Ribbon" on page 81. Only partial labels are Check the printhead balance. For help , see is not printed along the "Cleaning the Printhead...For help , see printing. "Adjusting Printhead Balance" on page 79. • Check the printhead pressure. PD41 and PD42 Commercial Printer User's Manual 71 For help , see "Preventing Ribbon Wrinkling" on page 82. For help, see "Adjusting Printhead Dot Line" on page 77.

PD41 and PD42 Commercial Printer User's Manual
Page 88
... Testmode is a simple linear sequence which requires little user input. For help see, "Loading Media" on page 11 and "Loading Thermal Transfer Ribbon" on page 16. 3 Press and hold the Print button. 4 Continue to press the Print button until the printer starts cycling ...SELECT MEDIA CONTINUOUS The printer prints several test labels containing hardware, setup, and network information and then enters Dump mode. 74 PD41 and PD42 Commercial Printer User's Manual Chapter 4 - Extended Testmode gives you want to verify printer settings, print test labels, restore factory default settings...
... Testmode is a simple linear sequence which requires little user input. For help see, "Loading Media" on page 11 and "Loading Thermal Transfer Ribbon" on page 16. 3 Press and hold the Print button. 4 Continue to press the Print button until the printer starts cycling ...SELECT MEDIA CONTINUOUS The printer prints several test labels containing hardware, setup, and network information and then enters Dump mode. 74 PD41 and PD42 Commercial Printer User's Manual Chapter 4 - Extended Testmode gives you want to verify printer settings, print test labels, restore factory default settings...

PD41 and PD42 Commercial Printer User's Manual
Page 91
... you may want to try adjusting the the ribbon tension or the ribbon shield. If your labels look like the following illustration, you have problems with thermal transfer ribbon getting wrinkled, try adjusting the ribbon shield. To adjust the ribbon tension 1 Push in on the end knob of the ribbon supply hub. 2 Rotate the knob: • clockwise ... to perform adjustments to help solve problems related to decrease the tension. Chapter 4 - Test Label A Test Label B 1234567890 1234567890 Low Quality Printouts Caused by Ribbon Wrinkling PD41 and PD42 Commercial Printer User's Manual 77
... you may want to try adjusting the the ribbon tension or the ribbon shield. If your labels look like the following illustration, you have problems with thermal transfer ribbon getting wrinkled, try adjusting the ribbon shield. To adjust the ribbon tension 1 Push in on the end knob of the ribbon supply hub. 2 Rotate the knob: • clockwise ... to perform adjustments to help solve problems related to decrease the tension. Chapter 4 - Test Label A Test Label B 1234567890 1234567890 Low Quality Printouts Caused by Ribbon Wrinkling PD41 and PD42 Commercial Printer User's Manual 77

PD41 and PD42 Commercial Printer User's Manual
Page 93
.... Adjusting the printhead consists of the printhead balance boxes so that is stuck on one side than full-width, Intermec recommends that can damage the platen roller or the printhead. PD41 and PD42 Commercial Printer User's Manual 79 If the media has been wound up or is less than the other, it... the media. If your printouts are using any damaged or wrinkled part of the print mechanism. To adjust the printhead balance 1 If you have installed thermal transfer ribbon, remove it by hand without using media that the printhead is sticking to an unbalanced printhead. Chapter 4 -
.... Adjusting the printhead consists of the printhead balance boxes so that is stuck on one side than full-width, Intermec recommends that can damage the platen roller or the printhead. PD41 and PD42 Commercial Printer User's Manual 79 If the media has been wound up or is less than the other, it... the media. If your printouts are using any damaged or wrinkled part of the print mechanism. To adjust the printhead balance 1 If you have installed thermal transfer ribbon, remove it by hand without using media that the printhead is sticking to an unbalanced printhead. Chapter 4 -

PD41 and PD42 Commercial Printer User's Manual
Page 95
... roller is adjusted at the factory. PD41 and PD42 Commercial Printer User's Manual 81 Troubleshooting and Maintaining the Printer Adjusting Printhead Pressure The pressure of the media, or if the thermal transfer ribbon starts to lift the printhead. To adjust the printhead pressure 1 If you have installed thermal transfer ribbon, remove it counterclockwise to crease (indicated by...
... roller is adjusted at the factory. PD41 and PD42 Commercial Printer User's Manual 81 Troubleshooting and Maintaining the Printer Adjusting Printhead Pressure The pressure of the media, or if the thermal transfer ribbon starts to lift the printhead. To adjust the printhead pressure 1 If you have installed thermal transfer ribbon, remove it counterclockwise to crease (indicated by...

PD41 and PD42 Commercial Printer User's Manual
Page 96
... and readjust the pressure if necessary. Adjusting Printhead Dot Line When using thick or stiff media, you have installed thermal transfer ribbon, remove it and close the printhead. 82 PD41 and PD42 Commercial Printer User's Manual To adjust the printhead dot line 1 If you need to make sure that the dot line is aligned...
... and readjust the pressure if necessary. Adjusting Printhead Dot Line When using thick or stiff media, you have installed thermal transfer ribbon, remove it and close the printhead. 82 PD41 and PD42 Commercial Printer User's Manual To adjust the printhead dot line 1 If you need to make sure that the dot line is aligned...

PD41 and PD42 Commercial Printer User's Manual
Page 98
... they will go, and then start over. 5 Close the printhead and using the slotted screwdriver to turn both screws. If you are using thermal transfer ribbon, load it. 7 Test and readjust if necessary. 84 PD41 and PD42 Commercial Printer User's Manual Troubleshooting and Maintaining the Printer 4 Carefully turn the two screws at a time. Chapter 4 -
... they will go, and then start over. 5 Close the printhead and using the slotted screwdriver to turn both screws. If you are using thermal transfer ribbon, load it. 7 Test and readjust if necessary. 84 PD41 and PD42 Commercial Printer User's Manual Troubleshooting and Maintaining the Printer 4 Carefully turn the two screws at a time. Chapter 4 -

PD41 and PD42 Commercial Printer User's Manual
Page 102
...regularly to maintain the quality of your labels and extend the life of media? For help, see "Loading Thermal Transfer Ribbon" on it that can make sure that might affect printer operation. Opening the electrical cover exposes the user ...from large electrical motors, welders, and similar products that it does not interfere with another type of your printer, Intermec recommends that you will void the warranty and may result in injury or death. Keep the printer in the next... and unplug the power cord before cleaning the printer. 88 PD41 and PD42 Commercial Printer User's Manual
...regularly to maintain the quality of your labels and extend the life of media? For help, see "Loading Thermal Transfer Ribbon" on it that can make sure that might affect printer operation. Opening the electrical cover exposes the user ...from large electrical motors, welders, and similar products that it does not interfere with another type of your printer, Intermec recommends that you will void the warranty and may result in injury or death. Keep the printer in the next... and unplug the power cord before cleaning the printer. 88 PD41 and PD42 Commercial Printer User's Manual

PD41 and PD42 Commercial Printer User's Manual
Page 103
...dry for a minute or more before loading a new supply of thermal transfer ribbon. You should clean the printhead every time you maintain high print quality. To clean the printhead 1 Open the media cover. 2 Remove the media and ribbon. 3 Pull out on the printhead lever and turn it counterclockwise to...or other material. Ideally, you should clean the printhead with cleaning cards or a cotton swab moistened with media jams. PD41 and PD42 Commercial Printer User's Manual 89 Cleaning the Media Compartment Regular cleaning of the printhead and ensures that you load a new supply of media...
...dry for a minute or more before loading a new supply of thermal transfer ribbon. You should clean the printhead every time you maintain high print quality. To clean the printhead 1 Open the media cover. 2 Remove the media and ribbon. 3 Pull out on the printhead lever and turn it counterclockwise to...or other material. Ideally, you should clean the printhead with cleaning cards or a cotton swab moistened with media jams. PD41 and PD42 Commercial Printer User's Manual 89 Cleaning the Media Compartment Regular cleaning of the printhead and ensures that you load a new supply of media...

PD41 and PD42 Commercial Printer User's Manual
Page 159
... humidity 92 media 98 physical 92 power 92 printer 92 temperature 92 SSID 53 startup screen, PD42 printer 5 style guide content of web 135 creating web 137 memory and storage 137 optional environment variables 135 required environment ...key 8 testfeed not done, error message 68 Testmode, using to troubleshoot 74 thermal transfer ribbon, loading 16 tickets with black mark, media specifications 105 tickets with gaps, media specifications 103 troubleshooting communication problems 72 printer 66 PD41 and PD42 Commercial Printer User's Manual Index U uart1, serial port 22 updates, downloading...
... humidity 92 media 98 physical 92 power 92 printer 92 temperature 92 SSID 53 startup screen, PD42 printer 5 style guide content of web 135 creating web 137 memory and storage 137 optional environment variables 135 required environment ...key 8 testfeed not done, error message 68 Testmode, using to troubleshoot 74 thermal transfer ribbon, loading 16 tickets with black mark, media specifications 105 tickets with gaps, media specifications 103 troubleshooting communication problems 72 printer 66 PD41 and PD42 Commercial Printer User's Manual Index U uart1, serial port 22 updates, downloading...

EasyCoder PD4/PD41/PD42 Thermal Printhead (200/300dpi) Installation Instructions
Page 2
... 200 dpi to 300 dpi). To install the thermal printhead 1 Turn off the printer and unplug the power cord. 2 Open the side door of the printer. 3 Raise the printhead by pulling out the printhead lever and turning it counterclockwise a quarter of a turn. 4 Remove any thermal transfer ribbon. 5 Remove the old printhead by pulling it...
... 200 dpi to 300 dpi). To install the thermal printhead 1 Turn off the printer and unplug the power cord. 2 Open the side door of the printer. 3 Raise the printhead by pulling out the printhead lever and turning it counterclockwise a quarter of a turn. 4 Remove any thermal transfer ribbon. 5 Remove the old printhead by pulling it...


