

Instruction Manual
Page 1
... parte inferior lateral de la caja. Modelo Nº DLA-RS620/DLA-RS520/ DLA-RS420 Nº de serie B5A-2025-0C Others Garder cetteinformation comme référence pour le futur. Mobile User Guide http://manual3.jvckenwood.com/projector/mobile/global/ The Mobile User Guide can be viewed ...on the side of the cabinet. DLA-RS620/DLA-RS520/ DLA-RS420 Serial No. . Conserve esta información como referencia para uso ulterior. Retain...
... parte inferior lateral de la caja. Modelo Nº DLA-RS620/DLA-RS520/ DLA-RS420 Nº de serie B5A-2025-0C Others Garder cetteinformation comme référence pour le futur. Mobile User Guide http://manual3.jvckenwood.com/projector/mobile/global/ The Mobile User Guide can be viewed ...on the side of the cabinet. DLA-RS620/DLA-RS520/ DLA-RS420 Serial No. . Conserve esta información como referencia para uso ulterior. Retain...

Instruction Manual
Page 2
...HAZARDS, DO NOT EXPOSE THIS APPLIANCE TO RAIN OR MOISTURE. CAUTION: To reduce the risk of Conformity Model Number: DLA-RS620K, DLA-RS520K, DLA-RS420K Trade Name: JVC Responsible party: JVCKENWOOD USA Corporation Address: 1700 Valley Road Wayne, N. only) CAUTION: Changes or modification not approved... for USA, the Electronic Industries Alliance: http://www.eiae.org. WARNING: THIS APPARATUS MUST BE EARTHED. This projector is not sturdy enough, the projector could void the user's authority to the following measures: Reorient or relocate the receiving antenna. NOISE EMISSION DECLARATION ...
...HAZARDS, DO NOT EXPOSE THIS APPLIANCE TO RAIN OR MOISTURE. CAUTION: To reduce the risk of Conformity Model Number: DLA-RS620K, DLA-RS520K, DLA-RS420K Trade Name: JVC Responsible party: JVCKENWOOD USA Corporation Address: 1700 Valley Road Wayne, N. only) CAUTION: Changes or modification not approved... for USA, the Electronic Industries Alliance: http://www.eiae.org. WARNING: THIS APPARATUS MUST BE EARTHED. This projector is not sturdy enough, the projector could void the user's authority to the following measures: Reorient or relocate the receiving antenna. NOISE EMISSION DECLARATION ...
Instruction Manual
Page 3
... to a child or adult, and serious damage to insert the plug into this causes condensation, which may result in a fire or electric shock. Place the projector near water. Do not use immediately after moving from a low temperature to high temperature, as this can be taken to avoid quick stops, excessive force...
... to a child or adult, and serious damage to insert the plug into this causes condensation, which may result in a fire or electric shock. Place the projector near water. Do not use immediately after moving from a low temperature to high temperature, as this can be taken to avoid quick stops, excessive force...

Instruction Manual
Page 4
... an unqualified person, it is not yet fully developed in impaired eyesight. - If installation is broken, ask your dealer, or the nearest authorized JVC service center. - It may lead to deteriorate very quickly. When turning on . Doing so would have serious effects on the device. * DO...careful to avoid situations where the child's eyes might stick to repair it on . If your dealer. - If anything is turned on the projector, ensure that present special hazards when over heated. - Please stop using the 3D feature, the video output may appear different from a broken ...
... an unqualified person, it is not yet fully developed in impaired eyesight. - If installation is broken, ask your dealer, or the nearest authorized JVC service center. - It may lead to deteriorate very quickly. When turning on . Doing so would have serious effects on the device. * DO...careful to avoid situations where the child's eyes might stick to repair it on . If your dealer. - If anything is turned on the projector, ensure that present special hazards when over heated. - Please stop using the 3D feature, the video output may appear different from a broken ...

Instruction Manual
Page 5
... with the letter E or the safety earth or colored green or green-and-yellow. AC240V. If nonetheless the mains plug is cut off , dispose of JVC KENWOOD Corporation is AC100V - IF IN DOUBT -- Power cord For United Kingdom For European continent countries WARNING: Do not cut off the main plug from...a power point, then obtain an appropriate safety approved extension lead or adapter or consult your product dealer. Ensure that the power cable used for the projector is colored blue must be connected to the main supply. The wire which is marked with the letter L or colored red.
... with the letter E or the safety earth or colored green or green-and-yellow. AC240V. If nonetheless the mains plug is cut off , dispose of JVC KENWOOD Corporation is AC100V - IF IN DOUBT -- Power cord For United Kingdom For European continent countries WARNING: Do not cut off the main plug from...a power point, then obtain an appropriate safety approved extension lead or adapter or consult your product dealer. Ensure that the power cable used for the projector is colored blue must be connected to the main supply. The wire which is marked with the letter L or colored red.

Instruction Manual
Page 8
... to the TRIGGER Terminal 20 Connecting the Power Cord (Supplied Accessory) ...... 20 Operate Viewing Videos 21 Adjusting the Projector Screen 23 Adjusting the Lens According to the Projection Position 23 Saving and Retrieving Adjustment Settings ....... 24 Setting Screen ... indicates a function that is supported by all models. 8 J indicates a function that is supported by DLA-RS520. Front 10 Main Unit - I indicates a function that is supported by DLA-RS420. Bottom 10 Main Unit - Rear 11 Main Unit - Getting Started Contents Getting Started Safety Precautions 2...
... to the TRIGGER Terminal 20 Connecting the Power Cord (Supplied Accessory) ...... 20 Operate Viewing Videos 21 Adjusting the Projector Screen 23 Adjusting the Lens According to the Projection Position 23 Saving and Retrieving Adjustment Settings ....... 24 Setting Screen ... indicates a function that is supported by all models. 8 J indicates a function that is supported by DLA-RS520. Front 10 Main Unit - I indicates a function that is supported by DLA-RS420. Bottom 10 Main Unit - Rear 11 Main Unit - Getting Started Contents Getting Started Safety Precautions 2...

Instruction Manual
Page 9
... operational check 2 pieces . Accessories/Optional Accessories Getting Started Check the Accessories Lens cover J 1 piece * It is attached to read the "Safety Precautions" before using this projector. Remote control 1 piece . Optional Accessories 0 Replacement lamp: Product no. AAA-size batteries (for EU) (about. 2 m 1 piece . 0 Quick User Guide, safety precautions, warranty card, and other...
... operational check 2 pieces . Accessories/Optional Accessories Getting Started Check the Accessories Lens cover J 1 piece * It is attached to read the "Safety Precautions" before using this projector. Remote control 1 piece . Optional Accessories 0 Replacement lamp: Product no. AAA-size batteries (for EU) (about. 2 m 1 piece . 0 Quick User Guide, safety precautions, warranty card, and other...
Instruction Manual
Page 10
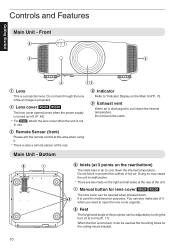
Getting Started Controls and Features Main Unit - C Remote Sensor (front) Please aim the remote control at the rear of the projector can be adjusted by turning the foot. (0 to 5 mm) (P. 17) When the foot is removed, it can be opened when pressed down. Main Unit - Doing ...
Getting Started Controls and Features Main Unit - C Remote Sensor (front) Please aim the remote control at the rear of the projector can be adjusted by turning the foot. (0 to 5 mm) (P. 17) When the foot is removed, it can be opened when pressed down. Main Unit - Doing ...

Instruction Manual
Page 12
... It is equipped with a trigger function. Note that is fitted to control devices such as an elevating screen that improper connection may damage the projector. (Tip=DC +12 V, Sleeve=GND) 12 It is used for sending output signals to the M3 lock hole. The depth of Rear ...Input Terminals Enlarged View of the screw hole is 3 mm. C [LAN] terminal (RJ-45) The projector can be controlled by connecting it to the projector. D [RS-232C] terminal (D-sub 9-pin male) The projector can view 3D movies. F [TRIGGER] terminal (E) Output terminal for control commands to be controlled by ...
... It is equipped with a trigger function. Note that is fitted to control devices such as an elevating screen that improper connection may damage the projector. (Tip=DC +12 V, Sleeve=GND) 12 It is used for sending output signals to the M3 lock hole. The depth of Rear ...Input Terminals Enlarged View of the screw hole is 3 mm. C [LAN] terminal (RJ-45) The projector can be controlled by connecting it to the projector. D [RS-232C] terminal (D-sub 9-pin male) The projector can view 3D movies. F [TRIGGER] terminal (E) Output terminal for control commands to be controlled by ...
Instruction Manual
Page 15
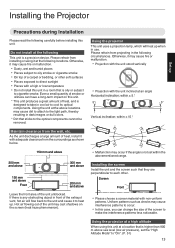
...the surroundings as checks may cause fire or malfunction. 0 Projection with the unit stood vertically . 0 Projection with non-uniform patterns. Using the projector This unit uses a projection lamp, which will flow back to the unit and cause it may cause interference patterns to occur. 0 In this... unit. Installing the Projector Set up Precautions during Installation Please read the following carefully before installing this case, you can have a long-term impact on the screen...
...the surroundings as checks may cause fire or malfunction. 0 Projection with the unit stood vertically . 0 Projection with non-uniform patterns. Using the projector This unit uses a projection lamp, which will flow back to the unit and cause it may cause interference patterns to occur. 0 In this... unit. Installing the Projector Set up Precautions during Installation Please read the following carefully before installing this case, you can have a long-term impact on the screen...
Instruction Manual
Page 16
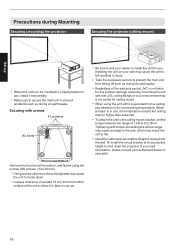
...unit to prevent accidents such as during an earthquake. 0 Regardless of the warranty period, JVC is not liable for use, install it suspended from falling off such as during Mounting Securing (mounting) the projector Securing the projector (ceiling mount) . 0 When this unit is to be higher than expected. 0 To... environment that is in injury. 0 Take the necessary actions to prevent the main unit from a ceiling, pay attention to shut down the projector. Securing with torque exceeding the above range may cause damage to the unit, which may result the unit to fall. 0 Install the outlet...
...unit to prevent accidents such as during an earthquake. 0 Regardless of the warranty period, JVC is not liable for use, install it suspended from falling off such as during Mounting Securing (mounting) the projector Securing the projector (ceiling mount) . 0 When this unit is to be higher than expected. 0 To... environment that is in injury. 0 Take the necessary actions to prevent the main unit from a ceiling, pay attention to shut down the projector. Securing with torque exceeding the above range may cause damage to the unit, which may result the unit to fall. 0 Install the outlet...
Instruction Manual
Page 17
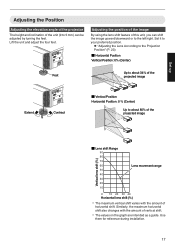
... be adjusted by turning the feet. Lift the unit and adjust the four feet. Set up Adjusting the Position Adjusting the elevation angle of the projector The height and inclination of the unit (0 to 5 mm) can shift the image upward/downward or to the left/right.
... be adjusted by turning the feet. Lift the unit and adjust the four feet. Set up Adjusting the Position Adjusting the elevation angle of the projector The height and inclination of the unit (0 to 5 mm) can shift the image upward/downward or to the left/right.
Instruction Manual
Page 18
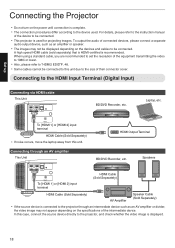
...a standard cable, you are recommended to set the resolution of the equipment transmitting the video to 1080i or lower. 0 Also, please refer to the projector through an AV amplifier This Unit HDMI Output Terminal BD/DVD Recorder, etc. Laptop, etc. Set up Connecting the... is used . In this case, connect the source device directly to this unit. To output the audio of the device to be connected. 0 This projector is complete. 0 The connection procedures differ according to the HDMI Input Terminal (Digital Input) Connecting via HDMI cable This Unit BD/DVD Recorder, etc. ...
...a standard cable, you are recommended to set the resolution of the equipment transmitting the video to 1080i or lower. 0 Also, please refer to the projector through an AV amplifier This Unit HDMI Output Terminal BD/DVD Recorder, etc. Laptop, etc. Set up Connecting the... is used . In this case, connect the source device directly to this unit. To output the audio of the device to be connected. 0 This projector is complete. 0 The connection procedures differ according to the HDMI Input Terminal (Digital Input) Connecting via HDMI cable This Unit BD/DVD Recorder, etc. ...

Instruction Manual
Page 20
... it to supply power to other than the indicated power voltage. 0 Do not damage, break or modify the power cord. Please connect it using the projector, please unplug the power cord from the outlet. 0 Connect it directly to prevent short circuit. 0 The factory setting is large. To change the setting, configure...
... it to supply power to other than the indicated power voltage. 0 Do not damage, break or modify the power cord. Please connect it using the projector, please unplug the power cord from the outlet. 0 Connect it directly to prevent short circuit. 0 The factory setting is large. To change the setting, configure...
Instruction Manual
Page 21
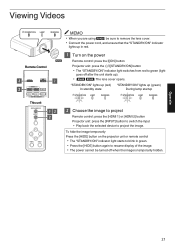
.../ON LAMP WARNING STANDBY/ON LAMP WARNING . 13 2 2 Choose the image to project Remote control: press the [HDMI 1] or [HDMI 2] button Projector unit: press the [INPUT] button to switch the input 0 Play back the selected device to green (light goes off when the image is temporarily hidden.... Remote Control 3 2 MODE 1 MODE 2 MODE 3 SETTING MEMORY This unit J 1 1 Turn on the projector unit or remote control 0 The "STANDBY/ON" indicator light starts to blink in green. 0 Press the [HIDE] button again to remove the lens cover. 0 ...
.../ON LAMP WARNING STANDBY/ON LAMP WARNING . 13 2 2 Choose the image to project Remote control: press the [HDMI 1] or [HDMI 2] button Projector unit: press the [INPUT] button to switch the input 0 Play back the selected device to green (light goes off when the image is temporarily hidden.... Remote Control 3 2 MODE 1 MODE 2 MODE 3 SETTING MEMORY This unit J 1 1 Turn on the projector unit or remote control 0 The "STANDBY/ON" indicator light starts to blink in green. 0 Press the [HIDE] button again to remove the lens cover. 0 ...
Instruction Manual
Page 22
... Main Unit"P. 75 for details. "STANDBY/ON" blinking (red) In the Cool-down mode). 3 Turn off the power Remote control: press the B [STAND BY] button Projector unit: press the A [STANDBY/ON] button 0 While the "Are you sure you want to cool down the lamp (Cool-down mode "STANDBY/ON" lights up...
... Main Unit"P. 75 for details. "STANDBY/ON" blinking (red) In the Cool-down mode). 3 Turn off the power Remote control: press the B [STAND BY] button Projector unit: press the A [STANDBY/ON] button 0 While the "Are you sure you want to cool down the lamp (Cool-down mode "STANDBY/ON" lights up...

Instruction Manual
Page 23
Operate 23 Adjusting the Projector Screen Adjusting the Lens According to end adjustment. Zoom (Screen Size) Adjustment Shift (Screen Position) Adjustment 2 Press the [MENU] button once, or the [BACK] twice, ...
Operate 23 Adjusting the Projector Screen Adjusting the Lens According to end adjustment. Zoom (Screen Size) Adjustment Shift (Screen Position) Adjustment 2 Press the [MENU] button once, or the [BACK] twice, ...
Instruction Manual
Page 26
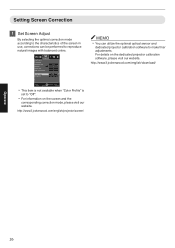
... on the screen and the corresponding correction mode, please visit our website. http://www3.jvckenwood.com/english/download/ Exit MENU . http://www3.jvckenwood.com/english/projector/screen/ Operate 26 Select Operate Back BACK 0 This item is not available when "Color Profile" is set to make finer adjustments. Off 32 1 MEMO 0 You... Adjust By selecting the optimal correction mode according to the characteristics of the screen in use, corrections can utilize the optional optical sensor and dedicated projector calibration software to "Off". 0 For information on the dedicated...
... on the screen and the corresponding correction mode, please visit our website. http://www3.jvckenwood.com/english/download/ Exit MENU . http://www3.jvckenwood.com/english/projector/screen/ Operate 26 Select Operate Back BACK 0 This item is not available when "Color Profile" is set to make finer adjustments. Off 32 1 MEMO 0 You... Adjust By selecting the optimal correction mode according to the characteristics of the screen in use, corrections can utilize the optional optical sensor and dedicated projector calibration software to "Off". 0 For information on the dedicated...

Instruction Manual
Page 31
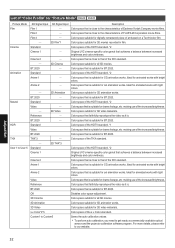
... the "Picture Mode", you can fine-tune the image quality according to the movie you need to get ready a commercially available optical sensor and the projector calibration software program. Off Disables color space adjustment. 3D Cinema Color space suitable for 3D broadcasts. Color space that is suitable for drama footage, etc...
... the "Picture Mode", you can fine-tune the image quality according to the movie you need to get ready a commercially available optical sensor and the projector calibration software program. Off Disables color space adjustment. 3D Cinema Color space suitable for 3D broadcasts. Color space that is suitable for drama footage, etc...
Instruction Manual
Page 32
...the HDTV standard. *2 Video - Color space that is close to User 5 Standard Color space of the HDTV standard. *2 Cinema 1 Original JVC cinema-specific color gamut that of FUJIFILM Corporation movie films. Film 3 - Natural Standard Color space of the HDTV standard. *2 Anime 1 ...Standard Color space of the increased brightness. For more details, please refer to get ready a commercially available optical sensor and the projector calibration software program. making use of art based on a Technicolor film. - 3D Film*1 Color space suitable for drama footage,...
...the HDTV standard. *2 Video - Color space that is close to User 5 Standard Color space of the HDTV standard. *2 Cinema 1 Original JVC cinema-specific color gamut that of FUJIFILM Corporation movie films. Film 3 - Natural Standard Color space of the HDTV standard. *2 Anime 1 ...Standard Color space of the increased brightness. For more details, please refer to get ready a commercially available optical sensor and the projector calibration software program. making use of art based on a Technicolor film. - 3D Film*1 Color space suitable for drama footage,...


