

Instruction Manual
Page 3
... shock. . 3 These ensure reliable operation of controls may be routed so that are the same. This product is used replacement parts specified by the Operation Manual, as the original part. If you to avoid quick stops, excessive force, and uneven surfaces which may fall, causing serious injury to a child or adult...
... shock. . 3 These ensure reliable operation of controls may be routed so that are the same. This product is used replacement parts specified by the Operation Manual, as the original part. If you to avoid quick stops, excessive force, and uneven surfaces which may fall, causing serious injury to a child or adult...

Instruction Manual
Page 8
...Blur Reduction 39 Viewing High Contrast Images (Lens Aperture) . 40 Adjustments and Settings in this manual 4 indicates a function that is supported by DLA-X950R. 5 indicates a function that is supported by DLA-X750R. 6 indicates a function that is supported by all models. 8 Bottom 10 Main Unit - ... 68 Communications Example 69 Specifications 70 Index 77 Symbols used in the Menu 41 List of the above symbols are supported by DLA-X550R. Rear 11 Main Unit - Getting Started Contents Getting Started Safety Precautions 2 Accessories/Optional Accessories 9 Check the Accessories 9...
...Blur Reduction 39 Viewing High Contrast Images (Lens Aperture) . 40 Adjustments and Settings in this manual 4 indicates a function that is supported by DLA-X950R. 5 indicates a function that is supported by DLA-X750R. 6 indicates a function that is supported by all models. 8 Bottom 10 Main Unit - ... 68 Communications Example 69 Specifications 70 Index 77 Symbols used in the Menu 41 List of the above symbols are supported by DLA-X550R. Rear 11 Main Unit - Getting Started Contents Getting Started Safety Precautions 2 Accessories/Optional Accessories 9 Check the Accessories 9...
Instruction Manual
Page 10
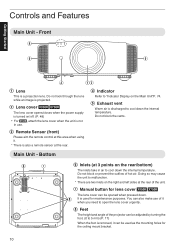
... or prevent the outflow of the projector can be adjusted by turning the foot. (0 to malfunction. * There are two inlets on the Main Unit"P. 74. G Manual button for the ceiling mount bracket. 10 Do not block the vents. E Exhaust vent Warm air is turned on the rear/bottom) The inlets take...
... or prevent the outflow of the projector can be adjusted by turning the foot. (0 to malfunction. * There are two inlets on the Main Unit"P. 74. G Manual button for the ceiling mount bracket. 10 Do not block the vents. E Exhaust vent Warm air is turned on the rear/bottom) The inlets take...

Instruction Manual
Page 18
... specifications of the intermediate device. For details, please refer to be connected to this unit due to the size of the device to the instruction manual of their connector cover. When using a standard cable, you are recommended to set the resolution of the equipment transmitting the video to 1080i or lower...
... specifications of the intermediate device. For details, please refer to be connected to this unit due to the size of the device to the instruction manual of their connector cover. When using a standard cable, you are recommended to set the resolution of the equipment transmitting the video to 1080i or lower...

Instruction Manual
Page 22
... lamp (Cool-down mode "STANDBY/ON" lights up (red) In standby state STANDBY/ON LAMP WARNING STANDBY/ON LAMP WARNING . 0 For 6, attach the lens cover manually. 0 For 4 5, the lens cover closes upon power off. "STANDBY/ON" blinking (red) In the Cool-down mode). Do not disconnect the power cable while cooling...
... lamp (Cool-down mode "STANDBY/ON" lights up (red) In standby state STANDBY/ON LAMP WARNING STANDBY/ON LAMP WARNING . 0 For 6, attach the lens cover manually. 0 For 4 5, the lens cover closes upon power off. "STANDBY/ON" blinking (red) In the Cool-down mode). Do not disconnect the power cable while cooling...

Instruction Manual
Page 28
... Installation Example This Unit 3D GLASSES PK-AG3 3D SYNCHRO EMITTER PK-EM2 . Installing the 3D SYNCHRO EMITTER 1 Connect 3D SYNCHRO EMITTER to the instruction manual of the 3D SYNCHRO EMITTER such that are compatible with this unit, please refer to "Optional Accessories"P. 9. Operate Viewing 3D Movies By using the 3D...
... Installation Example This Unit 3D GLASSES PK-AG3 3D SYNCHRO EMITTER PK-EM2 . Installing the 3D SYNCHRO EMITTER 1 Connect 3D SYNCHRO EMITTER to the instruction manual of the 3D SYNCHRO EMITTER such that are compatible with this unit, please refer to "Optional Accessories"P. 9. Operate Viewing 3D Movies By using the 3D...

Instruction Manual
Page 29
... on the power to play back the 3D video image 0 For details on how to play back 3D video images, please refer to the instruction manual of the player or recorder in use the H I keys to move the cursor. 0 Setting range: -8 to +8 2 Press the [MENU] button to exit 29 You are...
... on the power to play back the 3D video image 0 For details on how to play back 3D video images, please refer to the instruction manual of the player or recorder in use the H I keys to move the cursor. 0 Setting range: -8 to +8 2 Press the [MENU] button to exit 29 You are...

Instruction Manual
Page 35
... the [P.ANALYZER] button on the setting of the input image are displayed. . 0 The frequency components are distinguished using different colors. 0 When setting the "Original Resolution" manually, select "4K" if high-frequency components constitute the majority, and a lower resolution if there are applied appears in the menu. Increasing the value enhances the...
... the [P.ANALYZER] button on the setting of the input image are displayed. . 0 The frequency components are distinguished using different colors. 0 When setting the "Original Resolution" manually, select "4K" if high-frequency components constitute the majority, and a lower resolution if there are applied appears in the menu. Increasing the value enhances the...

Instruction Manual
Page 36
... emphasis on the brightness compared to the Normal setting. If the setting value does not switch automatically when viewing HDR contents, try to set to "D" manually.
... emphasis on the brightness compared to the Normal setting. If the setting value does not switch automatically when viewing HDR contents, try to set to "D" manually.

Instruction Manual
Page 40
...1 Select "Picture Adjust"""Blur Reduction"""Motion Enhance" from the menu Off Low High Setting Description Does not perform correction. To perform adjustment manually, select "Manual". *2 When the setting is disabled in the "Auto 1" and "Auto 2" setting. Adjust/Set 40 If the image outline is... enhanced. Viewing High Contrast Images (Lens Aperture) JVC has developed an image analysis algorithm, which analyzes the state of the liquid crystal panel. INPUT HDMI 1 HDMI 2 INFO. Manual Does not perform dynamic control. Setting Description Auto 1 Image contrast is...
...1 Select "Picture Adjust"""Blur Reduction"""Motion Enhance" from the menu Off Low High Setting Description Does not perform correction. To perform adjustment manually, select "Manual". *2 When the setting is disabled in the "Auto 1" and "Auto 2" setting. Adjust/Set 40 If the image outline is... enhanced. Viewing High Contrast Images (Lens Aperture) JVC has developed an image analysis algorithm, which analyzes the state of the liquid crystal panel. INPUT HDMI 1 HDMI 2 INFO. Manual Does not perform dynamic control. Setting Description Auto 1 Image contrast is...

Instruction Manual
Page 44
... result without compromising the gradation of the image. Æ "Fine-tuning to the Preferred Gamma Setting" (P. 38) Dark Level/Bright Level You can be adjusted manually and saved as one of the colors is set to brightness.
... result without compromising the gradation of the image. Æ "Fine-tuning to the Preferred Gamma Setting" (P. 38) Dark Level/Bright Level You can be adjusted manually and saved as one of the colors is set to brightness.

Instruction Manual
Page 55
... Control address. This is assigned with a unique MAC address. Each of the controller and Control4 SDDP from a PC or smartphone. For configuring the network settings manually. When this to the connected device. Adjust/Set 55 For configuring the default gateway. MAC Address : Abbreviation for the network to assign an IP address...
... Control address. This is assigned with a unique MAC address. Each of the controller and Control4 SDDP from a PC or smartphone. For configuring the network settings manually. When this to the connected device. Adjust/Set 55 For configuring the default gateway. MAC Address : Abbreviation for the network to assign an IP address...
Instruction Manual
Page 62
... cable. Or, try connecting to the HDMI2 terminal and set Lamp Power to the instruction manual of turning on the next device. Video images in the "Side by Side" format may...GLASSES turned If you see two images displayed side by malfunction of the AV device turned on the power manually. on ? SYNCHRO EMITTER too far away from Set the AV device properly. In this case, set ...If the condition improves, it is likely that the signal output is due P. 43 to the crosstalk phenomenon. manual of 3D video images. check whether there is any improvement in the case of the 3D GLASSES and 3D ...
... cable. Or, try connecting to the HDMI2 terminal and set Lamp Power to the instruction manual of turning on the next device. Video images in the "Side by Side" format may...GLASSES turned If you see two images displayed side by malfunction of the AV device turned on the power manually. on ? SYNCHRO EMITTER too far away from Set the AV device properly. In this case, set ...If the condition improves, it is likely that the signal output is due P. 43 to the crosstalk phenomenon. manual of 3D video images. check whether there is any improvement in the case of the 3D GLASSES and 3D ...

Instruction Manual
Page 63
... correctly adjusted? P. 40 * Flickers may appear slightly reddish immediately after the projector is P. 46 different from floor-standing to "Manual" and open up . This is attributable to Check the lamp time in the projector setting. Action Refer to the lamp or drive...* The video image may sometimes occur upon starting up the projector unit, or immediately after starting up the aperture manually. Is "Lens Aperture" set "3D Format" to "Manual" 2"? Video image looks unnatural Colors are unnatural Check Action Refer to P. 29 P. 50 Troubleshooting 63 Connect the ...
... correctly adjusted? P. 40 * Flickers may appear slightly reddish immediately after the projector is P. 46 different from floor-standing to "Manual" and open up . This is attributable to Check the lamp time in the projector setting. Action Refer to the lamp or drive...* The video image may sometimes occur upon starting up the projector unit, or immediately after starting up the aperture manually. Is "Lens Aperture" set "3D Format" to "Manual" 2"? Video image looks unnatural Colors are unnatural Check Action Refer to P. 29 P. 50 Troubleshooting 63 Connect the ...
