

Instruction Manual
Page 1
Retain this information for household room illumination. Modelo Nº DLA-X950R / DLA-X750R / DLA-X550R Nº de serie B5A-1144-03 Others For Customer use : Enter below the serial No. Conserve esta información como referencia para uso... reference. Pour utilisation par le client : Entrerci-dessous le N°de série qui est situé sous le boîtier. D-ILA PROJECTOR DLA-X950R DLA-X750R DLA-X550R INSTRUCTIONS Set up Operate Adjust/Set Maintenance Troubleshooting . Getting Started . Model No. Mobile User Guide http://manual3.jvckenwood.com...
Retain this information for household room illumination. Modelo Nº DLA-X950R / DLA-X750R / DLA-X550R Nº de serie B5A-1144-03 Others For Customer use : Enter below the serial No. Conserve esta información como referencia para uso... reference. Pour utilisation par le client : Entrerci-dessous le N°de série qui est situé sous le boîtier. D-ILA PROJECTOR DLA-X950R DLA-X750R DLA-X550R INSTRUCTIONS Set up Operate Adjust/Set Maintenance Troubleshooting . Getting Started . Model No. Mobile User Guide http://manual3.jvckenwood.com...

Instruction Manual
Page 2
...5722(For USA) or 1-800-964-2650(For Canada). CAUTION: To reduce the risk of Conformity Model Number: DLA-X950RBU, DLA-X750RBU, DLA-X550RBU Trade Name: JVC Responsible party: JVCKENWOOD USA Corporation Address: 1700 Valley Road Wayne, N. NOISE EMISSION DECLARATION The sound pressure level at... and (2) this equipment does cause harmful interference to radio or television reception, which the receiver is not sturdy enough, the projector could void the user's authority to provide reasonable protec tion against harmful interference in a residential installation. Increase the separation between ...
...5722(For USA) or 1-800-964-2650(For Canada). CAUTION: To reduce the risk of Conformity Model Number: DLA-X950RBU, DLA-X750RBU, DLA-X550RBU Trade Name: JVC Responsible party: JVCKENWOOD USA Corporation Address: 1700 Valley Road Wayne, N. NOISE EMISSION DECLARATION The sound pressure level at... and (2) this equipment does cause harmful interference to radio or television reception, which the receiver is not sturdy enough, the projector could void the user's authority to provide reasonable protec tion against harmful interference in a residential installation. Increase the separation between ...

Instruction Manual
Page 3
... out parts that produce heat. - Pay particular attention to dangerous voltages and other products such as the original part. When connecting other hazards. Place the projector near water. These ensure reliable operation of any way. For added protection of this product from the wall outlet and disconnect the cable system. Unplug...
... out parts that produce heat. - Pay particular attention to dangerous voltages and other products such as the original part. When connecting other hazards. Place the projector near water. These ensure reliable operation of any way. For added protection of this product from the wall outlet and disconnect the cable system. Unplug...
Instruction Manual
Page 4
...directly by opening the cabinet while the illumination lamp is performed by its function (such as found in your dealer, or the nearest authorized JVC service center. - The illumination lamp also contains ultraviolet rays and the light is possible for a long time can be careful to avoid... by the vibration, possibly causing it may appear different from the original video image due to install the unit. Do not ceiling-mount the projector to a place which could lead to the picture element. Please stop watching immediately and consult a physician if necessary. - If you feel ...
...directly by opening the cabinet while the illumination lamp is performed by its function (such as found in your dealer, or the nearest authorized JVC service center. - The illumination lamp also contains ultraviolet rays and the light is possible for a long time can be careful to avoid... by the vibration, possibly causing it may appear different from the original video image due to install the unit. Do not ceiling-mount the projector to a place which could lead to the picture element. Please stop watching immediately and consult a physician if necessary. - If you feel ...

Instruction Manual
Page 5
.... POWER CONNECTION (United Kingdom only) IMPORTANT (Europe only): When replacing the fuse, be connected to our website. The wire which is : JVC Technical Services Europe GmbH Konrad-Adenauer-Allee 1-11 61118 Bad Vilbel Germany . Fuse Dear Customer, This apparatus is shown in conformance with the letter... only the power cord designated by inadvertent connection to ensure Safety and EMC. If nonetheless the mains plug is the correct type for the projector is cut off , dispose of the plug immediately, to avoid a possible shock hazard by our dealer to the main supply. If a...
.... POWER CONNECTION (United Kingdom only) IMPORTANT (Europe only): When replacing the fuse, be connected to our website. The wire which is : JVC Technical Services Europe GmbH Konrad-Adenauer-Allee 1-11 61118 Bad Vilbel Germany . Fuse Dear Customer, This apparatus is shown in conformance with the letter... only the power cord designated by inadvertent connection to ensure Safety and EMC. If nonetheless the mains plug is the correct type for the projector is cut off , dispose of the plug immediately, to avoid a possible shock hazard by our dealer to the main supply. If a...

Instruction Manual
Page 8
...Communications Example 69 Specifications 70 Index 77 Symbols used in this manual 4 indicates a function that is supported by DLA-X950R. 5 indicates a function that is supported by DLA-X750R. 6 indicates a function that is supported by all models. 8 Front 10 Main Unit - Getting Started Contents...Connecting to the TRIGGER Terminal 20 Connecting the Power Cord (Supplied Accessory) ...... 20 Operate Viewing Videos 21 Adjusting the Projector Screen 23 Adjusting the Lens According to the Projection Position 23 Saving and Retrieving Adjustment Settings ....... 24 Setting Screen ...
...Communications Example 69 Specifications 70 Index 77 Symbols used in this manual 4 indicates a function that is supported by DLA-X950R. 5 indicates a function that is supported by DLA-X750R. 6 indicates a function that is supported by all models. 8 Front 10 Main Unit - Getting Started Contents...Connecting to the TRIGGER Terminal 20 Connecting the Power Cord (Supplied Accessory) ...... 20 Operate Viewing Videos 21 Adjusting the Projector Screen 23 Adjusting the Lens According to the Projection Position 23 Saving and Retrieving Adjustment Settings ....... 24 Setting Screen ...

Instruction Manual
Page 9
.... 9 Remote control 1 piece . Accessories/Optional Accessories Getting Started Check the Accessories Lens cover 6 1 piece * It is attached to read the "Safety Precautions" before using this projector. Optional Accessories 0 Replacement lamp: product no. X (Communication Method: RF (Radio frequency)) * Discontinued product Please check with your authorized dealer for USA) (about. 2 m 1 piece...
.... 9 Remote control 1 piece . Accessories/Optional Accessories Getting Started Check the Accessories Lens cover 6 1 piece * It is attached to read the "Safety Precautions" before using this projector. Optional Accessories 0 Replacement lamp: product no. X (Communication Method: RF (Radio frequency)) * Discontinued product Please check with your authorized dealer for USA) (about. 2 m 1 piece...
Instruction Manual
Page 10
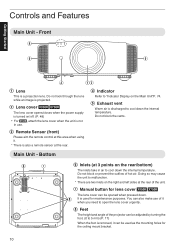
... temperature. B Lens cover 4 5 The lens cover opens/closes when the power supply is turned on the rear/bottom) The inlets take in use of the projector can be used for the ceiling mount bracket. 10 E Exhaust vent Warm air is not in air to cool down the internal temperature. Do not...
... temperature. B Lens cover 4 5 The lens cover opens/closes when the power supply is turned on the rear/bottom) The inlets take in use of the projector can be used for the ceiling mount bracket. 10 E Exhaust vent Warm air is not in air to cool down the internal temperature. Do not...

Instruction Manual
Page 12
C [LAN] terminal (RJ-45) The projector can be sent to the projector. F [TRIGGER] terminal (E) Output terminal for sending output signals to the M3 lock hole. Note that support HDMI output. (P. 18) It is fitted to control devices ... computer network for control commands to be controlled by connecting a PC to devices that improper connection may damage the projector. (Tip=DC +12 V, Sleeve=GND) 12 D [RS-232C] terminal (D-sub 9-pin male) The projector can view 3D movies. Input Terminals Enlarged View of the screw hole is used for DC 12 V, 100...
C [LAN] terminal (RJ-45) The projector can be sent to the projector. F [TRIGGER] terminal (E) Output terminal for sending output signals to the M3 lock hole. Note that support HDMI output. (P. 18) It is fitted to control devices ... computer network for control commands to be controlled by connecting a PC to devices that improper connection may damage the projector. (Tip=DC +12 V, Sleeve=GND) 12 D [RS-232C] terminal (D-sub 9-pin male) The projector can view 3D movies. Input Terminals Enlarged View of the screw hole is used for DC 12 V, 100...

Instruction Manual
Page 14
... sensor is within 7 m. If the remote control fails to work properly, move closer to heat, or the internal components may be brought closer to the projector to the t s marks. Load the batteries again and operate the remote control. This unit 30° 30° 20° 20° Remote Control . Control...
... sensor is within 7 m. If the remote control fails to work properly, move closer to heat, or the internal components may be brought closer to the projector to the t s marks. Load the batteries again and operate the remote control. This unit 30° 30° 20° 20° Remote Control . Control...

Instruction Manual
Page 15
...As the unit discharges a large amount of heat, and is designed to take in cool air to cool its optical components. Using the projector at the above Leave the front area of the screen to each other soft surfaces 0 Places exposed to direct sunlight 0 Places with non-.... Installing the screen Install the unit and the screen such that they are perpendicular to make the interference patterns less noticeable. Installing the Projector Set up Precautions during Installation Please read the following carefully before installing this unit in a room that is oily or subject to cigarette ...
...As the unit discharges a large amount of heat, and is designed to take in cool air to cool its optical components. Using the projector at the above Leave the front area of the screen to each other soft surfaces 0 Places exposed to direct sunlight 0 Places with non-.... Installing the screen Install the unit and the screen such that they are perpendicular to make the interference patterns less noticeable. Installing the Projector Set up Precautions during Installation Please read the following carefully before installing this unit in a room that is oily or subject to cigarette ...

Instruction Manual
Page 16
...the unit with non-JVC ceiling fittings or to an environment that is to be higher than expected. 0 To attach the unit to the ceiling mount bracket, set the torque between the range of 1.5N m to unplug from a ceiling, pay attention to break down the projector. Tightening with screws...a heater is in injury. 0 Take the necessary actions to prevent the main unit from falling off such as during Mounting Securing (mounting) the projector Securing the projector (ceiling mount) . 0 When this unit is not suited for use , the temperature around the ceiling may cause the unit to fall . ...
...the unit with non-JVC ceiling fittings or to an environment that is to be higher than expected. 0 To attach the unit to the ceiling mount bracket, set the torque between the range of 1.5N m to unplug from a ceiling, pay attention to break down the projector. Tightening with screws...a heater is in injury. 0 Take the necessary actions to prevent the main unit from falling off such as during Mounting Securing (mounting) the projector Securing the projector (ceiling mount) . 0 When this unit is not suited for use , the temperature around the ceiling may cause the unit to fall . ...

Instruction Manual
Page 17
... maximum horizontal shift also changes with the amount of the Feet projected image Extend . Set up Adjusting the Position Adjusting the elevation angle of the projector The height and inclination of the unit (0 to 5 mm) can shift the image upward/downward or to the left/right.
... maximum horizontal shift also changes with the amount of the Feet projected image Extend . Set up Adjusting the Position Adjusting the elevation angle of the projector The height and inclination of the unit (0 to 5 mm) can shift the image upward/downward or to the left/right.

Instruction Manual
Page 18
...input terminal HDMI Cable (Sold Separately) . 0 If noise occurs, move the laptop away from this case, connect the source device directly to the projector through an AV amplifier This Unit HDMI Output Terminal BD/DVD Recorder, etc. In this unit. Speakers To [HDMI 1] or [HDMI 2] input ... Also, please refer to "HDMI2 EDID"P. 47. 0 Some cables cannot be connected to this unit due to be connected. 0 This projector is recommended. Connecting to the device used for projecting images. Laptop, etc. For details, please refer to the instruction manual of their connector cover...
...input terminal HDMI Cable (Sold Separately) . 0 If noise occurs, move the laptop away from this case, connect the source device directly to the projector through an AV amplifier This Unit HDMI Output Terminal BD/DVD Recorder, etc. In this unit. Speakers To [HDMI 1] or [HDMI 2] input ... Also, please refer to "HDMI2 EDID"P. 47. 0 Some cables cannot be connected to this unit due to be connected. 0 This projector is recommended. Connecting to the device used for projecting images. Laptop, etc. For details, please refer to the instruction manual of their connector cover...

Instruction Manual
Page 20
..." item in the menu (P. 54). A Power Cord (Supplied) B Precautions to the power input terminal on the power cord, or heat or pull it using the projector, please unplug the power cord from the outlet. 0 Connect it .
..." item in the menu (P. 54). A Power Cord (Supplied) B Precautions to the power input terminal on the power cord, or heat or pull it using the projector, please unplug the power cord from the outlet. 0 Connect it .

Instruction Manual
Page 21
.../ON LAMP WARNING STANDBY/ON LAMP WARNING . 13 2 2 Choose the image to project Remote control: press the [HDMI 1] or [HDMI 2] button Projector unit: press the [INPUT] button to switch the input 0 Play back the selected device to green (light goes off when the image is temporarily hidden.... To hide the image temporarily Press the [HIDE] button on the power Remote control: press the C [ON] button Projector unit: press the A [STANDBY/ON] button 0 The "STANDBY/ON" indicator light switches from red to project the image. Viewing Videos STANDBY/ON ...
.../ON LAMP WARNING STANDBY/ON LAMP WARNING . 13 2 2 Choose the image to project Remote control: press the [HDMI 1] or [HDMI 2] button Projector unit: press the [INPUT] button to switch the input 0 Play back the selected device to green (light goes off when the image is temporarily hidden.... To hide the image temporarily Press the [HIDE] button on the power Remote control: press the C [ON] button Projector unit: press the A [STANDBY/ON] button 0 The "STANDBY/ON" indicator light switches from red to project the image. Viewing Videos STANDBY/ON ...

Instruction Manual
Page 22
... about 100 seconds, the "STANDBY/ON" indicator switches from a green light to turn off?" 3 Turn off the power Remote control: press the B [STAND BY] button Projector unit: press the A [STANDBY/ON] button 0 While the "Are you sure you want to a red blinking light. 0 After the light goes off, the fan will...
... about 100 seconds, the "STANDBY/ON" indicator switches from a green light to turn off?" 3 Turn off the power Remote control: press the B [STAND BY] button Projector unit: press the A [STANDBY/ON] button 0 While the "Are you sure you want to a red blinking light. 0 After the light goes off, the fan will...

Instruction Manual
Page 23
Adjusting the Projector Screen Adjusting the Lens According to end adjustment. ADJ. ABCD Focus Adjustment . Zoom (Screen Size) Adjustment Shift (Screen Position) Adjustment 2 Press the [MENU] button once, ...
Adjusting the Projector Screen Adjusting the Lens According to end adjustment. ADJ. ABCD Focus Adjustment . Zoom (Screen Size) Adjustment Shift (Screen Position) Adjustment 2 Press the [MENU] button once, ...

Instruction Manual
Page 26
...html Exit MENU . For details on the screen and the corresponding correction mode, please visit our website. http://www3.jvckenwood.com/english/projector/screen/ Operate 26 Select Operate Back BACK 0 This item is not available when "Color Profile" is set to "Off". 0 For... information on the dedicated projector calibration software, please visit our website. Installation Lens Control Pixel Adjust Installation Style Keystone 0 Anamorphic High Altitude Mode Front Off Off Screen...
...html Exit MENU . For details on the screen and the corresponding correction mode, please visit our website. http://www3.jvckenwood.com/english/projector/screen/ Operate 26 Select Operate Back BACK 0 This item is not available when "Color Profile" is set to "Off". 0 For... information on the dedicated projector calibration software, please visit our website. Installation Lens Control Pixel Adjust Installation Style Keystone 0 Anamorphic High Altitude Mode Front Off Off Screen...

Instruction Manual
Page 31
... all 3D movies. Natural 3D Cinema 3D Video 3D Animation x.v.Color*2*3 Color space that is close to get ready a commercially available optical sensor and the projector calibration software program. it includes wider color gamut than the HDTV standard.
... all 3D movies. Natural 3D Cinema 3D Video 3D Animation x.v.Color*2*3 Color space that is close to get ready a commercially available optical sensor and the projector calibration software program. it includes wider color gamut than the HDTV standard.


