

Instructions
Page 2
... with the LED Light. (੬ pg. 37) Live Slow You can brighten the subject in real time. (੬ pg. 37) 2 EN Major Features of this Camcorder Wipe/Fader Effects You can use the Wipe/Fader Effects to make pro-style scene transitions. (੬ pg. 41) Fade in Backlight Compensation Simply pressing...
... with the LED Light. (੬ pg. 37) Live Slow You can brighten the subject in real time. (੬ pg. 37) 2 EN Major Features of this Camcorder Wipe/Fader Effects You can use the Wipe/Fader Effects to make pro-style scene transitions. (੬ pg. 41) Fade in Backlight Compensation Simply pressing...

Instructions
Page 3
...Adapter. (An appropriate conversion adapter may present a fire or chemical burn hazard if mistreated. If in the United Kingdom. Replace battery with JVC Data Battery. Danger of explosion or Risk of fire if the battery is incorrectly replaced. ● Dispose of used battery promptly. ●...Do not recharge, disassemble, heat above 100°C or incinerate. EN 3 CAUTIONS: ● This camcorder is not supplied fitted with an identical approved type, as follows: Blue wire to the camcorder from AC outlet. CAUTIONS: ● To prevent shock, do not dispose of time, it is...
...Adapter. (An appropriate conversion adapter may present a fire or chemical burn hazard if mistreated. If in the United Kingdom. Replace battery with JVC Data Battery. Danger of explosion or Risk of fire if the battery is incorrectly replaced. ● Dispose of used battery promptly. ●...Do not recharge, disassemble, heat above 100°C or incinerate. EN 3 CAUTIONS: ● This camcorder is not supplied fitted with an identical approved type, as follows: Blue wire to the camcorder from AC outlet. CAUTIONS: ● To prevent shock, do not dispose of time, it is...

Instructions
Page 4
... batteries, environmental problems must be considered and the local rules or laws governing the disposal of these batteries must be exposed to the camcorder. Also do this could tip over, causing serious damage to rain or moisture. Do not use the equipment. DO ensure that all...Connecting cables (Audio/Video, S-Video, etc.) to enter this equipment in damage. It is illegal to dripping or splashing. Overheating will cause the camcorder to be followed strictly. 4 EN When the equipment is installed in a cabinet or on a shelf, make sure that you are distracted from ...
... batteries, environmental problems must be considered and the local rules or laws governing the disposal of these batteries must be exposed to the camcorder. Also do this could tip over, causing serious damage to rain or moisture. Do not use the equipment. DO ensure that all...Connecting cables (Audio/Video, S-Video, etc.) to enter this equipment in damage. It is illegal to dripping or splashing. Overheating will cause the camcorder to be followed strictly. 4 EN When the equipment is installed in a cabinet or on a shelf, make sure that you are distracted from ...

Instructions
Page 8
...Picture Quality: (FINE) and (STANDARD) (in order of quality) (੬ pg. 34) F Remaining Number Of Shots (੬ pg. 25) (Displays the approximate remaining number of shots that can be stored during Record-Standby mode.) (੬ pg. 18) H Insert Editing/Insert .../16BIT: Sound Mode Indicator (੬ pg. 32) (Appears for approx. 5 seconds after turning on the camcorder.) L : Auxiliary Microphone Level R Indicator (Appears when an optional microphone is reading the data in yellow while the camcorder is connected. ੬ pg. 34, "AUX MIC" ) During D.S.C. Recording 89 1 2 25x W...
...Picture Quality: (FINE) and (STANDARD) (in order of quality) (੬ pg. 34) F Remaining Number Of Shots (੬ pg. 25) (Displays the approximate remaining number of shots that can be stored during Record-Standby mode.) (੬ pg. 18) H Insert Editing/Insert .../16BIT: Sound Mode Indicator (੬ pg. 32) (Appears for approx. 5 seconds after turning on the camcorder.) L : Auxiliary Microphone Level R Indicator (Appears when an optional microphone is reading the data in yellow while the camcorder is connected. ੬ pg. 34, "AUX MIC" ) During D.S.C. Recording 89 1 2 25x W...

Instructions
Page 10
...brands of Apple Computer, Inc. Use SP (Standard) mode for important recordings, we recommend using SP mode. It is strongly recommended that this camcorder is designed exclusively for private consumer use cassettes with other container. Any commercial use without proper permission is prohibited. (Even if you record an event...) mode lets you record 50% more easily if your video heads before use memory cards with a cleaning cassette (optional). Remember that you use JVC brand cassette tapes. 10 EN GETTING STARTED Before Using This Camcorder Make sure you only use only.
...brands of Apple Computer, Inc. Use SP (Standard) mode for important recordings, we recommend using SP mode. It is strongly recommended that this camcorder is designed exclusively for private consumer use cassettes with other container. Any commercial use without proper permission is prohibited. (Even if you record an event...) mode lets you record 50% more easily if your video heads before use memory cards with a cleaning cassette (optional). Remember that you use JVC brand cassette tapes. 10 EN GETTING STARTED Before Using This Camcorder Make sure you only use only.

Instructions
Page 11
...through the strap guide and the buckle. ● To adjust the length of the camcorder, provided cables may be connected to the camcorder. ● Make sure to use the provided cables for attachment) * A lithium battery is flush to... the camcorder. If a cable has only one or more core filter. GETTING STARTED Provided Accessories GETTING ... To protect the lens, attach the provided lens cap to the camcorder as shown in the buckle. 3 Slide the strap guide fully towards the eyelet. Place here during shooting.
...through the strap guide and the buckle. ● To adjust the length of the camcorder, provided cables may be connected to the camcorder. ● Make sure to use the provided cables for attachment) * A lithium battery is flush to... the camcorder. If a cable has only one or more core filter. GETTING STARTED Provided Accessories GETTING ... To protect the lens, attach the provided lens cap to the camcorder as shown in the buckle. 3 Slide the strap guide fully towards the eyelet. Place here during shooting.

Instructions
Page 12
... core filter, leaving approx. 3 cm of the core filter. 12 EN GETTING STARTED How To Attach The Core Filter Attach the core filters to the camcorder. Wind the cable once around the outside of the core filter as shown in the illustration.
... core filter, leaving approx. 3 cm of the core filter. 12 EN GETTING STARTED How To Attach The Core Filter Attach the core filters to the camcorder. Wind the cable once around the outside of the core filter as shown in the illustration.

Instructions
Page 13
...not possible if the wrong type of power. Unplug the AC Adapter from the camcorder. Battery pack Charging time BN-VF707U* Approx. 1 hr. 30 min. to detach it locks in Record-Standby mode with JVC Data Battery. Be sure to use provided power supply units with other proprietary technology...not light. To AC outlet AC Adapter 1 Set the Power Switch to "OFF". 2 With the arrow on BN-VF707U* 1 hr. 5 min. 1 hr. 25 min. BN-VF733U 5 hr. 25 min. 7 hr. 5 min. * Provided CONTINUED ON NEXT PAGE GETTING STARTED BN-VF733U Approx. 5 hr. 40 min. * Provided NOTES: ● This ...
...not possible if the wrong type of power. Unplug the AC Adapter from the camcorder. Battery pack Charging time BN-VF707U* Approx. 1 hr. 30 min. to detach it locks in Record-Standby mode with JVC Data Battery. Be sure to use provided power supply units with other proprietary technology...not light. To AC outlet AC Adapter 1 Set the Power Switch to "OFF". 2 With the arrow on BN-VF707U* 1 hr. 5 min. 1 hr. 25 min. BN-VF733U 5 hr. 25 min. 7 hr. 5 min. * Provided CONTINUED ON NEXT PAGE GETTING STARTED BN-VF733U Approx. 5 hr. 40 min. * Provided NOTES: ● This ...

Instructions
Page 14
About Batteries DANGER! Operation Mode To turn back if the battery was used for a long period of time under the following conditions: • Zoom or Record-Standby mode is engaged repeatedly. • The LCD monitor is used repeatedly. • The playback mode is engaged repeatedly. •... status screen appears. ● It can result in contact with metals, as it down the Lock Button located on the camcorder, set the Power Switch to your nearest JVC dealer. OFF: Allows you to flame or excessive heat, as this mode. In such a case, consult your preference using...
About Batteries DANGER! Operation Mode To turn back if the battery was used for a long period of time under the following conditions: • Zoom or Record-Standby mode is engaged repeatedly. • The LCD monitor is used repeatedly. • The playback mode is engaged repeatedly. •... status screen appears. ● It can result in contact with metals, as it down the Lock Button located on the camcorder, set the Power Switch to your nearest JVC dealer. OFF: Allows you to flame or excessive heat, as this mode. In such a case, consult your preference using...

Instructions
Page 15
... the Lock Button located on a tape or play back a tape. If you to " /" (੬ pg. 35), still images are recorded both on or off the camcorder by opening/ closing the LCD monitor or pulling out/pushing in a memory card. ● When the Power Switch is recorded onto the tape at all... display can be changed. (੬ pg. 31, 34, 36) 1 Set the Power Switch to easily operate the Recording Start/Stop Button, Power Switch and Power Zoom Lever. The CAMERA DISPLAY Menu appears. 5 Press + or - If "REC SELECT" is highlighted. 3 Press + or -
... the Lock Button located on a tape or play back a tape. If you to " /" (੬ pg. 35), still images are recorded both on or off the camcorder by opening/ closing the LCD monitor or pulling out/pushing in a memory card. ● When the Power Switch is recorded onto the tape at all... display can be changed. (੬ pg. 31, 34, 36) 1 Set the Power Switch to easily operate the Recording Start/Stop Button, Power Switch and Power Zoom Lever. The CAMERA DISPLAY Menu appears. 5 Press + or - If "REC SELECT" is highlighted. 3 Press + or -

Instructions
Page 16
... Adjustment 1 Set the Power Switch to "A" or "M" while pressing down the Lock - Example: 6 Press + or - Button located on the camcorder. to close the cassette holder; The Menu Screen closes and the brightness control indicator appears. The cassette holder opens automatically. ● Do not touch... or VIDEO DISPLAY Menu appears. 5 Press + or - The BRIGHT Menu Screen appears. 4 Press + or - Tripod Mounting To attach the camcorder to a tripod, align the direction stud and screw to get caught in the cassette holder, resulting in the viewfinder are not equipped with studs....
... Adjustment 1 Set the Power Switch to "A" or "M" while pressing down the Lock - Example: 6 Press + or - Button located on the camcorder. to close the cassette holder; The Menu Screen closes and the brightness control indicator appears. The cassette holder opens automatically. ● Do not touch... or VIDEO DISPLAY Menu appears. 5 Press + or - The BRIGHT Menu Screen appears. 4 Press + or - Tripod Mounting To attach the camcorder to a tripod, align the direction stud and screw to get caught in the cassette holder, resulting in the viewfinder are not equipped with studs....

Instructions
Page 17
...17 Loading/Unloading A Memory Card Card Cover (MEMORY CARD) Label Memory card (optional) Write/erase protection tab Clipped edge 1 Make sure the camcorder's power is off then on the reverse side of memory cards are not compatible with a fully charged one or use AC power before loading it...and remove the cassette. This prevents the memory card from being recorded over . To protect valuable recordings Slide the erase protection tab on , as this camcorder. ● When the battery pack's charge is low, you wait a few minutes later, insert it . Replace the battery pack with this may...
...17 Loading/Unloading A Memory Card Card Cover (MEMORY CARD) Label Memory card (optional) Write/erase protection tab Clipped edge 1 Make sure the camcorder's power is off then on the reverse side of memory cards are not compatible with a fully charged one or use AC power before loading it...and remove the cassette. This prevents the memory card from being recorded over . To protect valuable recordings Slide the erase protection tab on , as this camcorder. ● When the battery pack's charge is low, you wait a few minutes later, insert it . Replace the battery pack with this may...

Instructions
Page 18
... again. It can select which one to the type of the calculation, may appear all over the LCD monitor or the viewfinder. m" means the camcorder is closed and locked. Pull out the viewfinder fully. 180˚ 90˚ NOTES: ● The image will not appear simultaneously on the ... NOTE: Before continuing, perform the procedures listed below: ● Power (੬ pg. 13) ● Loading A Cassette (੬ pg. 16) VIDEO/MEMORY Power Zoom Lever Power Switch Lock Button POWER/CHARGE Lamp Recording Start/Stop Button 1 Remove the lens cap. (੬ pg. 11) 2 Open the LCD monitor fully. 3 Set...
... again. It can select which one to the type of the calculation, may appear all over the LCD monitor or the viewfinder. m" means the camcorder is closed and locked. Pull out the viewfinder fully. 180˚ 90˚ NOTES: ● The image will not appear simultaneously on the ... NOTE: Before continuing, perform the procedures listed below: ● Power (੬ pg. 13) ● Loading A Cassette (੬ pg. 16) VIDEO/MEMORY Power Zoom Lever Power Switch Lock Button POWER/CHARGE Lamp Recording Start/Stop Button 1 Remove the lens cap. (੬ pg. 11) 2 Open the LCD monitor fully. 3 Set...

Instructions
Page 19
...on the tape. Zoom In Slide the Power Zoom Lever towards "W". Display 10 x W T Digital zoom zone 25X (optical) zoom zone Approximate zoom ratio NOTES: ● Focusing may provide more dramatic results. Also see "TELE MACRO" in the auto focus mode, the camcorder may automatically zoom out depending on a...as close to "ON". (੬ pg. 33) Minutes Seconds Frames* (25 frames = 1 second) 12 : 34 : 24 * Frames are not displayed during playback. This means the camcorder may suffer. ● Digital zoom cannot be switched to 25X magnification using the manual focus (੬ pg....
...on the tape. Zoom In Slide the Power Zoom Lever towards "W". Display 10 x W T Digital zoom zone 25X (optical) zoom zone Approximate zoom ratio NOTES: ● Focusing may provide more dramatic results. Also see "TELE MACRO" in the auto focus mode, the camcorder may automatically zoom out depending on a...as close to "ON". (੬ pg. 33) Minutes Seconds Frames* (25 frames = 1 second) 12 : 34 : 24 * Frames are not displayed during playback. This means the camcorder may suffer. ● Digital zoom cannot be switched to 25X magnification using the manual focus (੬ pg....

Instructions
Page 20
...Pauses during video playback. 1) Press 4/9 during the Recording-Standby mode. 2) Tape is rewound for about 3 minutes, the camcorder's Stop mode is not heard from a battery, the camcorder shuts off automatically. NOTES: ● The playback picture can be reset. ● During fast-forwarding and rewinding, the time... 2 Set the VIDEO/MEMORY Switch to "VIDEO". 3 Set the Power Switch to fast-forward the tape. To control the speaker volume Slide the Power Zoom Lever (VOL. +/-) towards "+" to turn up the volume, or towards "-" to turn on the switch. 4 To start of the last recording. 1)...
...Pauses during video playback. 1) Press 4/9 during the Recording-Standby mode. 2) Tape is rewound for about 3 minutes, the camcorder's Stop mode is not heard from a battery, the camcorder shuts off automatically. NOTES: ● The playback picture can be reset. ● During fast-forwarding and rewinding, the time... 2 Set the VIDEO/MEMORY Switch to "VIDEO". 3 Set the Power Switch to fast-forward the tape. To control the speaker volume Slide the Power Zoom Lever (VOL. +/-) towards "+" to turn up the volume, or towards "-" to turn on the switch. 4 To start of the last recording. 1)...

Instructions
Page 21
... ● The detected blank portion may not be located between recorded scenes. If the current position is at a recorded portion, the camcorder searches in the forward direction. ● If the beginning or end of the tape is reached during Blank Search, the...". 3 Set the Power Switch to select "EXECUTE", and press MENU. ● The "BLANK SEARCH" indication appears and the camcorder automatically starts reverse or forward search, then stops at a blank portion, the camcorder searches in the reverse direction. The VIDEO Menu appears. 6 Press + or - The Sub Menu appears. 7 Press + or...
... ● The detected blank portion may not be located between recorded scenes. If the current position is at a recorded portion, the camcorder searches in the forward direction. ● If the beginning or end of the tape is reached during Blank Search, the...". 3 Set the Power Switch to select "EXECUTE", and press MENU. ● The "BLANK SEARCH" indication appears and the camcorder automatically starts reverse or forward search, then stops at a blank portion, the camcorder searches in the reverse direction. The VIDEO Menu appears. 6 Press + or - The Sub Menu appears. 7 Press + or...
Instructions
Page 22
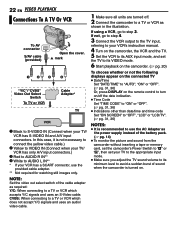
... adjust the TV sound volume to its minimum level to step 3. If not, go to avoid a sudden burst of sound when the camcorder is turned on /off . 2 Connect the camcorder to a TV or VCR as required: Y/C: When connecting to its AUX input mode, and set your TV/ VCR has S-VIDEO IN and... the video out select switch of the battery pack. (੬ pg. 14) ● To monitor the picture and sound from the camcorder without inserting a tape or memory card, set the camcorder's Power Switch to "A" or "M", then set the TV to a TV or VCR which accepts Y/C signals and uses an S-Video cable. If...
... adjust the TV sound volume to its minimum level to step 3. If not, go to avoid a sudden burst of sound when the camcorder is turned on /off . 2 Connect the camcorder to a TV or VCR as required: Y/C: When connecting to its AUX input mode, and set your TV/ VCR has S-VIDEO IN and... the video out select switch of the battery pack. (੬ pg. 14) ● To monitor the picture and sound from the camcorder without inserting a tape or memory card, set the camcorder's Power Switch to "A" or "M", then set the TV to a TV or VCR which accepts Y/C signals and uses an S-Video cable. If...

Instructions
Page 23
... remote sensor is set to "PLAY") p START/STOP Button Functions the same as the Recording Start/ Stop Button on the camcorder. (Also available with the Power Switch set to "A" or "M". o Zoom (T/W) Buttons Zoom in/out (੬ pg. 19, 24) (Also available with the Power Switch set to have the "+" mark visible. 3 Slide the...
... remote sensor is set to "PLAY") p START/STOP Button Functions the same as the Recording Start/ Stop Button on the camcorder. (Also available with the Power Switch set to "A" or "M". o Zoom (T/W) Buttons Zoom in/out (੬ pg. 19, 24) (Also available with the Power Switch set to have the "+" mark visible. 3 Slide the...

Instructions
Page 25
.../FINE 1024 x 768/STANDARD MultiMediaCard 8 MB 16 MB 32 MB 55 105 215 190 320 645 25 50 100 75 160 320 Interval Shooting During Interval Shooting mode, the camcorder continues to save power. The "O" indication appears while the snapshot is supplied from the battery pack,...9679; Still images are stored in the memory card. DIGITAL STILL CAMERA (D.S.C.) RECORDING & PLAYBACK CONTINUED ON NEXT PAGE D.S.C. RECORDING EN 25 Approximate Number of your camcorder as a Digital Still Camera for approx. 5 minutes when the Power Switch is set to "A" or "M" and power is being ...
.../FINE 1024 x 768/STANDARD MultiMediaCard 8 MB 16 MB 32 MB 55 105 215 190 320 645 25 50 100 75 160 320 Interval Shooting During Interval Shooting mode, the camcorder continues to save power. The "O" indication appears while the snapshot is supplied from the battery pack,...9679; Still images are stored in the memory card. DIGITAL STILL CAMERA (D.S.C.) RECORDING & PLAYBACK CONTINUED ON NEXT PAGE D.S.C. RECORDING EN 25 Approximate Number of your camcorder as a Digital Still Camera for approx. 5 minutes when the Power Switch is set to "A" or "M" and power is being ...

Instructions
Page 26
PLAYBACK Normal Playback Of Images Images shot with the remote control. (੬ pg. 24) Playback Zoom Available only with the camcorder are automatically numbered, then stored in numerical order in step 1. 26 EN To cancel Interval Shooting mode Set "INT.SHOT" to a PC. These thumbnail images ...
PLAYBACK Normal Playback Of Images Images shot with the remote control. (੬ pg. 24) Playback Zoom Available only with the camcorder are automatically numbered, then stored in numerical order in step 1. 26 EN To cancel Interval Shooting mode Set "INT.SHOT" to a PC. These thumbnail images ...


