
Instructions
Page 11
...use the Remote Control Unit, remove the insulation sheet. To use any other cables. a AC Adapter AP-V17E b Battery Pack BN-VF707U c S/AV Cable d USB Cable e Core Filter (for USB cable, ੬ pg. 12 for attachment) f CD-ROM g Cable Adapter h Remote Control Unit RM-V720U i Lithium Battery CR2025* (for ... GETTING STARTED EN 11 NOTES: ● In order to maintain optimum performance of the camcorder, provided cables may be connected to the camcorder. ● Make sure to use the provided cables for attachment) * A lithium battery is pre-installed in the Remote Control Unit at time...
...use the Remote Control Unit, remove the insulation sheet. To use any other cables. a AC Adapter AP-V17E b Battery Pack BN-VF707U c S/AV Cable d USB Cable e Core Filter (for USB cable, ੬ pg. 12 for attachment) f CD-ROM g Cable Adapter h Remote Control Unit RM-V720U i Lithium Battery CR2025* (for ... GETTING STARTED EN 11 NOTES: ● In order to maintain optimum performance of the camcorder, provided cables may be connected to the camcorder. ● Make sure to use the provided cables for attachment) * A lithium battery is pre-installed in the Remote Control Unit at time...

Instructions
Page 20
...supplied from the speaker. This is set the Power Switch to "OFF", then to "PLAY". ● When a cable is connected to the S/AV connector, the sound is not heard from a battery, the camcorder shuts off automatically. To turn on again, set to "ON". (੬ pg. 34) Quick Review Enables to... fast-forward the tape. To control the speaker volume Slide the Power Zoom Lever (VOL. +/-) towards "+" to turn ...
...supplied from the speaker. This is set the Power Switch to "OFF", then to "PLAY". ● When a cable is connected to the S/AV connector, the sound is not heard from a battery, the camcorder shuts off automatically. To turn on again, set to "ON". (੬ pg. 34) Quick Review Enables to... fast-forward the tape. To control the speaker volume Slide the Power Zoom Lever (VOL. +/-) towards "+" to turn ...
Instructions
Page 22
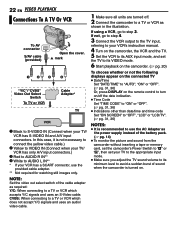
...'s instruction manual. 4 Turn on /off . 2 Connect the camcorder to AUDIO L IN** * If your VCR has a SCART connector, use the AC Adapter as shown in the illustration. In this case, it is not necessary to connect the yellow video cable.) B Yellow to VIDEO IN (Connect when your TV/ VCR....) C Red to AUDIO R IN** D White to a TV or VCR as the power supply instead of sound when the camcorder is recommended to use the provided cable adapter. ** Not required for watching still images only. 22 EN VIDEO PLAYBACK Connections To A TV Or VCR To AV connector S/AV cable (provided) Open the cover.
...'s instruction manual. 4 Turn on /off . 2 Connect the camcorder to AUDIO L IN** * If your VCR has a SCART connector, use the AC Adapter as shown in the illustration. In this case, it is not necessary to connect the yellow video cable.) B Yellow to VIDEO IN (Connect when your TV/ VCR....) C Red to AUDIO R IN** D White to a TV or VCR as the power supply instead of sound when the camcorder is recommended to use the provided cable adapter. ** Not required for watching still images only. 22 EN VIDEO PLAYBACK Connections To A TV Or VCR To AV connector S/AV cable (provided) Open the cover.

Instructions
Page 43
... accepts Y/C signals and uses an S-Video cable. To use this camcorder as a recorder, use this camcorder as a player 1 Following the illustrations, connect the camcorder and the VCR's input connectors. 2 Start playback on your TV/VCR has an S-VIDEO IN/OUT connector. Dubbing To Or From A VCR To S/AV connector S/AV cable (provided) Open the cover. NOTES: ●...
... accepts Y/C signals and uses an S-Video cable. To use this camcorder as a recorder, use this camcorder as a player 1 Following the illustrations, connect the camcorder and the VCR's input connectors. 2 Start playback on your TV/VCR has an S-VIDEO IN/OUT connector. Dubbing To Or From A VCR To S/AV connector S/AV cable (provided) Open the cover. NOTES: ●...

Instructions
Page 44
...; If no image is displayed on the LCD monitor, set "S/AV INPUT" to start dubbing, start dubbing. To use the optional JVC VC-VDV204U DV cable. The indication stops rotating. 9 Press 8 to return to stop playback on this camcorder to a video unit equipped with a DV output connector using a...all units are turned off. 2 Connect this camcorder to a video unit equipped with a DV input connector using a DV cable, be sure to use this camcorder as a recorder 1 Make sure all units are turned off the power and make connections again. ● If "Playback Zoom" (੬ pg. 24) or "Playback...
...; If no image is displayed on the LCD monitor, set "S/AV INPUT" to start dubbing, start dubbing. To use the optional JVC VC-VDV204U DV cable. The indication stops rotating. 9 Press 8 to return to stop playback on this camcorder to a video unit equipped with a DV output connector using a...all units are turned off. 2 Connect this camcorder to a video unit equipped with a DV input connector using a DV cable, be sure to use this camcorder as a recorder 1 Make sure all units are turned off the power and make connections again. ● If "Playback Zoom" (੬ pg. 24) or "Playback...


