
Instruction Manual
Page 1
... the Model No. which is located on the bottom of this digital video camera. Retain this information for purchasing this product. and Serial No. DIGITAL VIDEO CAMERA GR-D370AH For Accessories: http://www.jvc.co.jp/english/accessory/ Dear Customer, Thank you for future reference. To ...deactivate the demonstration, set "DEMO MODE" to ensure safe use , please read the safety information and precautions contained in the pages 2 - 5 to "OFF". (੬ pg. 32, 35) EN LYT1557-001B Before use of the camcorder...
... the Model No. which is located on the bottom of this digital video camera. Retain this information for purchasing this product. and Serial No. DIGITAL VIDEO CAMERA GR-D370AH For Accessories: http://www.jvc.co.jp/english/accessory/ Dear Customer, Thank you for future reference. To ...deactivate the demonstration, set "DEMO MODE" to ensure safe use , please read the safety information and precautions contained in the pages 2 - 5 to "OFF". (੬ pg. 32, 35) EN LYT1557-001B Before use of the camcorder...
Instruction Manual
Page 7
... Playback 23 Still Playback 23 Shuttle Search 23 Blank Search 23 Connections To A TV Or VCR 24 Playback Using The Remote Control 25 DIGITAL STILL CAMERA (D.S.C.) RECORDING & PLAYBACK 27 D.S.C.
... Playback 23 Still Playback 23 Shuttle Search 23 Blank Search 23 Connections To A TV Or VCR 24 Playback Using The Remote Control 25 DIGITAL STILL CAMERA (D.S.C.) RECORDING & PLAYBACK 27 D.S.C.

Instruction Manual
Page 9
.... 14) ìShoulder Strap Eyelet (੬ pg. 12) îGrip Strap (੬ pg. 18) ïSpeaker (੬ pg. 23) ñLens óLED Light òCamera Sensor (Be careful not to the IEEE1394-1995 industry specification and extensions thereof.
.... 14) ìShoulder Strap Eyelet (੬ pg. 12) îGrip Strap (੬ pg. 18) ïSpeaker (੬ pg. 23) ñLens óLED Light òCamera Sensor (Be careful not to the IEEE1394-1995 industry specification and extensions thereof.

Instruction Manual
Page 27
... Image Size/Picture Quality 640 x 480/FINE 640 x 480/STANDARD * Optional MultiMediaCard* 8 MB 16 MB 32 MB 57 105 215 191 320 645 DIGITAL STILL CAMERA (D.S.C.) RECORDING & PLAYBACK 1 Remove the lens cap. 2 Open the LCD monitor fully. (੬ pg. 20) 3 Set the VIDEO/MEMORY Switch to "MEMORY". 4... Set the Power Switch to save power. Basic Shooting (D.S.C. Snapshot) You can use your camcorder as a Digital Still Camera for approx. 5 minutes when the Power Switch is set "MELODY" to "OFF". (੬ pg. 32, 34) NOTE: If shooting is supplied from...
... Image Size/Picture Quality 640 x 480/FINE 640 x 480/STANDARD * Optional MultiMediaCard* 8 MB 16 MB 32 MB 57 105 215 191 320 645 DIGITAL STILL CAMERA (D.S.C.) RECORDING & PLAYBACK 1 Remove the lens cap. 2 Open the LCD monitor fully. (੬ pg. 20) 3 Set the VIDEO/MEMORY Switch to "MEMORY". 4... Set the Power Switch to save power. Basic Shooting (D.S.C. Snapshot) You can use your camcorder as a Digital Still Camera for approx. 5 minutes when the Power Switch is set "MELODY" to "OFF". (੬ pg. 32, 34) NOTE: If shooting is supplied from...
Instruction Manual
Page 29
...;les stored in the new folder. ADDITIONAL FEATURES FOR D.S.C. The PROTECT screen appears. 5 Press 4 or 3 to select "EXECUTE", and press SET. EN 29 DIGITAL STILL CAMERA (D.S.C.) RECORDING & PLAYBACK Resetting The File Name By resetting the file name, a new folder will be made files. 1 Perform steps 1 - 3 in "Protecting Files...
...;les stored in the new folder. ADDITIONAL FEATURES FOR D.S.C. The PROTECT screen appears. 5 Press 4 or 3 to select "EXECUTE", and press SET. EN 29 DIGITAL STILL CAMERA (D.S.C.) RECORDING & PLAYBACK Resetting The File Name By resetting the file name, a new folder will be made files. 1 Perform steps 1 - 3 in "Protecting Files...

Instruction Manual
Page 31
... the number. 6 Press 4 or 3 to "PLAY" while pressing down the Lock Button located on the switch. 3 Press MENU. DIGITAL STILL CAMERA (D.S.C.) RECORDING & PLAYBACK appears. ● If you have been protected, are cleared. 1 Set the VIDEO/MEMORY Switch to "MEMORY". 2 Set the...EXECUTE", and press SET. The memory card is initialised. ● When initialisation is reset to use the provided AC Adapter, as turning off the camcorder) during initialisation. If the memory card becomes corrupted, initialize it. The DPOF screen appears. 3 Press 1 or 2 to select the desired &#...
... the number. 6 Press 4 or 3 to "PLAY" while pressing down the Lock Button located on the switch. 3 Press MENU. DIGITAL STILL CAMERA (D.S.C.) RECORDING & PLAYBACK appears. ● If you have been protected, are cleared. 1 Set the VIDEO/MEMORY Switch to "MEMORY". 2 Set the...EXECUTE", and press SET. The memory card is initialised. ● When initialisation is reset to use the provided AC Adapter, as turning off the camcorder) during initialisation. If the memory card becomes corrupted, initialize it. The DPOF screen appears. 3 Press 1 or 2 to select the desired &#...
Instruction Manual
Page 33
... the recording time. * SP indicator does not appear on two separate channels. (Equivalent to the 48 kHz mode of focus. Depending on another camcorder, blocks of approx. 40 cm. SOUND MODE [12BIT]: Enables video recording of stereo sound on four separate channels, and is recommended for unstable ...images caused by camera-shake, particularly at the switching point. ● It is recommended that tapes recorded in the LP mode on this camcorder be changed only when the Power Switch is set to "REC". [ ] = Factory...
... the recording time. * SP indicator does not appear on two separate channels. (Equivalent to the 48 kHz mode of focus. Depending on another camcorder, blocks of approx. 40 cm. SOUND MODE [12BIT]: Enables video recording of stereo sound on four separate channels, and is recommended for unstable ...images caused by camera-shake, particularly at the switching point. ● It is recommended that tapes recorded in the LP mode on this camcorder be changed only when the Power Switch is set to "REC". [ ] = Factory...
Instruction Manual
Page 43
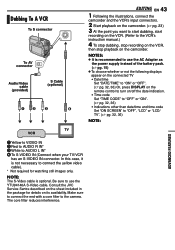
... to the VCR's instruction manual.) 4 To stop dubbing, stop recording on the VCR, then stop playback on the camcorder. Be sure to the camera. Consult the JVC Service Sentre described on the sheet included in the package for watching still images only. NOTES: ● It is recommended...AV connector Audio/Video cable (provided) S Cable (optional) 12 3 4 EDITING EN 43 1 Following the illustrations, connect the camcorder and the VCR's input connectors. 2 Start playback on the camcorder. (੬ pg. 23) 3 At the point you want to start dubbing, start recording on the VCR. (Refer to AUDIO...
... to the VCR's instruction manual.) 4 To stop dubbing, stop recording on the VCR, then stop playback on the camcorder. Be sure to the camera. Consult the JVC Service Sentre described on the sheet included in the package for watching still images only. NOTES: ● It is recommended...AV connector Audio/Video cable (provided) S Cable (optional) 12 3 4 EDITING EN 43 1 Following the illustrations, connect the camcorder and the VCR's input connectors. 2 Start playback on the camcorder. (੬ pg. 23) 3 At the point you want to start dubbing, start recording on the VCR. (Refer to AUDIO...

Instruction Manual
Page 53
... For periodic check-ups please consult your nearest JVC dealer. disassemble or modify the unit. ... in places of the battery pack. in places subject to excessive shock or vibration. ... swing the soft camera case excessively when the camcorder is extremely low (below 35%) or extremely ...hand strap or the grip. ... REFERENCES While using the cleaning cassette, the problems still exist, consult your nearest JVC dealer. leave the battery pack attached when the camcorder is not in places subject to direct sunlight. ... near a cooking stove. ... CAUTIONS EN 53 ●...
... For periodic check-ups please consult your nearest JVC dealer. disassemble or modify the unit. ... in places of the battery pack. in places subject to excessive shock or vibration. ... swing the soft camera case excessively when the camcorder is extremely low (below 35%) or extremely ...hand strap or the grip. ... REFERENCES While using the cleaning cassette, the problems still exist, consult your nearest JVC dealer. leave the battery pack attached when the camcorder is not in places subject to direct sunlight. ... near a cooking stove. ... CAUTIONS EN 53 ●...

Instruction Manual
Page 55
...viewfinder with the LCD monitor closed and the viewfinder pushed back in) Weight Approx. 400 g (without notice. E & O.E. SPECIFICATIONS EN 55 Camcorder For General Power supply DC 11 V (Using AC Adapter) DC 7.2 V (Using battery pack) Power consumption Approx. 2.4 W (2.6 W*) (LCD monitor off,...x D) 59 mm x 94 mm x 114 mm (with 0.33" colour LCD Speaker Monaural LED Light Effective distance: 1.5 m For Digital Still Camera Storage media SD Memory Card/MultiMediaCard Compression system JPEG (compatible) File size Still image: 640 x 480 pixels Picture quality 2 modes (FINE/STANDARD) ...
...viewfinder with the LCD monitor closed and the viewfinder pushed back in) Weight Approx. 400 g (without notice. E & O.E. SPECIFICATIONS EN 55 Camcorder For General Power supply DC 11 V (Using AC Adapter) DC 7.2 V (Using battery pack) Power consumption Approx. 2.4 W (2.6 W*) (LCD monitor off,...x D) 59 mm x 94 mm x 114 mm (with 0.33" colour LCD Speaker Monaural LED Light Effective distance: 1.5 m For Digital Still Camera Storage media SD Memory Card/MultiMediaCard Compression system JPEG (compatible) File size Still image: 640 x 480 pixels Picture quality 2 modes (FINE/STANDARD) ...


