
Instruction Manual
Page 1
...: Enter below the Model No. Serial No. which is located on the bottom of this product. DIGITAL VIDEO CAMERA GR-D370AH For Accessories: http://www.jvc.co.jp/english/accessory/ Dear Customer, Thank you for purchasing this information for future reference. and Serial No. Retain ...this digital video camera. Model No. To deactivate the demonstration, set "DEMO MODE" to ensure safe use of the camcorder. Before use, please...
...: Enter below the Model No. Serial No. which is located on the bottom of this product. DIGITAL VIDEO CAMERA GR-D370AH For Accessories: http://www.jvc.co.jp/english/accessory/ Dear Customer, Thank you for purchasing this information for future reference. and Serial No. Retain ...this digital video camera. Model No. To deactivate the demonstration, set "DEMO MODE" to ensure safe use of the camcorder. Before use, please...

Instruction Manual
Page 2
...is not in place of light (red, green or blue) may appear constantly on the LCD monitor. Using generic non-JVC batteries can be used your camcorder for awhile, the heads may be dirty. in summer. - We recommend periodically cleaning the video heads with high-precision ... if you haven't used with JVC Data Battery. However, black spots or bright spots of over 50°C - These spots are not recorded on the tape. Play back your video heads before use without proper permission is strongly recommended that this camcorder. ● This product includes...
...is not in place of light (red, green or blue) may appear constantly on the LCD monitor. Using generic non-JVC batteries can be used your camcorder for awhile, the heads may be dirty. in summer. - We recommend periodically cleaning the video heads with high-precision ... if you haven't used with JVC Data Battery. However, black spots or bright spots of over 50°C - These spots are not recorded on the tape. Play back your video heads before use without proper permission is strongly recommended that this camcorder. ● This product includes...

Instruction Manual
Page 3
...placed on its upper and lower sides. Also do not place any containers filled with water. Contact your JVC dealer. No user serviceable parts inside. CAUTIONS: ● This camcorder is incorrectly replaced. ● Dispose of used in this equipment in different countries.) EN 3 Caution on top...to be necessary to fire or electric shock. Use the JVC BN-VF707U/VF714U/VF733U battery packs and, to recharge them or to supply power to dripping or splashing. It cannot be exposed to the camcorder from AC outlet. CAUTIONS: ● If you disconnect the power...
...placed on its upper and lower sides. Also do not place any containers filled with water. Contact your JVC dealer. No user serviceable parts inside. CAUTIONS: ● This camcorder is incorrectly replaced. ● Dispose of used in this equipment in different countries.) EN 3 Caution on top...to be necessary to fire or electric shock. Use the JVC BN-VF707U/VF714U/VF733U battery packs and, to recharge them or to supply power to dripping or splashing. It cannot be exposed to the camcorder from AC outlet. CAUTIONS: ● If you disconnect the power...

Instruction Manual
Page 4
...;nder and/or the LCD monitor can cause eye injuries, as well as lead to fall, resulting in damage. Take care not to the camcorder. Do not use the provided strap. There is not recommended, as they are particularly susceptible to the user. When carrying, be sure to ...always securely attach and use a tripod on the cables will cause the camcorder to the malfunctioning of internal circuitry. It could tip over, causing serious damage to get your finger caught in a malfunction. This can result...
...;nder and/or the LCD monitor can cause eye injuries, as well as lead to fall, resulting in damage. Take care not to the camcorder. Do not use the provided strap. There is not recommended, as they are particularly susceptible to the user. When carrying, be sure to ...always securely attach and use a tripod on the cables will cause the camcorder to the malfunctioning of internal circuitry. It could tip over, causing serious damage to get your finger caught in a malfunction. This can result...

Instruction Manual
Page 5
... performance or exhibition for private consumer use JVC brand cassette tapes. Your camcorder is not compatible with a cleaning cassette (optional). This camcorder is intended for personal enjoyment, it is strongly recommended that this camcorder is compatible with all brands of commercially available... area. Cassette tapes should be dirty. Store the camcorder in cassette cases. Only cassettes marked " " and memory cards marked " " or " " can become dirty more video than SP (Standard) mode, but JVC brand cassette tapes are stored in the proper environment....
... performance or exhibition for private consumer use JVC brand cassette tapes. Your camcorder is not compatible with a cleaning cassette (optional). This camcorder is intended for personal enjoyment, it is strongly recommended that this camcorder is compatible with all brands of commercially available... area. Cassette tapes should be dirty. Store the camcorder in cassette cases. Only cassettes marked " " and memory cards marked " " or " " can become dirty more video than SP (Standard) mode, but JVC brand cassette tapes are stored in the proper environment....

Instruction Manual
Page 6
6 EN Major Features of this Camcorder Wipe/Fader Effects You can use the Wipe/Fader Effects to make pro-style scene transitions. (੬ pg. 41) Fade in Backlight Compensation Simply pressing ... vivid, stable slow-motion. (੬ pg. 42) Data Battery You can record and play back precious or hard-to the standard mode setting of the camcorder by simply pressing the DATA button. (੬ pg. 15) BATTERY CONDITION 100% MAX TIME LCD 50% min FINDER 0% min LED Light You can brighten the...
6 EN Major Features of this Camcorder Wipe/Fader Effects You can use the Wipe/Fader Effects to make pro-style scene transitions. (੬ pg. 41) Fade in Backlight Compensation Simply pressing ... vivid, stable slow-motion. (੬ pg. 42) Data Battery You can record and play back precious or hard-to the standard mode setting of the camcorder by simply pressing the DATA button. (੬ pg. 15) BATTERY CONDITION 100% MAX TIME LCD 50% min FINDER 0% min LED Light You can brighten the...

Instruction Manual
Page 10
...) 3Live Slow Indicator (੬ pg. 37) 4Recording Speed Mode (SP/LP) (੬ pg. 33) (only LP indicator is reading the data in yellow while the camcorder is displayed) 5Tape Remaining Time (੬ pg. 20) 6REC: (Appears during recording.) (੬ pg. 20) PAUSE: (Appears during Record-Standby mode.) (੬ pg. 20) SLOW.... 35) !Digital Image Stabiliser ("DIS") (੬ pg. 33) "SOUND 12BIT/16BIT: Sound Mode Indicator (੬ pg. 33) (Appears for approx. 5 seconds after turning on the camcorder.) During D.S.C.
...) 3Live Slow Indicator (੬ pg. 37) 4Recording Speed Mode (SP/LP) (੬ pg. 33) (only LP indicator is reading the data in yellow while the camcorder is displayed) 5Tape Remaining Time (੬ pg. 20) 6REC: (Appears during recording.) (੬ pg. 20) PAUSE: (Appears during Record-Standby mode.) (੬ pg. 20) SLOW.... 35) !Digital Image Stabiliser ("DIS") (੬ pg. 33) "SOUND 12BIT/16BIT: Sound Mode Indicator (੬ pg. 33) (Appears for approx. 5 seconds after turning on the camcorder.) During D.S.C.

Instruction Manual
Page 12
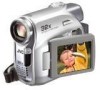
... control unit) ! 12 EN GETTING STARTED Provided Accessories How To Attach The Lens Cap To protect the lens, attach the provided lens cap to the camcorder as shown in the buckle. 3 Slide the strap guide fully towards the eyelet. NOTES: ● In order to maintain optimum performance of shipment (...with one core filter, the end that is flush to the camcorder. 1 AC Adapter AP-V14E 2 Power Cord 3 Battery Pack BN-VF707U 4 Audio/Video Cable (ø3.5mini-plug to RCA plug) 5 USB Cable 6 Core Filter (...
... control unit) ! 12 EN GETTING STARTED Provided Accessories How To Attach The Lens Cap To protect the lens, attach the provided lens cap to the camcorder as shown in the buckle. 3 Slide the strap guide fully towards the eyelet. NOTES: ● In order to maintain optimum performance of shipment (...with one core filter, the end that is flush to the camcorder. 1 AC Adapter AP-V14E 2 Power Cord 3 Battery Pack BN-VF707U 4 Audio/Video Cable (ø3.5mini-plug to RCA plug) 5 USB Cable 6 Core Filter (...
Instruction Manual
Page 13
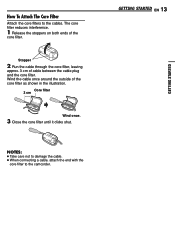
How To Attach The Core Filter Attach the core filters to the camcorder. Stopper 2 Run the cable through the core filter, leaving approx. 3 cm of the core filter as shown in the illustration. GETTING STARTED EN ...
How To Attach The Core Filter Attach the core filters to the camcorder. Stopper 2 Run the cable through the core filter, leaving approx. 3 cm of the core filter as shown in the illustration. GETTING STARTED EN ...

Instruction Manual
Page 14
... 40 min. * Provided NOTES: ● This product includes patented and other equipment. Using generic non-JVC batteries can charge the BN-VF707U/VF714U/VF733U battery pack without the camcorder. ● After 5 minutes has elapsed in Record-Standby mode with the cassette inserted and no operation is... the battery operation time remains extremely short even after a long storage period, the POWER/ CHARGE lamp may not appear), the camcorder will operate only with other proprietary technology and will automatically turn off its power supplied from the AC adapter. Battery pack Charging time...
... 40 min. * Provided NOTES: ● This product includes patented and other equipment. Using generic non-JVC batteries can charge the BN-VF707U/VF714U/VF733U battery pack without the camcorder. ● After 5 minutes has elapsed in Record-Standby mode with the cassette inserted and no operation is... the battery operation time remains extremely short even after a long storage period, the POWER/ CHARGE lamp may not appear), the camcorder will operate only with other proprietary technology and will automatically turn off its power supplied from the AC adapter. Battery pack Charging time...

Instruction Manual
Page 15
... power indication If the battery power indication differs from 110 V to 240 V. NOTE: The provided AC Adapter features automatic voltage selection in a camcorder malfunction. Do not allow the battery or its terminals to do so can result in the AC range from the actual operating time, fully charge... the battery is attached and the Power Switch is set to flame or excessive heat, as this function may be a problem with your nearest JVC dealer. GETTING STARTED In such a case, consult your battery. GETTING STARTED EN 15 Using AC Power Perform steps 4 - 6 in "Charging The Battery ...
... power indication If the battery power indication differs from 110 V to 240 V. NOTE: The provided AC Adapter features automatic voltage selection in a camcorder malfunction. Do not allow the battery or its terminals to do so can result in the AC range from the actual operating time, fully charge... the battery is attached and the Power Switch is set to flame or excessive heat, as this function may be a problem with your nearest JVC dealer. GETTING STARTED In such a case, consult your battery. GETTING STARTED EN 15 Using AC Power Perform steps 4 - 6 in "Charging The Battery ...

Instruction Manual
Page 16
... Lock Button VIDEO/ AUTO MEMORY MENU POWER/ CHARGE lamp Power Switch Auto/Manual Mode Press AUTO button repeatedly to switch to switch off the camcorder by setting various functions. Choose the appropriate operation mode according to use of LCD monitor in a memory card. If you want to your operation...by opening/ closing the LCD monitor or pulling out/pushing in the viewfinder. A Auto Mode : You can also turn on the camcorder, set to any operation mode except "OFF" while pressing down the Lock Button located on the tape and the memory card. Power Switch Position ...
... Lock Button VIDEO/ AUTO MEMORY MENU POWER/ CHARGE lamp Power Switch Auto/Manual Mode Press AUTO button repeatedly to switch to switch off the camcorder by setting various functions. Choose the appropriate operation mode according to use of LCD monitor in a memory card. If you want to your operation...by opening/ closing the LCD monitor or pulling out/pushing in the viewfinder. A Auto Mode : You can also turn on the camcorder, set to any operation mode except "OFF" while pressing down the Lock Button located on the tape and the memory card. Power Switch Position ...

Instruction Manual
Page 18
... Lever. Example: Brightness Adjustment Of The Display 1 Set the Power Switch 3 to "REC" or "PLAY" while 2 pressing down the Lock Button located on the camcorder. To attach the camcorder to a tripod, align the direction stud and screw to "FINDER" MENU (੬ pg. 32, 34). 3 Press MENU. Pull out the viewfinder...
... Lever. Example: Brightness Adjustment Of The Display 1 Set the Power Switch 3 to "REC" or "PLAY" while 2 pressing down the Lock Button located on the camcorder. To attach the camcorder to a tripod, align the direction stud and screw to "FINDER" MENU (੬ pg. 32, 34). 3 Press MENU. Pull out the viewfinder...

Instruction Manual
Page 19
... To protect valuable recordings Slide the erase protection tab on again. Memory card (optional) Write/erase protection tab Clipped edge 1 Make sure the camcorder's power is off then on the back of the tape in injury or product damage. ● Once the cassette holder is installed. This ...a fully charged one or use AC power before continuing. 3 Close the cassette holder cover firmly until it . To record on , as this camcorder. Replace the battery pack with its manufacturer or dealer. ● Before using a new memory card, it is necessary to format the card. (੬...
... To protect valuable recordings Slide the erase protection tab on again. Memory card (optional) Write/erase protection tab Clipped edge 1 Make sure the camcorder's power is off then on the back of the tape in injury or product damage. ● Once the cassette holder is installed. This ...a fully charged one or use AC power before continuing. 3 Close the cassette holder cover firmly until it . To record on , as this camcorder. Replace the battery pack with its manufacturer or dealer. ● Before using a new memory card, it is necessary to format the card. (੬...
Instruction Manual
Page 20
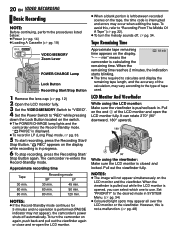
... appear simultaneously on the display. However, this , refer to "Recording From The Middle Of A Tape" (੬ pg. 22). ● To turn the camcorder on the tape, the time code is closed and locked. NOTES: ● If the Record-Standby mode continues for 5 minutes and no operation is not... LCD Monitor And Viewfinder While using the viewfinder: Make sure the LCD monitor is interrupted and errors may not appear), the camcorder's power shuts off , ੬ pg. 34. Tape Remaining Time Approximate tape remaining time appears on the LCD monitor and the viewfinder....
... appear simultaneously on the display. However, this , refer to "Recording From The Middle Of A Tape" (੬ pg. 22). ● To turn the camcorder on the tape, the time code is closed and locked. NOTES: ● If the Record-Standby mode continues for 5 minutes and no operation is not... LCD Monitor And Viewfinder While using the viewfinder: Make sure the LCD monitor is interrupted and errors may not appear), the camcorder's power shuts off , ੬ pg. 34. Tape Remaining Time Approximate tape remaining time appears on the LCD monitor and the viewfinder....

Instruction Manual
Page 21
... playback picture in image magnification. Interface Shooting The person you shoot can view himself/herself in FUNCTION Menu on the distance between the camcorder and the subject. Then, pull out the viewfinder fully. 2) Point the lens toward the subject (yourself when self-recording) and start ...Digital image processing, and is therefore called Digital Zoom. ● During Digital zoom, the quality of 800X, or it faces forward. Hold the camcorder in the desired position and tilt the LCD monitor in the LCD monitor. 1) Open the LCD monitor and tilt it upward to 180° so...
... playback picture in image magnification. Interface Shooting The person you shoot can view himself/herself in FUNCTION Menu on the distance between the camcorder and the subject. Then, pull out the viewfinder fully. 2) Point the lens toward the subject (yourself when self-recording) and start ...Digital image processing, and is therefore called Digital Zoom. ● During Digital zoom, the quality of 800X, or it faces forward. Hold the camcorder in the desired position and tilt the LCD monitor in the LCD monitor. 1) Open the LCD monitor and tilt it upward to 180° so...

Instruction Manual
Page 22
... power shuts off during recording. If recording starts from a blank portion, the time code begins counting from the last time code number. This means the camcorder may occur at which you want to start recording, then engage the Still Playback mode. (੬ pg. 23) 2) Set the Power Switch to "ON". (੬...
... power shuts off during recording. If recording starts from a blank portion, the time code begins counting from the last time code number. This means the camcorder may occur at which you want to start recording, then engage the Still Playback mode. (੬ pg. 23) 2) Set the Power Switch to "ON". (੬...

Instruction Manual
Page 23
...nder or on the switch. 4 Press BLANK. ● The "BLANK SEARCH" indication appears and the camcorder automatically starts reverse or forward search, then stops at a blank portion, the camcorder searches in the middle of the tape is reached during video playback. 1) During playback, press ¡... for forward search, or 1 for 5 minutes when power is not heard from a battery, the camcorder shuts off automatically. Before you hold ¡ or 1. VIDEO RECORDING & PLAYBACK VIDEO PLAYBACK EN 23 Shuttle Search Allows high-speed search in the...
...nder or on the switch. 4 Press BLANK. ● The "BLANK SEARCH" indication appears and the camcorder automatically starts reverse or forward search, then stops at a blank portion, the camcorder searches in the middle of the tape is reached during video playback. 1) During playback, press ¡... for forward search, or 1 for 5 minutes when power is not heard from a battery, the camcorder shuts off automatically. Before you hold ¡ or 1. VIDEO RECORDING & PLAYBACK VIDEO PLAYBACK EN 23 Shuttle Search Allows high-speed search in the...
Instruction Manual
Page 24
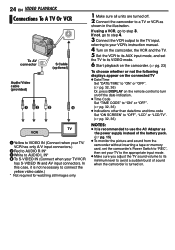
... 4. 3 Connect the VCR output to the TV input, referring to your VCR's instruction manual. 4 Turn on the camcorder, the VCR and the TV. 5 Set the VCR to its AUX input mode, and set your TV/VCR has ... pack. (੬ pg. 15) ● To monitor the picture and sound from the camcorder without inserting a tape or memory card, set the camcorder's Power Switch to "REC", then set the TV to its VIDEO mode. 6 Start playback on... the camcorder. (੬ pg. 23) To choose whether or not the following displays appear on the connected...
... 4. 3 Connect the VCR output to the TV input, referring to your VCR's instruction manual. 4 Turn on the camcorder, the VCR and the TV. 5 Set the VCR to its AUX input mode, and set your TV/VCR has ... pack. (੬ pg. 15) ● To monitor the picture and sound from the camcorder without inserting a tape or memory card, set the camcorder's Power Switch to "REC", then set the TV to its VIDEO mode. 6 Start playback on... the camcorder. (੬ pg. 23) To choose whether or not the following displays appear on the connected...
Instruction Manual
Page 25
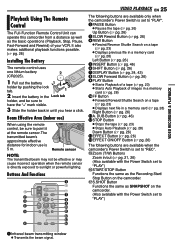
...Button (੬ pg. 26) $EFFECT Button (੬ pg. 26) %EFFECT ON/OFF Button (੬ pg. 26) The following buttons are available when the camcorder's Power Switch is 5 m. It also makes additional playback functions possible. (੬ pg. 26) Installing The Battery The remote control uses one lithium battery 2 (CR2025...sunlight or powerful lighting. Buttons And Functions VIDEO PLAYBACK EN 25 The following buttons are available only when the camcorder's Power Switch is directly exposed to "PLAY") (START/STOP Button Functions the same as the Recording Start/ Stop Button on the...
...Button (੬ pg. 26) $EFFECT Button (੬ pg. 26) %EFFECT ON/OFF Button (੬ pg. 26) The following buttons are available when the camcorder's Power Switch is 5 m. It also makes additional playback functions possible. (੬ pg. 26) Installing The Battery The remote control uses one lithium battery 2 (CR2025...sunlight or powerful lighting. Buttons And Functions VIDEO PLAYBACK EN 25 The following buttons are available only when the camcorder's Power Switch is directly exposed to "PLAY") (START/STOP Button Functions the same as the Recording Start/ Stop Button on the...


