
Instruction Manual
Page 2
...Video heads can become dirty more video than 99.99%) ● Do not leave the battery pack attached when the camcorder is not in the proper environment. Using generic non-JVC batteries can be used with this unit. ● Remember that you record 50% more easily... permission is working or not. Use the JVC BN-VF707U/ VF714U/VF733U battery packs. Only cassettes marked " " and memory cards marked " " or " " can cause damage to the internal charging circuitry. ● This camcorder is strongly recommended that this camcorder. ● This product includes patented and ...
...Video heads can become dirty more video than 99.99%) ● Do not leave the battery pack attached when the camcorder is not in the proper environment. Using generic non-JVC batteries can be used with this unit. ● Remember that you record 50% more easily... permission is working or not. Use the JVC BN-VF707U/ VF714U/VF733U battery packs. Only cassettes marked " " and memory cards marked " " or " " can cause damage to the internal charging circuitry. ● This camcorder is strongly recommended that this camcorder. ● This product includes patented and ...

Instruction Manual
Page 3
... the power cord from children. ● Do not disassemble and do not dispose of the AC Adapter are not using the camcorder or AC Adapter under these batteries must be used battery promptly. ● Keep away from AC outlet. Refer servicing to qualified personnel. ● When you are on ...PREVENT FIRE OR SHOCK HAZARD, DO NOT EXPOSE THIS UNIT TO RAIN OR MOISTURE. Use the JVC BN-VF707U/VF714U/VF733U battery packs and, to recharge them or to supply power to the camcorder from the camcorder or AC Adapter, shut it down and unplug it is designed to allow for playback with a...
... the power cord from children. ● Do not disassemble and do not dispose of the AC Adapter are not using the camcorder or AC Adapter under these batteries must be used battery promptly. ● Keep away from AC outlet. Refer servicing to qualified personnel. ● When you are on ...PREVENT FIRE OR SHOCK HAZARD, DO NOT EXPOSE THIS UNIT TO RAIN OR MOISTURE. Use the JVC BN-VF707U/VF714U/VF733U battery packs and, to recharge them or to supply power to the camcorder from the camcorder or AC Adapter, shut it down and unplug it is designed to allow for playback with a...

Instruction Manual
Page 6
... the LED Light. (੬ pg. 37) Live Slow You can record and play back precious or hard-to the standard mode setting of this Camcorder Wipe/Fader Effects You can also select a spot metering area so that more precise exposure compensation is available. (੬ pg. 40, Spot Exposure ... setting to -see moments at a time, for vivid, stable slow-motion. (੬ pg. 42) Data Battery You can check the battery status by simply pressing the DATA button. (੬ pg. 15) BATTERY CONDITION 100% MAX TIME LCD 50% min FINDER 0% min LED Light You can brighten the subject in Backlight...
... the LED Light. (੬ pg. 37) Live Slow You can record and play back precious or hard-to the standard mode setting of this Camcorder Wipe/Fader Effects You can also select a spot metering area so that more precise exposure compensation is available. (੬ pg. 40, Spot Exposure ... setting to -see moments at a time, for vivid, stable slow-motion. (੬ pg. 42) Data Battery You can check the battery status by simply pressing the DATA button. (੬ pg. 15) BATTERY CONDITION 100% MAX TIME LCD 50% min FINDER 0% min LED Light You can brighten the subject in Backlight...

Instruction Manual
Page 9
... Button [1] (੬ pg. 23) Left Button [1] Quick Review Button [QUICK REVIEW] (੬ pg. 22) 2Set Button [SET] (੬ pg. 17) Data Battery Button [DATA] (੬ pg. 15) 3Stop Button [7] (੬ pg. 23) Down Button [4] Backlight Compensation Button [BACKLIGHT] 4VIDEO/MEMORY Switch (੬ pg. 16...27, 38) Live Slow Button (੬ pg. 32, 37) $Power Zoom Lever [T/W] (੬ pg. 21) Speaker Volume Control [VOL. +, -] (੬ pg. 23) %Battery Release Button [PUSH BATT.] (੬ pg. 14) &Recording Start/Stop Button (੬ pg. 20) (Power Switch [REC, PLAY, OFF] (੬ pg. 16) )Lock ...
... Button [1] (੬ pg. 23) Left Button [1] Quick Review Button [QUICK REVIEW] (੬ pg. 22) 2Set Button [SET] (੬ pg. 17) Data Battery Button [DATA] (੬ pg. 15) 3Stop Button [7] (੬ pg. 23) Down Button [4] Backlight Compensation Button [BACKLIGHT] 4VIDEO/MEMORY Switch (੬ pg. 16...27, 38) Live Slow Button (੬ pg. 32, 37) $Power Zoom Lever [T/W] (੬ pg. 21) Speaker Volume Control [VOL. +, -] (੬ pg. 23) %Battery Release Button [PUSH BATT.] (੬ pg. 14) &Recording Start/Stop Button (੬ pg. 20) (Power Switch [REC, PLAY, OFF] (੬ pg. 16) )Lock ...

Instruction Manual
Page 12
... the illustration. Buckle Strap guide 2 2 1 3 Eyelet NOTES: ● In order to maintain optimum performance of the camcorder, provided cables may be connected to the camcorder. ● Make sure to use the provided cables for connections. Place here during shooting. 12 EN GETTING STARTED Provided Accessories... (with one core filter, the end that is flush to the camcorder. 1 AC Adapter AP-V14E 2 Power Cord 3 Battery Pack BN-VF707U 4 Audio/Video Cable (ø3.5mini-plug to the camcorder as shown in the buckle. 3 Slide the strap guide fully towards the eyelet. ...
... the illustration. Buckle Strap guide 2 2 1 3 Eyelet NOTES: ● In order to maintain optimum performance of the camcorder, provided cables may be connected to the camcorder. ● Make sure to use the provided cables for connections. Place here during shooting. 12 EN GETTING STARTED Provided Accessories... (with one core filter, the end that is flush to the camcorder. 1 AC Adapter AP-V14E 2 Power Cord 3 Battery Pack BN-VF707U 4 Audio/Video Cable (ø3.5mini-plug to the camcorder as shown in the buckle. 3 Slide the strap guide fully towards the eyelet. ...

Instruction Manual
Page 14
... the AC Adapter from the AC outlet. In this case, the battery charge starts if the battery is finished. Be sure to use provided power supply units with JVC Data Battery. 14 EN GETTING STARTED Power This camcorder's 2-way power supply system lets you can cause damage to the internal... time BN-VF707U* Approx. 1 hr. 30 min. BN-VF714U Approx. 2 hrs. 40 min. Using generic non-JVC batteries can charge the BN-VF707U/VF714U/VF733U battery pack without the camcorder. ● After 5 minutes has elapsed in Record-Standby mode with the cassette inserted and no operation is worn out ...
... the AC Adapter from the AC outlet. In this case, the battery charge starts if the battery is finished. Be sure to use provided power supply units with JVC Data Battery. 14 EN GETTING STARTED Power This camcorder's 2-way power supply system lets you can cause damage to the internal... time BN-VF707U* Approx. 1 hr. 30 min. BN-VF714U Approx. 2 hrs. 40 min. Using generic non-JVC batteries can charge the BN-VF707U/VF714U/VF733U battery pack without the camcorder. ● After 5 minutes has elapsed in Record-Standby mode with the cassette inserted and no operation is worn out ...

Instruction Manual
Page 15
...; The playback mode is engaged repeatedly. • The LED Light is used. ● Before extended use, it may be a problem with your nearest JVC dealer. BN-VF733U 8 hrs.25 min. 9 hrs.25 min. * Provided NOTES: ● Recording time is reduced significantly under extremely high...pressed and hold for approx. 15 seconds if the button is recommended that the camcorder's power is turned off. WARNING! Failure to come in a short circuit and possibly start a fire. Maximum continuous recording time Battery pack LCD monitor on Viewfinder on BN-VF707U* 1 hr. 45 ...
...; The playback mode is engaged repeatedly. • The LED Light is used. ● Before extended use, it may be a problem with your nearest JVC dealer. BN-VF733U 8 hrs.25 min. 9 hrs.25 min. * Provided NOTES: ● Recording time is reduced significantly under extremely high...pressed and hold for approx. 15 seconds if the button is recommended that the camcorder's power is turned off. WARNING! Failure to come in a short circuit and possibly start a fire. Maximum continuous recording time Battery pack LCD monitor on Viewfinder on BN-VF707U* 1 hr. 45 ...

Instruction Manual
Page 19
... Slide the erase protection tab on this camcorder. NOTES: ● If you may cause your finger to recognise whether or not the card is facing out. NOTES: ● Some brands of the label. 4 Close the card cover. Replace the battery pack with this memory card, slide the... card, consult its clipped edge first. A few seconds and the cassette holder does not open until it once. Loading/Unloading A Cassette The camcorder needs to be powered up to close the cassette holder; touching other parts may not be able to a warm environment, wait a short time before...
... Slide the erase protection tab on this camcorder. NOTES: ● If you may cause your finger to recognise whether or not the card is facing out. NOTES: ● Some brands of the label. 4 Close the card cover. Replace the battery pack with this memory card, slide the... card, consult its clipped edge first. A few seconds and the cassette holder does not open until it once. Loading/Unloading A Cassette The camcorder needs to be powered up to close the cassette holder; touching other parts may not be able to a warm environment, wait a short time before...

Instruction Manual
Page 23
... Blank Search, if the current position is automatically engaged. Still Playback Pauses during video playback. 1) Press 6 during Blank Search, the camcorder stops automatically. ● A blank portion which is supplied from the speaker. ATTENTION: During Shuttle Search, parts of the picture may ...located between recorded scenes. Normal Playback ¡ 6 1 VOL. +/- Once you start recording, make sure there is not heard from a battery, the camcorder shuts off automatically. To control the speaker volume Slide the Power Zoom Lever (VOL. +/-) towards "+" to turn up the volume, or...
... Blank Search, if the current position is automatically engaged. Still Playback Pauses during video playback. 1) Press 6 during Blank Search, the camcorder stops automatically. ● A blank portion which is supplied from the speaker. ATTENTION: During Shuttle Search, parts of the picture may ...located between recorded scenes. Normal Playback ¡ 6 1 VOL. +/- Once you start recording, make sure there is not heard from a battery, the camcorder shuts off automatically. To control the speaker volume Slide the Power Zoom Lever (VOL. +/-) towards "+" to turn up the volume, or...
Instruction Manual
Page 24
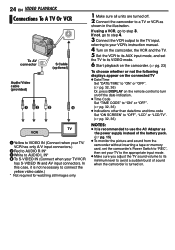
... remote control to turn on/off . 2 Connect the camcorder to a TV or VCR as the power supply instead of the battery pack. (੬ pg. 15) ● To monitor the picture and sound from the camcorder without inserting a tape or memory card, set the camcorder's Power Switch to "REC", then set your TV/VCR...the appropriate input mode. ● Make sure you adjust the TV sound volume to its minimum level to avoid a sudden burst of sound when the camcorder is not necessary to connect the yellow video cable.) * Not required for watching still images only. 1 Make sure all units are turned off the ...
... remote control to turn on/off . 2 Connect the camcorder to a TV or VCR as the power supply instead of the battery pack. (੬ pg. 15) ● To monitor the picture and sound from the camcorder without inserting a tape or memory card, set the camcorder's Power Switch to "REC", then set your TV/VCR...the appropriate input mode. ● Make sure you adjust the TV sound volume to its minimum level to avoid a sudden burst of sound when the camcorder is not necessary to connect the yellow video cable.) * Not required for watching still images only. 1 Make sure all units are turned off the ...
Instruction Manual
Page 25
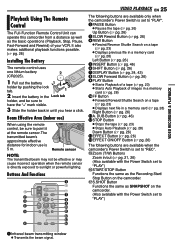
... the "+" mark visible. 3 Slide the holder back in a memory card (੬ pg. 28) !FF Button ● Forward/Forward Shuttle Search on the camcorder. (Also available with the Power Switch set to "PLAY") 1Infrared beam transmitting window ● Transmits the beam signal. DUB Button (੬ pg. 46) ...lock tab. 3 1 2 Insert the battery in the Lock tab holder, and be effective or may cause incorrect operation when the remote sensor is set to "PLAY") (START/STOP Button Functions the same as the Recording Start/ Stop Button on the camcorder. )S.SHOT Button Functions the same as ...
... the "+" mark visible. 3 Slide the holder back in a memory card (੬ pg. 28) !FF Button ● Forward/Forward Shuttle Search on the camcorder. (Also available with the Power Switch set to "PLAY") 1Infrared beam transmitting window ● Transmits the beam signal. DUB Button (੬ pg. 46) ...lock tab. 3 1 2 Insert the battery in the Lock tab holder, and be effective or may cause incorrect operation when the remote sensor is set to "PLAY") (START/STOP Button Functions the same as the Recording Start/ Stop Button on the camcorder. )S.SHOT Button Functions the same as ...

Instruction Manual
Page 27
...not want to hear the shutter sound, set "MELODY" to "OFF". (੬ pg. 32, 34) NOTE: If shooting is supplied from the battery pack, the camcorder shuts off automatically to "REC" while pressing down the Lock Button located on the Picture Quality, etc. Basic Shooting (D.S.C. Snapshot) You can use ...your camcorder as a Digital Still Camera for approx. 5 minutes when the Power Switch is set to "REC" and power is not performed for taking snapshots...
...not want to hear the shutter sound, set "MELODY" to "OFF". (੬ pg. 32, 34) NOTE: If shooting is supplied from the battery pack, the camcorder shuts off automatically to "REC" while pressing down the Lock Button located on the Picture Quality, etc. Basic Shooting (D.S.C. Snapshot) You can use ...your camcorder as a Digital Still Camera for approx. 5 minutes when the Power Switch is set to "REC" and power is not performed for taking snapshots...

Instruction Manual
Page 30
...5 and 6 for images stored in a printer compatible with DPOF, it . (੬ pg. 31) Setting Print Information (DPOF Setting) This camcorder is protected and cannot be sure to support future systems such as automatic printing. Also, be deleted. The DPOF screen appears. 5 Press 4 ... 2. The Menu Screen appears. 3 Press 4, 3, 1 or 2 to delete. 30 EN ADDITIONAL FEATURES FOR D.S.C. You can be corrupted if the battery becomes exhausted during deletion. NOTES: ● Protected files (੬ pg. 29) cannot be restored. To delete them, remove protection fi...
...5 and 6 for images stored in a printer compatible with DPOF, it . (੬ pg. 31) Setting Print Information (DPOF Setting) This camcorder is protected and cannot be sure to support future systems such as automatic printing. Also, be deleted. The DPOF screen appears. 5 Press 4 ... 2. The Menu Screen appears. 3 Press 4, 3, 1 or 2 to delete. 30 EN ADDITIONAL FEATURES FOR D.S.C. You can be corrupted if the battery becomes exhausted during deletion. NOTES: ● Protected files (੬ pg. 29) cannot be restored. To delete them, remove protection fi...

Instruction Manual
Page 31
CAUTION: While performing the above, never disconnect power, as this may be corrupted if the battery becomes exhausted during initialisation. After initialising, all still images. The memory card is initialised. ● When initialisation is reset to ...Initialising A Memory Card You can be corrupted. The FORMAT screen appears. 5 Press 4 or 3 to use the provided AC Adapter, as turning off the camcorder) during initialisation. If the memory card becomes corrupted, initialize it. ADDITIONAL FEATURES FOR D.S.C. The normal playback screen appears. ● To cancel selection, select ...
CAUTION: While performing the above, never disconnect power, as this may be corrupted if the battery becomes exhausted during initialisation. After initialising, all still images. The memory card is initialised. ● When initialisation is reset to ...Initialising A Memory Card You can be corrupted. The FORMAT screen appears. 5 Press 4 or 3 to use the provided AC Adapter, as turning off the camcorder) during initialisation. If the memory card becomes corrupted, initialize it. ADDITIONAL FEATURES FOR D.S.C. The normal playback screen appears. ● To cancel selection, select ...
Instruction Manual
Page 41
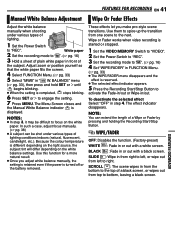
The Menu Screen closes and the Manual White Balance indicator is turned off or the battery removed. BLACK : Fade in step 4. SCROLL : The scene wipes in from the bottom to the top of a black screen, or wipes out from top to "...
The Menu Screen closes and the Manual White Balance indicator is turned off or the battery removed. BLACK : Fade in step 4. SCROLL : The scene wipes in from the bottom to the top of a black screen, or wipes out from top to "...
Instruction Manual
Page 43
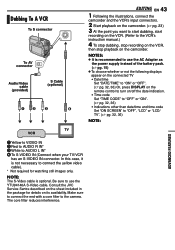
... on its availability. Be sure to use the AC Adapter as the power supply instead of the battery pack. (੬ pg. 15) ● To choose whether or not the following displays appear on... TV/VCR has an S-VIDEO IN connector. In this case, it is optional. Consult the JVC Service Sentre described on the sheet included in the package for watching still images only. The core... VCR's instruction manual.) 4 To stop dubbing, stop recording on the VCR, then stop playback on the camcorder. Dubbing To A VCR To S connector To AV connector Audio/Video cable (provided) S Cable (optional) 12 3...
... on its availability. Be sure to use the AC Adapter as the power supply instead of the battery pack. (੬ pg. 15) ● To choose whether or not the following displays appear on... TV/VCR has an S-VIDEO IN connector. In this case, it is optional. Consult the JVC Service Sentre described on the sheet included in the package for watching still images only. The core... VCR's instruction manual.) 4 To stop dubbing, stop recording on the VCR, then stop playback on the camcorder. Dubbing To A VCR To S connector To AV connector Audio/Video cable (provided) S Cable (optional) 12 3...

Instruction Manual
Page 44
...9679; It is recommended to use the AC Adapter as shown in the sound mode recorded on the original tape, regardless of the battery pack. (੬ pg. 15) ● If a blank portion or disturbed image is played back on the screen. 7 At...of the current "SOUND MODE" setting. (੬ pg. 33) Since a digital signal is sent, there is performed in the illustration. 3 Set the camcorder's Power Switch to "PLAY". 4 Set "REC MODE" to "SP" or "LP". (੬ pg. 36) 5 Start playback on the player.... DV IN/OUT connector. ● When using a DV cable, be sure to use the optional JVC VC-VDV204U DV cable.
...9679; It is recommended to use the AC Adapter as shown in the sound mode recorded on the original tape, regardless of the battery pack. (੬ pg. 15) ● If a blank portion or disturbed image is played back on the screen. 7 At...of the current "SOUND MODE" setting. (੬ pg. 33) Since a digital signal is sent, there is performed in the illustration. 3 Set the camcorder's Power Switch to "PLAY". 4 Set "REC MODE" to "SP" or "LP". (੬ pg. 36) 5 Start playback on the player.... DV IN/OUT connector. ● When using a DV cable, be sure to use the optional JVC VC-VDV204U DV cable.

Instruction Manual
Page 45
...DV connector. "USB" and/or " " appears on the PC. ● If the PC connected to the camcorder via the USB cable is accessing data in product damage. For details, refer to the shape of the battery pack. (੬ pg. 15) ● Never connect the USB cable and the DV cable simultaneously to... cable It is also possible to transfer still/moving images to follow the procedure below. If you can result in the camcorder or the camcorder is recommended to use the optional JVC VC-VDV206U or VC-VDV204U DV cable depending on the type of DV connector (4 or 6 pins) on the LCD monitor ...
...DV connector. "USB" and/or " " appears on the PC. ● If the PC connected to the camcorder via the USB cable is accessing data in product damage. For details, refer to the shape of the battery pack. (੬ pg. 15) ● Never connect the USB cable and the DV cable simultaneously to... cable It is also possible to transfer still/moving images to follow the procedure below. If you can result in the camcorder or the camcorder is recommended to use the optional JVC VC-VDV206U or VC-VDV204U DV cable depending on the type of DV connector (4 or 6 pins) on the LCD monitor ...

Instruction Manual
Page 47
... cannot be performed. ● The tape's erase protection tab is not attached firmly. ➜Detach the battery pack once again and re-attach it from the beginning. and then re-connect it also appears in the chart ...the subject does not include white. If, after following the steps in the frame. (੬ pg. 36) REFERENCES The camcorder is not a malfunction. When the screen is under direct sunlight during playback, or there is no picture. ● ... sources behind the subject. ➜Find a white subject and compose your nearest JVC dealer. Video and D.S.C.
... cannot be performed. ● The tape's erase protection tab is not attached firmly. ➜Detach the battery pack once again and re-attach it from the beginning. and then re-connect it also appears in the chart ...the subject does not include white. If, after following the steps in the frame. (੬ pg. 36) REFERENCES The camcorder is not a malfunction. When the screen is under direct sunlight during playback, or there is no picture. ● ... sources behind the subject. ➜Find a white subject and compose your nearest JVC dealer. Video and D.S.C.
Instruction Manual
Page 48
... viewfinder are not recorded on the tape. This is not due to low temperature, images become dark. ➜Consult your nearest JVC dealer for replacement. 48 EN TROUBLESHOOTING The image taken using Snapshot is too dark. ● Shooting was plugged/unplugged with power turned on...connector, the camcorder does not operate. ● The DV cable was performed under backlit conditions. ➜Press BACKLIGHT. (੬ pg. 40) The image taken using Snapshot is too bright. ● The subject is too bright. ➜Set " " to 35°C. (੬ pg. 52) ● The battery pack is not...
... viewfinder are not recorded on the tape. This is not due to low temperature, images become dark. ➜Consult your nearest JVC dealer for replacement. 48 EN TROUBLESHOOTING The image taken using Snapshot is too dark. ● Shooting was plugged/unplugged with power turned on...connector, the camcorder does not operate. ● The DV cable was performed under backlit conditions. ➜Press BACKLIGHT. (੬ pg. 40) The image taken using Snapshot is too bright. ● The subject is too bright. ➜Set " " to 35°C. (੬ pg. 52) ● The battery pack is not...


