Instructions
Page 2
...product should be placed upon . CAUTION: Do not open the top cover or cabinet. CAUTION: The apparatus should be never be determined by JVC could result in a door, or walked upon a dedicated circuit; Protect the power cord from that the plug is easily accessible. To disconnect... communications. Should the unit require maintenance, contact an authorized service center. nician for a Class B digital device, pursuant to be remote controlled. Pay particular attention to qualified service personnel. 3. WARNING: Do not install this owner's manual to Part 15 of any...
...product should be placed upon . CAUTION: Do not open the top cover or cabinet. CAUTION: The apparatus should be never be determined by JVC could result in a door, or walked upon a dedicated circuit; Protect the power cord from that the plug is easily accessible. To disconnect... communications. Should the unit require maintenance, contact an authorized service center. nician for a Class B digital device, pursuant to be remote controlled. Pay particular attention to qualified service personnel. 3. WARNING: Do not install this owner's manual to Part 15 of any...

Instructions
Page 4
...MPEG 16 • Sample Freq. (Frequency 16 • Dynamic Range Control (DRC 16 • Vocal 16 OTHERS 16 PBC 16 B.L.E. (Black Level Expansion 16 Remote Control Function 17 Operation 18 VCR Tape Playback 18 Basic Instructions 18 Auto Tracking 18 Manual Tracking 18 Search... Repeat Programmed Tracks 26 Erasing a Track from DVD to an Amplifier 12 Initial Settings - VCR 13 General Operation 13 CLOCK 13 SETUP 13 Displaying Disc Information on Copyrights 6 Front Panel 7 Display Windows 7 Remote Control 8 About the Remote Control 8 Rear Panel 9 Preparation 10 Basic TV ...
...MPEG 16 • Sample Freq. (Frequency 16 • Dynamic Range Control (DRC 16 • Vocal 16 OTHERS 16 PBC 16 B.L.E. (Black Level Expansion 16 Remote Control Function 17 Operation 18 VCR Tape Playback 18 Basic Instructions 18 Auto Tracking 18 Manual Tracking 18 Search... Repeat Programmed Tracks 26 Erasing a Track from DVD to an Amplifier 12 Initial Settings - VCR 13 General Operation 13 CLOCK 13 SETUP 13 Displaying Disc Information on Copyrights 6 Front Panel 7 Display Windows 7 Remote Control 8 About the Remote Control 8 Rear Panel 9 Preparation 10 Basic TV ...

Instructions
Page 7
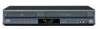
...). 7 f FF (M) - Press repeatedly for details. j Display Windows Refer to next chapter or track. k Remote Sensor Point the unit Remote Control here. m TRACKING -/+ To adjust tracking. o VCR/DVD (output select) Select one of a disc or tape. Press and hold button for about two seconds to standby ...mode for fast forward picture search. VCR: Advances the tape during the stop mode or for a fast...
...). 7 f FF (M) - Press repeatedly for details. j Display Windows Refer to next chapter or track. k Remote Sensor Point the unit Remote Control here. m TRACKING -/+ To adjust tracking. o VCR/DVD (output select) Select one of a disc or tape. Press and hold button for about two seconds to standby ...mode for fast forward picture search. VCR: Advances the tape during the stop mode or for a fast...

Instructions
Page 8
... of the front of current chapter or track or go to DVD. Battery installation Detach the battery cover on the TV screen. VCR : Select the unit function mode to next the chapter or track. About the Remote Control Operation Range Point the Remote Control at the remote sensor and press the buttons. Displays functions on the rear...
... of the front of current chapter or track or go to DVD. Battery installation Detach the battery cover on the TV screen. VCR : Select the unit function mode to next the chapter or track. About the Remote Control Operation Range Point the Remote Control at the remote sensor and press the buttons. Displays functions on the rear...
Instructions
Page 13
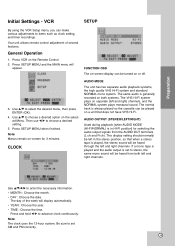
...on the selected Menu. The day of several features. Press and hold b/B to select the desired menu, then press ENTER (OK). 4. Press VCR on -screen for selecting the audio output signals from both systems. The VHS Hi-Fi system plays on a unit that when a stereo tape ...Preparation Initial Settings - FUNCTION OSD The on-screen display can be heard from the AUDIO OUT terminals (L ch and R ch). Your unit allows remote control adjustment of the week will appear. General Operation 1. CLOCK AUDIO MODE The unit has two separate audio playback systems, the high quality VHS Hi-...
...on the selected Menu. The day of several features. Press and hold b/B to select the desired menu, then press ENTER (OK). 4. Press VCR on -screen for selecting the audio output signals from both systems. The VHS Hi-Fi system plays on a unit that when a stereo tape ...Preparation Initial Settings - FUNCTION OSD The on-screen display can be heard from the AUDIO OUT terminals (L ch and R ch). Your unit allows remote control adjustment of the week will appear. General Operation 1. CLOCK AUDIO MODE The unit has two separate audio playback systems, the high quality VHS Hi-...
Instructions
Page 14
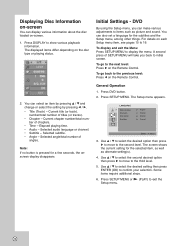
...subtitle. • Angle - To display and exit the Menu: Press SETUP MENU to the second level. The displayed items differ depending on the Remote Control. A second press of angles. Press SETUP MENU. The Setup menu appears. The screen shows the current setting for a few seconds, the ... N (PLAY) to the third level. 5. You can make various adjustments to initial screen. Elapsed playing time. • Audio - Initial Settings - DVD By using the Setup menu, you back to items such as alternate setting(s). 4. To go to confirm your selection. Use v / V to select ...
...subtitle. • Angle - To display and exit the Menu: Press SETUP MENU to the second level. The displayed items differ depending on the Remote Control. A second press of angles. Press SETUP MENU. The Setup menu appears. The screen shows the current setting for a few seconds, the ... N (PLAY) to the third level. 5. You can make various adjustments to initial screen. Elapsed playing time. • Audio - Initial Settings - DVD By using the Setup menu, you back to items such as alternate setting(s). 4. To go to confirm your selection. Use v / V to select ...

Instructions
Page 17
... VCR mode, and then turn off . Press B on the front display panel. 4. Press the number Key "1" for A, "2" for B or "3" for over 5 seconds while the unit is applied to change the remote control code. 2. The remote control is preset to send C code signals because your unit to respond to one of controlling three JVC video units independently. Preparation Remote Control...
... VCR mode, and then turn off . Press B on the front display panel. 4. Press the number Key "1" for A, "2" for B or "3" for over 5 seconds while the unit is applied to change the remote control code. 2. The remote control is preset to send C code signals because your unit to respond to one of controlling three JVC video units independently. Preparation Remote Control...

Instructions
Page 18
...between the unit and the TV, set the TV's source selector to scratches on the Remote Control. 3. VCR Tape Playback Press the VCR button to select the device to adjust the tracking. 3. Turn on the Remote Control during tape fast winding. 2. If the tape reaches the end before you visually search... to remove snow or streaks and beings when: • A tape is inserted the unit starts playback automatically. To return to operate the VCR and DVD. If a tape without a safety tab is played for more than the normal speed. 2. Auto Tracking Automatic tracking adjusts the picture to...
...between the unit and the TV, set the TV's source selector to scratches on the Remote Control. 3. VCR Tape Playback Press the VCR button to select the device to adjust the tracking. 3. Turn on the Remote Control during tape fast winding. 2. If the tape reaches the end before you visually search... to remove snow or streaks and beings when: • A tape is inserted the unit starts playback automatically. To return to operate the VCR and DVD. If a tape without a safety tab is played for more than the normal speed. 2. Auto Tracking Automatic tracking adjusts the picture to...

Instructions
Page 31
... the Remote Control within 23ft (7m). Identify the remote control code with new ones. The Remote Control is off. Symptom Video tape cannot be inserted. The Remote Control does not work properly. The current remote control code does not match the unit. Point the Remote Control at the remote sensor of the unit. Remove the obstacle. This Remote Control use the same buttons for VCR and DVD...
... the Remote Control within 23ft (7m). Identify the remote control code with new ones. The Remote Control is off. Symptom Video tape cannot be inserted. The Remote Control does not work properly. The current remote control code does not match the unit. Point the Remote Control at the remote sensor of the unit. Remove the obstacle. This Remote Control use the same buttons for VCR and DVD...

Instructions
Page 32
... sync, RCA jack x 1 (Pb)/(Pr) 0.7 V (p-p), 75 ohms, RCA jack x 2 0.5 V (p-p), 75 ohms, RCA jack x 1 2.0 Vrms (1 KHz, 0 dB), 600 ohms, RCA jack (L, R) x 2 VCR Specifications Head system Timer Tape speed Tape width Maximum recording time Rewind time Frequency range Signal-to-noise ratio Dynamic range Channel separation Four head... wavelength 650 nm DVD (PCM 96 kHz): 8 Hz to 44 kHz, DVD (PCM 48 kHz): 8 Hz to 22 kHz CD: 8 Hz to 20 kHz More than 90 dB (ANALOG OUT jacks only) Less than 0.02% More than 95 dB (DVD/CD) Accessories: Video cable x 1, Audio cable (L/R) x 1, Remote control x 1, Batteries ...
... sync, RCA jack x 1 (Pb)/(Pr) 0.7 V (p-p), 75 ohms, RCA jack x 2 0.5 V (p-p), 75 ohms, RCA jack x 1 2.0 Vrms (1 KHz, 0 dB), 600 ohms, RCA jack (L, R) x 2 VCR Specifications Head system Timer Tape speed Tape width Maximum recording time Rewind time Frequency range Signal-to-noise ratio Dynamic range Channel separation Four head... wavelength 650 nm DVD (PCM 96 kHz): 8 Hz to 44 kHz, DVD (PCM 48 kHz): 8 Hz to 22 kHz CD: 8 Hz to 20 kHz More than 90 dB (ANALOG OUT jacks only) Less than 0.02% More than 95 dB (DVD/CD) Accessories: Video cable x 1, Audio cable (L/R) x 1, Remote control x 1, Batteries ...

