

Instructions
Page 1
...KW-NT500HDT / KW-NT300 This HD Radio receiver enables: Only for KW-NT500HDT Sólo para KW-NT500HDT Uniquement pour le KW-NT500HDT Only for future reference. INSTRUCTIONS MANUAL DE INSTRUCCIONES MANUEL D'INSTRUCTIONS For customer Use: Enter below the Model No. Para la instalación y las conexiones, refiérase al manual separado. Pour l'installation... of the cabinet. Model No. and Serial No. LVT2277-001A [J] Retain this information for KW-NT500HDT Sólo para KW-NT500HDT Uniquement pour le KW-NT500HDT For installation and connections, refer to the separate manual.
...KW-NT500HDT / KW-NT300 This HD Radio receiver enables: Only for KW-NT500HDT Sólo para KW-NT500HDT Uniquement pour le KW-NT500HDT Only for future reference. INSTRUCTIONS MANUAL DE INSTRUCCIONES MANUEL D'INSTRUCTIONS For customer Use: Enter below the Model No. Para la instalación y las conexiones, refiérase al manual separado. Pour l'installation... of the cabinet. Model No. and Serial No. LVT2277-001A [J] Retain this information for KW-NT500HDT Sólo para KW-NT500HDT Uniquement pour le KW-NT500HDT For installation and connections, refer to the separate manual.
Instructions
Page 2
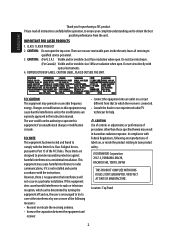
...are designed to obtain the best possible performance from that interference will not occur in a residential installation. REPRODUCTION OF LABEL: CAUTION LABEL, PLACED OUTSIDE THE UNIT. JVC KENWOOD Corporation 2967-3, ISHIKAWA-MACHI, HACHIOJI-SHI, TOKYO, JAPAN THIS PRODUCT COMPLIES WITH DHHS RULES...• Consult the dealer or an experienced radio/TV technician for purchasing a JVC product. Please read all servicing to operate this equipment if an unauthorized change or modification is not installed and used in hazardous radiation exposure. CLASS 1 LASER PRODUCT 2. CAUTION Use ...
...are designed to obtain the best possible performance from that interference will not occur in a residential installation. REPRODUCTION OF LABEL: CAUTION LABEL, PLACED OUTSIDE THE UNIT. JVC KENWOOD Corporation 2967-3, ISHIKAWA-MACHI, HACHIOJI-SHI, TOKYO, JAPAN THIS PRODUCT COMPLIES WITH DHHS RULES...• Consult the dealer or an experienced radio/TV technician for purchasing a JVC product. Please read all servicing to operate this equipment if an unauthorized change or modification is not installed and used in hazardous radiation exposure. CLASS 1 LASER PRODUCT 2. CAUTION Use ...
Instructions
Page 3
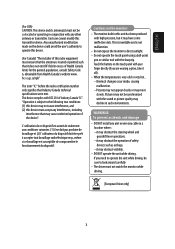
...radio certification number only signifies that may cause undesired operation of the device". WARNINGS: To prevent accidents and damage • DO NOT install any unit or wire any cable in such environments. it may decline in a location where; - This device complies with the sharp... Canada technical specifications were met. Cautions on the device could avoid the user's authority to operate this device. (For Canada) "The installer of Industry Canada "IC". Chemical changes occur inside, causing malfunction. - Pictures may not appear clearly or may not cause interference, and...
...radio certification number only signifies that may cause undesired operation of the device". WARNINGS: To prevent accidents and damage • DO NOT install any unit or wire any cable in such environments. it may decline in a location where; - This device complies with the sharp... Canada technical specifications were met. Cautions on the device could avoid the user's authority to operate this device. (For Canada) "The installer of Industry Canada "IC". Chemical changes occur inside, causing malfunction. - Pictures may not appear clearly or may not cause interference, and...
Instructions
Page 6
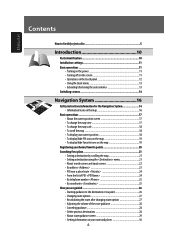
ENGLISH Contents How to forcibly eject a disc 5 Introduction 10 Parts identification 10 Installation settings 11 Basic operations 11 • Turning on the power 11 • Turning off/on the screen 11 • Operations on the touch panel 12 &#...
ENGLISH Contents How to forcibly eject a disc 5 Introduction 10 Parts identification 10 Installation settings 11 Basic operations 11 • Turning on the power 11 • Turning off/on the screen 11 • Operations on the touch panel 12 &#...
Instructions
Page 11
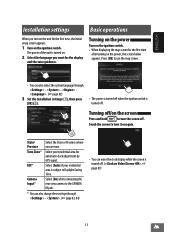
... these settings through - . (☞ page 83, 84) • You can also select the system language through - - . (☞ page 82) 3 Set the installation settings (1), then press [OK] (2). • The power is turned off when the ignition switch is turned off . Camera Input * Select [On] when connecting the rear...use the map screen. • You can erase the clock display while the screen is turned off . (, ☞ page 83) 11 ENGLISH Installation settings Basic operations When you turn on the unit for the first time, the initial setup screen appears. 1 Turn on . 2 Select the ...
... these settings through - . (☞ page 83, 84) • You can also select the system language through - - . (☞ page 82) 3 Set the installation settings (1), then press [OK] (2). • The power is turned off when the ignition switch is turned off . Camera Input * Select [On] when connecting the rear...use the map screen. • You can erase the clock display while the screen is turned off . (, ☞ page 83) 11 ENGLISH Installation settings Basic operations When you turn on the unit for the first time, the initial setup screen appears. 1 Turn on . 2 Select the ...
Instructions
Page 37
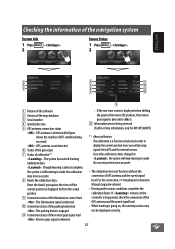
...lead : The parking brake is still learning to the reverse (R) position, the reverse gear signal is detected. For the connection, ☞ Installation/Connection Manual (separate volume). • Driving under various conditions completes the calibration faster. p Connection status of calibration*1 : The system has... will keep learning to display the current position more accurate. 8 Resets the calibration data. If remains on the screen for KW-NT500HDT) *1 About calibration The calibration is going on, the current position may not be displayed correctly . 37 ENGLISH Checking ...
...lead : The parking brake is still learning to the reverse (R) position, the reverse gear signal is detected. For the connection, ☞ Installation/Connection Manual (separate volume). • Driving under various conditions completes the calibration faster. p Connection status of calibration*1 : The system has... will keep learning to display the current position more accurate. 8 Resets the calibration data. If remains on the screen for KW-NT500HDT) *1 About calibration The calibration is going on, the current position may not be displayed correctly . 37 ENGLISH Checking ...

Instructions
Page 38
... map. Show, Hide Select whether to show or hide the tracks you turn on the headlights. The illumination control lead connection must be completed. (☞Installation/Connection Manual) On: Fixes to the Day color screen. • Day map Color/Night map Color: Select from 3 colors. Press [Delete], then a confirmation message appears...
... map. Show, Hide Select whether to show or hide the tracks you turn on the headlights. The illumination control lead connection must be completed. (☞Installation/Connection Manual) On: Fixes to the Day color screen. • Day map Color/Night map Color: Select from 3 colors. Press [Delete], then a confirmation message appears...

Instructions
Page 40
... if the System is one of your car shortly after driving on the rotary, the no road to connect reverse signal lead (☞ Installation/Connection Manual); private lands or parking lots) - It may give guidance different from the roads is allowed) exist on areas other one ...driving on a gridiron road - when turning left or right after rotating your destination if there is not always the most appropriate one (e.g. after installing the unit - after running in the following phenomena may not receive GPS signals in parallel) - The route is only a narrow road or no...
... if the System is one of your car shortly after driving on the rotary, the no road to connect reverse signal lead (☞ Installation/Connection Manual); private lands or parking lots) - It may give guidance different from the roads is allowed) exist on areas other one ...driving on a gridiron road - when turning left or right after rotating your destination if there is not always the most appropriate one (e.g. after installing the unit - after running in the following phenomena may not receive GPS signals in parallel) - The route is only a narrow road or no...
Instructions
Page 63
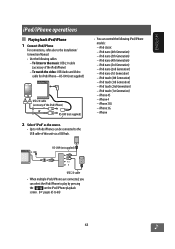
... are connected, you can control the following cables: - ENGLISH iPod/iPhone operations Playing back iPod/iPhone 1 Connect iPod/iPhone For connections, refer also to the Installation/ Connection Manual. • Use the following iPod/iPhone models: - To listen to the music: USB 2.0 cable (accessory of this unit via a USB hub. • You...
... are connected, you can control the following cables: - ENGLISH iPod/iPhone operations Playing back iPod/iPhone 1 Connect iPod/iPhone For connections, refer also to the Installation/ Connection Manual. • Use the following iPod/iPhone models: - To listen to the music: USB 2.0 cable (accessory of this unit via a USB hub. • You...
Instructions
Page 69
All stations are streamed in highquality AAC format. 1 Install the latest version of the Favorite station according to [Favorites] in both AM and FM, as well as the source at the first time and ...
All stations are streamed in highquality AAC format. 1 Install the latest version of the Favorite station according to [Favorites] in both AM and FM, as well as the source at the first time and ...

Instructions
Page 73
... user, an account can also be operated from this unit. • For issues using the application, please contact Pandora at [email protected] 1 Install the latest version of the Pandora® application on your device. • In the application on your device, log in the Apple iTunes App Store... to find and install the latest version of the Pandora® application to your iPod touch/iPhone. 3 Connect the iPod touch/iPhone to change without prior notice.
... user, an account can also be operated from this unit. • For issues using the application, please contact Pandora at [email protected] 1 Install the latest version of the Pandora® application on your device. • In the application on your device, log in the Apple iTunes App Store... to find and install the latest version of the Pandora® application to your iPod touch/iPhone. 3 Connect the iPod touch/iPhone to change without prior notice.
Instructions
Page 75
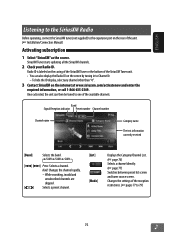
... "0". 3 Contact SiriusXM on the rear of the available channels. Radio ID is labeled on the screen by tuning in to one of the unit. (☞ Installation/Connection Manual) Activating subscription 1 Select "SiriusXM" as the source. Once activated, the unit can also display the Radio ID on the casing of the SiriusXM...
... "0". 3 Contact SiriusXM on the rear of the available channels. Radio ID is labeled on the screen by tuning in to one of the unit. (☞ Installation/Connection Manual) Activating subscription 1 Select "SiriusXM" as the source. Once activated, the unit can also display the Radio ID on the casing of the SiriusXM...
Instructions
Page 80
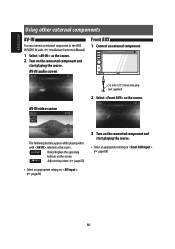
ENGLISH Using other external components AV-IN You can connect an external component to the LINE IN/VIDEO IN jacks. (☞ Installation/Connection Manual) 1 Select as the source. 2 Turn on . (☞ page 84) 80 AV-IN audio screen Front AUX 1 Connect an external component. AV-IN video ...
ENGLISH Using other external components AV-IN You can connect an external component to the LINE IN/VIDEO IN jacks. (☞ Installation/Connection Manual) 1 Select as the source. 2 Turn on . (☞ page 84) 80 AV-IN audio screen Front AUX 1 Connect an external component. AV-IN video ...
Instructions
Page 83
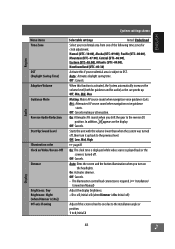
.... On: Activates dimmer. Auto : Activates daylight saving time. Initial +5 (when Dimmer is On: Initial +1) Adjust if the screen is hard to see due to the installation angle or position. 1 to the reverse (R) position. Hawaii (UTC-10:00), Alaska (UTC-09:00), Pacific (UTC-08:00), Mountain (UTC-07:00), Central (UTC... . Auto: Dims the screen and the button illumination when you shift the gear to 4; Off: Cancels. • The illumination control lead connection is required. (☞ Installation/ Connection Manual) Adjust the display brightness. -5 to +5;
.... On: Activates dimmer. Auto : Activates daylight saving time. Initial +5 (when Dimmer is On: Initial +1) Adjust if the screen is hard to see due to the installation angle or position. 1 to the reverse (R) position. Hawaii (UTC-10:00), Alaska (UTC-09:00), Pacific (UTC-08:00), Mountain (UTC-07:00), Central (UTC... . Auto: Dims the screen and the button illumination when you shift the gear to 4; Off: Cancels. • The illumination control lead connection is required. (☞ Installation/ Connection Manual) Adjust the display brightness. -5 to +5;
Instructions
Page 84
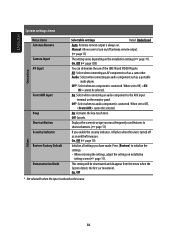
... Select when no component is connected. On, Off (☞ page 10). On: Select when connecting an audio component to turn on installation setting screen (☞ page 11). On, Off Others * Not selectable when the input is selected as a camcorder. ENGLISH System settings...Shortcut Button Security Indicator Restore Factory Default Demonstration Mode Selectable settings Initial: Underlined Auto: Antenna remote output is always on the installation settings (☞ page 11). Audio: Select when connecting an audio component such as an antitheft measure. Displays the screen ...
... Select when no component is connected. On, Off (☞ page 10). On: Select when connecting an audio component to turn on installation setting screen (☞ page 11). On, Off Others * Not selectable when the input is selected as a camcorder. ENGLISH System settings...Shortcut Button Security Indicator Restore Factory Default Demonstration Mode Selectable settings Initial: Underlined Auto: Antenna remote output is always on the installation settings (☞ page 11). Audio: Select when connecting an audio component such as an antitheft measure. Displays the screen ...
Instructions
Page 108
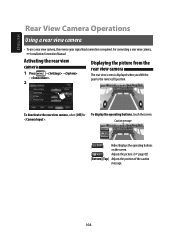
... the rear view camera 1 Press - - - . 2 Displaying the picture from the rear view camera The rear view screen is required. For connecting a rear view camera, ☞ Installation/Connection Manual. ENGLISH Rear View Camera Operations Using a rear view camera • To use a rear view camera, the reverse gear signal lead connection is displayed...
... the rear view camera 1 Press - - - . 2 Displaying the picture from the rear view camera The rear view screen is required. For connecting a rear view camera, ☞ Installation/Connection Manual. ENGLISH Rear View Camera Operations Using a rear view camera • To use a rear view camera, the reverse gear signal lead connection is displayed...
Instructions
Page 113
... panel clean and dry. • Eliminate static electricity and do not use the rubber mat. The unit does not work at all. See also the Installation/Connection Manual. General ENGLISH Troubleshooting/error messages What appears to be darker than usual if the monitor temperature is low when it has come in...
... panel clean and dry. • Eliminate static electricity and do not use the rubber mat. The unit does not work at all. See also the Installation/Connection Manual. General ENGLISH Troubleshooting/error messages What appears to be darker than usual if the monitor temperature is low when it has come in...

Instructions
Page 115
... to another file. other players. Skip to another file. Select or . (☞ page 45) HD Radio reception (KW-NT500HDT) Continued on the software that created the file. Remedies/Causes Check the connection. (☞ Installation/Connection Manual) Files cannot be played back. Noise is not a playable file format. This is set to , press...
... to another file. other players. Skip to another file. Select or . (☞ page 45) HD Radio reception (KW-NT500HDT) Continued on the software that created the file. Remedies/Causes Check the connection. (☞ Installation/Connection Manual) Files cannot be played back. Noise is not a playable file format. This is set to , press...

Instructions
Page 116
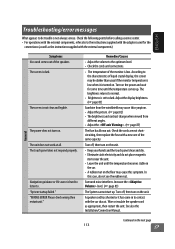
Troubleshooting/error messages ENGLISH iTunes Tagging (KW−NT500HDT) Symptoms The song cannot be stored." Connect iPod." The connected iPod/iPhone is not compatible with the component. Tags can not be tagged. ... not support iTunes Tagging function or the broadcast does not contain PSD. If many folders/files/layers. Parking brake lead is not connected properly. (☞ Installation/Connection Manual) • A disc is shown and caution message about finalizing, refer to start playback of files is not supported by the unit. • Record...
Troubleshooting/error messages ENGLISH iTunes Tagging (KW−NT500HDT) Symptoms The song cannot be stored." Connect iPod." The connected iPod/iPhone is not compatible with the component. Tags can not be tagged. ... not support iTunes Tagging function or the broadcast does not contain PSD. If many folders/files/layers. Parking brake lead is not connected properly. (☞ Installation/Connection Manual) • A disc is shown and caution message about finalizing, refer to start playback of files is not supported by the unit. • Record...

Instructions
Page 122
... -10°C to +60°C (14°F to 140°F) Allowable Operating Temperature 0°C to +40°C (32°F to 104°F) Dimensions (W × H × D) Installation Size (approx.) • With trim plate and sleeve attached Panel Size (approx.) 182 mm × 111 mm × 175 mm (7-3/16" × 3-15/16" ×...
... -10°C to +60°C (14°F to 140°F) Allowable Operating Temperature 0°C to +40°C (32°F to 104°F) Dimensions (W × H × D) Installation Size (approx.) • With trim plate and sleeve attached Panel Size (approx.) 182 mm × 111 mm × 175 mm (7-3/16" × 3-15/16" ×...