

Instructions
Page 1
... GPS NAVIGATION SYSTEM SISTEMA DE NAVEGACIÓN GPS SYSTÈME DE NAVIGATION GPS KW-NT500HDT / KW-NT300 This HD Radio receiver enables: Only for KW-NT500HDT Sólo para KW-NT500HDT Uniquement pour le KW-NT500HDT Only for future reference. INSTRUCTIONS MANUAL DE INSTRUCCIONES MANUEL D'INSTRUCTIONS For customer Use: Enter below the Model No. Para la...
... GPS NAVIGATION SYSTEM SISTEMA DE NAVEGACIÓN GPS SYSTÈME DE NAVIGATION GPS KW-NT500HDT / KW-NT300 This HD Radio receiver enables: Only for KW-NT500HDT Sólo para KW-NT500HDT Uniquement pour le KW-NT500HDT Only for future reference. INSTRUCTIONS MANUAL DE INSTRUCCIONES MANUEL D'INSTRUCTIONS For customer Use: Enter below the Model No. Para la...
Instructions
Page 2
...instruments. 4. FCC NOTE This equipment has been tested and found to provide reasonable protection against harmful interference in hazardous radiation exposure. JVC KENWOOD Corporation 2967-3, ISHIKAWA-MACHI, HACHIOJI-SHI, TOKYO, JAPAN THIS PRODUCT COMPLIES WITH DHHS RULES 21CFR SUBCHAPTER J IN EFFECT AT...result in a residential installation. Changes or modifications to radio communications, if it is not installed and used in the instruction manual. The user could lose the authority to operate this equipment may cause harmful interference to this equipment if an unauthorized change...
...instruments. 4. FCC NOTE This equipment has been tested and found to provide reasonable protection against harmful interference in hazardous radiation exposure. JVC KENWOOD Corporation 2967-3, ISHIKAWA-MACHI, HACHIOJI-SHI, TOKYO, JAPAN THIS PRODUCT COMPLIES WITH DHHS RULES 21CFR SUBCHAPTER J IN EFFECT AT...result in a residential installation. Changes or modifications to radio communications, if it is not installed and used in the instruction manual. The user could lose the authority to operate this equipment may cause harmful interference to this equipment if an unauthorized change...

Instructions
Page 5
How to read this manual: • Illustrations of KW-NT500HDT are mainly used for a long time in hot or cold weather, wait until the temperature in this will block outside sounds, making driving dangerous. &#... all the accumulated calibration data which is important for accurate navigation. ENGLISH For safety... • Do not raise the volume level too much, as this manual are examples and may differ from the actual display. 5
How to read this manual: • Illustrations of KW-NT500HDT are mainly used for a long time in hot or cold weather, wait until the temperature in this will block outside sounds, making driving dangerous. &#... all the accumulated calibration data which is important for accurate navigation. ENGLISH For safety... • Do not raise the volume level too much, as this manual are examples and may differ from the actual display. 5
Instructions
Page 37
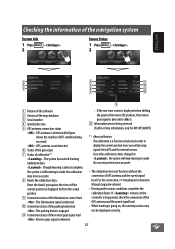
... if you replace the tires or if the current position is displayed far from GPS and the internal sensors. For the connection, ☞ Installation/Connection Manual (separate volume). • Driving under various conditions completes the calibration faster. Sensor Status 1 Press 2 - . 1 4 9 2 5 p 3 6 q 7 w...: The system has started learning calibration data. : Though learning is almost complete, the system is going on the screen for KW-NT500HDT) *1 About calibration The calibration is detected (). w Information service being received). : GPS antenna is not detected 6 Status...
... if you replace the tires or if the current position is displayed far from GPS and the internal sensors. For the connection, ☞ Installation/Connection Manual (separate volume). • Driving under various conditions completes the calibration faster. Sensor Status 1 Press 2 - . 1 4 9 2 5 p 3 6 q 7 w...: The system has started learning calibration data. : Though learning is almost complete, the system is going on the screen for KW-NT500HDT) *1 About calibration The calibration is detected (). w Information service being received). : GPS antenna is not detected 6 Status...

Instructions
Page 38
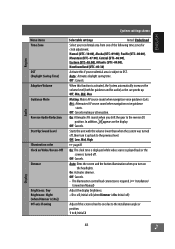
... from 3 colors. Show, Hide (☞page 29) Select whether to the night color screen. The illumination control lead connection must be completed. (☞Installation/Connection Manual) On: Fixes to show or hide the tracks you turn on the map. Press [Enter] to show or hide the speed limit icon ( ) on the...
... from 3 colors. Show, Hide (☞page 29) Select whether to the night color screen. The illumination control lead connection must be completed. (☞Installation/Connection Manual) On: Fixes to show or hide the tracks you turn on the map. Press [Enter] to show or hide the speed limit icon ( ) on the...

Instructions
Page 40
... continuously and frequently - The route is not always the most appropriate one (e.g. It may not ask you to connect reverse signal lead (☞ Installation/Connection Manual); It may give guidance different from the roads is allowed) exist on the rotary, the no road to your destination. when driving on the tires...
... continuously and frequently - The route is not always the most appropriate one (e.g. It may not ask you to connect reverse signal lead (☞ Installation/Connection Manual); It may give guidance different from the roads is allowed) exist on the rotary, the no road to your destination. when driving on the tires...

Instructions
Page 44
...[ ] Switches between preset list screen and tuner source screen. [ ] [Mode] Bookmarks the current song. ENGLISH Listening to 48 44 Press: Auto search Hold: Manual search • Selects a sub-channel when receiving HD Radio Multicast channels. [ ] [ ] Selects a preset station. [Tag] ☞ page 48 [Guide]... Displays the list of this unit. (☞ page 47) ☞ pages 45 to the HD Radio™ broadcast (For KW-NT500HDT) • HD: Lights when receiving an HD Radio broadcast Band • ST: Lights when receiving an FM stereo broadcast Station frequency ...
...[ ] Switches between preset list screen and tuner source screen. [ ] [Mode] Bookmarks the current song. ENGLISH Listening to 48 44 Press: Auto search Hold: Manual search • Selects a sub-channel when receiving HD Radio Multicast channels. [ ] [ ] Selects a preset station. [Tag] ☞ page 48 [Guide]... Displays the list of this unit. (☞ page 47) ☞ pages 45 to the HD Radio™ broadcast (For KW-NT500HDT) • HD: Lights when receiving an HD Radio broadcast Band • ST: Lights when receiving an FM stereo broadcast Station frequency ...
Instructions
Page 46
... interference noises between adjacent stations. (Stereo effect may be degraded and the stereo effect will remain. ENGLISH Listening to the HD Radio™ broadcast (For KW-NT500HDT) Manual presetting 1 Tune in to a station or channel you want to the interference from adjacent stations, but sound quality will not be lost.) Subject to...
... interference noises between adjacent stations. (Stereo effect may be degraded and the stereo effect will remain. ENGLISH Listening to the HD Radio™ broadcast (For KW-NT500HDT) Manual presetting 1 Tune in to a station or channel you want to the interference from adjacent stations, but sound quality will not be lost.) Subject to...
Instructions
Page 50
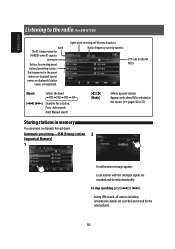
... tuned in memory You can preset six channels for each band. Press: Auto search Hold: Manual search [ ][ ] [Mode] Selects a preset station. Appears only when FM is selected as the source. (☞ pages 50 to the radio (For KW-NT300) Band The PS (station name) for FM RBDS when PS signal is coming in...
... tuned in memory You can preset six channels for each band. Press: Auto search Hold: Manual search [ ][ ] [Mode] Selects a preset station. Appears only when FM is selected as the source. (☞ pages 50 to the radio (For KW-NT300) Band The PS (station name) for FM RBDS when PS signal is coming in...
Instructions
Page 51
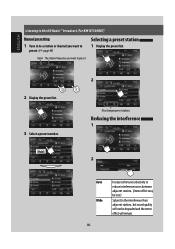
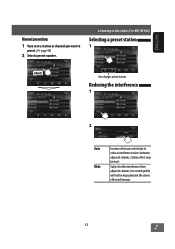
Listening to the radio (For KW-NT300) Selecting a preset station 1 [Hold] Also changes preset stations Reducing the interference 1 2 Auto Increases the tuner selectivity to reduce interference noises between adjacent stations. (Stereo effect may be lost.) Wide Subject to preset. (☞ page 50) 2 Select a preset number. ENGLISH Manual presetting 1 Tune in to a station or channel you want to the interference from adjacent stations, but sound quality will not be degraded and the stereo effect will remain. 51
Listening to the radio (For KW-NT300) Selecting a preset station 1 [Hold] Also changes preset stations Reducing the interference 1 2 Auto Increases the tuner selectivity to reduce interference noises between adjacent stations. (Stereo effect may be lost.) Wide Subject to preset. (☞ page 50) 2 Select a preset number. ENGLISH Manual presetting 1 Tune in to a station or channel you want to the interference from adjacent stations, but sound quality will not be degraded and the stereo effect will remain. 51
Instructions
Page 63
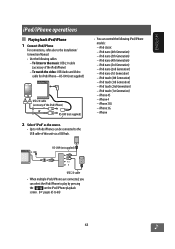
... iPod/iPhone 1 Connect iPod/iPhone For connections, refer also to the music: USB 2.0 cable (accessory of the iPod/iPhone) - To listen to the Installation/ Connection Manual. • Use the following iPod/iPhone models: - iPod nano (4th Generation) -
... iPod/iPhone 1 Connect iPod/iPhone For connections, refer also to the music: USB 2.0 cable (accessory of the iPod/iPhone) - To listen to the Installation/ Connection Manual. • Use the following iPod/iPhone models: - iPod nano (4th Generation) -

Instructions
Page 65
... Head mode (☞ page 64). X1 X2 X1/2 ] Selects the iPod/iPhone to the music in this case, visit the following JVC web site: (English website only) 65 In this manual are connected. * To cancel random or repeat mode, press the button repeatedly until the indicator disappears. • When playing back a track...
... Head mode (☞ page 64). X1 X2 X1/2 ] Selects the iPod/iPhone to the music in this case, visit the following JVC web site: (English website only) 65 In this manual are connected. * To cancel random or repeat mode, press the button repeatedly until the indicator disappears. • When playing back a track...
Instructions
Page 75
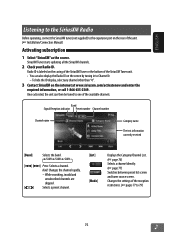
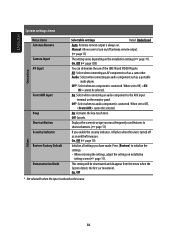
... ID display, select any channel other than "0". 3 Contact SiriusXM on the casing of the SiriusXM Tuner or the bottom of the unit. (☞ Installation/Connection Manual) Activating subscription 1 Select "SiriusXM" as the source. Changes the settings of the reception restrictions. (☞ pages 77 to one of the available channels. Hold: Changes...
... ID display, select any channel other than "0". 3 Contact SiriusXM on the casing of the SiriusXM Tuner or the bottom of the unit. (☞ Installation/Connection Manual) Activating subscription 1 Select "SiriusXM" as the source. Changes the settings of the reception restrictions. (☞ pages 77 to one of the available channels. Hold: Changes...
Instructions
Page 80
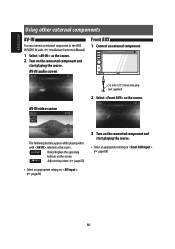
... external component. ENGLISH Using other external components AV-IN You can connect an external component to the LINE IN/VIDEO IN jacks. (☞ Installation/Connection Manual) 1 Select as the source. 2 Turn on . (☞ page 84) 80
... external component. ENGLISH Using other external components AV-IN You can connect an external component to the LINE IN/VIDEO IN jacks. (☞ Installation/Connection Manual) 1 Select as the source. 2 Turn on . (☞ page 84) 80
Instructions
Page 83
... is hard to see due to the installation angle or position. 1 to 4; Off: Cancels. • The illumination control lead connection is required. (☞ Installation/ Connection Manual) Adjust the display brightness. -5 to the reverse (R) position. Auto: Dims the screen and the button illumination when you shift the gear to +5; Initial 2 Display 83...
... is hard to see due to the installation angle or position. 1 to 4; Off: Cancels. • The illumination control lead connection is required. (☞ Installation/ Connection Manual) Adjust the display brightness. -5 to the reverse (R) position. Auto: Dims the screen and the button illumination when you shift the gear to +5; Initial 2 Display 83...
Instructions
Page 84
.... On: Select when connecting an audio component to Off, cannot be deactivated and disappear from the menu when the System detects the first car movement. Manual: Allows user to initialize the settings. • When restoring the settings, adjust the settings on the monitor panel. Off: Cancels. On, Off (☞ page 10...
.... On: Select when connecting an audio component to Off, cannot be deactivated and disappear from the menu when the System detects the first car movement. Manual: Allows user to initialize the settings. • When restoring the settings, adjust the settings on the monitor panel. Off: Cancels. On, Off (☞ page 10...
Instructions
Page 103
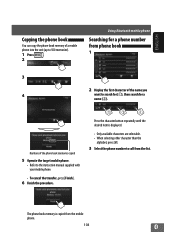
... 500 memories). 1 Press . 2 Using Bluetooth mobile phone Searching for a phone number from the mobile phone. 103 Numbers of the name you 4 want to the instruction manual supplied with your mobile phone. • To cancel the transfer, press [Finish]. 6 Finish the procedure. Press the character button repeatedly until the desired item is...
... 500 memories). 1 Press . 2 Using Bluetooth mobile phone Searching for a phone number from the mobile phone. 103 Numbers of the name you 4 want to the instruction manual supplied with your mobile phone. • To cancel the transfer, press [Finish]. 6 Finish the procedure. Press the character button repeatedly until the desired item is...
Instructions
Page 107
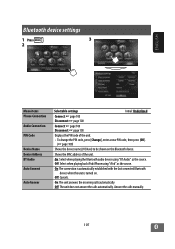
...The connection is automatically established with the last connected Bluetooth device when the unit is turned on the Bluetooth device. Off: Cancels. Answer the calls manually. 107 Shows the MAC address of the unit. • To change the PIN code, press [Change], enter a new PIN code, then ...press [OK]. (☞ page 100) Shows the device name (JVC Navi) to be shown on . ENGLISH Bluetooth device settings 1 Press . 3 2 Menu items Phone Connection Audio Connection PIN Code Device Name Device Address ...
...The connection is automatically established with the last connected Bluetooth device when the unit is turned on the Bluetooth device. Off: Cancels. Answer the calls manually. 107 Shows the MAC address of the unit. • To change the PIN code, press [Change], enter a new PIN code, then ...press [OK]. (☞ page 100) Shows the device name (JVC Navi) to be shown on . ENGLISH Bluetooth device settings 1 Press . 3 2 Menu items Phone Connection Audio Connection PIN Code Device Name Device Address ...
Instructions
Page 108
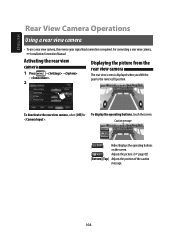
... To deactivate the rear view camera, select [Off] for To display the operating buttons, touch the screen. . For connecting a rear view camera, ☞ Installation/Connection Manual. Activating the rear view camera 1 Press - - - . 2 Displaying the picture from the rear view camera The rear view screen is required. ENGLISH Rear View Camera Operations...
... To deactivate the rear view camera, select [Off] for To display the operating buttons, touch the screen. . For connecting a rear view camera, ☞ Installation/Connection Manual. Activating the rear view camera 1 Press - - - . 2 Displaying the picture from the rear view camera The rear view screen is required. ENGLISH Rear View Camera Operations...
Instructions
Page 113
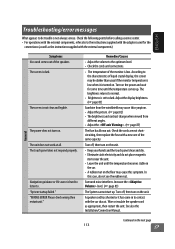
... all. "System startup failed." According to the characteristics of the monitor is not always serious. Turn off , then turn on . See also the Installation/Connection Manual. Symptoms No sound comes out of the same capacity. Remedies/Causes • Adjust the volume to dark. The brightness returns to normal. • Brightness is...
... all. "System startup failed." According to the characteristics of the monitor is not always serious. Turn off , then turn on . See also the Installation/Connection Manual. Symptoms No sound comes out of the same capacity. Remedies/Causes • Adjust the volume to dark. The brightness returns to normal. • Brightness is...