Instructions
Page 7
... Lock Code 44 Auto Demo 45 Illumination 45 Language 45 Closed Caption 46 Auto Shut Off 48 XDS ID 48 Noise Muting 49 Front Panel Lock 49 V1 Smart Input 50 Video Input Label 50 Position Adjustment 51 Power Indicator 51 Video-1 Monitor Out 51 Digital-In 52 Digital...-In Audio 52 Picture Adjust 53 Picture Settings 53 Adjust Picture Settings 53 Color Temperature 53 Digital Noise Clear 54 Color Management 54 Dynamic Gamma 54 Smart Picture 55 Reset 55 Table of Contents Sound Adjust 56 Sound Settings 56 Adjust Sound...
... Lock Code 44 Auto Demo 45 Illumination 45 Language 45 Closed Caption 46 Auto Shut Off 48 XDS ID 48 Noise Muting 49 Front Panel Lock 49 V1 Smart Input 50 Video Input Label 50 Position Adjustment 51 Power Indicator 51 Video-1 Monitor Out 51 Digital-In 52 Digital...-In Audio 52 Picture Adjust 53 Picture Settings 53 Adjust Picture Settings 53 Color Temperature 53 Digital Noise Clear 54 Color Management 54 Dynamic Gamma 54 Smart Picture 55 Reset 55 Table of Contents Sound Adjust 56 Sound Settings 56 Adjust Sound...
Instructions
Page 10
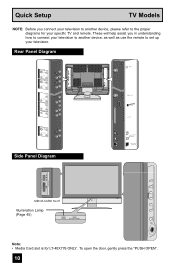
...Illumination Lamp (Page 45) POWER PROGRAM/TIMER POWER Note: • Media Card slot is for your television. L Y Pr Pb R - AUDIO - AUDIO - L INPUT 1 COMPONENT DIGITAL IN AUDIO AUDIOMOUNITTOR / REC OUT Side Panel Diagram 75Ω (VHF/UHF) ATSC / DIGITAL CABLE IN DIGITAL-IN CABLE CARD i.LINK IN/.../OUT S400(TS) OPTICAL OUT Digital Audio xD-Picture Card MEMORY STICK PUSH-OPEN SD/ MMC Close door when using media cards. L L S-VIDEO VIDEO R - Quick Setup TV Models NOTE: Before you in understanding how to connect your television to another device, please refer to set up ...
...Illumination Lamp (Page 45) POWER PROGRAM/TIMER POWER Note: • Media Card slot is for your television. L Y Pr Pb R - AUDIO - AUDIO - L INPUT 1 COMPONENT DIGITAL IN AUDIO AUDIOMOUNITTOR / REC OUT Side Panel Diagram 75Ω (VHF/UHF) ATSC / DIGITAL CABLE IN DIGITAL-IN CABLE CARD i.LINK IN/.../OUT S400(TS) OPTICAL OUT Digital Audio xD-Picture Card MEMORY STICK PUSH-OPEN SD/ MMC Close door when using media cards. L L S-VIDEO VIDEO R - Quick Setup TV Models NOTE: Before you in understanding how to connect your television to another device, please refer to set up ...
Instructions
Page 20
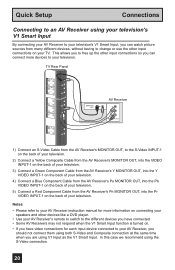
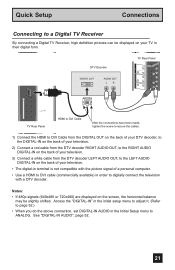
... from the AV Receiver's Y MONITOR OUT, into the Y VIDEO INPUT-1 on the back of your television. 4) Connect a Blue Component Cable from the AV Receiver's PB MONITOR OUT, into the Pr VIDEO INPUT-1 on your TV. TV Rear Panel INPUT 1 INPUT 2 INPUT 3 S-VIDEO VIDEO OVER R - L VIDEO R - L S-VIDEO VIDEO ... connecting your speakers and other input connections on the back of your television. L Y Pr Pb R - L S-VIDEO VIDEO OVER R - This allows you to free up the other input connections so you can watch picture sources from many different devices, without having to change or use the...
... from the AV Receiver's Y MONITOR OUT, into the Y VIDEO INPUT-1 on the back of your television. 4) Connect a Blue Component Cable from the AV Receiver's PB MONITOR OUT, into the Pr VIDEO INPUT-1 on your TV. TV Rear Panel INPUT 1 INPUT 2 INPUT 3 S-VIDEO VIDEO OVER R - L VIDEO R - L S-VIDEO VIDEO ... connecting your speakers and other input connections on the back of your television. L Y Pr Pb R - L S-VIDEO VIDEO OVER R - This allows you to free up the other input connections so you can watch picture sources from many different devices, without having to change or use the...
Instructions
Page 21
... do the above connection, set DIGITAL-IN AUDIO in order to digitally connect the television with a DTV decoder. L VIDEO R - L Y Pr Pb R - L DIGITAL IN AUDIO INPUT 1 COMPONENT DIGITAL-IN AUDIO OUT CABLE CARD TV Rear Panel R L HDMI to DVI Cable After the connections have been made, tighten the ... a white cable from the DTV decoder LEFT AUDIO OUT, to the LEFT AUDIO DIGITAL-IN on your television. • The digital-in terminal is not compatible with the picture signal of a personal computer. • Use a HDMI to DVI cable (commercially available) in the Initial Setup menu to a ...
... do the above connection, set DIGITAL-IN AUDIO in order to digitally connect the television with a DTV decoder. L VIDEO R - L Y Pr Pb R - L DIGITAL IN AUDIO INPUT 1 COMPONENT DIGITAL-IN AUDIO OUT CABLE CARD TV Rear Panel R L HDMI to DVI Cable After the connections have been made, tighten the ... a white cable from the DTV decoder LEFT AUDIO OUT, to the LEFT AUDIO DIGITAL-IN on your television. • The digital-in terminal is not compatible with the picture signal of a personal computer. • Use a HDMI to DVI cable (commercially available) in the Initial Setup menu to a ...
Instructions
Page 22
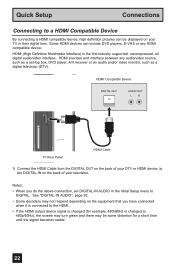
.... Quick Setup Connections Connecting to a HDMI Compatible Device By connecting a HDMI compatible device, high definition pictures can include DVD players, D-VHS or any audio/video source, such as a digital television (DTV). Notes: • When you have connected when it is connected to the DIGITAL-IN on...ATSC / DIGITAL CABLE IN DIGITAL OUT AUDIO OUT LR DIGITAL-IN CABLE CARD TV Rear Panel HDMI Cable 1) Connect the HDMI Cable from the DIGITAL OUT on the back of your television. Some HDMI devices can be displayed on the equipment that you do the above connection,...
.... Quick Setup Connections Connecting to a HDMI Compatible Device By connecting a HDMI compatible device, high definition pictures can include DVD players, D-VHS or any audio/video source, such as a digital television (DTV). Notes: • When you have connected when it is connected to the DIGITAL-IN on...ATSC / DIGITAL CABLE IN DIGITAL OUT AUDIO OUT LR DIGITAL-IN CABLE CARD TV Rear Panel HDMI Cable 1) Connect the HDMI Cable from the DIGITAL OUT on the back of your television. Some HDMI devices can be displayed on the equipment that you do the above connection,...
Instructions
Page 32
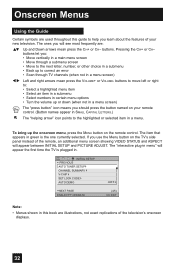
... mean press the CH+ or CH- The "interactive plug-in menu" will appear between INITIAL SETUP and PICTURE ADJUST. Pressing the CH+ or CH- To bring up or down (when not in a menu screen... buttons to move left or right to help you should press the button named on your new television. INITIAL SETUP PREVIOUS AUTO TUNER SETUP CHANNEL SUMMARY V-CHIP SET LOCK CODE AUTO DEMO OFF NEXT ...8226; Turn the volume up the onscreen menu, press the MENU button on the TV's side panel instead of the remote, an additional menu screen showing VIDEO STATUS and ASPECT will appear the first...
... mean press the CH+ or CH- The "interactive plug-in menu" will appear between INITIAL SETUP and PICTURE ADJUST. Pressing the CH+ or CH- To bring up or down (when not in a menu screen... buttons to move left or right to help you should press the button named on your new television. INITIAL SETUP PREVIOUS AUTO TUNER SETUP CHANNEL SUMMARY V-CHIP SET LOCK CODE AUTO DEMO OFF NEXT ...8226; Turn the volume up the onscreen menu, press the MENU button on the TV's side panel instead of the remote, an additional menu screen showing VIDEO STATUS and ASPECT will appear the first...

Instructions
Page 34
... being displayed on the screen. • When the Menu button on the TV side panel is pressed, the FRONT PANEL CONTROL menu between INITIAL SETUP 05 and PICTURE ADJUST 01 will appear. • Regarding the digital setup menu, see page 70. • MEDIA CARD VIEWER is for LT-40X776 ONLY. 34 ...FRAN. ESP. NOISE CLEAR COLOR MANAGEMENT DYNAMIC GAMMA SMART PICTURE HIGH OFF OFF OFF ON RESET...
... being displayed on the screen. • When the Menu button on the TV side panel is pressed, the FRONT PANEL CONTROL menu between INITIAL SETUP 05 and PICTURE ADJUST 01 will appear. • Regarding the digital setup menu, see page 70. • MEDIA CARD VIEWER is for LT-40X776 ONLY. 34 ...FRAN. ESP. NOISE CLEAR COLOR MANAGEMENT DYNAMIC GAMMA SMART PICTURE HIGH OFF OFF OFF ON RESET...

Instructions
Page 51
...button π† √® To POWER INDICATOR To adjust POWER INDICATOR LOW, HIGH or OFF Note: INITIAL SETUP PREVIOUS NOISE MUTING FRONT PANEL LOCK V1 SMART INPUT VIDEO INPUT LABEL POSITION ADJUSTMENT POWER INDICATOR NEXT PAGE SELECT OPERATE ON OFF ON LOW (2/5) MENU EXIT • If you.... • When you change the screen size, perform the position adjustment again. • Position adjustment allows you to adjust the brightness of the picture on stand by. Press the MENU button π† To VIDEO-1 MONITOR OUT √® To select ON or OFF INITIAL SETUP PREVIOUS VIDEO...
...button π† √® To POWER INDICATOR To adjust POWER INDICATOR LOW, HIGH or OFF Note: INITIAL SETUP PREVIOUS NOISE MUTING FRONT PANEL LOCK V1 SMART INPUT VIDEO INPUT LABEL POSITION ADJUSTMENT POWER INDICATOR NEXT PAGE SELECT OPERATE ON OFF ON LOW (2/5) MENU EXIT • If you.... • When you change the screen size, perform the position adjustment again. • Position adjustment allows you to adjust the brightness of the picture on stand by. Press the MENU button π† To VIDEO-1 MONITOR OUT √® To select ON or OFF INITIAL SETUP PREVIOUS VIDEO...
Instructions
Page 52
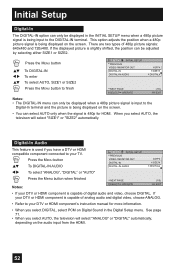
...types of digital audio and video, choose DIGITAL. When you select DIGITAL, select PCM on Digital Sound in the INITIAL SETUP menu when a 480p picture signal is being displayed on the screen. Press the MENU button π† √® π† To DIGITAL-IN To enter ... or HDMI component is capable of 480p picture signals: 640x480 and 720x480. See page 71. • When you have a DTV or HDMI compatible component connected to the DIGITAL-IN terminal. Digital-In Audio This feature is used if you select AUTO, the television will select "SIZE1" or "SIZE2" ...
...types of digital audio and video, choose DIGITAL. When you select DIGITAL, select PCM on Digital Sound in the INITIAL SETUP menu when a 480p picture signal is being displayed on the screen. Press the MENU button π† √® π† To DIGITAL-IN To enter ... or HDMI component is capable of 480p picture signals: 640x480 and 720x480. See page 71. • When you have a DTV or HDMI compatible component connected to the DIGITAL-IN terminal. Digital-In Audio This feature is used if you select AUTO, the television will select "SIZE1" or "SIZE2" ...

Instructions
Page 53
... MENU button when finished PICTURE ADJUST PREVIOUS STANDARD COLOR TEMPERATURE DIG. ENERGY SAVER MODE The energy saver mode adjusts the level of black and white on your TV picture. PICTURE Picture allows you to adjust the levels of red and green in your television. NOISE CLEAR COLOR MANAGEMENT... DYNAMIC GAMMA SMART PICTURE HIGH OFF OFF OFF ON RESET NEXT PAGE (2/2) SELECT OPERATE MENU ...
... MENU button when finished PICTURE ADJUST PREVIOUS STANDARD COLOR TEMPERATURE DIG. ENERGY SAVER MODE The energy saver mode adjusts the level of black and white on your TV picture. PICTURE Picture allows you to adjust the levels of red and green in your television. NOISE CLEAR COLOR MANAGEMENT... DYNAMIC GAMMA SMART PICTURE HIGH OFF OFF OFF ON RESET NEXT PAGE (2/2) SELECT OPERATE MENU ...
Instructions
Page 54
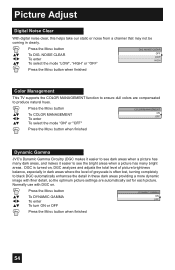
...To select the mode "ON" or "OFF" COLOR MANAGEMENT ON OFF Press the MENU button when finished Dynamic Gamma JVC's Dynamic Gamma Circuitry (DGC makes it easier to see dark areas when a picture has many bright areas. DGC is often lost, turning completely to see the bright areas when... a more dynamic image with DGC on , DGC analyzes and adjusts the total level of picture brightness balance, especially in clearly. π† √® π† Press the MENU button To DIG. Picture Adjust Digital Noise Clear With digital noise clear, this helps take our static or noise from...
...To select the mode "ON" or "OFF" COLOR MANAGEMENT ON OFF Press the MENU button when finished Dynamic Gamma JVC's Dynamic Gamma Circuitry (DGC makes it easier to see dark areas when a picture has many bright areas. DGC is often lost, turning completely to see the bright areas when... a more dynamic image with DGC on , DGC analyzes and adjusts the total level of picture brightness balance, especially in clearly. π† √® π† Press the MENU button To DIG. Picture Adjust Digital Noise Clear With digital noise clear, this helps take our static or noise from...
Instructions
Page 55
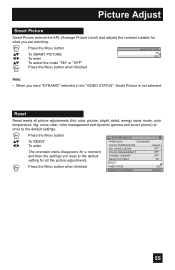
... PAGE (2/2) SELECT OPERATE MENU EXIT 55 Press the MENU button when finished PICTURE ADJUST PREVIOUS STANDARD COLOR TEMPERATURE DIG. noise clear, color management and dynamic gamma and smart picture) at once to the default settings. π† √® ... when finished SMART PICTURE ON OFF Note: • When you have "DYNAMIC" selected in the "VIDEO STATUS", Smart Picture is not selected. Picture Adjust Smart Picture Smart Picture detects the APL (Average Picture Level) and adjusts the contrast suitable for all picture adjustments (tint, color, picture, bright, detail...
... PAGE (2/2) SELECT OPERATE MENU EXIT 55 Press the MENU button when finished PICTURE ADJUST PREVIOUS STANDARD COLOR TEMPERATURE DIG. noise clear, color management and dynamic gamma and smart picture) at once to the default settings. π† √® ... when finished SMART PICTURE ON OFF Note: • When you have "DYNAMIC" selected in the "VIDEO STATUS", Smart Picture is not selected. Picture Adjust Smart Picture Smart Picture detects the APL (Average Picture Level) and adjusts the contrast suitable for all picture adjustments (tint, color, picture, bright, detail...
Instructions
Page 59
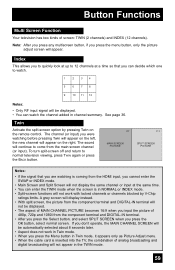
...the split-screen option by V-Chip ratings limits. To turn split-screen off and return to normal television viewing, press TWIN again or press the BACK button. 07 MAIN SCREEN PICTURE V-1 SPLIT SCREEN PICTURE Notes: • If the signal that you cannot enter the SWAP or INDEX mode. •...watch the channel added in Twin mode. • When you press the menu button, only the picture adjust screen will appear on the remote control. Button Functions Multi Screen Function Your television has two kinds of 480p, 720p and 1080i from the main screen channel (or input). A ...
...the split-screen option by V-Chip ratings limits. To turn split-screen off and return to normal television viewing, press TWIN again or press the BACK button. 07 MAIN SCREEN PICTURE V-1 SPLIT SCREEN PICTURE Notes: • If the signal that you cannot enter the SWAP or INDEX mode. •...watch the channel added in Twin mode. • When you press the menu button, only the picture adjust screen will appear on the remote control. Button Functions Multi Screen Function Your television has two kinds of 480p, 720p and 1080i from the main screen channel (or input). A ...

Instructions
Page 60
.... Note: When the screen is in freeze mode, if you can exchange the channel (or input) displayed in TWIN mode. Swap You can select the picture (channel) while viewing SPLIT screen. Note: • It will cancel out. In order to return to the split-screen display with the still...
.... Note: When the screen is in freeze mode, if you can exchange the channel (or input) displayed in TWIN mode. Swap You can select the picture (channel) while viewing SPLIT screen. Note: • It will cancel out. In order to return to the split-screen display with the still...
Instructions
Page 63
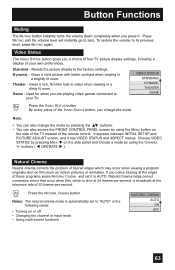
... VIDEO STATUS by using the CHANNEL +/- Video Status The VIDEO STATUS button gives you are playing video games connected to your own preferences. Resets the picture display to zero. buttons ( √ OPERATE ® ). Natural Cinema helps correct conversion errors that occur when film, which may occur when viewing...by using the MENU button on the side panel and choose a mode by pressing MENU† on the side of the TV instead of blurred edges which is shot at 24 frames-per -second. If you notice blurring at the television rate of these programs, press NATURAL CINEMA ...
... VIDEO STATUS by using the CHANNEL +/- Video Status The VIDEO STATUS button gives you are playing video games connected to your own preferences. Resets the picture display to zero. buttons ( √ OPERATE ® ). Natural Cinema helps correct conversion errors that occur when film, which may occur when viewing...by using the MENU button on the side panel and choose a mode by pressing MENU† on the side of the TV instead of blurred edges which is shot at 24 frames-per -second. If you notice blurring at the television rate of these programs, press NATURAL CINEMA ...
Instructions
Page 67
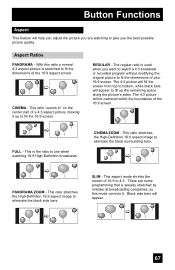
...give you want to watch a 4:3 broadcast or recorded program without modifying the original picture to bottom, while black bars will be centered within the boundaries of the 16:9 aspect screen. CINEMA - The 4:3 picture will appear to fit the dimensions of the 16:9 screen. This ratio stretches the... broadcasts. The regular ratio is stretched to fill up to fill the 16:9 screen. Black side bars will help you adjust the picture you are some programming that is the ratio to eliminate the black side bars. Button Functions Aspect This feature will appear. 67 With...
...give you want to watch a 4:3 broadcast or recorded program without modifying the original picture to bottom, while black bars will be centered within the boundaries of the 16:9 aspect screen. CINEMA - The 4:3 picture will appear to fit the dimensions of the 16:9 screen. This ratio stretches the... broadcasts. The regular ratio is stretched to fill up to fill the 16:9 screen. Black side bars will help you adjust the picture you are some programming that is the ratio to eliminate the black side bars. Button Functions Aspect This feature will appear. 67 With...

Instructions
Page 68
...the aspect ratio or signal, reset the picture position to center. • You can only be used. (LT-40X776 Only) Menu The MENU button allows you to access JVC's onscreen menu system. buttons ( √ OPERATE ® ). • "SLIM" can also access the FRONT PANEL CONTROL screen by using the MENU button... the aspect mode after the televison changed it has VIDEO STATUS and ASPECT menus. When you change a selection or correct a mistake. 68 If the television receives a 4:3 signal from your selection when you to go back in FULL aspect mode, it is ATSC (480i or 480p). • If the...
...the aspect ratio or signal, reset the picture position to center. • You can only be used. (LT-40X776 Only) Menu The MENU button allows you to access JVC's onscreen menu system. buttons ( √ OPERATE ® ). • "SLIM" can also access the FRONT PANEL CONTROL screen by using the MENU button... the aspect mode after the televison changed it has VIDEO STATUS and ASPECT menus. When you change a selection or correct a mistake. 68 If the television receives a 4:3 signal from your selection when you to go back in FULL aspect mode, it is ATSC (480i or 480p). • If the...
Instructions
Page 71
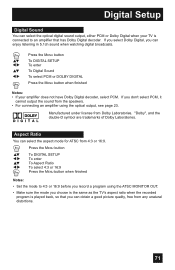
... optical digital sound output, either PCM or Dolby Digital when your amplifier does not have Dolby Digital decoder, select PCM. If you can obtain a good picture quality, free from 4:3 or 16:9. "Dolby", and the double-D symbol are trademarks of Dolby Laboratories. If you select Dolby Digital, you can select the aspect...
... optical digital sound output, either PCM or Dolby Digital when your amplifier does not have Dolby Digital decoder, select PCM. If you can obtain a good picture quality, free from 4:3 or 16:9. "Dolby", and the double-D symbol are trademarks of Dolby Laboratories. If you select Dolby Digital, you can select the aspect...
Instructions
Page 79
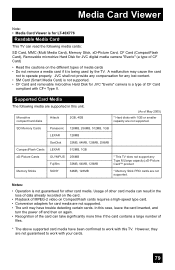
JVC shall not provide any compensation for any Type M (large capacity) xD-Picture Card™ product Memory Sticks SONY 64MB, 128MB * ...128MB, 256MB, 512MB, 1GB LEXAR 128MB SanDisk 32MB, 64MB, 128MB, 256MB CompactFlash Cards LEXAR 512MB, 1GB xD-Picture Cards OLYMPUS 256MB Fujifilm 32MB, 64MB, 128MB * This TV does not support any lost content. • SM ... Supported Card Media The following media cards: SD Card, MMC (Multi Media Card), Memory Stick, xD-Picture Card, CF Card (CompactFlash Card), Removable microdrive Hard Disk for other card media can result in this ...
JVC shall not provide any compensation for any Type M (large capacity) xD-Picture Card™ product Memory Sticks SONY 64MB, 128MB * ...128MB, 256MB, 512MB, 1GB LEXAR 128MB SanDisk 32MB, 64MB, 128MB, 256MB CompactFlash Cards LEXAR 512MB, 1GB xD-Picture Cards OLYMPUS 256MB Fujifilm 32MB, 64MB, 128MB * This TV does not support any lost content. • SM ... Supported Card Media The following media cards: SD Card, MMC (Multi Media Card), Memory Stick, xD-Picture Card, CF Card (CompactFlash Card), Removable microdrive Hard Disk for other card media can result in this ...
Instructions
Page 80
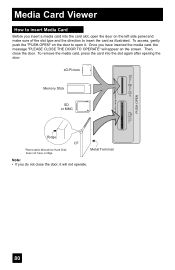
To remove the media card, press the card into the card slot, open it will appear on the left side panel and make sure of the slot type and the direction to insert Media Card Before you have a ridge. COMPACT FLASH Ridge CF *Removable Microdrive Hard ...Disk does not have inserted the media card, the message "PLEASE CLOSE THE DOOR TO OPERATE" will not operate. 80 xD-Picture Memory Stick SD or MMC xD-Picture Card MEMORY STICK PUSH-OPEN SD/ MMC Close door when using media cards. Media Card Viewer How to insert the card as...
To remove the media card, press the card into the card slot, open it will appear on the left side panel and make sure of the slot type and the direction to insert Media Card Before you have a ridge. COMPACT FLASH Ridge CF *Removable Microdrive Hard ...Disk does not have inserted the media card, the message "PLEASE CLOSE THE DOOR TO OPERATE" will not operate. 80 xD-Picture Memory Stick SD or MMC xD-Picture Card MEMORY STICK PUSH-OPEN SD/ MMC Close door when using media cards. Media Card Viewer How to insert the card as...


