
Quick Reference Guide
Page 2
..., there is equipped with a 3-blade grounding type plug to Part 15 of the D-ILA device Do not allow the same still picture to be projected for future reference. - ...Place the projector near water. Do not use a mount recommended by one or more of Products using HID Lamps (that contains mercury) This product has a High Intensity Discharge (HID) lamp that cannot...About the installation place Do not install the projector in a residential installation. All operating instructions should be taken to avoid quick stops, ex- (symbol provided by JVC could be - The product should be ...
..., there is equipped with a 3-blade grounding type plug to Part 15 of the D-ILA device Do not allow the same still picture to be projected for future reference. - ...Place the projector near water. Do not use a mount recommended by one or more of Products using HID Lamps (that contains mercury) This product has a High Intensity Discharge (HID) lamp that cannot...About the installation place Do not install the projector in a residential installation. All operating instructions should be taken to avoid quick stops, ex- (symbol provided by JVC could be - The product should be ...

Quick Reference Guide
Page 3
...- Do not attempt to .) For proper ventilation, separate the product from other products such as opening the cabinet while the illumination lamp is provided and the manufacturer's instructions have fallen on the label. Unplug this can result in your country. Adjust only those controls ...connecting other equipment, which may expose you are not likely to the ceiling) since special technical knowledge and skills are provided for this projector is damaged. Do not place combustibles behind the cooling fan. It may cause injuries. - Use only the accessory cord designed for...
...- Do not attempt to .) For proper ventilation, separate the product from other products such as opening the cabinet while the illumination lamp is provided and the manufacturer's instructions have fallen on the label. Unplug this can result in your country. Adjust only those controls ...connecting other equipment, which may expose you are not likely to the ceiling) since special technical knowledge and skills are provided for this projector is damaged. Do not place combustibles behind the cooling fan. It may cause injuries. - Use only the accessory cord designed for...

Quick Reference Guide
Page 6
... 39 w Language menu 39 e Information menu 40 Editing and Projecting Logo 41 Replacing the Lamp 43 The light source lamp and its lamp time 43 The procedure for the details. • Replacement lamp (lamp unit) BHL5006-S • Replacement filter Inner filter : LC32058-001 Lower filter : LC32087-...for lamp replacement 43 Resetting the lamp time 45 Cleaning and Replacing the Filter 46 Troubleshooting 47 What to be input into the Remote Control 14 Installing the Projector 15 Precautions for Installation 15 Installing the Projector against the Screen 16 Mounting the Projector 16...
... 39 w Language menu 39 e Information menu 40 Editing and Projecting Logo 41 Replacing the Lamp 43 The light source lamp and its lamp time 43 The procedure for the details. • Replacement lamp (lamp unit) BHL5006-S • Replacement filter Inner filter : LC32058-001 Lower filter : LC32087-...for lamp replacement 43 Resetting the lamp time 45 Cleaning and Replacing the Filter 46 Troubleshooting 47 What to be input into the Remote Control 14 Installing the Projector 15 Precautions for Installation 15 Installing the Projector against the Screen 16 Mounting the Projector 16...
Quick Reference Guide
Page 9
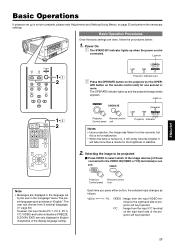
...VIDEO OPERATE W V-KEYSTONE H-KEYSTONE SCREEN DIGITAL ZOOM S FREEZE VOLUME FOCUS QUICK ALIGN. 1-2 2 MENU EXIT ENTER PRESET HIDE LAMP TEMP STAND BY OPERATE Projector: Indicator part 2 Press the OPERATE button on , it will take more . It will slowly become brighter. Light on OPERATE ...OPERATE LAMP TEMP STAND BY OPERATE Projector: Remote control Control panel unit Projector : Indicator Notes • Upon projection, the image may flicker for one second or more than ...
...VIDEO OPERATE W V-KEYSTONE H-KEYSTONE SCREEN DIGITAL ZOOM S FREEZE VOLUME FOCUS QUICK ALIGN. 1-2 2 MENU EXIT ENTER PRESET HIDE LAMP TEMP STAND BY OPERATE Projector: Indicator part 2 Press the OPERATE button on , it will take more . It will slowly become brighter. Light on OPERATE ...OPERATE LAMP TEMP STAND BY OPERATE Projector: Remote control Control panel unit Projector : Indicator Notes • Upon projection, the image may flicker for one second or more than ...

Quick Reference Guide
Page 11
...Unit When "Menu display" (☞ page 39) is set value to "0". Turn off Turn on OPERATE OPERATE STAND BY LAMP TEMP OPERATE Projector: Control Panel Remote Control Unit Projector: Indicator part Note • The OPERATE button will reset the set to "15sec", after pressing the VOLUME button, the ... into the cool-down mode. ● The STAND BY indicator will shorten the life of the light source lamp cools (Cool Down Mode). ERATE button on the projector (or the OP- Adjusting the Sound Volume Ⅵ To increase the volume: press VOLUME ª (0 ➞ 50) Ⅵ To lower...
...Unit When "Menu display" (☞ page 39) is set value to "0". Turn off Turn on OPERATE OPERATE STAND BY LAMP TEMP OPERATE Projector: Control Panel Remote Control Unit Projector: Indicator part Note • The OPERATE button will reset the set to "15sec", after pressing the VOLUME button, the ... into the cool-down mode. ● The STAND BY indicator will shorten the life of the light source lamp cools (Cool Down Mode). ERATE button on the projector (or the OP- Adjusting the Sound Volume Ⅵ To increase the volume: press VOLUME ª (0 ➞ 50) Ⅵ To lower...

Quick Reference Guide
Page 12
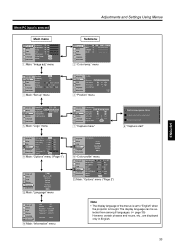
...: "Logo" menu Image adj. Set up R GB Logo Options A Language Information Sleep time[min] Menu color PC2(BNC) DIST SCART RS-232C[bps] SXGA Page 1 15 30 OFF RGB OFF OFF 9600 1280 ENTER 60 OFF ON YPbPr ON ON 19200 1400 q Main: "Options" menu ("Page 2") Note &#...8226; The display language of the projector have the following structure. Set up Logo Options A Language Information Input Switcher Source VIDEO CH.0 NTSC Lamp time 1234 h e Main: "Information" menu Image adj. menu Image adj. Horiz.move Vert.move Horiz...
...: "Logo" menu Image adj. Set up R GB Logo Options A Language Information Sleep time[min] Menu color PC2(BNC) DIST SCART RS-232C[bps] SXGA Page 1 15 30 OFF RGB OFF OFF 9600 1280 ENTER 60 OFF ON YPbPr ON ON 19200 1400 q Main: "Options" menu ("Page 2") Note &#...8226; The display language of the projector have the following structure. Set up Logo Options A Language Information Input Switcher Source VIDEO CH.0 NTSC Lamp time 1234 h e Main: "Information" menu Image adj. menu Image adj. Horiz.move Vert.move Horiz...
Quick Reference Guide
Page 13
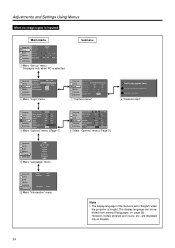
... YPbPr DIST OFF ON SCART OFF ON RS-232C[bps] 9600 19200 SXGA 1280 1400 Page 1 ENTER q Main: "Options" menu ("Page 2") Note • The display language of the menus is set to "English" when the projector is selected Main menu Image adj. ENGLISH 33 Set up R GB ..."Image adj." Set up R GB Logo Options A Language Information Input PC1 Switcher CH.0 Resolution 1280 X 1024 Frequency H 63.98kHz Frequency V 60.02 Hz Lamp time 1234 h e Main: "Information" menu Image adj. Set up R GB Logo Options A Language Information Capture menu Menu pos. Vert.disp.pos. Set ...
... YPbPr DIST OFF ON SCART OFF ON RS-232C[bps] 9600 19200 SXGA 1280 1400 Page 1 ENTER q Main: "Options" menu ("Page 2") Note • The display language of the menus is set to "English" when the projector is selected Main menu Image adj. ENGLISH 33 Set up R GB ..."Image adj." Set up R GB Logo Options A Language Information Input PC1 Switcher CH.0 Resolution 1280 X 1024 Frequency H 63.98kHz Frequency V 60.02 Hz Lamp time 1234 h e Main: "Information" menu Image adj. Set up R GB Logo Options A Language Information Capture menu Menu pos. Vert.disp.pos. Set ...
Quick Reference Guide
Page 14
...A Language Information Logo disp. Set up R GB Logo Options A Language Information Sleep time[min] Menu color PC2(BNC) DIST SCART RS-232C[bps] SXGA Page 1 15 30 OFF RGB OFF OFF 9600 1280 ENTER 60 OFF ON YPbPr ON ON 19200 1400 q Main: "Options" menu ("Page 2") Image ...Image adj. Set up R GB Logo Options A Language Information Input Switcher PC1 CH.0 Lamp time 1234 h e Main: "Information" menu Note • The display language of the menus is set to "English" when the projector is inputted Main menu Image adj. Adjustments and Settings Using Menus When no image signal is...
...A Language Information Logo disp. Set up R GB Logo Options A Language Information Sleep time[min] Menu color PC2(BNC) DIST SCART RS-232C[bps] SXGA Page 1 15 30 OFF RGB OFF OFF 9600 1280 ENTER 60 OFF ON YPbPr ON ON 19200 1400 q Main: "Options" menu ("Page 2") Image ...Image adj. Set up R GB Logo Options A Language Information Input Switcher PC1 CH.0 Lamp time 1234 h e Main: "Information" menu Note • The display language of the menus is set to "English" when the projector is inputted Main menu Image adj. Adjustments and Settings Using Menus When no image signal is...

Quick Reference Guide
Page 15
...; When the accumulated lamp time reaches 1900 hours: The LAMP indicator on the projector lights up the handle. The LAMP and OPERATE indicators blink on the projector. ❈ The projector does not turn on unless the lamp (lamp unit) is replaced and the "Lamp time" is reset. (☞ page 45) About lamp replacement ● If the projector is set in a constricted...
...; When the accumulated lamp time reaches 1900 hours: The LAMP indicator on the projector lights up the handle. The LAMP and OPERATE indicators blink on the projector. ❈ The projector does not turn on unless the lamp (lamp unit) is replaced and the "Lamp time" is reset. (☞ page 45) About lamp replacement ● If the projector is set in a constricted...
Quick Reference Guide
Page 16
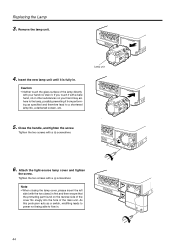
..., please insert the left side (with your hand may adhere to the lamp, possibly preventing it is fully in . 44 Replacing the Lamp 3. Lamp unit 5. Close the handle, and tighten the screw. Tighten the two screws with a ª screwdriver. 6. If you touch it with a bare hand, oil or other ...substances on the reverse side of the cover fits snugly into the hole of the lamp directly with the two claws) in first and then ensure that the protruding part found on your hand nor stain it. Caution • Neither touch...
..., please insert the left side (with your hand may adhere to the lamp, possibly preventing it is fully in . 44 Replacing the Lamp 3. Lamp unit 5. Close the handle, and tighten the screw. Tighten the two screws with a ª screwdriver. 6. If you touch it with a bare hand, oil or other ...substances on the reverse side of the cover fits snugly into the hole of the lamp directly with the two claws) in first and then ensure that the protruding part found on your hand nor stain it. Caution • Neither touch...
Quick Reference Guide
Page 17
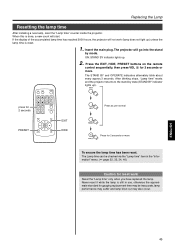
... BY and OPERATE indicators alternately blink about every approx.3 seconds. Insert the main plug. PC VIDEO OPERATE 2. Replacing the Lamp Resetting the lamp time After installing a new lamp, reset the "Lamp time" counter inside the projector. Press as per normal HIDE PRESET MENU EXIT ENTER PRESET HIDE EXIT HIDE PRESET VOL( ) Press for 2 seconds or...
... BY and OPERATE indicators alternately blink about every approx.3 seconds. Insert the main plug. PC VIDEO OPERATE 2. Replacing the Lamp Resetting the lamp time After installing a new lamp, reset the "Lamp time" counter inside the projector. Press as per normal HIDE PRESET MENU EXIT ENTER PRESET HIDE EXIT HIDE PRESET VOL( ) Press for 2 seconds or...

Quick Reference Guide
Page 19
...Fan locked) Ⅵ Action to the basic operation procedures. No.6 : Check the ambient temperature. No.7 : Leave the projector until it cools down . Warning The light-source lamp does not light up , pull out the power cord and check the following table. Circuit operation is abnormally high. The ... 90 seconds. If the same warning indication is correctly set in the following items one . ENGLISH 51 The light-source lamp is normal, leave the projector until the inside cools down. If it cools down . Restart according to stop projection and run the cooling fan for the...
...Fan locked) Ⅵ Action to the basic operation procedures. No.6 : Check the ambient temperature. No.7 : Leave the projector until it cools down . Warning The light-source lamp does not light up , pull out the power cord and check the following table. Circuit operation is abnormally high. The ... 90 seconds. If the same warning indication is correctly set in the following items one . ENGLISH 51 The light-source lamp is normal, leave the projector until the inside cools down. If it cools down . Restart according to stop projection and run the cooling fan for the...


