
Instructions
Page 4
... analog component 13 Connecting to a digital component 13 Connecting a USB mass storage class device 13 Connecting the power cord 13 Operating external components with the remote control 14 Operating the TV 14 Operating the DBS tuner or CATV converter 15 Operating the VCR 15 Basic operations 16 Turning the system on... Tuner operations 36 Manual tuning 36 Preset tuning 37 Selecting the FM reception mode 37 Reducing the noise of AM broadcast 37 AV COMPU LINK remote control system .... 38 References 39 Maintenance 39 Troubleshooting 39 Specifications 40 1
... analog component 13 Connecting to a digital component 13 Connecting a USB mass storage class device 13 Connecting the power cord 13 Operating external components with the remote control 14 Operating the TV 14 Operating the DBS tuner or CATV converter 15 Operating the VCR 15 Basic operations 16 Turning the system on... Tuner operations 36 Manual tuning 36 Preset tuning 37 Selecting the FM reception mode 37 Reducing the noise of AM broadcast 37 AV COMPU LINK remote control system .... 38 References 39 Maintenance 39 Troubleshooting 39 Specifications 40 1

Instructions
Page 5
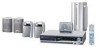
When you connect the system to your dealer immediately. • Remote control (1) • Batteries (2) • FM antenna (1) • AM loop antenna (1) • Power cord (1) • System cord (1) • Composite video cord (1) • Speaker ...left/right) and center speakers (3) 10 m: For satellite speakers (surround left/right) (2) • Screws TH-C60: M5 x 40 mm (4) M4 x 20 mm (8) TH-C50: M5 x 40 mm (2) M4 x 20 mm (4) • Speaker cord clamps TH-C60 (4) TH-C50 (2) 2 Supplied accessories Check to vibration. between 5°C and 35°C. • Leave sufficient ...
When you connect the system to your dealer immediately. • Remote control (1) • Batteries (2) • FM antenna (1) • AM loop antenna (1) • Power cord (1) • System cord (1) • Composite video cord (1) • Speaker ...left/right) and center speakers (3) 10 m: For satellite speakers (surround left/right) (2) • Screws TH-C60: M5 x 40 mm (4) M4 x 20 mm (8) TH-C50: M5 x 40 mm (2) M4 x 20 mm (4) • Speaker cord clamps TH-C60 (4) TH-C50 (2) 2 Supplied accessories Check to vibration. between 5°C and 35°C. • Leave sufficient ...
Instructions
Page 8
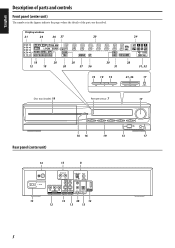
Description of parts and controls Front panel (center unit) The numbers in the figures indicate the pages where the details of the parts are described. Display window 21 24 36 37 20 24 18 12 18 20 20 20 37 36 30 28 31 31, 32 19 19 19 21, 36 17 Disc tray (inside): 19 Remote sensor: 7 17 Rear panel (center unit) 16 16 19 13 17 13 13 8 13 12 38 12 12 13 13 5
Description of parts and controls Front panel (center unit) The numbers in the figures indicate the pages where the details of the parts are described. Display window 21 24 36 37 20 24 18 12 18 20 20 20 37 36 30 28 31 31, 32 19 19 19 21, 36 17 Disc tray (inside): 19 Remote sensor: 7 17 Rear panel (center unit) 16 16 19 13 17 13 13 8 13 12 38 12 12 13 13 5

Instructions
Page 10
... - 32 15, 21 19, 37 22, 36 28, 29 29 31 30, 31 20 33 32 19, 29 18, 30 17 Putting batteries in the remote control 16 15 14 14 14, 15 14 - 36 26 R03 (UM-4)/AAA (24F) type dry-cell batteries (supplied) 14, 17 17 19, 37 19... 28 24 30 22 26 18 18 18 18 If the range or effectiveness of the center unit. • Do not block the remote sensor. 7 Operating the system from the remote control Aim the remote control directly to heat or flame. CAUTION • Do not expose batteries to the front panel of the...
... - 32 15, 21 19, 37 22, 36 28, 29 29 31 30, 31 20 33 32 19, 29 18, 30 17 Putting batteries in the remote control 16 15 14 14 14, 15 14 - 36 26 R03 (UM-4)/AAA (24F) type dry-cell batteries (supplied) 14, 17 17 19, 37 19... 28 24 30 22 26 18 18 18 18 If the range or effectiveness of the center unit. • Do not block the remote sensor. 7 Operating the system from the remote control Aim the remote control directly to heat or flame. CAUTION • Do not expose batteries to the front panel of the...

Instructions
Page 17
... a Toshiba TV: Press 0, then 8. If there is more than one code listed for corresponding brand, try each one . 7 Operation Aim the remote control at the TV. The following buttons are available: F TV: Turns TV on manufacturers. 14 TV/VIDEO: Selects the input mode (either TV or...selector to TV. 2 Press and hold F TV. Operating the TV 7 To set the manufacturer's code 1 Slide the remote control mode selector to TV. Manufacturer JVC Hitachi Magnavox Mitsubishi Panasonic Philips RCA Code Manufacturer 01* Samsung 10 Sanyo 02 Sharp 03 Sony 04, 11 Toshiba 15 Zenith 05...
... a Toshiba TV: Press 0, then 8. If there is more than one code listed for corresponding brand, try each one . 7 Operation Aim the remote control at the TV. The following buttons are available: F TV: Turns TV on manufacturers. 14 TV/VIDEO: Selects the input mode (either TV or...selector to TV. 2 Press and hold F TV. Operating the TV 7 To set the manufacturer's code 1 Slide the remote control mode selector to TV. Manufacturer JVC Hitachi Magnavox Mitsubishi Panasonic Philips RCA Code Manufacturer 01* Samsung 10 Sanyo 02 Sharp 03 Sony 04, 11 Toshiba 15 Zenith 05...

Instructions
Page 18
...1: Rewinds video tape. NOTE • When operating a VCR or DBS tuner/CATV converter; - Operating external components with 8 to pause recording. Manufacturer JVC Emerson Fisher Funai Gold Star Hitachi Mitsubishi NEC Panasonic Code 01*, 02, 03 11, 26 29 10, 14, 15, 16 12 04 13 25 ...initial setting. 6 Release F VCR/DBS. If there is more than one code listed for your brand, try each one until you have changed the remote control mode selector to enter the manufacturer's code (2 digits). REC: Press this button together with 3 (play button): Starts playback. 7: Stops operation....
...1: Rewinds video tape. NOTE • When operating a VCR or DBS tuner/CATV converter; - Operating external components with 8 to pause recording. Manufacturer JVC Emerson Fisher Funai Gold Star Hitachi Mitsubishi NEC Panasonic Code 01*, 02, 03 11, 26 29 10, 14, 15, 16 12 04 13 25 ...initial setting. 6 Release F VCR/DBS. If there is more than one code listed for your brand, try each one until you have changed the remote control mode selector to enter the manufacturer's code (2 digits). REC: Press this button together with 3 (play button): Starts playback. 7: Stops operation....

Instructions
Page 19
... CODE ERROR!": Appears when the Region Code of the DISC (1-5) 0 buttons on . • The power supply to the subwoofer is selected as on the remote control for the following phenomena may happen depending on , then set to "OFF". One of the DISC (1-5) buttons (with SHIFT pressed) on pages 16 to... 18. otherwise, the following operation; • Set the remote control mode selector to AUDIO. The sound comes out from the AC outlet to turn on the system by pressing the following messages will appear...
... CODE ERROR!": Appears when the Region Code of the DISC (1-5) 0 buttons on . • The power supply to the subwoofer is selected as on the remote control for the following phenomena may happen depending on , then set to "OFF". One of the DISC (1-5) buttons (with SHIFT pressed) on pages 16 to... 18. otherwise, the following operation; • Set the remote control mode selector to AUDIO. The sound comes out from the AC outlet to turn on the system by pressing the following messages will appear...

Instructions
Page 20
... back a disc (DVD VIDEO, VCD etc.). (See page 19.) USB MEMORY: To select a file in a USB mass storage class device. (See "To play On the remote control: Press one of the following signals are down the volume; • Before connecting or putting on headphones as high volume may damage both the... and AUX IN (VCR) jacks. (See page 13.) DBS: To select the source from a component connected to minimum level before starting any source. On the remote control: Press VOL +/-.
... back a disc (DVD VIDEO, VCD etc.). (See page 19.) USB MEMORY: To select a file in a USB mass storage class device. (See "To play On the remote control: Press one of the following signals are down the volume; • Before connecting or putting on headphones as high volume may damage both the... and AUX IN (VCR) jacks. (See page 13.) DBS: To select the source from a component connected to minimum level before starting any source. On the remote control: Press VOL +/-.

Instructions
Page 22
... file control display (see page 27) appears on the TV screen. may appear on the TV screen. Basic playback 7 To play button) on the remote control - DISC(1-5) 3 or 3 on the center unit. • The system plays back available discs sequentially until the disc loaded on the DISC 5..., press 3 (play button) 3 Press DISC (1-5), with SHIFT pressed. Label side up When placing an 8 cm disc Number buttons Cursor (3/2)/ ENTER 19 Remote control mode selector (play button). 7 To stop playback or until you press any buttons before the entire picture appears on the TV screen. 7 To pause...
... file control display (see page 27) appears on the TV screen. may appear on the TV screen. Basic playback 7 To play button) on the remote control - DISC(1-5) 3 or 3 on the center unit. • The system plays back available discs sequentially until the disc loaded on the DISC 5..., press 3 (play button) 3 Press DISC (1-5), with SHIFT pressed. Label side up When placing an 8 cm disc Number buttons Cursor (3/2)/ ENTER 19 Remote control mode selector (play button). 7 To stop playback or until you press any buttons before the entire picture appears on the TV screen. 7 To pause...

Instructions
Page 24
... within a same track. 21 NOTE • This function works in the disc tray 5 is not shown. - Fast-forward/fast-reverse search 7 During playback On the remote control: Press y or 1. One Touch Replay You can move back the playback position by 10 seconds from HDMI MONITOR OUT terminal. • If you press...
... within a same track. 21 NOTE • This function works in the disc tray 5 is not shown. - Fast-forward/fast-reverse search 7 During playback On the remote control: Press y or 1. One Touch Replay You can move back the playback position by 10 seconds from HDMI MONITOR OUT terminal. • If you press...

Instructions
Page 25
.... • This feature may not work for some discs/files. To select 114: Press h10, h10, 1, 1, then 4. Skip to use the number buttons" on the remote control 7 For DVD VIDEO (title, chapter): While stopped, the title number is useful especially when you press the button, the playback position skips to the...
.... • This feature may not work for some discs/files. To select 114: Press h10, h10, 1, 1, then 4. Skip to use the number buttons" on the remote control 7 For DVD VIDEO (title, chapter): While stopped, the title number is useful especially when you press the button, the playback position skips to the...

Instructions
Page 26
... of Digital Theater Systems, Inc. *3 You can enjoy more realistic sound field than a stereo sound by using the remote control for the following operation; • Set the remote control mode selector to decode all 2 channel sources - "Dolby", "Pro Logic", and the double-D symbol are trademarks... modes - In such a case, follow each input signal The √ marks show available surround modes. Number buttons Cursor (3/2/Y/5)/ ENTER Remote control mode selector (play button) Using the surround mode You can select these modes by Digital Theater Systems, Inc., such as it ...
... of Digital Theater Systems, Inc. *3 You can enjoy more realistic sound field than a stereo sound by using the remote control for the following operation; • Set the remote control mode selector to decode all 2 channel sources - "Dolby", "Pro Logic", and the double-D symbol are trademarks... modes - In such a case, follow each input signal The √ marks show available surround modes. Number buttons Cursor (3/2/Y/5)/ ENTER Remote control mode selector (play button) Using the surround mode You can select these modes by Digital Theater Systems, Inc., such as it ...

Instructions
Page 27
... surround mode (Dolby Digital or DTS Digital Surround) is automatically recalled when you can reproduce a larger stereo sound field using the remote control for the following operation; • Set the remote control mode selector to automatically select the optimal surround mode for input signal from digital multichannel software. When playing back a 2 channel...
... surround mode (Dolby Digital or DTS Digital Surround) is automatically recalled when you can reproduce a larger stereo sound field using the remote control for the following operation; • Set the remote control mode selector to automatically select the optimal surround mode for input signal from digital multichannel software. When playing back a 2 channel...
Instructions
Page 31
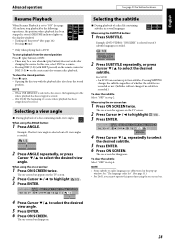
... button) does not work after changing the source. To clear the stored position Press 7 again. • Opening the disc tray with SHIFT pressed) on the remote control or DISC (1-5) 3 on the TV screen. 2 Press Cursor 3/2 to highlight . 3 Press ENTER. 4 Press Cursor Y/5 repeatedly to highlight . 3 Press ENTER. Example: The first view angle...
... button) does not work after changing the source. To clear the stored position Press 7 again. • Opening the disc tray with SHIFT pressed) on the remote control or DISC (1-5) 3 on the TV screen. 2 Press Cursor 3/2 to highlight . 3 Press ENTER. 4 Press Cursor Y/5 repeatedly to highlight . 3 Press ENTER. Example: The first view angle...

Instructions
Page 33
... terminal). 7 During playback 1 Press VFP. If all of the procedure, the setting at that time will be used with Program Playback. • DISC (1-5) on the remote control and DISC (1-5) 3 on the TV screen. To check the program contents During playback, press 7. Example: See page 23 for movies. To clear the programs...
... terminal). 7 During playback 1 Press VFP. If all of the procedure, the setting at that time will be used with Program Playback. • DISC (1-5) on the remote control and DISC (1-5) 3 on the TV screen. To check the program contents During playback, press 7. Example: See page 23 for movies. To clear the programs...

Instructions
Page 35
... B). 7 During playback 1 Press ON SCREEN twice. On the center unit ONLY: While the system is locked. Sound and other settings IMPORTANT Before using the remote control for the following steps. Example: 2 Press Cursor Y/5 to select the item you want to repeat (point B). COMP (Component): To watch DVD playback ... a desired part by which you watch DVD playback after connecting your TV. (See page 12.) Set the video output to use AV COMPU LINK remote control system. (See page 38.) VIDEO: To watch DVD playback via the VIDEO jack. To cancel Select "OFF" in DVD player does not work...
... B). 7 During playback 1 Press ON SCREEN twice. On the center unit ONLY: While the system is locked. Sound and other settings IMPORTANT Before using the remote control for the following steps. Example: 2 Press Cursor Y/5 to select the item you want to repeat (point B). COMP (Component): To watch DVD playback ... a desired part by which you watch DVD playback after connecting your TV. (See page 12.) Set the video output to use AV COMPU LINK remote control system. (See page 38.) VIDEO: To watch DVD playback via the VIDEO jack. To cancel Select "OFF" in DVD player does not work...

Instructions
Page 36
... Using the setup menus • You can change the language used as "AA", etc. NOTE • See the following operation; 1 Set the remote control mode selector to a disc, the original language is automatically used in multiple languages. • Select the initial language*. 7 AUDIO LANGUAGE Some DVDs...LT Lithuanian SV Swedish LV Latvian, Lettish SW Swahili MG Malagasy TA Tamil MI Maori TE Telugu MK Macedonian TG Tajik ML Malayalam TH Thai MN Mongolian TI Tigrinya MO Moldavian TK Turkmen MR Marathi TL Tagalog MS Malay (MAY) TN Setswana MT Maltese TO Tonga...
... Using the setup menus • You can change the language used as "AA", etc. NOTE • See the following operation; 1 Set the remote control mode selector to a disc, the original language is automatically used in multiple languages. • Select the initial language*. 7 AUDIO LANGUAGE Some DVDs...LT Lithuanian SV Swedish LV Latvian, Lettish SW Swahili MG Malagasy TA Tamil MI Maori TE Telugu MK Macedonian TG Tajik ML Malayalam TH Thai MN Mongolian TI Tigrinya MO Moldavian TK Turkmen MR Marathi TL Tagalog MS Malay (MAY) TN Setswana MT Maltese TO Tonga...

Instructions
Page 39
...want . The buttons described below are used on the display window. 36 repeatedly until the system starts searching for the following operation; 1 Set the remote control mode selector to AUDIO. 2 Press FM/AM. Example: When the system is received, the ST indicator lights on pages 36 and 37. ...NOTE • When an FM stereo program is tuned in to. Tuner operations IMPORTANT Before using the remote control for stations and then release it, the system stops searching automatically when a station of sufficient signal strength is tuned in to 810 kHz...
...want . The buttons described below are used on the display window. 36 repeatedly until the system starts searching for the following operation; 1 Set the remote control mode selector to AUDIO. 2 Press FM/AM. Example: When the system is received, the ST indicator lights on pages 36 and 37. ...NOTE • When an FM stereo program is tuned in to. Tuner operations IMPORTANT Before using the remote control for stations and then release it, the system stops searching automatically when a station of sufficient signal strength is tuned in to 810 kHz...

Instructions
Page 41
... the TV volume control on the TV. • When turning on and changes the input mode to the appropriate position so that you to operate JVC's video components via the video components terminals. NOTE • If you turn on the system; • If the previously selected source is "DVD",... case, turn the TV volume to VCR. This system is "VCR", the TV and VCR will continue recording. • When starting playback on the remote control to use the functions listed following. To use this system. (Press F VCR/DBS.) NOTE • To correctly use the automatic selection of the...
... the TV volume control on the TV. • When turning on and changes the input mode to the appropriate position so that you to operate JVC's video components via the video components terminals. NOTE • If you turn on the system; • If the previously selected source is "DVD",... case, turn the TV volume to VCR. This system is "VCR", the TV and VCR will continue recording. • When starting playback on the remote control to use the functions listed following. To use this system. (Press F VCR/DBS.) NOTE • To correctly use the automatic selection of the...

Instructions
Page 42
... it with a hard cloth. - Connect the power cord and system cord correctly. (See page 13.) The remote control does The batteries are distorted. not work properly, turn it . - Replace the batteries. (See page 7.) Hide the remote sensor from direct sunlight. The disc reading time is The disc is not playable. on . 39... the system may not be shown correctly depending on a disc/file when the TV is displayed on the TV or no sound come on the remote sensor. DO NOT allow any other cases than the noted above . The power cord and/or system cord is connected between the center unit and...
... it with a hard cloth. - Connect the power cord and system cord correctly. (See page 13.) The remote control does The batteries are distorted. not work properly, turn it . - Replace the batteries. (See page 7.) Hide the remote sensor from direct sunlight. The disc reading time is The disc is not playable. on . 39... the system may not be shown correctly depending on a disc/file when the TV is displayed on the TV or no sound come on the remote sensor. DO NOT allow any other cases than the noted above . The power cord and/or system cord is connected between the center unit and...


