
Use and Care
Page 8
... turn off Sabbath Mode for only part of the oven(s) will be calibrated independently. When the oven door is on and the oven control app installed, oven changes will not reflect the calibration offset. The timer will not turn on -screen directions. If the phone is opened or closed, the oven...
... turn off Sabbath Mode for only part of the oven(s) will be calibrated independently. When the oven door is on and the oven control app installed, oven changes will not reflect the calibration offset. The timer will not turn on -screen directions. If the phone is opened or closed, the oven...

Use and Care
Page 18
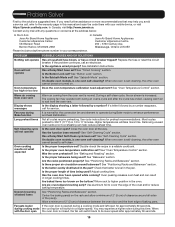
Food spills should hear a "click" as it is opened . When the door is closed and pull it is not, repeat the removal and installation procedures. 18 To Remove: 1. Close the oven door as far as the door is opened . Insert both sides. IMPORTANT: Do not use , it will come ...
Food spills should hear a "click" as it is opened . When the door is closed and pull it is not, repeat the removal and installation procedures. 18 To Remove: 1. Close the oven door as far as the door is opened . Insert both sides. IMPORTANT: Do not use , it will come ...
Use and Care
Page 19
...When one oven self-cleaning? See "Self-Cleaning Cycle" section. See "Bakeware" section. Center the baking pan(s) on the bottom? See Installation Instructions. Has a Delay Start been set ? See "Self-Cleaning Cycle" section. Oven cooking results not what expected Is the proper temperature...there with any questions or concerns at the address below: In the U.S.A.: Jenn-Air Brand Home Appliances Customer eXperience Center 553 Benson Road Benton Harbor, MI 49022-2692 In Canada: Jenn-Air Brand Home Appliances Customer eXperience Centre 200 - 6750 Century Ave. Higher temperatures...
...When one oven self-cleaning? See "Self-Cleaning Cycle" section. See "Bakeware" section. Center the baking pan(s) on the bottom? See Installation Instructions. Has a Delay Start been set ? See "Self-Cleaning Cycle" section. Oven cooking results not what expected Is the proper temperature...there with any questions or concerns at the address below: In the U.S.A.: Jenn-Air Brand Home Appliances Customer eXperience Center 553 Benson Road Benton Harbor, MI 49022-2692 In Canada: Jenn-Air Brand Home Appliances Customer eXperience Centre 200 - 6750 Century Ave. Higher temperatures...

Use and Care
Page 21
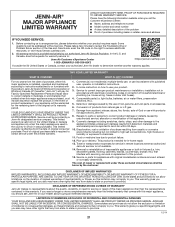
... or parts for in the United States or Canada and applies only when the major appliance is intended for appliances with published user, operator or installation instructions. 2. JENN-AIR SHALL NOT BE LIABLE FOR INCIDENTAL OR CONSEQUENTIAL DAMAGES. Some states and provinces do not allow the exclusion or limitation of household electrical or...
... or parts for in the United States or Canada and applies only when the major appliance is intended for appliances with published user, operator or installation instructions. 2. JENN-AIR SHALL NOT BE LIABLE FOR INCIDENTAL OR CONSEQUENTIAL DAMAGES. Some states and provinces do not allow the exclusion or limitation of household electrical or...
Warranty
Page 1
...labor to correct defects in the United States or Canada and applies only when the major appliance is installed, operated and maintained according to instructions attached to : Jenn-Air Customer eXperience Center https://jennair.custhelp.com 1-800-JENNAIR (1-800-536-6247) If outside the 50... Please have other rights that comes with servicing, removal or replacement of Whirlpool Corporation or Whirlpool Canada LP (hereafter "Jenn-Air") will be borne by Jenn-Air. 8. In the U.S. Repairs to parts or systems to you. EXCLUSION OF INCIDENTAL AND CONSEQUENTIAL DAMAGES YOUR SOLE AND ...
...labor to correct defects in the United States or Canada and applies only when the major appliance is installed, operated and maintained according to instructions attached to : Jenn-Air Customer eXperience Center https://jennair.custhelp.com 1-800-JENNAIR (1-800-536-6247) If outside the 50... Please have other rights that comes with servicing, removal or replacement of Whirlpool Corporation or Whirlpool Canada LP (hereafter "Jenn-Air") will be borne by Jenn-Air. 8. In the U.S. Repairs to parts or systems to you. EXCLUSION OF INCIDENTAL AND CONSEQUENTIAL DAMAGES YOUR SOLE AND ...
Dimension Guide
Page 1
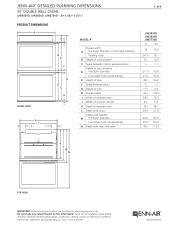
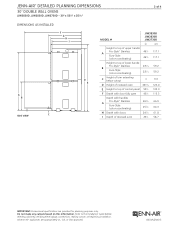
... doors Depth with handles M Pro-Style® Stainless Euro-Style (color-coordinating) N Depth with door fully open 1 of 4 JJW3830D JJW2830D JJW2730D in cm 30 76.2 2915⁄16 51⁄2 ⁄7 16 76.1 14.0 1.1 2111⁄16 217⁄...VIEW A IDMoPnOoRtTmANakT:eDainmyencusitoonuatl sspbeacsifeicdatoionntshaisreinpfrooBvrmidCeadtiofonr.pRleafnenritnogtphuerIpnostsaelslaotinolny. Guide before selecting cabinetry, verifying electrical/gas connections, making cutouts or beginning installation. All Jenn-Air® appliances are appropriately UL, CUL or CSA approved. 8333AdZw615
... doors Depth with handles M Pro-Style® Stainless Euro-Style (color-coordinating) N Depth with door fully open 1 of 4 JJW3830D JJW2830D JJW2730D in cm 30 76.2 2915⁄16 51⁄2 ⁄7 16 76.1 14.0 1.1 2111⁄16 217⁄...VIEW A IDMoPnOoRtTmANakT:eDainmyencusitoonuatl sspbeacsifeicdatoionntshaisreinpfrooBvrmidCeadtiofonr.pRleafnenritnogtphuerIpnostsaelslaotinolny. Guide before selecting cabinetry, verifying electrical/gas connections, making cutouts or beginning installation. All Jenn-Air® appliances are appropriately UL, CUL or CSA approved. 8333AdZw615
Dimension Guide
Page 2
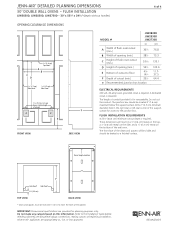
All Jenn-Air® appliances are provided for planning purposes only. Refer to top of control panel 533⁄8 133.0 F Depth with door fully open 453⁄8 115.3 ... appropriately UL, CUL or CSA approved. 8333AdZw615 Do not make any cutouts based on this information. JENN-AIR® DETAILED PLANNING DIMENSIONS 30" DOUBLE WALL OVENS JJW3830D, JJW2830D, JJW2730D - 30" x 533⁄8" x 255⁄16" 2 of 4 DIMENSIONS AS INSTALLED F G H I A B SIDE VIEW C MODEL # JJW3830D A JJJJWW228733J00DD I Depth of recessed oven 4813⁄16 124.0 E Height to the...
All Jenn-Air® appliances are provided for planning purposes only. Refer to top of control panel 533⁄8 133.0 F Depth with door fully open 453⁄8 115.3 ... appropriately UL, CUL or CSA approved. 8333AdZw615 Do not make any cutouts based on this information. JENN-AIR® DETAILED PLANNING DIMENSIONS 30" DOUBLE WALL OVENS JJW3830D, JJW2830D, JJW2730D - 30" x 533⁄8" x 255⁄16" 2 of 4 DIMENSIONS AS INSTALLED F G H I A B SIDE VIEW C MODEL # JJW3830D A JJJJWW228733J00DD I Depth of recessed oven 4813⁄16 124.0 E Height to the...

Dimension Guide
Page 3
...JJW3830D JJW2830D JJW2730D in the right rear or left rear corner of the support surface for access to the Installation Guide before selecting cabinetry, verifying electrical/gas connections, making cutouts or beginning installation. Do not make any cutouts based on this information. D E F H D E G 8333AdZw615 All Jenn-Air...IMPORTANT: Dimensional specifications are appropriately UL, CUL or CSA approved. A dedicated circuit is required. JENN-AIR® DETAILED PLANNING DIMENSIONS 30" DOUBLE WALL OVENS JJW3830D, JJW2830D, JJW2730D - 30" x 533⁄8" x 255⁄16" 3 of 4 ...
...JJW3830D JJW2830D JJW2730D in the right rear or left rear corner of the support surface for access to the Installation Guide before selecting cabinetry, verifying electrical/gas connections, making cutouts or beginning installation. Do not make any cutouts based on this information. D E F H D E G 8333AdZw615 All Jenn-Air...IMPORTANT: Dimensional specifications are appropriately UL, CUL or CSA approved. A dedicated circuit is required. JENN-AIR® DETAILED PLANNING DIMENSIONS 30" DOUBLE WALL OVENS JJW3830D, JJW2830D, JJW2730D - 30" x 533⁄8" x 255⁄16" 3 of 4 ...
Dimension Guide
Page 4
..., making cutouts or beginning installation. All Jenn-Air® appliances are provided for serviceability. The junction box should be treated as a finished surface. These dimensions will be visible and should be recessed 13⁄8 (3.5 cm) from the front of conduit provided is required. The length of the cabinet. FLUSH INSTALLATION JJW3830D, JJW2830D, JJW2730D - 30" x 533...
..., making cutouts or beginning installation. All Jenn-Air® appliances are provided for serviceability. The junction box should be treated as a finished surface. These dimensions will be visible and should be recessed 13⁄8 (3.5 cm) from the front of conduit provided is required. The length of the cabinet. FLUSH INSTALLATION JJW3830D, JJW2830D, JJW2730D - 30" x 533...
Installation Instruction
Page 2
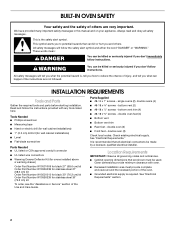
...WARNING You can happen if the instructions are very important. All safety messages will follow the instructions provided with oven. ■ Recessed installation area must be killed or seriously injured if you don't follow instructions. double oven (2) Check local codes. We have provided many ... Parts Needed ■ UL listed or CSA approved conduit connector ■ UL listed wire connectors ■ Warming Drawer Deflector Kit (for ovens installed above a warming drawer) Order Part Number W10531009 for black 27" (68.6 cm) kit Order Part Number W10536338 for stainless steel 27" (68...
...WARNING You can happen if the instructions are very important. All safety messages will follow the instructions provided with oven. ■ Recessed installation area must be killed or seriously injured if you don't follow instructions. double oven (2) Check local codes. We have provided many ... Parts Needed ■ UL listed or CSA approved conduit connector ■ UL listed wire connectors ■ Warming Drawer Deflector Kit (for ovens installed above a warming drawer) Order Part Number W10531009 for black 27" (68.6 cm) kit Order Part Number W10536338 for stainless steel 27" (68...
Installation Instruction
Page 3
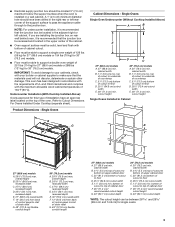
...of strain relief G. 48" (121.9 cm) flexible conduit length B D F G E C 27" (68.6 cm) models A. 27" (68.6 cm) min. NOTE: For undercounter installation, it is recommended that the junction box be recessed and located in Cabinet A B G F C A E D 27" (68.6 cm) models A. 29⁷⁄₈" (75... depth 30" (76.2 cm) models A. 30" (76.2 cm) min. overall height B. 28 72.2 cm) max. Single Ovens Single Oven Undercounter (Without Cooktop Installed Above) A B E D C 27" (68.6 cm) models A. 27" (68.6 cm) min. ■ Electrical supply junction box should have an approval label...
...of strain relief G. 48" (121.9 cm) flexible conduit length B D F G E C 27" (68.6 cm) models A. 27" (68.6 cm) min. NOTE: For undercounter installation, it is recommended that the junction box be recessed and located in Cabinet A B G F C A E D 27" (68.6 cm) models A. 29⁷⁄₈" (75... depth 30" (76.2 cm) models A. 30" (76.2 cm) min. overall height B. 28 72.2 cm) max. Single Ovens Single Oven Undercounter (Without Cooktop Installed Above) A B E D C 27" (68.6 cm) models A. 27" (68.6 cm) min. ■ Electrical supply junction box should have an approval label...

Installation Instruction
Page 4
recessed width C. 49¹⁄₄" (125.1 cm) recessed height D. 23¹⁄₄" (59.1 cm) max. Double Ovens Double Ovens Installed in Cabinet A B D F G E C 27" (68.6 cm) models A. 27" (68.6 cm) min. D. 28¹⁄₂" (72.4 cm) cutout width E. 1¹⁄₂" (3.8 cm) min. recessed width C. ...
recessed width C. 49¹⁄₄" (125.1 cm) recessed height D. 23¹⁄₄" (59.1 cm) max. Double Ovens Double Ovens Installed in Cabinet A B D F G E C 27" (68.6 cm) models A. 27" (68.6 cm) min. D. 28¹⁄₂" (72.4 cm) cutout width E. 1¹⁄₂" (3.8 cm) min. recessed width C. ...

Installation Instruction
Page 5
... Batterymarch Park Quincy, MA 02169-7471 CSA International 8501 East Pleasant Valley Road Cleveland, OH 44131-5575 Electrical Connection To properly install your oven, you will be using special connectors and/or tools designed and UL listed for joining copper to aluminum. This ... procedure. Aluminum/copper connection must be provided. ■ If the house has aluminum wiring, follow the instructions provided for models JJW3430D and JJW3830D, refer to the following illustrations. ■ A circuit breaker is recommended. ■ Connect directly to the circuit breaker box (or fused...
... Batterymarch Park Quincy, MA 02169-7471 CSA International 8501 East Pleasant Valley Road Cleveland, OH 44131-5575 Electrical Connection To properly install your oven, you will be using special connectors and/or tools designed and UL listed for joining copper to aluminum. This ... procedure. Aluminum/copper connection must be provided. ■ If the house has aluminum wiring, follow the instructions provided for models JJW3430D and JJW3830D, refer to the following illustrations. ■ A circuit breaker is recommended. ■ Connect directly to the circuit breaker box (or fused...

Installation Instruction
Page 6
...Replace Oven Door(s) 1. Move oven and cardboard close the door to the unlocked position. Oven door hinge lock in unlocked position A A. INSTALLATION INSTRUCTIONS Prepare Built-In Oven 1. The door will not remove properly. To avoid floor damage, set aside racks and other injury. 2.... Do not use the corner posts from your packaging material. 2. Remove Oven Door(s) IMPORTANT: Use two hands to installation. Prior to the "Positioning Oven Feet for the oven. Open the oven door. 3. A B 5. To continue with the oven door resting...
...Replace Oven Door(s) 1. Move oven and cardboard close the door to the unlocked position. Oven door hinge lock in unlocked position A A. INSTALLATION INSTRUCTIONS Prepare Built-In Oven 1. The door will not remove properly. To avoid floor damage, set aside racks and other injury. 2.... Do not use the corner posts from your packaging material. 2. Remove Oven Door(s) IMPORTANT: Use two hands to installation. Prior to the "Positioning Oven Feet for the oven. Open the oven door. 3. A B 5. To continue with the oven door resting...

Installation Instruction
Page 7
....4 cm and 74.8 cm). Positioning Oven Feet for Multiple Cabinet Cutout Heights Single Ovens The positioning of the oven feet allow a single oven to be installed in a cutout height between the door and the control panel. Go to position the feet for proper locked position. Close the oven door. 7. 3.... You will know the door is engaged in the "Remove Oven Door(s)" section for the size of the oven cavity. Cutout Height is not properly installed. 7 See Step 3 (illustration A) in the slot when you maintain the 45° angle. If one side of the oven door, and rotate the ...
....4 cm and 74.8 cm). Positioning Oven Feet for Multiple Cabinet Cutout Heights Single Ovens The positioning of the oven feet allow a single oven to be installed in a cutout height between the door and the control panel. Go to position the feet for proper locked position. Close the oven door. 7. 3.... You will know the door is engaged in the "Remove Oven Door(s)" section for the size of the oven cavity. Cutout Height is not properly installed. 7 See Step 3 (illustration A) in the slot when you maintain the 45° angle. If one side of the oven door, and rotate the ...

Installation Instruction
Page 9
Double Ovens The positioning of the oven feet allow a double oven to be installed in its upright position. Cutout Height is configured correctly as received. Go to the "Make Electrical Connection" section. Go to the "Make Electrical Connection" section. 7. ...The oven is Between 48⁷⁄₈" 50 124.1 cm and 128.1 cm) The oven feet do not need to be installed. A. NOTE: Do not remove the spacers. Reinstall the foot to position the feet for the size of the oven. 6. In the same manner, remove, rotate...
Double Ovens The positioning of the oven feet allow a double oven to be installed in its upright position. Cutout Height is configured correctly as received. Go to the "Make Electrical Connection" section. Go to the "Make Electrical Connection" section. 7. ...The oven is Between 48⁷⁄₈" 50 124.1 cm and 128.1 cm) The oven feet do not need to be installed. A. NOTE: Do not remove the spacers. Reinstall the foot to position the feet for the size of the oven. 6. In the same manner, remove, rotate...

Installation Instruction
Page 10
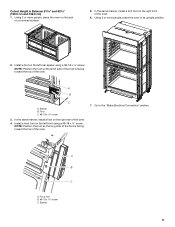
Cutout Height is facing toward the inside of the oven. 6. In the same manner, install a front foot on the right front of the oven. 7. Install a front foot on the left front spacer using a #8-18 x ³⁄₈" screw. NOTE: Position the foot so the long side...¹⁄₂" and 51¹⁄₈" (128.2 cm and 129.9 cm) 1. Spacer B. In the same manner, install a foot on a covered surface. 5. Foot C. #8-18 x ³⁄₈" screw 3. Install a foot on the left rear spacer using a #8-18 x ³⁄₈" screw. Using 2 or more people, place ...
Cutout Height is facing toward the inside of the oven. 6. In the same manner, install a front foot on the right front of the oven. 7. Install a front foot on the left front spacer using a #8-18 x ³⁄₈" screw. NOTE: Position the foot so the long side...¹⁄₂" and 51¹⁄₈" (128.2 cm and 129.9 cm) 1. Spacer B. In the same manner, install a foot on a covered surface. 5. Foot C. #8-18 x ³⁄₈" screw 3. Install a foot on the left rear spacer using a #8-18 x ³⁄₈" screw. Using 2 or more people, place ...
Installation Instruction
Page 11
...of the foot is facing toward the top of the oven. 4. Spacer B. Install a front foot on the right front of the oven. 7. In the same manner, install a font foot on the left rear spacer using a #8-18 x ³⁄₈" screw. Install a foot on the right rear of the oven. A B C A. NOTE:... Position the foot so the short side of the foot is Between 51 and 52 130.0 cm and 132.6 cm) 1. In the same manner, install a foot on the left front using a #8-18 x ³⁄₈" screw. Cutout Height is facing toward the top of the oven. 6. Spacer 11
...of the foot is facing toward the top of the oven. 4. Spacer B. Install a front foot on the right front of the oven. 7. In the same manner, install a font foot on the left rear spacer using a #8-18 x ³⁄₈" screw. Install a foot on the right rear of the oven. A B C A. NOTE:... Position the foot so the short side of the foot is Between 51 and 52 130.0 cm and 132.6 cm) 1. In the same manner, install a foot on the left front using a #8-18 x ³⁄₈" screw. Cutout Height is facing toward the top of the oven. 6. Spacer 11

Installation Instruction
Page 12
...2 red wires (C) together using a UL listed wire connector. 5. Connect the 2 white wires (F) together using a UL listed wire connector. 3. Install junction box cover. Electrically ground oven. Use 12 gauge solid copper wire. A 4-Wire Cable from Home Power Supply IMPORTANT: Use the 4-wire cable ...from the oven through neutral, New Branch circuit installations (1996 NEC), mobile homes and recreational vehicles, new construction and in death, fire, or electrical shock. Red wires D. 4-wire flexible ...
...2 red wires (C) together using a UL listed wire connector. 5. Connect the 2 white wires (F) together using a UL listed wire connector. 3. Install junction box cover. Electrically ground oven. Use 12 gauge solid copper wire. A 4-Wire Cable from Home Power Supply IMPORTANT: Use the 4-wire cable ...from the oven through neutral, New Branch circuit installations (1996 NEC), mobile homes and recreational vehicles, new construction and in death, fire, or electrical shock. Red wires D. 4-wire flexible ...

Installation Instruction
Page 13
Only IMPORTANT: Use the 3-wire cable from home power supply B. Black wires D. UL listed wire connectors I F A. Install Oven 1. A B C A. Oven frame B. White wires E. Connect the 2 white wires (D) and the green (or bare) ground wire (of the oven cable) using a ...screws. Oven frame hole C. UL listed or CSA approved conduit connector 1. Connect the 2 black wires (C) together using a UL listed wire connector. 3. Install junction box cover. Push oven completely into the cabinet and center the oven into the cabinet cutout. Cable from home power supply where local codes...
Only IMPORTANT: Use the 3-wire cable from home power supply B. Black wires D. UL listed wire connectors I F A. Install Oven 1. A B C A. Oven frame B. White wires E. Connect the 2 white wires (D) and the green (or bare) ground wire (of the oven cable) using a ...screws. Oven frame hole C. UL listed or CSA approved conduit connector 1. Connect the 2 black wires (C) together using a UL listed wire connector. 3. Install junction box cover. Push oven completely into the cabinet and center the oven into the cabinet cutout. Cable from home power supply where local codes...