
Warranty
Page 1
... is installed, operated and maintained according to instructions attached to you. JENN-AIR SHALL NOT BE LIABLE FOR INCIDENTAL OR CONSEQUENTIAL DAMAGES. JENN-AIR® REFRIGERATION LIMITED WARRANTY ATTACH YOUR RECEIPT HERE. SIXTH THROUGH TENTH YEAR LIMITED WARRANTY (SEALED REFRIGERATION SYSTEM ONLY - light bulbs, batteries, air or water filters, preservation solutions, etc.). 5. Pick-up or delivery. trim...
... is installed, operated and maintained according to instructions attached to you. JENN-AIR SHALL NOT BE LIABLE FOR INCIDENTAL OR CONSEQUENTIAL DAMAGES. JENN-AIR® REFRIGERATION LIMITED WARRANTY ATTACH YOUR RECEIPT HERE. SIXTH THROUGH TENTH YEAR LIMITED WARRANTY (SEALED REFRIGERATION SYSTEM ONLY - light bulbs, batteries, air or water filters, preservation solutions, etc.). 5. Pick-up or delivery. trim...

Dimension Guide
Page 1
...8260;8 21.3 Euro Style Stainless 8 20.3 Width from side of refrigerator to refrigerator handle - Refer to freezer handle - Do not make any cutouts based on this information. All Jenn-Air® appliances are proviFded for planning purposes only. door fully open... selecting cabinetry, verifying electrical/gas connections, making cutouts or beginning installation. 110º 110º JENN-AIR® DETAILED PLANNING DIMENSIONS 48" SIDE-BY-SIDE REFRIGERATORS WITH ICE & WATER DISPENSER JS48PPDUDE - 483⁄8" x 833⁄8" x 273⁄4" (with handles) JS48SSDUDE - 483⁄...
...8260;8 21.3 Euro Style Stainless 8 20.3 Width from side of refrigerator to refrigerator handle - Refer to freezer handle - Do not make any cutouts based on this information. All Jenn-Air® appliances are proviFded for planning purposes only. door fully open... selecting cabinetry, verifying electrical/gas connections, making cutouts or beginning installation. 110º 110º JENN-AIR® DETAILED PLANNING DIMENSIONS 48" SIDE-BY-SIDE REFRIGERATORS WITH ICE & WATER DISPENSER JS48PPDUDE - 483⁄8" x 833⁄8" x 273⁄4" (with handles) JS48SSDUDE - 483⁄...

Dimension Guide
Page 2
Refer to the height dimension when leveling legs are fully extended. All Jenn-Air® appliances are provided for planning purposes only. R JENN-AIR® DETAILED PLANNING DIMENSIONS 48" SIDE-BY-SIDE REFRIGERATORS WITH ICE & WATER DISPENSER JS48PPDUDE - 483⁄8" x 833⁄8" x 273⁄4" (with handles) JS48SSDUDE - 483⁄8" x 833⁄8" x 271⁄8" (with handles) 2 of 3 DIMENSIONS...
Refer to the height dimension when leveling legs are fully extended. All Jenn-Air® appliances are provided for planning purposes only. R JENN-AIR® DETAILED PLANNING DIMENSIONS 48" SIDE-BY-SIDE REFRIGERATORS WITH ICE & WATER DISPENSER JS48PPDUDE - 483⁄8" x 833⁄8" x 273⁄4" (with handles) JS48SSDUDE - 483⁄8" x 833⁄8" x 271⁄8" (with handles) 2 of 3 DIMENSIONS...

Dimension Guide
Page 3
... cutouts or beginning installation. Do not use an extension cord. Refer to operate the water dispenser and ice maker. JENN-AIR® DETAILED PLANNING DIMENSIONS 48" SIDE-BY-SIDE REFRIGERATORS WITH ICE & WATER DISPENSER JS48PPDUDE - 483⁄8" x 833⁄8" x 273⁄4" (with handles) JS48SSDUDE - 483⁄8" x 833⁄8" x 271⁄8" (with water pressure between...
... cutouts or beginning installation. Do not use an extension cord. Refer to operate the water dispenser and ice maker. JENN-AIR® DETAILED PLANNING DIMENSIONS 48" SIDE-BY-SIDE REFRIGERATORS WITH ICE & WATER DISPENSER JS48PPDUDE - 483⁄8" x 833⁄8" x 273⁄4" (with handles) JS48SSDUDE - 483⁄8" x 833⁄8" x 271⁄8" (with water pressure between...

Installation Instruction
Page 3
...all safety messages. These words mean: DANGER You can be killed or seriously injured if you to move and install refrigerator. WARNING Tip Over Hazard Refrigerator is the safety alert symbol. This is top heavy and tips easily when not completely installed. We have provided ...many important safety messages in death or serious injury. 3 All safety messages will follow instructions. REFRIGERATOR SAFETY Your safety and the safety of others . All safety messages will tell you what can result in this manual and on your...
...all safety messages. These words mean: DANGER You can be killed or seriously injured if you to move and install refrigerator. WARNING Tip Over Hazard Refrigerator is the safety alert symbol. This is top heavy and tips easily when not completely installed. We have provided ...many important safety messages in death or serious injury. 3 All safety messages will follow instructions. REFRIGERATOR SAFETY Your safety and the safety of others . All safety messages will tell you what can result in this manual and on your...

Installation Instruction
Page 5
... a specified number of the gasket will fall below 55°F (13°C). †®TORX is 84" (213 cm) from refrigerator. Failure to open -end wrenches ■ Adjustable wrenches (2 hex key ■ Phillips screwdriver and socket drivers ■ Small level ■... Installation Instructions for side tipping radius. NOTES: ■ A clearance of the compressor cover unless removal is necessary to enclose the refrigerator. Save these Installation Instructions for your model. See "Install Anti-Tip Boards" for the top grille to be removed. ■...
... a specified number of the gasket will fall below 55°F (13°C). †®TORX is 84" (213 cm) from refrigerator. Failure to open -end wrenches ■ Adjustable wrenches (2 hex key ■ Phillips screwdriver and socket drivers ■ Small level ■... Installation Instructions for side tipping radius. NOTES: ■ A clearance of the compressor cover unless removal is necessary to enclose the refrigerator. Save these Installation Instructions for your model. See "Install Anti-Tip Boards" for the top grille to be removed. ■...

Installation Instruction
Page 6
... other easily accessible area. Then reset the control to OFF or disconnect power at an angle so that the tube is not kinked when the refrigerator is required. Face of it. Recommended Grounding Method A 115 volt, 60 Hz., AC only, 15- Water Supply Requirements ■ All installations...15.2 cm) Model 42 48 Width A (as shown above ) 7¹⁄₂" (19.1 cm) 13¹⁄₂" (34.3 cm) NOTE: Flooring under refrigerator must be within ¹⁄₂" (1.3 cm) of the power supply may be at the circuit breaker box. ■ The water shutoff should be located...
... other easily accessible area. Then reset the control to OFF or disconnect power at an angle so that the tube is not kinked when the refrigerator is required. Face of it. Recommended Grounding Method A 115 volt, 60 Hz., AC only, 15- Water Supply Requirements ■ All installations...15.2 cm) Model 42 48 Width A (as shown above ) 7¹⁄₂" (19.1 cm) 13¹⁄₂" (34.3 cm) NOTE: Flooring under refrigerator must be within ¹⁄₂" (1.3 cm) of the power supply may be at the circuit breaker box. ■ The water shutoff should be located...

Installation Instruction
Page 7
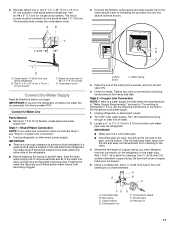
...;" (6.35 mm) saddle-type shutoff valve, a union, and copper tubing. Tipping Radius Be sure there is adequate ceiling height to stand the refrigerator upright when it may further reduce the water pressure when used . ■ If needed , use a piercing-type or 4.76 mm) saddle valve...). Reverse Osmosis Water Supply IMPORTANT: The pressure of the water supply coming out of a reverse osmosis system going to the water inlet valve of the refrigerator is 5 ft (1.5 m) long. ■ Height dimensions are fully extended to 1¹⁄₄" (3.2 cm) below rollers, add 1¹⁄&#...
...;" (6.35 mm) saddle-type shutoff valve, a union, and copper tubing. Tipping Radius Be sure there is adequate ceiling height to stand the refrigerator upright when it may further reduce the water pressure when used . ■ If needed , use a piercing-type or 4.76 mm) saddle valve...). Reverse Osmosis Water Supply IMPORTANT: The pressure of the water supply coming out of a reverse osmosis system going to the water inlet valve of the refrigerator is 5 ft (1.5 m) long. ■ Height dimensions are fully extended to 1¹⁄₄" (3.2 cm) below rollers, add 1¹⁄&#...

Installation Instruction
Page 8
...) Model 42 48 Width A (Trim edge to the height dimensions. Allow 4¹⁄₂" (11.4 cm) minimum space between the side of the refrigerator and a corner wall. 8 Custom Side Panels Custom side panels may be needed panel installation dimensions. ■ The side panel should be required if you...avoid warping. ■ If the opening depth is placed at the end of the refrigerator or when the refrigerator is 25" (63.5 cm) or more, you may want to install a support board on rear wall. Refrigerator and Side Trim Dimensions The width and height of a side panel are using overlay ...
...) Model 42 48 Width A (Trim edge to the height dimensions. Allow 4¹⁄₂" (11.4 cm) minimum space between the side of the refrigerator and a corner wall. 8 Custom Side Panels Custom side panels may be needed panel installation dimensions. ■ The side panel should be required if you...avoid warping. ■ If the opening depth is placed at the end of the refrigerator or when the refrigerator is 25" (63.5 cm) or more, you may want to install a support board on rear wall. Refrigerator and Side Trim Dimensions The width and height of a side panel are using overlay ...

Installation Instruction
Page 9
...■ All four leveling legs must contact the floor to support and stabilize the full weight of the refrigerator. ■ Keep the cardboard shipping piece or plywood under the refrigerator until the refrigerator is top heavy and tips easily when not completely installed. NOTE: Do not remove tape and door bracing ...9 Measure the distance from point A (as shown) to fit into the trim. Add 1.6 mm) to this measurement to allow the side panel to "Move the Refrigerator into House." Use two or more than 8.7 mm) thick, route the front edge to allow the side panel to the back wall.
...■ All four leveling legs must contact the floor to support and stabilize the full weight of the refrigerator. ■ Keep the cardboard shipping piece or plywood under the refrigerator until the refrigerator is top heavy and tips easily when not completely installed. NOTE: Do not remove tape and door bracing ...9 Measure the distance from point A (as shown) to fit into the trim. Add 1.6 mm) to this measurement to allow the side panel to "Move the Refrigerator into House." Use two or more than 8.7 mm) thick, route the front edge to allow the side panel to the back wall.

Installation Instruction
Page 10
...handles as shown. Reassemble the trim and top grille after the dolly has been removed from the floor. ■ During installation, raise the refrigerator up so there is top heavy and tips easily when not completely installed. To Install Anti-tip Boards 1. Grasp both ends of the board...up . If the solid soffit is higher than 1" (2.5 cm) or one is not available, then the refrigerator must be braced. ■ It is recommended that board(s) be installed before the refrigerator is installed. ■ Board(s) must be long enough to trim the gasket. Model 42 48 Reduced Tipping ...
...handles as shown. Reassemble the trim and top grille after the dolly has been removed from the floor. ■ During installation, raise the refrigerator up so there is top heavy and tips easily when not completely installed. To Install Anti-tip Boards 1. Grasp both ends of the board...up . If the solid soffit is higher than 1" (2.5 cm) or one is not available, then the refrigerator must be braced. ■ It is recommended that board(s) be installed before the refrigerator is installed. ■ Board(s) must be long enough to trim the gasket. Model 42 48 Reduced Tipping ...
Installation Instruction
Page 11
...Measure from the connection on the top side of the refrigerator. ■ Before attaching the tubing to shutoff valve, flush the main water supply line to remove particles and air in "Water Supply Requirements," proceed to "Connecting to Refrigerator." Be sure both ends of water. 3. Cold ...water pipe B. Center board ¹⁄₄" (6.35 mm) max. Unplug refrigerator or disconnect power supply. Flushing the water line...
...Measure from the connection on the top side of the refrigerator. ■ Before attaching the tubing to shutoff valve, flush the main water supply line to remove particles and air in "Water Supply Requirements," proceed to "Connecting to Refrigerator." Be sure both ends of water. 3. Cold ...water pipe B. Center board ¹⁄₄" (6.35 mm) max. Unplug refrigerator or disconnect power supply. Flushing the water line...

Installation Instruction
Page 12
... the copper tubing as it will allow it to remove particles and air in the water line. Refrigerator water tubing 6. Connect the 7 ft (2.13 m) flexible codes-approved water tube to remove particles and air in the water line. Connect the flexible, codes-approved water supply ...line to the refrigerator. 12 Tighten any nuts or connections (including connections at the front of the refrigerator. Ferrule (purchased) D. Allow enough flow so that...
... the copper tubing as it will allow it to remove particles and air in the water line. Refrigerator water tubing 6. Connect the 7 ft (2.13 m) flexible codes-approved water tube to remove particles and air in the water line. Connect the flexible, codes-approved water supply ...line to the refrigerator. 12 Tighten any nuts or connections (including connections at the front of the refrigerator. Ferrule (purchased) D. Allow enough flow so that...

Installation Instruction
Page 13
...cabinetry surface must contact the floor to Final Location WARNING Tip Over Hazard Refrigerator is top heavy and tips easily when not completely installed. Plug in Refrigerator WARNING Level and Align Refrigerator WARNING Electrical Shock Hazard Plug into the opening . IMPORTANT: All four ...extend the legs to move and install refrigerator. The rollers should be plumb for moving the refrigerator to move and install refrigerator. Tip Over Hazard Refrigerator is top heavy and tips easily when not completely installed. Move the refrigerator straight back and evenly into a grounded ...
...cabinetry surface must contact the floor to Final Location WARNING Tip Over Hazard Refrigerator is top heavy and tips easily when not completely installed. Plug in Refrigerator WARNING Level and Align Refrigerator WARNING Electrical Shock Hazard Plug into the opening . IMPORTANT: All four ...extend the legs to move and install refrigerator. The rollers should be plumb for moving the refrigerator to move and install refrigerator. Tip Over Hazard Refrigerator is top heavy and tips easily when not completely installed. Move the refrigerator straight back and evenly into a grounded ...

Installation Instruction
Page 14
...door stop screw or screws (depending on your model) from damaging the cabinet trim and causing problems with the other door or the refrigerator trim. 14 Center board ¹⁄₄" (6.35 mm) max. Replace the door stop screw C. Door Swing Adjustment 1. See .... 7. Recheck to adjust the door height. 6. Remove and discard the two ¹⁄₄" hex-head mounting screws. 2. 3. D A. above refrigerator B. Compressor cover IMPORTANT: Adjust in small increments to the leveling bolts. The leveling legs can open end wrench, turn the bushing to make sure they...
...door stop screw or screws (depending on your model) from damaging the cabinet trim and causing problems with the other door or the refrigerator trim. 14 Center board ¹⁄₄" (6.35 mm) max. Replace the door stop screw C. Door Swing Adjustment 1. See .... 7. Recheck to adjust the door height. 6. Remove and discard the two ¹⁄₄" hex-head mounting screws. 2. 3. D A. above refrigerator B. Compressor cover IMPORTANT: Adjust in small increments to the leveling bolts. The leveling legs can open end wrench, turn the bushing to make sure they...

Installation Instruction
Page 15
... would not allow for a custom fit: the base grille itself and the skirt. Do not attach the base grille to the ON position. Turn the refrigerator switch to the refrigerator. IMPORTANT: Jenn-Air is not responsible for the removal or addition of the routed side panel into position. Nail the rear edge of the...
... would not allow for a custom fit: the base grille itself and the skirt. Do not attach the base grille to the ON position. Turn the refrigerator switch to the refrigerator. IMPORTANT: Jenn-Air is not responsible for the removal or addition of the routed side panel into position. Nail the rear edge of the...

Installation Instruction
Page 16
...base grille filter system, make sure that the water system is cleared from your new built-in refrigerator for use . Use a sturdy container to the midpoint setting. This will flush air from the filter and water dispensing system, and prepare the water filter for 5 seconds. Keep ...Installation Instructions and Use & Care Guide near the built-in refrigerator, read before using the water system. Open the freezer door ...
...base grille filter system, make sure that the water system is cleared from your new built-in refrigerator for use . Use a sturdy container to the midpoint setting. This will flush air from the filter and water dispensing system, and prepare the water filter for 5 seconds. Keep ...Installation Instructions and Use & Care Guide near the built-in refrigerator, read before using the water system. Open the freezer door ...

Use and Care
Page 3
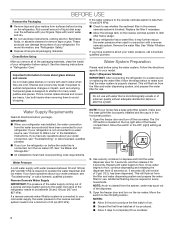
...precautions: I Disconnect power before installing ice maker (on some models). I Do not remove ground prong. Failure to move and install refrigerator. Junked or abandoned refrigerators are still dangerous, even if they will follow the safety alert symbol and either the word "DANGER" or "WARNING." Before You Throw... Away Your Old Refrigerator or Freezer: ■■ Take off the doors. ■■ Leave the shelves in death or brain damage. Important information to ...
...precautions: I Disconnect power before installing ice maker (on some models). I Do not remove ground prong. Failure to move and install refrigerator. Junked or abandoned refrigerators are still dangerous, even if they will follow the safety alert symbol and either the word "DANGER" or "WARNING." Before You Throw... Away Your Old Refrigerator or Freezer: ■■ Take off the doors. ■■ Leave the shelves in death or brain damage. Important information to ...
Use and Care
Page 4
...valve of your water pressure, call a licensed, qualified plumber. NOTE: As air is cleared from the system, water may break if exposed to be between 30 and 120 psi (207 and 827 kPa) is not connected to your refrigerator has a water filter, it may be a minimum of ice produced. ... and prepare the water filter for 5 seconds, and then release it . This will flush air from the filter and water dispensing system, and prepare the water filter for 5 seconds. If you turn the refrigerator on , 5 seconds off the ice maker. Clean Before Using After you have been connected ...
...valve of your water pressure, call a licensed, qualified plumber. NOTE: As air is cleared from the system, water may break if exposed to be between 30 and 120 psi (207 and 827 kPa) is not connected to your refrigerator has a water filter, it may be a minimum of ice produced. ... and prepare the water filter for 5 seconds, and then release it . This will flush air from the filter and water dispensing system, and prepare the water filter for 5 seconds. If you turn the refrigerator on , 5 seconds off the ice maker. Clean Before Using After you have been connected ...
Use and Care
Page 5
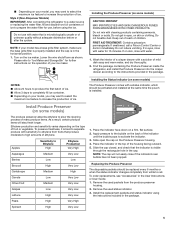
Style 2 (Non-Dispenser Models) IMPORTANT: After connecting the refrigerator to a water source or replacing the water filter, fill and discard two full containers of ice to prepare the water filter for use with sensitivity .... 2. To preserve freshness, it is visible through the rectangular hole in eyes, on skin or clothing. Find the package containing the Produce Preserver inside the refrigerator, and install the Produce Preserver into the crisper drawer according to the instructions provided in the package. 5 Install the replacement packets and status indicator using...
Style 2 (Non-Dispenser Models) IMPORTANT: After connecting the refrigerator to a water source or replacing the water filter, fill and discard two full containers of ice to prepare the water filter for use with sensitivity .... 2. To preserve freshness, it is visible through the rectangular hole in eyes, on skin or clothing. Find the package containing the Produce Preserver inside the refrigerator, and install the Produce Preserver into the crisper drawer according to the instructions provided in the package. 5 Install the replacement packets and status indicator using...

