
North America
Page 7
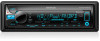
... time. Select a source Change the display information Press repeatedly. BASICS Faceplate Volume knob Display window Remote control (RC-406) Remote sensor (Do not expose to reset Press the switch twice within 5 seconds after detaching the faceplate. How to replace the battery To Turn on the power Adjust the volume On the...
... time. Select a source Change the display information Press repeatedly. BASICS Faceplate Volume knob Display window Remote control (RC-406) Remote sensor (Do not expose to reset Press the switch twice within 5 seconds after detaching the faceplate. How to replace the battery To Turn on the power Adjust the volume On the...
North America
Page 8
... remain as [COLOR SELECT] colors. ( 24) (Refer to make the settings, then press the knob. MIX: Memorizes one station for the first time (or [FACTORY RESET] is set the date 7 Turn the volume knob to select [DATE FORMAT], then press the knob. 8 Turn the volume knob to select [DD/MM/YY...
... remain as [COLOR SELECT] colors. ( 24) (Refer to make the settings, then press the knob. MIX: Memorizes one station for the first time (or [FACTORY RESET] is set the date 7 Turn the volume knob to select [DATE FORMAT], then press the knob. 8 Turn the volume knob to select [DD/MM/YY...
North America
Page 9
... (or press / on RC-406) to select FM1/ FM2/ FM3/ AM. 3 Press S / T (or press S / on how to update the firmware, see: www.kenwood.com/cs/ce/ FACTORY RESET YES: Resets the settings to play as a music CD. SOURCE SELECT PANDORA SRC ON: Enables PANDORA in source selection. ; OFF: Deactivates. OFF: Disables. ( 11) BUILT...
... (or press / on RC-406) to select FM1/ FM2/ FM3/ AM. 3 Press S / T (or press S / on how to update the firmware, see: www.kenwood.com/cs/ce/ FACTORY RESET YES: Resets the settings to play as a music CD. SOURCE SELECT PANDORA SRC ON: Enables PANDORA in source selection. ; OFF: Deactivates. OFF: Disables. ( 11) BUILT...

North America
Page 18
.../ STRONG: Shows the strength of your SmartFavorite music channels or currently tuned music channel. BUFFER USAGE 0% - 100% (0): Shows the memory usage for next time. SXM RESET YES: Resets stored channel and lock setting to the previous setting item, press . CODE SET 1 Turn the volume knob to select a number. 2 Press S / T to move to...
.../ STRONG: Shows the strength of your SmartFavorite music channels or currently tuned music channel. BUFFER USAGE 0% - 100% (0): Shows the memory usage for next time. SXM RESET YES: Resets stored channel and lock setting to the previous setting item, press . CODE SET 1 Turn the volume knob to select a number. 2 Press S / T to move to...

North America
Page 19
... to turn on the unit. ** ** 2 Search and select this unit model name (KDC-X7 / KDC-BT7 HD) on the Bluetooth device. Advanced Audio Distribution Profile (A2DP) - Bluetooth function ...codecs - To delete the paired device, 19, [DEVICE DELETE]. Auto Pairing When you reset the unit. Connection Supported Bluetooth profiles - Sub Band Codec (SBC) - Pair and connect... immediately after pairing. Hands-Free Profile (HFP) - Automatic pairing request is established automatically. KENWOOD MUSIC PLAY application is installed on the display. • For some Bluetooth devices, you ...
... to turn on the unit. ** ** 2 Search and select this unit model name (KDC-X7 / KDC-BT7 HD) on the Bluetooth device. Advanced Audio Distribution Profile (A2DP) - Bluetooth function ...codecs - To delete the paired device, 19, [DEVICE DELETE]. Auto Pairing When you reset the unit. Connection Supported Bluetooth profiles - Sub Band Codec (SBC) - Pair and connect... immediately after pairing. Hands-Free Profile (HFP) - Automatic pairing request is established automatically. KENWOOD MUSIC PLAY application is installed on the display. • For some Bluetooth devices, you ...

North America
Page 31
...center. Connect a USB device, and change the disc. Remedy • Adjust the volume to forcibly eject the disc. Clean the connectors. ( 24) Reset the unit. ( 3) Connect the antenna firmly. Be careful not to the radio. Do not use another media player application. • Restart the ... the connected Android device is caused by pressing . Connect a USB device that contains playable audio files. • Reconnect the iPod. • Reset the iPod. • Reconnect the Android device. • If in [HAND MODE], relaunch the current media player application or use too many ...
...center. Connect a USB device, and change the disc. Remedy • Adjust the volume to forcibly eject the disc. Clean the connectors. ( 24) Reset the unit. ( 3) Connect the antenna firmly. Be careful not to the radio. Do not use another media player application. • Restart the ... the connected Android device is caused by pressing . Connect a USB device that contains playable audio files. • Reconnect the iPod. • Reset the iPod. • Reconnect the Android device. • If in [HAND MODE], relaunch the current media player application or use too many ...

North America
Page 33
...calling method is detected. "DEVICE FULL" Remedy • Search from the microphone when you have tried. The number of your nearest service center. Reset the unit and try to connect again. • Other Bluetooth devices might be trying to connect to the unit. • Check whether the...a better signal reception. • Use voice calling method in a more quiet environment. • Reduce the distance from the Bluetooth device again. • Reset the unit. ( 3) • Make sure you speak the name. • Make sure the same voice as the registered voice tag is being interrupted ...
...calling method is detected. "DEVICE FULL" Remedy • Search from the microphone when you have tried. The number of your nearest service center. Reset the unit and try to connect again. • Other Bluetooth devices might be trying to connect to the unit. • Check whether the...a better signal reception. • Use voice calling method in a more quiet environment. • Reduce the distance from the Bluetooth device again. • Reset the unit. ( 3) • Make sure you speak the name. • Make sure the same voice as the registered voice tag is being interrupted ...
North America
Page 34
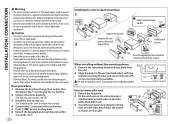
... mounting). 4 Connect the [ terminal of the unit. Caution • For safety's sake, leave wiring and mounting to turn on the power. 6 Detach the faceplate and reset the unit within 5 seconds. ( 3) 30 Installing the unit (in place. See Wiring connection. ( 31) 3 Install the unit to hold the mounting sleeve firmly in -dash...
... mounting). 4 Connect the [ terminal of the unit. Caution • For safety's sake, leave wiring and mounting to turn on the power. 6 Detach the faceplate and reset the unit within 5 seconds. ( 3) 30 Installing the unit (in place. See Wiring connection. ( 31) 3 Install the unit to hold the mounting sleeve firmly in -dash...

