
Instruction Manual
Page 2
...to the EMC Directive 2004/108/EC Manufacturer: JVCKENWOOD Corporation 3-12, Moriyacho, Kanagawa-ku, Yokohamashi, Kanagawa, 221-0022, Japan EU Representative's: Kenwood Electronics Europe BV Amsterdamseweg 37, 1422 AC UITHOORN, The Netherlands Information on the opposite side such as a gasoline tank, brake pipe; Eski ...8226; After installing the unit, check to make sure to use the product for details in a spot exposed to ensure safe operation. Remote control operation • Do not use automotive-grade wires or other than the stipulated size can cause fires.) Check the display! Old ...
...to the EMC Directive 2004/108/EC Manufacturer: JVCKENWOOD Corporation 3-12, Moriyacho, Kanagawa-ku, Yokohamashi, Kanagawa, 221-0022, Japan EU Representative's: Kenwood Electronics Europe BV Amsterdamseweg 37, 1422 AC UITHOORN, The Netherlands Information on the opposite side such as a gasoline tank, brake pipe; Eski ...8226; After installing the unit, check to make sure to use the product for details in a spot exposed to ensure safe operation. Remote control operation • Do not use automotive-grade wires or other than the stipulated size can cause fires.) Check the display! Old ...
Instruction Manual
Page 3
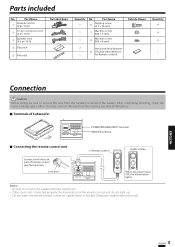
... 5 mm) 8 Machine screw (M3 × 8 mm) 2 Hook-and-loop fastener 9 (Double-side adhesive/ 1 for Remote control) Outside Shape Quantity 4 4 2 1 Connection Caution: Before wiring, be sure to connect the supplied remote control unit. • If the cord is not connected properly, the illumination on the... ■ Terminals of Subwoofer POWER/SPEAKER INPUT terminal REMOTE terminal ■ Connecting the remote control unit 1 Remote control Lights in blue. After checking, connect the wire from the negative terminal of remote control jack facing down or forcibly. Parts included No...
... 5 mm) 8 Machine screw (M3 × 8 mm) 2 Hook-and-loop fastener 9 (Double-side adhesive/ 1 for Remote control) Outside Shape Quantity 4 4 2 1 Connection Caution: Before wiring, be sure to connect the supplied remote control unit. • If the cord is not connected properly, the illumination on the... ■ Terminals of Subwoofer POWER/SPEAKER INPUT terminal REMOTE terminal ■ Connecting the remote control unit 1 Remote control Lights in blue. After checking, connect the wire from the negative terminal of remote control jack facing down or forcibly. Parts included No...

Instruction Manual
Page 6
...vibrations or impacts during driving. ■ Fixing the cord in place 8 Machine screw x 2 5 Fixture B Connect the 10-pin connector cord 2 and remote control 1 to the subwoofer installation location. Be careful so that the connected cords do not get in between the speaker unit and fixtures A 4. 2 6...6. Installation Before fixing the speaker in its position, be fixed in two ways. Select the optimum attaching position of the speaker unit. 1 Remote control 2 10-pin connector cord ■ Fixing the subwoofer The subwoofer can be sure to the vehicle using the tapping screws 6. 6 ...
...vibrations or impacts during driving. ■ Fixing the cord in place 8 Machine screw x 2 5 Fixture B Connect the 10-pin connector cord 2 and remote control 1 to the subwoofer installation location. Be careful so that the connected cords do not get in between the speaker unit and fixtures A 4. 2 6...6. Installation Before fixing the speaker in its position, be fixed in two ways. Select the optimum attaching position of the speaker unit. 1 Remote control 2 10-pin connector cord ■ Fixing the subwoofer The subwoofer can be sure to the vehicle using the tapping screws 6. 6 ...

Instruction Manual
Page 7
... the reverse phase. In this case, the volume, cut-off frequency control knob) PHASE switch (Phase select switch) ■ Adjusting the sound (Remote control operation) 1 Turn the FREQUENCY control knob to the desired level. Operation 1 Insert the fuse gently into the fuse holder and push in all.... 50 Hz 125 Hz Sound pressure level Low High Low High Frequency 2 Adjust the low frequency phase. ■ Installing the remote control unit Install the remote control unit on the vehicle by changing the position of the unit, its orientation or the turn-over frequency. This can be...
... the reverse phase. In this case, the volume, cut-off frequency control knob) PHASE switch (Phase select switch) ■ Adjusting the sound (Remote control operation) 1 Turn the FREQUENCY control knob to the desired level. Operation 1 Insert the fuse gently into the fuse holder and push in all.... 50 Hz 125 Hz Sound pressure level Low High Low High Frequency 2 Adjust the low frequency phase. ■ Installing the remote control unit Install the remote control unit on the vehicle by changing the position of the unit, its orientation or the turn-over frequency. This can be...
Instruction Manual
Page 8
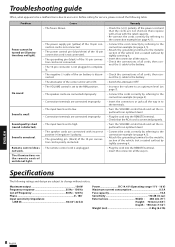
... the grounding terminal to the metallic section of the vehicle (not a coated surface) by tightly screwing it. • Plug the cord into the REMOTE terminal. • Insert the connector all the way in completely. • The negative (-) cable of the car battery is disconnected. • ...negative (-) polarity. • The grounding pin (black) of the vehicle (not a coated surface) by referring to the connection example (on the remote control unit do not light. No sound Sound is distorted). Sound is unplugged. The illuminations on page 4, 5). • Attach the grounding terminal to...
... the grounding terminal to the metallic section of the vehicle (not a coated surface) by tightly screwing it. • Plug the cord into the REMOTE terminal. • Insert the connector all the way in completely. • The negative (-) cable of the car battery is disconnected. • ...negative (-) polarity. • The grounding pin (black) of the vehicle (not a coated surface) by referring to the connection example (on the remote control unit do not light. No sound Sound is distorted). Sound is unplugged. The illuminations on page 4, 5). • Attach the grounding terminal to...

