
Instruction Manual
Page 4
... properly following are designed to emit smoke or strange smells, turn off and on a circuit different from the LCD contacts your Kenwood dealer. Otherwise it is no guarantee that the unit is accidentally swallowed. The use radio frequency energy. Normal brightness will not ... Regulations, following the illustration inside the product relating to malfunction. • To prevent short circuits when replacing a fuse, first disconnect the wiring harness. • Do not use any metallic objects (e.g., coins or metal tools) inside the unit. • If the unit starts to ...
... properly following are designed to emit smoke or strange smells, turn off and on a circuit different from the LCD contacts your Kenwood dealer. Otherwise it is no guarantee that the unit is accidentally swallowed. The use radio frequency energy. Normal brightness will not ... Regulations, following the illustration inside the product relating to malfunction. • To prevent short circuits when replacing a fuse, first disconnect the wiring harness. • Do not use any metallic objects (e.g., coins or metal tools) inside the unit. • If the unit starts to ...
Instruction Manual
Page 57
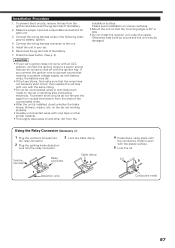
... • Do not install the receiver unit under the carpet. Vehicle harness Relay connector 2 Cable clamp 3 1 Detection wire 4 Press down using pliers until the conductive metal is even with the ignition key. Connect the wiring harness wires in your car's ignition does not come with an ACC position, connect... the ignition wires to a power source that receives a constant voltage supply, as with battery wires, the battery may be turned on and off with...
... • Do not install the receiver unit under the carpet. Vehicle harness Relay connector 2 Cable clamp 3 1 Detection wire 4 Press down using pliers until the conductive metal is even with the ignition key. Connect the wiring harness wires in your car's ignition does not come with an ACC position, connect... the ignition wires to a power source that receives a constant voltage supply, as with battery wires, the battery may be turned on and off with...

Instruction Manual
Page 58
... /AM ANTENNA AV OUTPUT VIDEO L R AV INPUT 1 VIDEO L R AV INPUT 2 VIDEO L R FRONT L R PREOUT REAR L R NON-FAD L R POWER (AccessoryF) Receiver unit (front side) A Ignition wire (Red) Battery wire (Yellow) B Wiring harness (Accessory A) ( 3A ) ( 10A ) C When using , connect either to the control terminal of the motor antenna, or to its power control terminal. To car light...
... /AM ANTENNA AV OUTPUT VIDEO L R AV INPUT 1 VIDEO L R AV INPUT 2 VIDEO L R FRONT L R PREOUT REAR L R NON-FAD L R POWER (AccessoryF) Receiver unit (front side) A Ignition wire (Red) Battery wire (Yellow) B Wiring harness (Accessory A) ( 3A ) ( 10A ) C When using , connect either to the control terminal of the motor antenna, or to its power control terminal. To car light...

Instruction Manual
Page 65
...to the proper terminal. The input/output wires or wiring harness are incorrectly connected. The speakers are pressed. The car antenna is not connected. The battery wire has not been connected to the parking brake detection switch. Connect the wire correctly, referring to "Connections" (See ... connections according to the section on "Connection". 65 Reset the fader and/or balance settings. Reconnect the input/output wires or the wiring harness correctly. Troubleshooting Guide What might appear to be a malfunction in your unit may appear darker when power is first ...
...to the proper terminal. The input/output wires or wiring harness are incorrectly connected. The speakers are pressed. The car antenna is not connected. The battery wire has not been connected to the parking brake detection switch. Connect the wire correctly, referring to "Connections" (See ... connections according to the section on "Connection". 65 Reset the fader and/or balance settings. Reconnect the input/output wires or the wiring harness correctly. Troubleshooting Guide What might appear to be a malfunction in your unit may appear darker when power is first ...


