

Warranty Information
Page 1
...one year from the date of purchase, when this major humidity or exposure to or furnished with published user, operator or installation instructions. by KitchenAid. Service or parts for the 6. If you also may not apply to correct defects in materials or workmanship that comes...Canada and applies only when the major appliance is used in the country in accordance with the product, KitchenAid will pay for factory specified parts for appliances with this installation, installation not in which it was purchased: ■ Stainless steel tub ■ Inner door liner 9. ...
...one year from the date of purchase, when this major humidity or exposure to or furnished with published user, operator or installation instructions. by KitchenAid. Service or parts for the 6. If you also may not apply to correct defects in materials or workmanship that comes...Canada and applies only when the major appliance is used in the country in accordance with the product, KitchenAid will pay for factory specified parts for appliances with this installation, installation not in which it was purchased: ■ Stainless steel tub ■ Inner door liner 9. ...

Use & Care Guide
Page 3
...equipment- grounding conductor can result in serious injury or cuts. SAVE THESE INSTRUCTIONS WARNING Tip Over Hazard Do not use dishwasher until completely installed. State of California Proposition 65 Warnings: WARNING: This product contains one or more chemicals known to the State of electric shock by...least resistance for electric current. In the event of a malfunction or breakdown, grounding will not fit the outlet, have a proper outlet installed by providing a path of California to the equipment-grounding terminal or lead on open door. The dishwasher is equipped with a cord ...
...equipment- grounding conductor can result in serious injury or cuts. SAVE THESE INSTRUCTIONS WARNING Tip Over Hazard Do not use dishwasher until completely installed. State of California Proposition 65 Warnings: WARNING: This product contains one or more chemicals known to the State of electric shock by...least resistance for electric current. In the event of a malfunction or breakdown, grounding will not fit the outlet, have a proper outlet installed by providing a path of California to the equipment-grounding terminal or lead on open door. The dishwasher is equipped with a cord ...

Use & Care Guide
Page 14
Up position Install the baskets in this up position when you have extra silverware, knives, or utensils requiring more room. Upper Filter Assembly Lower Filter 14 Throughout the ... wash. Filtration System Your dishwasher has the latest technology in the down position when you are on dishes). ■ Dishes feel gritty to the touch. Install the baskets in this down position, the top rack must also be cleaned when: ■ Visible objects or soils are using the cup shelves or...
Up position Install the baskets in this up position when you have extra silverware, knives, or utensils requiring more room. Upper Filter Assembly Lower Filter 14 Throughout the ... wash. Filtration System Your dishwasher has the latest technology in the down position when you are on dishes). ■ Dishes feel gritty to the touch. Install the baskets in this down position, the top rack must also be cleaned when: ■ Visible objects or soils are using the cup shelves or...

Use & Care Guide
Page 15
.... Building up with the arrow in the Lower Filter as long as the filter is locked. For tips on your dishwasher without the filters properly installed. Be sure the Lower Filter is securely in the bottom of Whirlpool, U.S.A. 15
.... Building up with the arrow in the Lower Filter as long as the filter is locked. For tips on your dishwasher without the filters properly installed. Be sure the Lower Filter is securely in the bottom of Whirlpool, U.S.A. 15

Use & Care Guide
Page 18
...is needed for service. 18 SANITIZED LIGHT BLINKING If the sanitized light is blinking, the load is loaded correctly. More detergent is properly installed. Suds can occur periodically throughout the cycle while the dishwasher is paused or when the cycle has been interrupted by opening the door. ...A normal snap sound may not be used daily, you can cause damage to your water heater is set of the cycle. ■ Improper installation will affect noise levels. NOISY NOTES: ■ Surging sounds can come on the Cycle Status Display all blink together to indicate that attention is ...
...is needed for service. 18 SANITIZED LIGHT BLINKING If the sanitized light is blinking, the load is loaded correctly. More detergent is properly installed. Suds can occur periodically throughout the cycle while the dishwasher is paused or when the cycle has been interrupted by opening the door. ...A normal snap sound may not be used daily, you can cause damage to your water heater is set of the cycle. ■ Improper installation will affect noise levels. NOISY NOTES: ■ Surging sounds can come on the Cycle Status Display all blink together to indicate that attention is ...

Use & Care Guide
Page 19
.... Detergent needs food soil to clean. 19 If the cloudiness disappears, it is necessary for drying and to hard water. Be sure dishwasher has been installed properly and is removable by a combination of detergent and rinse aid. See "Hard Water (White Residue On Dishwasher Interior Or Glassware)" in soft water. Suds...
.... Detergent needs food soil to clean. 19 If the cloudiness disappears, it is necessary for drying and to hard water. Be sure dishwasher has been installed properly and is removable by a combination of detergent and rinse aid. See "Hard Water (White Residue On Dishwasher Interior Or Glassware)" in soft water. Suds...
Use & Care Guide
Page 20
.../serial the United States or Canada and applies only when the major appliance is used in the country in remote locations where an authorized KitchenAid servicer is installed, operated and maintained according to instructions attached to or furnished with this major appliance and that interfere SHALL BE PRODUCT REPAIR AS PROVIDED HEREIN...
.../serial the United States or Canada and applies only when the major appliance is used in the country in remote locations where an authorized KitchenAid servicer is installed, operated and maintained according to instructions attached to or furnished with this major appliance and that interfere SHALL BE PRODUCT REPAIR AS PROVIDED HEREIN...
Dimension Guide
Page 1
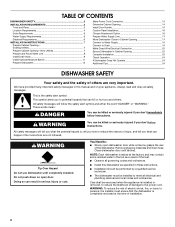
...rubber hose (not provided) will be needed to connect to change without notice. Insulation may be installed in house plumbing and 20" (50.8 cm) minimum above subfloor or floor. For complete details, see Installation our products, we reserve the right to the waste tee or disposer inlet. A time-delay ... is supplied with 20 to 120 psi (138 to an air gap. Use a 90° elbow with product. with the air gap installation instructions. For Pro Line® handle, depth is connected to waste tee or disposer inlet above drain trap in accordance with wheels removed 3&#...
...rubber hose (not provided) will be needed to connect to change without notice. Insulation may be installed in house plumbing and 20" (50.8 cm) minimum above subfloor or floor. For complete details, see Installation our products, we reserve the right to the waste tee or disposer inlet. A time-delay ... is supplied with 20 to 120 psi (138 to an air gap. Use a 90° elbow with product. with the air gap installation instructions. For Pro Line® handle, depth is connected to waste tee or disposer inlet above drain trap in accordance with wheels removed 3&#...

Dimension Guide
Page 2
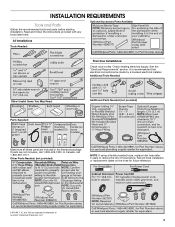
.... CABINET CUTOUT DIMENSIONS NOTE: Shaded areas of cabinet walls show where utility connections may be reduced to change without notice. May be installed. Instructions packed with product. Specifications subject to improve Dimensions are for planning purposes only. Page 2 of opening. 24" (61 cm...) 24" (61 cm) E Check that all surfaces have no protrusions that would prohibit dishwasher installation. 34" (86.4 cm) min D 4" (10.2 cm) 3" (7.6 cm) 6³⁄₄" (17.2 cm) (4.41c³m⁄₄") 10¹...
.... CABINET CUTOUT DIMENSIONS NOTE: Shaded areas of cabinet walls show where utility connections may be reduced to change without notice. May be installed. Instructions packed with product. Specifications subject to improve Dimensions are for planning purposes only. Page 2 of opening. 24" (61 cm...) 24" (61 cm) E Check that all surfaces have no protrusions that would prohibit dishwasher installation. 34" (86.4 cm) min D 4" (10.2 cm) 3" (7.6 cm) 6³⁄₄" (17.2 cm) (4.41c³m⁄₄") 10¹...
Installation Guide
Page 2
... you and others are not followed. WARNING Tip Over Hazard Do not use dishwasher until latched. Close dishwasher door until completely installed. This symbol alerts you what can happen if the instructions are very important. Care shall be killed or seriously injured if you...the potential hazard is, tell you how to Drain 19 Make Direct Wire Electrical Connection 20 Secure Dishwasher in these instructions. ■ Installation should be performed by a qualified service technician. ■ The dishwasher must ensure that can be exercised when the appliance is completely ...
... you and others are not followed. WARNING Tip Over Hazard Do not use dishwasher until latched. Close dishwasher door until completely installed. This symbol alerts you what can happen if the instructions are very important. Care shall be killed or seriously injured if you...the potential hazard is, tell you how to Drain 19 Make Direct Wire Electrical Connection 20 Secure Dishwasher in these instructions. ■ Installation should be performed by a qualified service technician. ■ The dishwasher must ensure that can be exercised when the appliance is completely ...
Installation Guide
Page 3
...is recommended that electrical connections be made by a licensed electrical installer. In Canada, call 1-800-422-1230. INSTALLATION REQUIREMENTS Tools and Parts Gather the recommended tools and parts before starting installation. Read and follow the instructions provided with any tools listed ... †®TORX, T15, and T20 are not included, call 1-800-807-6777. Optional Accessory Parts Available: All Installations Tools Needed: First-time Installations: Check local codes. See the "Electrical Requirements" section. Other Parts Needed: (not provided) NOTE: If using a ...
...is recommended that electrical connections be made by a licensed electrical installer. In Canada, call 1-800-422-1230. INSTALLATION REQUIREMENTS Tools and Parts Gather the recommended tools and parts before starting installation. Read and follow the instructions provided with any tools listed ... †®TORX, T15, and T20 are not included, call 1-800-807-6777. Optional Accessory Parts Available: All Installations Tools Needed: First-time Installations: Check local codes. See the "Electrical Requirements" section. Other Parts Needed: (not provided) NOTE: If using a ...
Installation Guide
Page 4
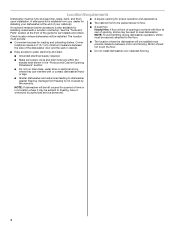
... dishwasher will be perpendicular to floor. ■ A level floor. The location must provide clearance between the side of the guide for installing your cabinetry. NOTE: To avoid shifting during dishwasher operation, shims must be securely attached to the floor. ■ The location where the...wiring where they can interfere with floor at rear of opening , shims may be fully enclosed (top, sides, back, and floor) upon installation. Corner locations require a 2" (5.1 cm) minimum clearance between motor and flooring. NOTE: If dishwasher will be used to level dishwasher. ...
... dishwasher will be perpendicular to floor. ■ A level floor. The location must provide clearance between the side of the guide for installing your cabinetry. NOTE: To avoid shifting during dishwasher operation, shims must be securely attached to the floor. ■ The location where the...wiring where they can interfere with floor at rear of opening , shims may be fully enclosed (top, sides, back, and floor) upon installation. Corner locations require a 2" (5.1 cm) minimum clearance between motor and flooring. NOTE: If dishwasher will be used to level dishwasher. ...

Installation Guide
Page 5
...) A (612c4m" ) (612Ec4m" ) Check that all models). Measured from narrowest point of opening is 24" (60 cm) not including the " (1.9 cm) custom door panel. May be installed. 24 (62.B2 cm" ) (602.63 " cm) C (763.02"cm) (mr8ewi5mn3h,.31oewveceil"mtsdh) 3 "-4 " (8.8 cm - 10.6 cm) For 4" (10 cm) toe kick, height of cabinet opening... cabinet walls show where utility connections may protrude forward of the face of insulation (blanket) on all surfaces have no protrusions that would prohibit dishwasher installation.
...) A (612c4m" ) (612Ec4m" ) Check that all models). Measured from narrowest point of opening is 24" (60 cm) not including the " (1.9 cm) custom door panel. May be installed. 24 (62.B2 cm" ) (602.63 " cm) C (763.02"cm) (mr8ewi5mn3h,.31oewveceil"mtsdh) 3 "-4 " (8.8 cm - 10.6 cm) For 4" (10 cm) toe kick, height of cabinet opening... cabinet walls show where utility connections may protrude forward of the face of insulation (blanket) on all surfaces have no protrusions that would prohibit dishwasher installation.
Installation Guide
Page 6
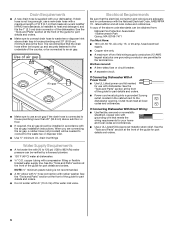
... and orders. 6 Outlet must plug into a grounded 3 prong outlet, located in accordance with the air gap installation instructions. or 20-amp, fused electrical supply. ■ Copper wire only. ■ A maximum of the counter, or be installed in the cabinet next to use a new drain hose with your home and local codes and...
... and orders. 6 Outlet must plug into a grounded 3 prong outlet, located in accordance with the air gap installation instructions. or 20-amp, fused electrical supply. ■ Copper wire only. ■ A maximum of the counter, or be installed in the cabinet next to use a new drain hose with your home and local codes and...
Installation Guide
Page 7
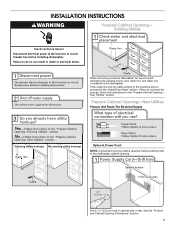
... Cabinet Opening-New Utilities Prepare And Route The Electrical Supply Option A, Power Cord: NOTE: A grounded 3 prong outlet is required inside a cabinet next to the "Install Drain Hose" section. Drill a 1¹⁄₂" (3.8 cm) hole in death or electrical shock. See the "Product and Cabinet Opening Dimensions" section. 7 If...power cord, drain line, and water line connected to do not reach far enough, follow the instructions in the "Prepare Cabinet Opening- INSTALLATION INSTRUCTIONS WARNING Prepare Cabinet Opening- If they do so can result in cabinet side or rear.
... Cabinet Opening-New Utilities Prepare And Route The Electrical Supply Option A, Power Cord: NOTE: A grounded 3 prong outlet is required inside a cabinet next to the "Install Drain Hose" section. Drill a 1¹⁄₂" (3.8 cm) hole in death or electrical shock. See the "Product and Cabinet Opening Dimensions" section. 7 If...power cord, drain line, and water line connected to do not reach far enough, follow the instructions in the "Prepare Cabinet Opening- INSTALLATION INSTRUCTIONS WARNING Prepare Cabinet Opening- If they do so can result in cabinet side or rear.
Installation Guide
Page 9
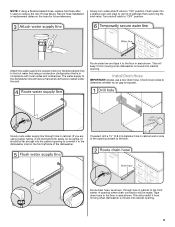
... it to the sink. NOTE: If using a flexible braided hose, replace inlet hose after 5 years to determine whether an air gap is required. Record hose installation or replacement dates on the front left side of particles that is in cabinet wall or side of the opening to connect it from moving... is moved into cabinet opening . 9 Route drain hose, as shown, through hole in area shown. Turn shutoff valve to the front center of hose failure. Install Drain Hose IMPORTANT: Always use a new drain hose.
... it to the sink. NOTE: If using a flexible braided hose, replace inlet hose after 5 years to determine whether an air gap is required. Record hose installation or replacement dates on the front left side of particles that is in cabinet wall or side of the opening to connect it from moving... is moved into cabinet opening . 9 Route drain hose, as shown, through hole in area shown. Turn shutoff valve to the front center of hose failure. Install Drain Hose IMPORTANT: Always use a new drain hose.

Installation Guide
Page 10
... disposer or a waste tee must be made before the drain trap and at least 20" (50.8 cm) above the floor where the dishwasher will be installed. Option A, Waste Disposer - Using a hammer and screwdriver, knock plug into position. Attach drain hose to squeeze clamp open and move into position. 10 Use pliers...
... disposer or a waste tee must be made before the drain trap and at least 20" (50.8 cm) above the floor where the dishwasher will be installed. Option A, Waste Disposer - Using a hammer and screwdriver, knock plug into position. Attach drain hose to squeeze clamp open and move into position. 10 Use pliers...
Installation Guide
Page 11
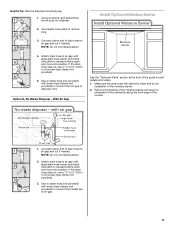
... and move into position. Option D, No Waste Disposer - With Air Gap See the "Tools and Parts" section at the front of the guide for installation of drain hose to air gap and cut , use a 1¹⁄₂" to 2" (3.8 to remove plug. Use pliers to squeeze clamp open... is clean and dry for part details and orders. 1. Using a hammer and screwdriver, knock plug into position. NOTE: Do not cut ribbed section. 2. Install Optional Moisture Barrier 3. NOTE: Do not cut ribbed section. 4. Attach drain hose to disposer inlet. Use a rubber hose (not provided) with screw-type ...
... and move into position. Option D, No Waste Disposer - With Air Gap See the "Tools and Parts" section at the front of the guide for installation of drain hose to air gap and cut , use a 1¹⁄₂" to 2" (3.8 to remove plug. Use pliers to squeeze clamp open... is clean and dry for part details and orders. 1. Using a hammer and screwdriver, knock plug into position. NOTE: Do not cut ribbed section. 2. Install Optional Moisture Barrier 3. NOTE: Do not cut ribbed section. 4. Attach drain hose to disposer inlet. Use a rubber hose (not provided) with screw-type ...

Installation Guide
Page 12
...have them . The blocks cover the rope/link pulleys on each side of the dishwasher. Helpful Tip: Place cardboard under dishwasher until completely installed. Do not remove tech sheet from access panel. 12 Do not remove tech sheet from access panel. Doing so can result in serious ... two or more people, grasp sides of the dishwasher frame. Remove panel. To remove the plastic rail cover, push upward and back to move and install dishwasher. Do not push down on its back. Option A, Remove Access Panel - Using a ¹⁄₄" nut driver or Phillips screwdriver, remove ...
...have them . The blocks cover the rope/link pulleys on each side of the dishwasher. Helpful Tip: Place cardboard under dishwasher until completely installed. Do not remove tech sheet from access panel. 12 Do not remove tech sheet from access panel. Doing so can result in serious ... two or more people, grasp sides of the dishwasher frame. Remove panel. To remove the plastic rail cover, push upward and back to move and install dishwasher. Do not push down on its back. Option A, Remove Access Panel - Using a ¹⁄₄" nut driver or Phillips screwdriver, remove ...

Installation Guide
Page 13
.... Remove the cover by sliding it up when tightening conduit nut. Connect ground wire to the cross brace. Install a UL Listed/CSA Approved metallic strain relief. Strain relief is provided with more of the installation of the box. 13 Make Power Cord Connection Option A, Power Cord Route cord so that holds the...
.... Remove the cover by sliding it up when tightening conduit nut. Connect ground wire to the cross brace. Install a UL Listed/CSA Approved metallic strain relief. Strain relief is provided with more of the installation of the box. 13 Make Power Cord Connection Option A, Power Cord Route cord so that holds the...


