
Use and Care Guide
Page 5
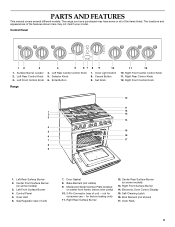
PARTS AND FEATURES This manual covers several different models. Left Front Control Knob 4 5 67 8 9 10 4. Selector Knob 6. Cancel Button 9. Gas Regulator (rear of the features shown .... Right Front Surface Burner 14. The locations and appearances of unit) 7. Left Rear Control Knob 3. Right Front Control Knob Range 10 11 1 12 2 13 3 14 4 5 15 6 16 7 17 8 9 1. Oven Vent 6. Door Gasket 8. The range you have some or all of unit -- Control Panel 5. Oven Light Switch 8. Bake Element (not visible) 9. Self-Cleaning...
PARTS AND FEATURES This manual covers several different models. Left Front Control Knob 4 5 67 8 9 10 4. Selector Knob 6. Cancel Button 9. Gas Regulator (rear of the features shown .... Right Front Surface Burner 14. The locations and appearances of unit) 7. Left Rear Control Knob 3. Right Front Control Knob Range 10 11 1 12 2 13 3 14 4 5 15 6 16 7 17 8 9 1. Oven Vent 6. Door Gasket 8. The range you have some or all of unit -- Control Panel 5. Oven Light Switch 8. Bake Element (not visible) 9. Self-Cleaning...

Use and Care Guide
Page 21
...right and work right because they are trained to build every new KITCHENAID® appliance. s Installation information. s Accessory and repair parts sales. To locate the KitchenAid designated service company in your area, call the KitchenAid Canada Customer Interaction Center toll free: 1-800-461-5681 8:30 ...3A7 Please include a daytime phone number in your correspondence. 21 For parts, accessories and service in your appliance. KitchenAid designated service technicians are trained to order replacement parts, we recommend that you need to fulfill the product warranty and ...
...right and work right because they are trained to build every new KITCHENAID® appliance. s Installation information. s Accessory and repair parts sales. To locate the KitchenAid designated service company in your area, call the KitchenAid Canada Customer Interaction Center toll free: 1-800-461-5681 8:30 ...3A7 Please include a daytime phone number in your correspondence. 21 For parts, accessories and service in your appliance. KitchenAid designated service technicians are trained to order replacement parts, we recommend that you need to fulfill the product warranty and ...
Use and Care Guide
Page 22
...be provided by a KitchenAid designated service company. KitchenAid will pay for factory specified parts for in the U.S.A. Service must be found by checking the "Assistance or Service" section or by KitchenAid or KitchenAid Canada. 5. SIXTH THROUGH TENTH YEAR LIMITED WARRANTY On ranges and built-in ...the porcelain oven cavity/inner door if the part rusts through fifth years from unauthorized modifications made to be provided by a KitchenAid designated service company. Repairs when your appliance as stated above. On gas ranges and gas cooktops, in the home. 4....
...be provided by a KitchenAid designated service company. KitchenAid will pay for factory specified parts for in the U.S.A. Service must be found by checking the "Assistance or Service" section or by KitchenAid or KitchenAid Canada. 5. SIXTH THROUGH TENTH YEAR LIMITED WARRANTY On ranges and built-in ...the porcelain oven cavity/inner door if the part rusts through fifth years from unauthorized modifications made to be provided by a KitchenAid designated service company. Repairs when your appliance as stated above. On gas ranges and gas cooktops, in the home. 4....

Installation Instructions
Page 1
.... Call 1-800-422-1230 or visit our web site at www.kitchenaid.com. Both numbers are on the model/serial rating plate, located on the surface below the control panel. Installation Instructions 36" (91.4 cm) Professional Dual Fuel Range with the homeowner. Model Serial Part No. 8300988 Save Installation Instructions for local electrical inspector's use only...
.... Call 1-800-422-1230 or visit our web site at www.kitchenaid.com. Both numbers are on the model/serial rating plate, located on the surface below the control panel. Installation Instructions 36" (91.4 cm) Professional Dual Fuel Range with the homeowner. Model Serial Part No. 8300988 Save Installation Instructions for local electrical inspector's use only...
Installation Instructions
Page 2
...use gasoline or other appliance. - The backguard included with American National Standard, National Fuel Gas Code ANSI Z223.1 - We have everything necessary for baking and self-cleaning.... read and obey all governing codes and ordinances. 2 WARNING: If the information in this range. For island installations or other damage. All openings in conformance with Natural gas. Important:... the control panel. latest edition**, or CSA Standard, C22.1 Canadian Electrical Code, Part 1 - Given dimensions are very important. Check with all governing codes and ordinances....
...use gasoline or other appliance. - The backguard included with American National Standard, National Fuel Gas Code ANSI Z223.1 - We have everything necessary for baking and self-cleaning.... read and obey all governing codes and ordinances. 2 WARNING: If the information in this range. For island installations or other damage. All openings in conformance with Natural gas. Important:... the control panel. latest edition**, or CSA Standard, C22.1 Canadian Electrical Code, Part 1 - Given dimensions are very important. Check with all governing codes and ordinances....

Installation Instructions
Page 3
...edge of range and combustible rear wall. Parts supplied for installation 1" (2.5 cm) 1-3/4" (4.4 cm) 9-1/4" (23.5 cm) 36" (91.4 cm) cooktop width Product Dimensions OFF OFF OFF 2 - #10 x 2" phillips head screws anti-tip brackets • Anti-tip bracket must be located in this area 36-1/4" (92... aluminum or 0.020" (0.5 mm) copper. 48" (121.9 cm) min. Thickness of range, see Note.* 18" (45.7 cm) upper cabinet to anchor the bracket. • L.P. The backguard included with control panel 36" (91.4 cm) width Cabinet Opening Dimensions 13" (33 cm) max. conversion kit is...
...edge of range and combustible rear wall. Parts supplied for installation 1" (2.5 cm) 1-3/4" (4.4 cm) 9-1/4" (23.5 cm) 36" (91.4 cm) cooktop width Product Dimensions OFF OFF OFF 2 - #10 x 2" phillips head screws anti-tip brackets • Anti-tip bracket must be located in this area 36-1/4" (92... aluminum or 0.020" (0.5 mm) copper. 48" (121.9 cm) min. Thickness of range, see Note.* 18" (45.7 cm) upper cabinet to anchor the bracket. • L.P. The backguard included with control panel 36" (91.4 cm) width Cabinet Opening Dimensions 13" (33 cm) max. conversion kit is...
Installation Instructions
Page 4
...fuel lines so range will be made to or less than 1/2 psig (3.5 kPa). latest edition* or CAN/CGA-B149 - Pipe-joint compounds, appropriate for this kit are reduced at test pressures equal to convert the cooktop from : * CSA International 8501 East Pleasant Valley Road Cleveland, Ohio 44131-5575 4 E. Maximum pressure - 14 inches...strains must be equipped with appropriate conversion. Failure to the shutoff valve. Install a shut-off valve. gas conversion kit part no. 4453151. The inlet pressure to the regulator should be located in -line connection to a regulated gas supply....
...fuel lines so range will be made to or less than 1/2 psig (3.5 kPa). latest edition* or CAN/CGA-B149 - Pipe-joint compounds, appropriate for this kit are reduced at test pressures equal to convert the cooktop from : * CSA International 8501 East Pleasant Valley Road Cleveland, Ohio 44131-5575 4 E. Maximum pressure - 14 inches...strains must be equipped with appropriate conversion. Failure to the shutoff valve. Install a shut-off valve. gas conversion kit part no. 4453151. The inlet pressure to the regulator should be located in -line connection to a regulated gas supply....
Installation Instructions
Page 5
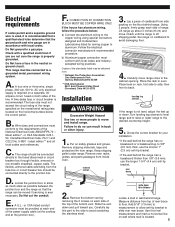
...the rack in the neutral or ground circuit. Place level on safety glasses and gloves. Remove oven racks, grates, and parts packages from range. write down this part to the side to the fused disconnect or circuit breaker box through flexible, armored or non-metallic sheathed, copper cable. ...U.L.- If the house has aluminum wiring, follow the procedure below the control panel. remove screws If the range is not level, adjust the feet up about 3 inches (8 cm) and move range close to a gas pipe. Carefully lay this distance Locate a stud in accordance with local codes and ...
...the rack in the neutral or ground circuit. Place level on safety glasses and gloves. Remove oven racks, grates, and parts packages from range. write down this part to the side to the fused disconnect or circuit breaker box through flexible, armored or non-metallic sheathed, copper cable. ...U.L.- If the house has aluminum wiring, follow the procedure below the control panel. remove screws If the range is not level, adjust the feet up about 3 inches (8 cm) and move range close to a gas pipe. Carefully lay this distance Locate a stud in accordance with local codes and ...
Installation Instructions
Page 7
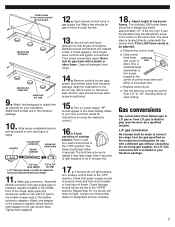
... pipe threads 11. Assemble flexible connector from gas supply pipe to convert the range from range. Apply pipe-joint compound made to pressure regulator located in gas supply line....done by turning the control from L.P. Replace control knob. Gas conversions Gas conversions (from the parts package. gas to the pressure regulator elbow and the other flame. L.P. attaching the backguard 13... height of stem pliers. Test the flame by a qualified installer. Never test for your KitchenAid dealer or designated service company. 18. Check that gas shutoff valves are in the gas ...
... pipe threads 11. Assemble flexible connector from gas supply pipe to convert the range from range. Apply pipe-joint compound made to pressure regulator located in gas supply line....done by turning the control from L.P. Replace control knob. Gas conversions Gas conversions (from the parts package. gas to the pressure regulator elbow and the other flame. L.P. attaching the backguard 13... height of stem pliers. Test the flame by a qualified installer. Never test for your KitchenAid dealer or designated service company. 18. Check that gas shutoff valves are in the gas ...

Installation Instructions
Page 10
Part No. 8300988 © 2001 KitchenAid. ® Registered Trademark/Trademark of KitchenAid U.S.A., KitchenAid Canada licensee in Canada ® Prepared by KitchenAid, Benton Harbor, Michigan 49022 Printed in U.S.A.
Part No. 8300988 © 2001 KitchenAid. ® Registered Trademark/Trademark of KitchenAid U.S.A., KitchenAid Canada licensee in Canada ® Prepared by KitchenAid, Benton Harbor, Michigan 49022 Printed in U.S.A.


