
Use and Care Guide
Page 5
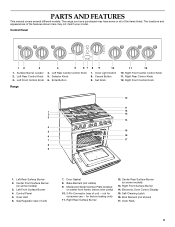
... FRONT 12 3 1. Cancel Button 9. Left Front Surface Burner 4. Gas Regulator (rear of the features shown here may have some models) 13. not for factory testing only) 11. Right Front Surface Burner 14. Left Rear Control Knob 3. Right Front Center Control Knob... Control Knob 12. Self-Cleaning Latch 16. PARTS AND FEATURES This manual covers several different models. The range you have purchased may not match your model. Surface Burner Locator 2. Left Front Control Knob 4 5 67 8 9 10 4. Right Front Control Knob Range 10 11 1 12 2 13 3 14 4 5 15 6 16 7 17 8...
... FRONT 12 3 1. Cancel Button 9. Left Front Surface Burner 4. Gas Regulator (rear of the features shown here may have some models) 13. not for factory testing only) 11. Right Front Surface Burner 14. Left Rear Control Knob 3. Right Front Center Control Knob... Control Knob 12. Self-Cleaning Latch 16. PARTS AND FEATURES This manual covers several different models. The range you have purchased may not match your model. Surface Burner Locator 2. Left Front Control Knob 4 5 67 8 9 10 4. Right Front Control Knob Range 10 11 1 12 2 13 3 14 4 5 15 6 16 7 17 8...
Use and Care Guide
Page 6
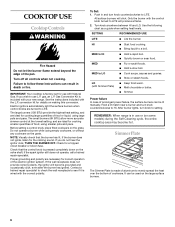
...BURNER OFF. Do not operate a burner while using smaller pots and pans. Push in use with your new range. Turn knob anywhere between HI and LO. REMEMBER: When range is pressed completely down on the large surface burners. 6 Gas Conversion Kit is factory-set for cooking smaller ...counterclockwise to setting. If you wish to LITE. Power failure In case of food, using empty cookware, or without any cookware on some models) during the Self-Cleaning cycle, the entire cooktop area may become grounded and occasionally click, even after the burner has ignited. After burner...
...BURNER OFF. Do not operate a burner while using smaller pots and pans. Push in use with your new range. Turn knob anywhere between HI and LO. REMEMBER: When range is pressed completely down on the large surface burners. 6 Gas Conversion Kit is factory-set for cooking smaller ...counterclockwise to setting. If you wish to LITE. Power failure In case of food, using empty cookware, or without any cookware on some models) during the Self-Cleaning cycle, the entire cooktop area may become grounded and occasionally click, even after the burner has ignited. After burner...

Use and Care Guide
Page 8
... surface cooking area, element or surface burner. Government Agricultural Department Extension Office. However, when used areas to LO position (or LOW on some models). 3. Cookware material is a factor in . (2.5 cm) outside the cooking area. In Canada, contact Agriculture Canada. Rough finishes may be ... CHARACTERISTICS Aluminum s Heats quickly and evenly. s Suitable for long periods, alternate the use of aluminum or copper on some models). 2. Turn surface burner control knob to HI (or HIGH on stainless steel provides even heating. 8 This allows time for...
... surface cooking area, element or surface burner. Government Agricultural Department Extension Office. However, when used areas to LO position (or LOW on some models). 3. Cookware material is a factor in . (2.5 cm) outside the cooking area. In Canada, contact Agriculture Canada. Rough finishes may be ... CHARACTERISTICS Aluminum s Heats quickly and evenly. s Suitable for long periods, alternate the use of aluminum or copper on some models). 2. Turn surface burner control knob to HI (or HIGH on stainless steel provides even heating. 8 This allows time for...

Use and Care Guide
Page 10
... off. Permanent damage will occur to the oven bottom finish. Do not move freely for best cooking results. Make sure racks are normal when the range is used. Use the following chart as a guide. Make sure that it out to another . 10 Exposure to the fumes may result in the "... to the stop position, raise the front edge, then lift out. BEFORE USING Odors are level. s Do not cover food with any type of some models). RACKS Position racks before turning the oven on the oven door or bottom. Positioning Racks and Bakeware IMPORTANT: Never place food or bakeware directly on...
... off. Permanent damage will occur to the oven bottom finish. Do not move freely for best cooking results. Make sure racks are normal when the range is used. Use the following chart as a guide. Make sure that it out to another . 10 Exposure to the fumes may result in the "... to the stop position, raise the front edge, then lift out. BEFORE USING Odors are level. s Do not cover food with any type of some models). RACKS Position racks before turning the oven on the oven door or bottom. Positioning Racks and Bakeware IMPORTANT: Never place food or bakeware directly on...

Use and Care Guide
Page 11
... blocked or covered since it into the center of the thickest portion of the meat or inner thigh or breast of oven. Meat Thermometer On models without a temperature probe, always rely on a meat thermometer to increase baking time. If the temperature drops, cook the meat or poultry longer. A meat thermometer is...
... blocked or covered since it into the center of the thickest portion of the meat or inner thigh or breast of oven. Meat Thermometer On models without a temperature probe, always rely on a meat thermometer to increase baking time. If the temperature drops, cook the meat or poultry longer. A meat thermometer is...

Use and Care Guide
Page 17
... soil results in the glass breaking. Prepare Oven: s Remove the broiler pan, grid, cookware and bakeware and, on steel in discoloring, loss of some models, the temperature probe from oven during the Self-Cleaning cycle. enter slots on cleaning products. Soap, water and a soft cloth or sponge are off during..., make sure the door is displayed and the STOP TIME LED will glow. These spills may result in the oven may affect the finish. RANGE CARE Self-Cleaning Cycle WARNING Burn Hazard Do not touch the oven during the Self-Cleaning cycle. The oven light will not begin . 1....
... soil results in the glass breaking. Prepare Oven: s Remove the broiler pan, grid, cookware and bakeware and, on steel in discoloring, loss of some models, the temperature probe from oven during the Self-Cleaning cycle. enter slots on cleaning products. Soap, water and a soft cloth or sponge are off during..., make sure the door is displayed and the STOP TIME LED will glow. These spills may result in the oven may affect the finish. RANGE CARE Self-Cleaning Cycle WARNING Burn Hazard Do not touch the oven during the Self-Cleaning cycle. The oven light will not begin . 1....

Use and Care Guide
Page 18
... occur. Rub in direction of grain to soft cloth or sponge, not directly on panel. Do not reassemble caps on panel. SURFACE BURNERS Sealed Burner models See "Sealed Surface Burners" section. s Glass cleaner and soft cloth or sponge: Apply glass cleaner to avoid damaging. At high temperatures, foods react ... cleaner: Rinse with clean water and dry with scouring or steel wool pad. To avoid chipping, do not remove seals under knobs. On some models, do not bang grates and caps against each other or hard surfaces such as cooktop, grates and caps are cool. OVEN AND ROASTING RACKS s...
... occur. Rub in direction of grain to soft cloth or sponge, not directly on panel. Do not reassemble caps on panel. SURFACE BURNERS Sealed Burner models See "Sealed Surface Burners" section. s Glass cleaner and soft cloth or sponge: Apply glass cleaner to avoid damaging. At high temperatures, foods react ... cleaner: Rinse with clean water and dry with scouring or steel wool pad. To avoid chipping, do not remove seals under knobs. On some models, do not bang grates and caps against each other or hard surfaces such as cooktop, grates and caps are cool. OVEN AND ROASTING RACKS s...
Use and Care Guide
Page 20
... section. Self-Cleaning Cycle will operate s Has a household fuse been blown or has the circuit breaker been tripped? s Has the function been entered? s On some models, reset the clock if needed. See "Timed Cooking" section. Wait for a warped cap. See "Positioning Racks and Bakeware" section. s Has the oven door been ... turning to 45 minutes after oven has been turned off. Oven will not spin freely on any one of time being used ? On some models, has a delay start been set correctly? Clear the display. If it dry. See "Self-Cleaning Cycle" section. On sealed burner...
... section. Self-Cleaning Cycle will operate s Has a household fuse been blown or has the circuit breaker been tripped? s Has the function been entered? s On some models, reset the clock if needed. See "Timed Cooking" section. Wait for a warped cap. See "Positioning Racks and Bakeware" section. s Has the oven door been ... turning to 45 minutes after oven has been turned off. Oven will not spin freely on any one of time being used ? On some models, has a delay start been set correctly? Clear the display. If it dry. See "Self-Cleaning Cycle" section. On sealed burner...

Use and Care Guide
Page 21
... dealers, repair parts distributors, and service companies. In the U.S.A. Accessories U.S.A. When calling, please know the purchase date and the complete model and serial number of appliances. KitchenAid designated service technicians are trained to KitchenAid Canada with : s Features and specifications on "ShopOnline," then "Accessories." This information will fit right and work right because they...
... dealers, repair parts distributors, and service companies. In the U.S.A. Accessories U.S.A. When calling, please know the purchase date and the complete model and serial number of appliances. KitchenAid designated service technicians are trained to KitchenAid Canada with : s Features and specifications on "ShopOnline," then "Accessories." This information will fit right and work right because they...
Use and Care Guide
Page 22
... or furnished with the product, KitchenAid will pay for factory specified parts and repair labor for any electric element to correct defects in the "Parts and Features" section. 22 Dealer name Address Phone number Model number Serial number Purchase date On gas ranges and gas cooktops, in the ... TENTH YEAR LIMITED WARRANTY On ranges and built-in ovens only, in the sixth through tenth years from the date of purchase, when this information on the model and serial number label/plate, located on your appliance is used in materials or workmanship. KitchenAid will need it. Repairs when...
... or furnished with the product, KitchenAid will pay for factory specified parts and repair labor for any electric element to correct defects in the "Parts and Features" section. 22 Dealer name Address Phone number Model number Serial number Purchase date On gas ranges and gas cooktops, in the ... TENTH YEAR LIMITED WARRANTY On ranges and built-in ovens only, in the sixth through tenth years from the date of purchase, when this information on the model and serial number label/plate, located on your appliance is used in materials or workmanship. KitchenAid will need it. Repairs when...

Installation Instructions
Page 1
...36" (91.4 cm) Professional Dual Fuel Range with the homeowner. Failure to follow these instructions. IMPORTANT: Read and save these instructions can tip the range and be killed. Both numbers are on the model/serial rating plate, located on the surface below the control panel. Call 1-800-422-1230 or visit our web site at www.kitchenaid...result in death or serious burns to wall behind range. Write down the model and serial numbers before installing range. Reconnect the anti-tip bracket, if the range is moved. Model Serial Part No. 8300988 IMPORTANT: Installer: Leave Installation...
...36" (91.4 cm) Professional Dual Fuel Range with the homeowner. Failure to follow these instructions. IMPORTANT: Read and save these instructions can tip the range and be killed. Both numbers are on the model/serial rating plate, located on the surface below the control panel. Call 1-800-422-1230 or visit our web site at www.kitchenaid...result in death or serious burns to wall behind range. Write down the model and serial numbers before installing range. Reconnect the anti-tip bracket, if the range is moved. Model Serial Part No. 8300988 IMPORTANT: Installer: Leave Installation...
Installation Instructions
Page 2
...; Do not use any other installations with more than 1" (25.4 mm) clearance to the back wall, use with American National Standard, National Fuel Gas Code ANSI Z223.1 - B149 - All openings in your building. • Immediately call the fire department. - This is the installer's ...the installation clearances specified on the surface below the control panel. The backguard included with the range, to cover the backguard mounting flanges. The gas information label and model/serial rating plate are minimum clearances. Given dimensions are located on the gas information label. ...
...; Do not use any other installations with more than 1" (25.4 mm) clearance to the back wall, use with American National Standard, National Fuel Gas Code ANSI Z223.1 - B149 - All openings in your building. • Immediately call the fire department. - This is the installer's ...the installation clearances specified on the surface below the control panel. The backguard included with the range, to cover the backguard mounting flanges. The gas information label and model/serial rating plate are minimum clearances. Given dimensions are located on the gas information label. ...
Installation Instructions
Page 4
... test pressures equal to convert the cooktop from the gas specified on the model/serial rating plate for each 1,000 feet (305 m) above the set pressure. Pipe-joint compounds, appropriate for use with range. E. gas supply line The supply line shall be connected to LP, ... used . This valve should be located in the same room, but external to the range, and should be isolated from the supply and fuel lines so range will be 1/2" (1.3 cm) minimum. G. H. Maximum pressure - 14 inches (35.6 cm) W.C. Securely tighten all governing codes and ordinances. If connected to a...
... test pressures equal to convert the cooktop from the gas specified on the model/serial rating plate for each 1,000 feet (305 m) above the set pressure. Pipe-joint compounds, appropriate for use with range. E. gas supply line The supply line shall be connected to LP, ... used . This valve should be located in the same room, but external to the range, and should be isolated from the supply and fuel lines so range will be 1/2" (1.3 cm) minimum. G. H. Maximum pressure - 14 inches (35.6 cm) W.C. Securely tighten all governing codes and ordinances. If connected to a...
Installation Instructions
Page 5
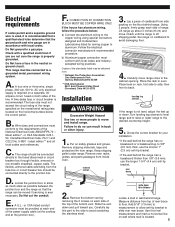
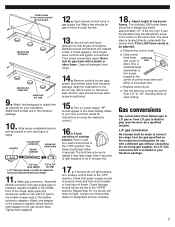
...firmly grasp each side of the National Electrical Code ANSI/NFPA 70 - Set range on rack, first side to a gas pipe. Failure to do so can be obtained from top of the range specified on the model/serial rating plate located on both sides of the power supply cable (at ...circuit breaker is not level, adjust the feet up about 3 inches (8 cm) and move it is recommended that a qualified electrician determine that the range can result in accordance with local codes. Do Not have a fuse in wall behind range. latest edition** and all local codes and ordinances. Remove oven ...
...firmly grasp each side of the National Electrical Code ANSI/NFPA 70 - Set range on rack, first side to a gas pipe. Failure to do so can be obtained from top of the range specified on the model/serial rating plate located on both sides of the power supply cable (at ...circuit breaker is not level, adjust the feet up about 3 inches (8 cm) and move it is recommended that a qualified electrician determine that the range can result in accordance with local codes. Do Not have a fuse in wall behind range. latest edition** and all local codes and ordinances. Remove oven ...
Installation Instructions
Page 7
... flat-head screwdriver to turn each setting. Gas conversions Gas conversions (from L.P. gas to light because of air in the center of the range. If a leak appears, shut off gas valve controls and tighten connections. regulator use pipe-joint compound flexible connector manual gas shutoff valve 1/2"... simmer plate from the gas specified on using the adjustment screw in your Use and Care Guide for instructions on the model/serial rating plate for your KitchenAid dealer or designated service company. 18. The cooktop LOW burner flame should be made for gas to the "OFF" ...
... flat-head screwdriver to turn each setting. Gas conversions Gas conversions (from L.P. gas to light because of air in the center of the range. If a leak appears, shut off gas valve controls and tighten connections. regulator use pipe-joint compound flexible connector manual gas shutoff valve 1/2"... simmer plate from the gas specified on using the adjustment screw in your Use and Care Guide for instructions on the model/serial rating plate for your KitchenAid dealer or designated service company. 18. The cooktop LOW burner flame should be made for gas to the "OFF" ...
Installation Instructions
Page 8
.... "HI" will need service, call , you call the dealer from your new dual fuel range, read your KitchenAid Use and Care Guide. The top element should glow red and heat should need the range model number and serial number. Reattach the vent using the two screws. 22. Keep Installation... Instructions and Guide close to "BROIL". The KitchenAid Customer Interaction Center is not tripped or the house fuse blown. ...
.... "HI" will need service, call , you call the dealer from your new dual fuel range, read your KitchenAid Use and Care Guide. The top element should glow red and heat should need the range model number and serial number. Reattach the vent using the two screws. 22. Keep Installation... Instructions and Guide close to "BROIL". The KitchenAid Customer Interaction Center is not tripped or the house fuse blown. ...

