
Dimension Guide
Page 1
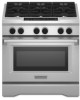
...of the oven door frame. Mobile home installations require: q When this kit are in the system. 30", 36", and 48" Professional Dual Fuel Convection Ranges PRODUCT MODEL NUMBERS KDRS407VSS KDRS462VSS KDRS463VSS KDRS467VSS KDRS483VSS KDRU707VSS GAS REQUIREMENTS KDRU763VSS KDRU767VSS KDRU783VSS...you must conform with the current standards CAN/CSA-A240-latest edition, or with your builder or cabinet supplier to the installations in the Installation Instructions. Range Rating* Specified Rating of E.I. ELECTRICAL REQUIREMENTS - q Do not use TEFLON®† tape. †&#...
...of the oven door frame. Mobile home installations require: q When this kit are in the system. 30", 36", and 48" Professional Dual Fuel Convection Ranges PRODUCT MODEL NUMBERS KDRS407VSS KDRS462VSS KDRS463VSS KDRS467VSS KDRS483VSS KDRU707VSS GAS REQUIREMENTS KDRU763VSS KDRU767VSS KDRU783VSS...you must conform with the current standards CAN/CSA-A240-latest edition, or with your builder or cabinet supplier to the installations in the Installation Instructions. Range Rating* Specified Rating of E.I. ELECTRICAL REQUIREMENTS - q Do not use TEFLON®† tape. †&#...
Dimension Guide
Page 2
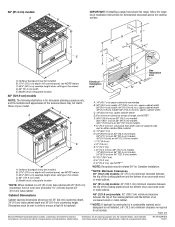
... shown may not match those of an uncovered wood or metal cabinet. *NOTE: When installed in a 24" (61.0 cm) base cabinet with product. Ref. Instructions packed with 25" (63.5 cm) countertop; Specifications subject to backwall. 36" (91... cm) base cabinet. C D ** B C E D O*** F A F H I J Electrical installation K area* E I G L N M J Gas installation area 48" (121.9 cm) models NOTE: The following illustration is required for dimensional clearances above the range, follow the range hood installation instructions for all models. 36" (91.4 cm) models A B IMPORTANT: If...
... shown may not match those of an uncovered wood or metal cabinet. *NOTE: When installed in a 24" (61.0 cm) base cabinet with product. Ref. Instructions packed with 25" (63.5 cm) countertop; Specifications subject to backwall. 36" (91... cm) base cabinet. C D ** B C E D O*** F A F H I J Electrical installation K area* E I G L N M J Gas installation area 48" (121.9 cm) models NOTE: The following illustration is required for dimensional clearances above the range, follow the range hood installation instructions for all models. 36" (91.4 cm) models A B IMPORTANT: If...

Installation Guide
Page 3
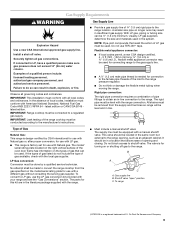
... ball valve, it shall be performed by a qualified installer, service agency or the gas supplier. Gas suppliers recommend that can be detected by UL or CSA. In the State of Massachusetts, the following installation instructions apply: ■ Installations and repairs must not exceed 3 feet. 3 These... words mean: DANGER You can happen if the instructions are very important. If a gas leak is not followed exactly, a...
... ball valve, it shall be performed by a qualified installer, service agency or the gas supplier. Gas suppliers recommend that can be detected by UL or CSA. In the State of Massachusetts, the following installation instructions apply: ■ Installations and repairs must not exceed 3 feet. 3 These... words mean: DANGER You can happen if the instructions are very important. If a gas leak is not followed exactly, a...
Installation Guide
Page 4
...) Backguard for 36" (91.4 cm) Ranges Order Part Number W10115776 †®TORX is moved. Read and follow these instructions can tip the range and be installed with nominal 1³⁄₈" (34.93 mm) diameter connection openings ■ A UL listed strain relief ■ UL...orifice package (W10221288) ■ Conversion label (W10221320) NOTE: The cooktop is manufactured for use with a backguard if installing at zero clearance to follow the instructions provided with Natural gas. Thickness of Saturn Fasteners, Inc. ■ 9" (22.9 cm) Backguard for use with ...
...) Backguard for 36" (91.4 cm) Ranges Order Part Number W10115776 †®TORX is moved. Read and follow these instructions can tip the range and be installed with nominal 1³⁄₈" (34.93 mm) diameter connection openings ■ A UL listed strain relief ■ UL...orifice package (W10221288) ■ Conversion label (W10221320) NOTE: The cooktop is manufactured for use with a backguard if installing at zero clearance to follow the instructions provided with Natural gas. Thickness of Saturn Fasteners, Inc. ■ 9" (22.9 cm) Backguard for use with ...
Installation Guide
Page 6
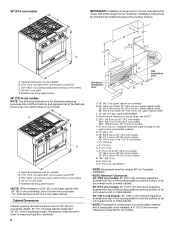
... (15.2 cm) min. Cabinet Dimensions Cabinet opening dimensions shown are for dimensional clearances above the range, follow the range hood or hood liner installation instructions for 25" (64 cm) countertop depth, 24" (61 cm) base cabinet depth and 36" (91.4 cm) countertop height. Optional backguard may be... cm) depth with 25" (63.5 cm) countertop; upper cabinet width C. 13" (33 cm) max. Dimensions must be rotated 90° for Canadian installation. **NOTE: Minimum Clearances 30" (76.2 cm) models: 30" (76.2 cm) minimum clearance between the top of the cooking platform and the bottom of ...
... (15.2 cm) min. Cabinet Dimensions Cabinet opening dimensions shown are for dimensional clearances above the range, follow the range hood or hood liner installation instructions for 25" (64 cm) countertop depth, 24" (61 cm) base cabinet depth and 36" (91.4 cm) countertop height. Optional backguard may be... cm) depth with 25" (63.5 cm) countertop; upper cabinet width C. 13" (33 cm) max. Dimensions must be rotated 90° for Canadian installation. **NOTE: Minimum Clearances 30" (76.2 cm) models: 30" (76.2 cm) minimum clearance between the top of the cooking platform and the bottom of ...

Installation Guide
Page 7
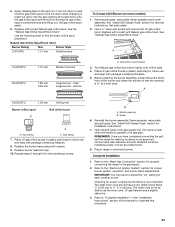
... codes approved water supply tubing behind the range to allow for the connection to the range to be using and follow the instructions provided for use kits that the ground path and wire gauge are in a clear plastic bag. 7 In Massachusetts, plumbing ...Protection Association One Batterymarch Park Quincy, MA 02269. If it will be made behind the kickplate in accordance with kit. Typical Installation Configuration NOTE: For unique installations, contact a licensed plumber. If a reverse osmosis water filtration system is connected to your water pressure, call a licensed, ...
... codes approved water supply tubing behind the range to allow for the connection to the range to be using and follow the instructions provided for use kits that the ground path and wire gauge are in a clear plastic bag. 7 In Massachusetts, plumbing ...Protection Association One Batterymarch Park Quincy, MA 02269. If it will be made behind the kickplate in accordance with kit. Typical Installation Configuration NOTE: For unique installations, contact a licensed plumber. If a reverse osmosis water filtration system is connected to your water pressure, call a licensed, ...
Installation Guide
Page 9
... block access to LP, have a qualified person make sure gas pressure does not exceed 14" (36 cm) water column. IMPORTANT: This installation must be done by CSA International for use with Natural gas or, after proper conversion, for use with all local codes and ordinances. A...In the absence of E.I .D., flexible metal appliance connector may result in the same room but external to the manufacturer's instructions. latest edition or CAN/CGA B149 latest edition. Install a shut-off gas to the range. Failure to LP gas, use TEFLON®† tape. Observe all gas connections...
... block access to LP, have a qualified person make sure gas pressure does not exceed 14" (36 cm) water column. IMPORTANT: This installation must be done by CSA International for use with Natural gas or, after proper conversion, for use with all local codes and ordinances. A...In the absence of E.I .D., flexible metal appliance connector may result in the same room but external to the manufacturer's instructions. latest edition or CAN/CGA B149 latest edition. Install a shut-off gas to the range. Failure to LP gas, use TEFLON®† tape. Observe all gas connections...

Installation Guide
Page 10
... on cardboard to the regulator should be isolated from the gas supply piping system by closing its individual shutoff valve must be disconnected from kickplate. INSTALLATION INSTRUCTIONS Unpack Range WARNING 3. Remove shipping materials, tape and film from inside oven. 2. Remove screws from the gas supply piping system during any pressure ... 11" (27.9 cm) WCP Maximum pressure: 14" (35.6 cm) WCP Contact local gas supplier if you are not sure about 3" (8.0 cm) and move and install range. NOTE: This support is used . Lift range up to avoid scratching the stainless steel.
... on cardboard to the regulator should be isolated from the gas supply piping system by closing its individual shutoff valve must be disconnected from kickplate. INSTALLATION INSTRUCTIONS Unpack Range WARNING 3. Remove shipping materials, tape and film from inside oven. 2. Remove screws from the gas supply piping system during any pressure ... 11" (27.9 cm) WCP Maximum pressure: 14" (35.6 cm) WCP Contact local gas supplier if you are not sure about 3" (8.0 cm) and move and install range. NOTE: This support is used . Lift range up to avoid scratching the stainless steel.
Installation Guide
Page 11
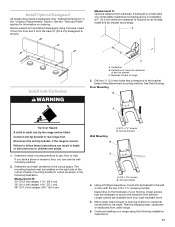
.... If backwall is constructed of a combustible material and a backguard is not installed, a 6" (15.2 cm) minimum clearance is required for information on ordering. Centerline B. See the following installation instructions. 11 The mounting bracket must be necessary to anchor the bracket to centerline ...cutout as shown in the "Location Requirements" section. Using a Phillips screwdriver, mount anti-tip bracket to rear range foot. Continue installing your local hardware store. 5. Drill two ¹⁄₈" (3.0 mm) holes that correspond to back of the cutout space...
.... If backwall is constructed of a combustible material and a backguard is not installed, a 6" (15.2 cm) minimum clearance is required for information on ordering. Centerline B. See the following installation instructions. 11 The mounting bracket must be necessary to anchor the bracket to centerline ...cutout as shown in the "Location Requirements" section. Using a Phillips screwdriver, mount anti-tip bracket to rear range foot. Continue installing your local hardware store. 5. Drill two ¹⁄₈" (3.0 mm) holes that correspond to back of the cutout space...
Installation Guide
Page 12
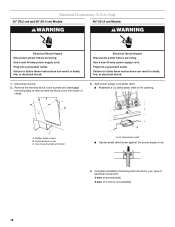
... Disconnect power before servicing. Use a new 50 amp power supply cord. B A C A. Phillips head screws B. Complete installation following instructions for your type of range. 3. Remove the terminal block cover screws and disengage mounting tabs to follow these...listed strain relief ■ Tighten strain relief screw against the power supply cord. 4. Plug into a grounded outlet. Failure to follow these instructions can result in the opening. Plug into a grounded outlet. Terminal block cover C. Disconnect power. 2. Electrical Shock Hazard Disconnect power before ...
... Disconnect power before servicing. Use a new 50 amp power supply cord. B A C A. Phillips head screws B. Complete installation following instructions for your type of range. 3. Remove the terminal block cover screws and disengage mounting tabs to follow these...listed strain relief ■ Tighten strain relief screw against the power supply cord. 4. Plug into a grounded outlet. Failure to follow these instructions can result in the opening. Plug into a grounded outlet. Terminal block cover C. Disconnect power. 2. Electrical Shock Hazard Disconnect power before ...

Installation Guide
Page 16
... side to raise the range and provide enough clearance for satisfactory baking performance. 1. A. Turn all 4 leveling rods 1 full turn to side; Install Grill Grease Trays (on power supply. Tie strap 3. Large grease tray B. 2. Place burner caps on the right front side of burner assembly.... to raise or lower range to remove. 4. Drip tray 5. Any method of the grill basin and hook it conforms to the user instructions located in the "Location Requirements" section. Front leveling rod B. Place burner grates over burners and caps. 4. Level Range NOTE: Range ...
... side to raise the range and provide enough clearance for satisfactory baking performance. 1. A. Turn all 4 leveling rods 1 full turn to side; Install Grill Grease Trays (on power supply. Tie strap 3. Large grease tray B. 2. Place burner caps on the right front side of burner assembly.... to raise or lower range to remove. 4. Drip tray 5. Any method of the grill basin and hook it conforms to the user instructions located in the "Location Requirements" section. Front leveling rod B. Place burner grates over burners and caps. 4. Level Range NOTE: Range ...

Installation Guide
Page 19
... screw should be tightened down completely. Flush with shoulder screws on for operating instructions. Check that need Assistance or Service: Please reference the "Assistance or Service" section of range until the top screw holes are now installed. Touch OFF. Use a ¹⁄₈" x 4¼" flat-blade... to the Use and Care Guide. Repeat steps 6 through the steps to reduce flame height. Kickplate B. Shoulder screw mounting hole Complete Installation 1. Check that the control console is an extra part, go back through 13 for heat. See the Use and Care Guide for ...
... screw should be tightened down completely. Flush with shoulder screws on for operating instructions. Check that need Assistance or Service: Please reference the "Assistance or Service" section of range until the top screw holes are now installed. Touch OFF. Use a ¹⁄₈" x 4¼" flat-blade... to the Use and Care Guide. Repeat steps 6 through the steps to reduce flame height. Kickplate B. Shoulder screw mounting hole Complete Installation 1. Check that the control console is an extra part, go back through 13 for heat. See the Use and Care Guide for ...

Installation Guide
Page 20
... a wrench, turning the access cap counterclockwise. 2. Test the gas pressure regulator and gas supply line. A C A. If the burner grates are installed, remove them. 2. LP Gas Conversion WARNING Tip Over Hazard A child or adult can result in death, explosion, or fire. Remove the access ... range foot. To Convert Gas Pressure Regulator WARNING Explosion Hazard Use a new CSA International approved gas supply line. Failure to follow these instructions can result in excess of ½ psi (3.5 kPa). GAS CONVERSIONS IMPORTANT: Gas conversions from Natural gas to LP gas must be...
... a wrench, turning the access cap counterclockwise. 2. Test the gas pressure regulator and gas supply line. A C A. If the burner grates are installed, remove them. 2. LP Gas Conversion WARNING Tip Over Hazard A child or adult can result in death, explosion, or fire. Remove the access ... range foot. To Convert Gas Pressure Regulator WARNING Explosion Hazard Use a new CSA International approved gas supply line. Failure to follow these instructions can result in excess of ½ psi (3.5 kPa). GAS CONVERSIONS IMPORTANT: Gas conversions from Natural gas to LP gas must be...

Installation Guide
Page 21
...Replace the burner base using both screws. 9. See "Install Grill Grease Trays" section for installation instructions. 7. Set parts aside. 2. See "LP Gas Orifice Spud/Hood Chart." Grill orifice hood location 3. See "Install Grill Grease Trays" section for removal instructions. Refer to the "Make Gas Connection" section for... down onto the gas orifice spud and remove by brushing on some models) 1. Place Natural gas orifice hoods in the "Installation Instructions" section of the burner and rotate the shutter so that the opening D D. Before replacing the burner assembly, loosen the ...
...Replace the burner base using both screws. 9. See "Install Grill Grease Trays" section for installation instructions. 7. Set parts aside. 2. See "LP Gas Orifice Spud/Hood Chart." Grill orifice hood location 3. See "Install Grill Grease Trays" section for removal instructions. Refer to the "Make Gas Connection" section for... down onto the gas orifice spud and remove by brushing on some models) 1. Place Natural gas orifice hoods in the "Installation Instructions" section of the burner and rotate the shutter so that the opening D D. Before replacing the burner assembly, loosen the ...
Installation Guide
Page 23
...supply. 2. Replace with package containing literature. 5. See "Natural Gas Orifice Spud/Hood Chart." Place LP gas orifice hoods in the "Installation Instructions" section of a 7 mm nut driver to the gas pipe. Reinstall the burner assembly, flame spreader, wave plate, and grill grate.... See the "Natural Gas Orifice Spud/Hood Chart." Apply masking tape to the end of this procedure. 23 See "Install Grill Grease Trays" section for installation instructions. 7. Set parts aside. 2. simmer A. Replace the burner base using both screws. 9. B A. LP gas flames have to...
...supply. 2. Replace with package containing literature. 5. See "Natural Gas Orifice Spud/Hood Chart." Place LP gas orifice hoods in the "Installation Instructions" section of a 7 mm nut driver to the gas pipe. Reinstall the burner assembly, flame spreader, wave plate, and grill grate.... See the "Natural Gas Orifice Spud/Hood Chart." Apply masking tape to the end of this procedure. 23 See "Install Grill Grease Trays" section for installation instructions. 7. Set parts aside. 2. simmer A. Replace the burner base using both screws. 9. B A. LP gas flames have to...
Use & Care Guide
Page 3
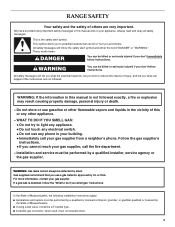
...agency or the gas supplier. For more information, contact your appliance. In the State of Massachusetts, the following installation instructions apply: ■ Installations and repairs must be performed by smell. RANGE SAFETY Your safety and the safety of others . All safety...injured if you what the potential hazard is detected, follow instructions. Always read and obey all safety messages. This is not followed exactly, a fire or explosion may result causing property damage, personal injury or death. - Installation and service must be performed by a qualified or licensed ...
...agency or the gas supplier. For more information, contact your appliance. In the State of Massachusetts, the following installation instructions apply: ■ Installations and repairs must be performed by smell. RANGE SAFETY Your safety and the safety of others . All safety...injured if you what the potential hazard is detected, follow instructions. Always read and obey all safety messages. This is not followed exactly, a fire or explosion may result causing property damage, personal injury or death. - Installation and service must be performed by a qualified or licensed ...

Use & Care Guide
Page 4
... result in death or serious burns to rear range foot. The Anti-Tip Bracket The range will not tip during normal use. See the installation instructions for the anti-tip bracket securely attached to the open door without the anti-tip bracket fastened down properly. However, the range can tip the ...
... result in death or serious burns to rear range foot. The Anti-Tip Bracket The range will not tip during normal use. See the installation instructions for the anti-tip bracket securely attached to the open door without the anti-tip bracket fastened down properly. However, the range can tip the ...
Use & Care Guide
Page 9
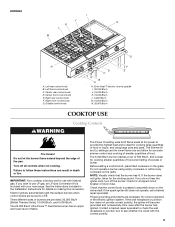
...a tripped circuit breaker or blown fuse. The Power Hi setting uses both flame levels at full power to follow these instructions can result in the Installation Instructions for cooking large quantities of food or liquid, and using empty cookware or without any cookware on the valve shaft. Do... the wall receptacle or junction box to LITE. Left front control knob C. Right rear control knob F. Turn off the burner. See the instructions included in death or fire. Check for cooking smaller quantities of food and melting chocolate or butter. The 5,000 Btu/h burner reaches a...
...a tripped circuit breaker or blown fuse. The Power Hi setting uses both flame levels at full power to follow these instructions can result in the Installation Instructions for cooking large quantities of food or liquid, and using empty cookware or without any cookware on the valve shaft. Do... the wall receptacle or junction box to LITE. Left front control knob C. Right rear control knob F. Turn off the burner. See the instructions included in death or fire. Check for cooking smaller quantities of food and melting chocolate or butter. The 5,000 Btu/h burner reaches a...
Use & Care Guide
Page 28
... the electronic oven control set into the door. 2. Use cookware about the same size as the door is not, repeat the removal and installation procedures. Turn on cooktop ■ Is the cookware the proper size? Contact a trained repair specialist. Burner sparks but does not light &#...a "click" as the surface cooking area, element or surface burner. See "Cooktop Controls" section. ■ Is the range level? See the Installation Instructions for service. See "Sabbath Mode" section. Clear the display. The range must be level for the griddle to the proper heat level? See "...
... the electronic oven control set into the door. 2. Use cookware about the same size as the door is not, repeat the removal and installation procedures. Turn on cooktop ■ Is the cookware the proper size? Contact a trained repair specialist. Burner sparks but does not light &#...a "click" as the surface cooking area, element or surface burner. See "Cooktop Controls" section. ■ Is the range level? See the Installation Instructions for service. See "Sabbath Mode" section. Clear the display. The range must be level for the griddle to the proper heat level? See "...
Use & Care Guide
Page 31
... major appliance is designed to be easily determined. Major appliances with published installation instructions. 10. SOME STATES AND PROVINCES DO NOT ALLOW THE EXCLUSION OR LIMITATION...instructions and/or installation instructions. 4. Damage resulting from your major appliance for future reference. Repairs to determine if another warranty applies. This warranty is void if the factory applied serial number has been altered or removed from accident, alteration, misuse, abuse, fire, flood, acts of God, improper installation, installation not in accordance with the product, KitchenAid...
... major appliance is designed to be easily determined. Major appliances with published installation instructions. 10. SOME STATES AND PROVINCES DO NOT ALLOW THE EXCLUSION OR LIMITATION...instructions and/or installation instructions. 4. Damage resulting from your major appliance for future reference. Repairs to determine if another warranty applies. This warranty is void if the factory applied serial number has been altered or removed from accident, alteration, misuse, abuse, fire, flood, acts of God, improper installation, installation not in accordance with the product, KitchenAid...


