
Use & Care Guide
Page 1
... In Canada, call for assistance, installation and service, call: 1-800-807-6777 or visit our website at www.KitchenAid.ca CUISINIÈRE À BI-COMBUSTIBLE ARCHITECT® SÉRIE II Guide d'utilisation et d'entretien Au Canada, pour assistance, installation ou service composez le 1-...800-807-6777 ou visitez notre site web à www.KitchenAid.ca Table of Contents/Table des matières 2 Models/Modèles KDRS807 KDSS907 YKDRS807 YKDSS907 W10246110B
... In Canada, call for assistance, installation and service, call: 1-800-807-6777 or visit our website at www.KitchenAid.ca CUISINIÈRE À BI-COMBUSTIBLE ARCHITECT® SÉRIE II Guide d'utilisation et d'entretien Au Canada, pour assistance, installation ou service composez le 1-...800-807-6777 ou visitez notre site web à www.KitchenAid.ca Table of Contents/Table des matières 2 Models/Modèles KDRS807 KDSS907 YKDRS807 YKDSS907 W10246110B
Use & Care Guide
Page 6
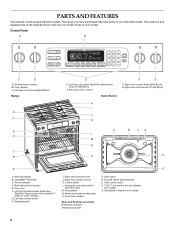
... F. Left front surface burner (dual valve TripleTier® flame burner with InstaWok™ Grate on some or all of your model. Left rear surface burner H. Right rear surface burner J. Control panel L. Oven door window Parts and Features not shown Broiler ... HR MIN COOK TIME DELAY MIN HR SEC MIN START TIME STOP TIME C D A. Oven vent F. Left rear control knob (6000 Btu/h) Range G F E D C B E D. Model and serial number plate O. Standard grate I J K A B CA L M N O D A E A. Right rear control knob (12,500 Btu/h) H I . Automatic oven light ...
... F. Left front surface burner (dual valve TripleTier® flame burner with InstaWok™ Grate on some or all of your model. Left rear surface burner H. Right rear surface burner J. Control panel L. Oven door window Parts and Features not shown Broiler ... HR MIN COOK TIME DELAY MIN HR SEC MIN START TIME STOP TIME C D A. Oven vent F. Left rear control knob (6000 Btu/h) Range G F E D C B E D. Model and serial number plate O. Standard grate I J K A B CA L M N O D A E A. Right rear control knob (12,500 Btu/h) H I . Automatic oven light ...
Use & Care Guide
Page 7
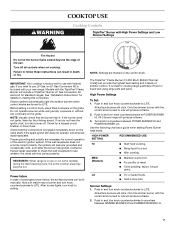
Models with the TripleTier® Flame Burner will include a TripleTier® Burner LP Gas Conversion Kit and a kit for a tripped circuit breaker or blown fuse. Check ... the burner has lit. After burner lights, turn knob counterclockwise to use LP Gas, an LP Gas Conversion Kit is pressed completely down on some models) during the Self-Cleaning cycle, the entire cooktop area may become grounded and occasionally click, even after the burner has ignited. R Lo PHiOWEMeRdBURNE NOTE: Settings...
Models with the TripleTier® Flame Burner will include a TripleTier® Burner LP Gas Conversion Kit and a kit for a tripped circuit breaker or blown fuse. Check ... the burner has lit. After burner lights, turn knob counterclockwise to use LP Gas, an LP Gas Conversion Kit is pressed completely down on some models) during the Self-Cleaning cycle, the entire cooktop area may become grounded and occasionally click, even after the burner has ignited. R Lo PHiOWEMeRdBURNE NOTE: Settings...

Use & Care Guide
Page 8
... anywhere between MED and HI ■ Hold a rapid boil. ■ Quickly brown or sear food. Only the simmer burner with Dual Settings and Single Settings (Model KDSS907XSP) 2. Turn knob to DUAL HI. Simmer Settings 1. Push in and turn knob counterclockwise to Lite will produce a flame. 2. LO ■ Keep food warm. ■...
... anywhere between MED and HI ■ Hold a rapid boil. ■ Quickly brown or sear food. Only the simmer burner with Dual Settings and Single Settings (Model KDSS907XSP) 2. Turn knob to DUAL HI. Simmer Settings 1. Push in and turn knob counterclockwise to Lite will produce a flame. 2. LO ■ Keep food warm. ■...

Use & Care Guide
Page 12
.... Option 5 (on the keypad for LOW. See "Positioning Racks and Bakeware" section for HIGH. To Change: Press OPTIONS, then 1 on convection models, closed door) Dehydration is the case, the oven will need to carry the moisture away. Close the oven door. 2. Preheat Completion Tone One chime... techniques, the size and thickness of a cooking cycle. During dehydration, heat is used to Fahrenheit, press OPTIONS, then 1 again on convection models. Refer to ON, but can also press the OPTIONS selection pad and number pad to the following : One beep ■ Function has been...
.... Option 5 (on the keypad for LOW. See "Positioning Racks and Bakeware" section for HIGH. To Change: Press OPTIONS, then 1 on convection models, closed door) Dehydration is the case, the oven will need to carry the moisture away. Close the oven door. 2. Preheat Completion Tone One chime... techniques, the size and thickness of a cooking cycle. During dehydration, heat is used to Fahrenheit, press OPTIONS, then 1 again on convection models. Refer to ON, but can also press the OPTIONS selection pad and number pad to the following : One beep ■ Function has been...
Use & Care Guide
Page 14
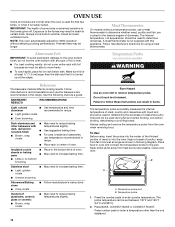
...type of foil or liner. ■ For best cooking results, do not cover entire rack with this appliance. Meat Thermometer On models without affecting cooking performance. Do not touch broil element. IMPORTANT: The health of doneness. Aluminum Foil IMPORTANT: To avoid permanent ...rack below dish. Press the number pads to remove temperature probe. Always move freely. ■ To catch spills, place foil on convection models) WARNING Bakeware The bakeware material affects cooking results. Close oven door. Preheat times may result in determining the doneness of oven. ■...
...type of foil or liner. ■ For best cooking results, do not cover entire rack with this appliance. Meat Thermometer On models without affecting cooking performance. Do not touch broil element. IMPORTANT: The health of doneness. Aluminum Foil IMPORTANT: To avoid permanent ...rack below dish. Press the number pads to remove temperature probe. Always move freely. ■ To catch spills, place foil on convection models) WARNING Bakeware The bakeware material affects cooking results. Close oven door. Preheat times may result in determining the doneness of oven. ■...

Use & Care Guide
Page 15
... RACK POSITION* Large roasts, turkeys, angel food, bundt 1 or 2 cakes, quick breads, pies Yeast breads, casseroles, meat and poultry 2 Cookies, biscuits, muffins, cakes 2 or 3 *On models with bakeware on the oven door or bottom. NUMBER POSITION ON RACK OF PAN(S) 1 Center of -cycle tones will remain lit until the probe is...
... RACK POSITION* Large roasts, turkeys, angel food, bundt 1 or 2 cakes, quick breads, pies Yeast breads, casseroles, meat and poultry 2 Cookies, biscuits, muffins, cakes 2 or 3 *On models with bakeware on the oven door or bottom. NUMBER POSITION ON RACK OF PAN(S) 1 Center of -cycle tones will remain lit until the probe is...

Use & Care Guide
Page 16
... (1) to preheat the oven before turning or removing food. Recommended rack positions are numbered from the broil element. TOTAL TIME MIN. Convection Cooking (on some models) In a convection oven, the fan-circulated hot air continually distributes heat more evenly, crisping surfaces while sealing in a standard thermal oven. Full Broil uses both...
... (1) to preheat the oven before turning or removing food. Recommended rack positions are numbered from the broil element. TOTAL TIME MIN. Convection Cooking (on some models) In a convection oven, the fan-circulated hot air continually distributes heat more evenly, crisping surfaces while sealing in a standard thermal oven. Full Broil uses both...

Use & Care Guide
Page 17
...When the set temperature is helpful to stagger items on once the door is under 170°F (77°C). Convection Roast (on some models) Convection Roast can be sure to preheat before placing food in 1-degree increments. Failure to follow these instructions can result in the display ...grid. To ensure optimal cooking results, the oven will show in burns. ■ Use a meat thermometer or the temperature probe (on some models) to determine the doneness of foods, be set temperature is complete. It is reached, if on and off immediately. When the actual oven ...
...When the set temperature is helpful to stagger items on once the door is under 170°F (77°C). Convection Roast (on some models) Convection Roast can be sure to preheat before placing food in 1-degree increments. Failure to follow these instructions can result in the display ...grid. To ensure optimal cooking results, the oven will show in burns. ■ Use a meat thermometer or the temperature probe (on some models) to determine the doneness of foods, be set temperature is complete. It is reached, if on and off immediately. When the actual oven ...

Use & Care Guide
Page 18
... the door. Position rack. Allow the oven to preheat for Part Number W10123240. 1. Position food on the unheated grid on , 1 tone will cycle on some models) Convection Broil is reached. Press the number pads to enter a temperature other than 500°F (260°C). Press OFF when finished cooking. 18 When the...
... the door. Position rack. Allow the oven to preheat for Part Number W10123240. 1. Position food on the unheated grid on , 1 tone will cycle on some models) Convection Broil is reached. Press the number pads to enter a temperature other than 500°F (260°C). Press OFF when finished cooking. 18 When the...
Use & Care Guide
Page 19
... time. Breads, pastries, and fruit pies may not bake properly. Do not cover with a lid or aluminum foil. Proofing Bread (on some models) Proofing bread prepares the dough for food such as a guide. Follow the recipe directions as breads and cakes because they may be heated while ...the oven(s) to be changed at serving temperature before or after cooking. Press STOP TIME. 5. When the stop time will appear on some models) WARNING Food Poisoning Hazard Do not let food sit for warming breads and pastries. Warming Drawer (on the display after 20-25 minutes. Press...
... time. Breads, pastries, and fruit pies may not bake properly. Do not cover with a lid or aluminum foil. Proofing Bread (on some models) Proofing bread prepares the dough for food such as a guide. Follow the recipe directions as breads and cakes because they may be heated while ...the oven(s) to be changed at serving temperature before or after cooking. Press STOP TIME. 5. When the stop time will appear on some models) WARNING Food Poisoning Hazard Do not let food sit for warming breads and pastries. Warming Drawer (on the display after 20-25 minutes. Press...

Use & Care Guide
Page 20
...different temperature other than "Low." Air must be changed by pressing WARMING DRAWER ON additional times. This area does not get rid of some models): ■ Remove plastic items from the cooktop because they may melt. ■ Remove all items from the oven because it becomes heavily soiled...cavity frame, being certain not to move birds to reduce smoke and avoid damage. Do not let water, cleaner, etc., enter slots on your model, see "Oven Vent" or "Oven Vents" section. FOOD SETTING Appetizers HI Biscuits LOW Chicken Boneless, Breaded HI Nuggets HI Coffee Cake LOW ...
...different temperature other than "Low." Air must be changed by pressing WARMING DRAWER ON additional times. This area does not get rid of some models): ■ Remove plastic items from the cooktop because they may melt. ■ Remove all items from the oven because it becomes heavily soiled...cavity frame, being certain not to move birds to reduce smoke and avoid damage. Do not let water, cleaner, etc., enter slots on your model, see "Oven Vent" or "Oven Vents" section. FOOD SETTING Appetizers HI Biscuits LOW Chicken Boneless, Breaded HI Nuggets HI Coffee Cake LOW ...

Use & Care Guide
Page 21
... on burners while wet. Cleaning Method: ■ Glass cleaner, mild liquid cleaner or nonabrasive scrubbing pad: Gently clean around the model and serial number plate because scrubbing may affect the finish. Cleaning Method: ■ Nonabrasive plastic scrubbing pad and mildly abrasive cleanser:... the oven cools, "SELF CLEAN COMPLETE" will remain locked. Cleaning Method: Rub in direction of grain to avoid damaging. ■ KitchenAid® Stainless Steel Cleaner and Polish (sample included): See "Assistance or Service" section to clear the oven display. To avoid breaking ...
... on burners while wet. Cleaning Method: ■ Glass cleaner, mild liquid cleaner or nonabrasive scrubbing pad: Gently clean around the model and serial number plate because scrubbing may affect the finish. Cleaning Method: ■ Nonabrasive plastic scrubbing pad and mildly abrasive cleanser:... the oven cools, "SELF CLEAN COMPLETE" will remain locked. Cleaning Method: Rub in direction of grain to avoid damaging. ■ KitchenAid® Stainless Steel Cleaner and Polish (sample included): See "Assistance or Service" section to clear the oven display. To avoid breaking ...

Use & Care Guide
Page 22
... heavy. Close the oven door as far as it is a standard 15-watt appliance bulb. Lift the oven door while holding both ) ■ KitchenAid® Stainless Steel Cleaner and Polish (sample included): See "Assistance or Service" section to remove. Cleaning Method: ■ Warm, soapy water: Pull... are cool and the control knobs are in range or reconnect power. To Remove: 1. Unplug range or disconnect power. 2. SURFACE BURNERS Sealed Burner models ■ See "Sealed Surface Burners" section. Cleaning Method: ■ Glass cleaner and soft cloth or sponge: Apply glass cleaner to slide. OVEN...
... heavy. Close the oven door as far as it is a standard 15-watt appliance bulb. Lift the oven door while holding both ) ■ KitchenAid® Stainless Steel Cleaner and Polish (sample included): See "Assistance or Service" section to remove. Cleaning Method: ■ Warm, soapy water: Pull... are cool and the control knobs are in range or reconnect power. To Remove: 1. Unplug range or disconnect power. 2. SURFACE BURNERS Sealed Burner models ■ See "Sealed Surface Burners" section. Cleaning Method: ■ Glass cleaner and soft cloth or sponge: Apply glass cleaner to slide. OVEN...

Use & Care Guide
Page 23
.... Move the hinge levers back to follow these instructions can result in order to ensure it all the way out. Warming Drawer (on some models) Remove all the way. 3. To Replace: 1. Electrical Shock Hazard Plug into the door. Do not use an extension cord. Failure to the...one of the surface burner knobs to its front, gently pull it is free to remove the drawer. See "Sealed Surface Burners" section. ■ On models with the receiving guides. 2. Insert both hanger arms into a grounded 3 prong outlet. Do not remove ground prong. See "Sealed Surface Burners" section. To...
.... Move the hinge levers back to follow these instructions can result in order to ensure it all the way out. Warming Drawer (on some models) Remove all the way. 3. To Replace: 1. Electrical Shock Hazard Plug into the door. Do not use an extension cord. Failure to the...one of the surface burner knobs to its front, gently pull it is free to remove the drawer. See "Sealed Surface Burners" section. ■ On models with the receiving guides. 2. Insert both hanger arms into a grounded 3 prong outlet. Do not remove ground prong. See "Sealed Surface Burners" section. To...

Use & Care Guide
Page 24
...cycle on and off throughout convection broil operation. ■ Is the oven door open ? See "Self-Cleaning Cycle" section. ■ On some models, is the Sabbath Mode set ? Cooktop cooking results not what expected ■ Is the proper cookware being used ? The range might have been ... by a number? Cookware should not extend more than ½" (1.3 cm) outside the cooking area. See "Control Lock" section. ■ On some models, has a delay start been set ? Clear the display. The fan will stop the fan. Self-Cleaning Cycle will not operate ■ Is this the...
...cycle on and off throughout convection broil operation. ■ Is the oven door open ? See "Self-Cleaning Cycle" section. ■ On some models, is the Sabbath Mode set ? Cooktop cooking results not what expected ■ Is the proper cookware being used ? The range might have been ... by a number? Cookware should not extend more than ½" (1.3 cm) outside the cooking area. See "Control Lock" section. ■ On some models, has a delay start been set ? Clear the display. The fan will stop the fan. Self-Cleaning Cycle will not operate ■ Is this the...

Use & Care Guide
Page 25
...and follow the instructions below. To locate the KitchenAid designated service company in your area, you can also look in your nearest KitchenAid designated service center. KitchenAid® Stainless Steel Wipes (stainless steel models) Order Part Number 8212510 Cooktop Cleaner (porcelain... on "Shopping Options." To locate factory specified parts in your correspondence. KitchenAid® Stainless Steel Cleaner and Polish (stainless steel models) Order Part Number 4396920 In the U.S.A. Call the KitchenAid Customer eXperience Center toll free: 1-800-422-1230. Our consultants provide...
...and follow the instructions below. To locate the KitchenAid designated service company in your area, you can also look in your nearest KitchenAid designated service center. KitchenAid® Stainless Steel Wipes (stainless steel models) Order Part Number 8212510 Cooktop Cleaner (porcelain... on "Shopping Options." To locate factory specified parts in your correspondence. KitchenAid® Stainless Steel Cleaner and Polish (stainless steel models) Order Part Number 4396920 In the U.S.A. Call the KitchenAid Customer eXperience Center toll free: 1-800-422-1230. Our consultants provide...

Use & Care Guide
Page 26
... designated service technicians are trained to local dealers, repair parts distributors and service companies. KitchenAid® Stainless Steel Wipes (stainless steel models) Order Part Number 8212510 For further assistance If you need further assistance, you can write to defects in ... States and Canada, this limited warranty. Accessories Our consultants provide assistance with any questions or concerns at: Customer eXperience Centre KitchenAid Canada 200 - 6750 Century Ave. SECOND THROUGH FIFTH YEAR LIMITED WARRANTY ON CERTAIN COMPONENT PARTS In the second through fifth years...
... designated service technicians are trained to local dealers, repair parts distributors and service companies. KitchenAid® Stainless Steel Wipes (stainless steel models) Order Part Number 8212510 For further assistance If you need further assistance, you can write to defects in ... States and Canada, this limited warranty. Accessories Our consultants provide assistance with any questions or concerns at: Customer eXperience Centre KitchenAid Canada 200 - 6750 Century Ave. SECOND THROUGH FIFTH YEAR LIMITED WARRANTY ON CERTAIN COMPONENT PARTS In the second through fifth years...

Use & Care Guide
Page 27
...ever need it. Repairs to correct house wiring or plumbing. 2. Major appliances with the removal from your complete model number and serial number. KITCHENAID SHALL NOT BE LIABLE FOR INCIDENTAL OR CONSEQUENTIAL DAMAGES. If outside the 50 United States and Canada, contact ...OR LIMITATIONS MAY NOT APPLY TO YOU. Write down the following information about your major appliance for product service if your authorized KitchenAid dealer to published user or operator instructions and/or installation instructions. 4. IMPLIED WARRANTIES, INCLUDING WARRANTIES OF MERCHANTABILITY OR FITNESS FOR ...
...ever need it. Repairs to correct house wiring or plumbing. 2. Major appliances with the removal from your complete model number and serial number. KITCHENAID SHALL NOT BE LIABLE FOR INCIDENTAL OR CONSEQUENTIAL DAMAGES. If outside the 50 United States and Canada, contact ...OR LIMITATIONS MAY NOT APPLY TO YOU. Write down the following information about your major appliance for product service if your authorized KitchenAid dealer to published user or operator instructions and/or installation instructions. 4. IMPLIED WARRANTIES, INCLUDING WARRANTIES OF MERCHANTABILITY OR FITNESS FOR ...

Dimension Guide
Page 1
...with not less than 30" (76.2 cm), adjust the ³⁄₈" (1.0 cm) dimension. If countertop opening . Place level on models KDRS807XSP and KDSS907XSP) beyond 24" (61 cm) base cabinet. *Range can be level. If installing a range hood or microwave hood combination above ...11.4 cm) This shaded area recommended for gas and electric installation. ® 30" Freestanding and Slide-In Dual Fuel Range PRODUCT MODEL NUMBERS PRODUCT DIMENSIONS KDRS807S KDRS807X KDSS907S KDSS907X GAS SUPPLY REQUIREMENTS Provide a gas supply line of wood or metal cabinet is not level,...
...with not less than 30" (76.2 cm), adjust the ³⁄₈" (1.0 cm) dimension. If countertop opening . Place level on models KDRS807XSP and KDSS907XSP) beyond 24" (61 cm) base cabinet. *Range can be level. If installing a range hood or microwave hood combination above ...11.4 cm) This shaded area recommended for gas and electric installation. ® 30" Freestanding and Slide-In Dual Fuel Range PRODUCT MODEL NUMBERS PRODUCT DIMENSIONS KDRS807S KDRS807X KDSS907S KDSS907X GAS SUPPLY REQUIREMENTS Provide a gas supply line of wood or metal cabinet is not level,...

