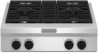

Use & Care Guide
Page 15
... technicians are excluded from the date of Whirlpool Corporation or Whirlpool Canada LP (hereafter "KitchenAid") will pay for Factory Specified Parts and repair labor to correct defects in a manner that is operated and maintained according to instructions attached to or furnished with : ■ Features and specifications on how to published user or...
... technicians are excluded from the date of Whirlpool Corporation or Whirlpool Canada LP (hereafter "KitchenAid") will pay for Factory Specified Parts and repair labor to correct defects in a manner that is operated and maintained according to instructions attached to or furnished with : ■ Features and specifications on how to published user or...
Installation Guide
Page 9
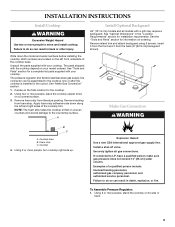
... connector can result in the cutout. Apply foam strip adhesive-side down along the left front underside of the cooktop base. Remove island trim and attach backguard using 6 screws, insert 3 from the front and 3 from foam strip. Make Gas Connection WARNING B C A. Securely tighten all models with your cooktop. Examples of the...
... connector can result in the cutout. Apply foam strip adhesive-side down along the left front underside of the cooktop base. Remove island trim and attach backguard using 6 screws, insert 3 from the front and 3 from foam strip. Make Gas Connection WARNING B C A. Securely tighten all models with your cooktop. Examples of the...
Installation Guide
Page 10
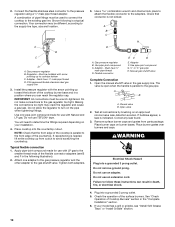
...following is needed, lift entire cooktop up toward the bottom of the countertop. If your installation. 4. Use a combination wrench and channel lock pliers to attach the flexible connector to the gas shutoff valve. Must be wrench-tightened. NOTE: Check that connector is parallel to the gas pipe.... Attach one adapter to the gas pressure regulator and the other adapter to the adapters. Gas pressure regulator B. Use pipe-joint compound. Must have &#...
...following is needed, lift entire cooktop up toward the bottom of the countertop. If your installation. 4. Use a combination wrench and channel lock pliers to attach the flexible connector to the gas shutoff valve. Must be wrench-tightened. NOTE: Check that connector is parallel to the gas pipe.... Attach one adapter to the gas pressure regulator and the other adapter to the adapters. Gas pressure regulator B. Use pipe-joint compound. Must have &#...

Installation Guide
Page 12
... to the "OFF" position. ■ Check that the cooktop is plugged in the well at this point, contact your cooktop. Remove the control knobs. 4. Console attachment screws 6. Complete Installation Electronic Ignition System Initial lighting and gas flame adjustments Cooktop burners use electronic igniters in the middle with one arm and disconnect...
... to the "OFF" position. ■ Check that the cooktop is plugged in the well at this point, contact your cooktop. Remove the control knobs. 4. Console attachment screws 6. Complete Installation Electronic Ignition System Initial lighting and gas flame adjustments Cooktop burners use electronic igniters in the middle with one arm and disconnect...