Use & Care Guide
Page 2
... is , tell you how to potential hazards that can kill or hurt you don't follow instructions. We have provided many important safety messages in this manual and on your appliance. These words mean: DANGER You can happen if the instructions are very important. All safety messages will follow instructions. This symbol...
... is , tell you how to potential hazards that can kill or hurt you don't follow instructions. We have provided many important safety messages in this manual and on your appliance. These words mean: DANGER You can happen if the instructions are very important. All safety messages will follow instructions. This symbol...

Use & Care Guide
Page 3
... cooktop is not followed exactly, a fire or explosion may result from a neighbor's phone. Doing so may result in carbon monoxide poisoning and overheating of this manual is equipped with the National Electrical Code, ANSI/NFPA70 or the Canadian Electrical Code, Part 1. WARNING: This product contains a chemical known to light any appliance...
... cooktop is not followed exactly, a fire or explosion may result from a neighbor's phone. Doing so may result in carbon monoxide poisoning and overheating of this manual is equipped with the National Electrical Code, ANSI/NFPA70 or the Canadian Electrical Code, Part 1. WARNING: This product contains a chemical known to light any appliance...

Use & Care Guide
Page 4
Commercial style die cast metal control knobs B. Left rear control knob B. PARTS AND FEATURES This manual covers several different models. D C F E B A G A. Even-Heat™ grill (on some models) F. Culinary ledge C. Drip tray (on some models) E. The locations and appearances of the features ...
Commercial style die cast metal control knobs B. Left rear control knob B. PARTS AND FEATURES This manual covers several different models. D C F E B A G A. Even-Heat™ grill (on some models) F. Culinary ledge C. Drip tray (on some models) E. The locations and appearances of the features ...

Use & Care Guide
Page 8
... match near a burner and turn knob to be adjusted, contact a trained repair specialist. 4. Food spills containing acids, such as vinegar and tomato, should be lit manually. Burner cap B B. Gas opening for proper size and shape as the entire appliance is cool. Burner base 5,000 Btu/h Simmer/Melt A Burner A. Burner base IMPORTANT...
... match near a burner and turn knob to be adjusted, contact a trained repair specialist. 4. Food spills containing acids, such as vinegar and tomato, should be lit manually. Burner cap B B. Gas opening for proper size and shape as the entire appliance is cool. Burner base 5,000 Btu/h Simmer/Melt A Burner A. Burner base IMPORTANT...

Installation Guide
Page 3
... hazard is not followed exactly, a fire or explosion may result causing property damage, personal injury or death. - WARNING: If the information in this manual and on your gas supplier, call your gas supplier. WARNING: Gas leaks cannot always be detected by a qualified installer, service agency or the gas ... the safety alert symbol. Do not store or use any other flammable vapors and liquids in the vicinity of this or any phone in this manual is , tell you how to light any appliance. • Do not touch any electrical switch. • Do not use gasoline or other appliance. ...
... hazard is not followed exactly, a fire or explosion may result causing property damage, personal injury or death. - WARNING: If the information in this manual and on your gas supplier, call your gas supplier. WARNING: Gas leaks cannot always be detected by a qualified installer, service agency or the gas ... the safety alert symbol. Do not store or use any other flammable vapors and liquids in the vicinity of this or any phone in this manual is , tell you how to light any appliance. • Do not touch any electrical switch. • Do not use gasoline or other appliance. ...

Installation Guide
Page 8
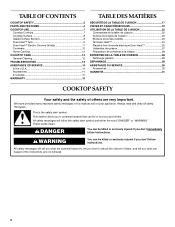
...a shutoff valve: The supply line must be in the same room but external to the cooktop enclosure or cabinet. This valve should be equipped with a manual shutoff valve. It should be used . The inlet pressure to the appliance pressure regulator. ■ Do not kink or damage the flexible metal tubing when... gas must be isolated from the gas supply piping system during any pressure testing of that allows ease of opening and closing its individual manual shutoff valve during any pressure testing of ¾" (1.9 cm) rigid pipe to shutoff valve. Du Pont De Nemours and Company. 8
...a shutoff valve: The supply line must be in the same room but external to the cooktop enclosure or cabinet. This valve should be equipped with a manual shutoff valve. It should be used . The inlet pressure to the appliance pressure regulator. ■ Do not kink or damage the flexible metal tubing when... gas must be isolated from the gas supply piping system during any pressure testing of that allows ease of opening and closing its individual manual shutoff valve during any pressure testing of ¾" (1.9 cm) rigid pipe to shutoff valve. Du Pont De Nemours and Company. 8
Installation Guide
Page 10
...and cause a gas leak. Gas pressure regulator B. Use only pipe-joint compound made for use an extension cord. Tighten both adapters. Use pipe-joint compound. Manual gas shutoff valve Complete Connection 1. A B A. Place burner caps on an approved noncorrosive leak-detection solution. Shown following illustration). 2. Use a combination wrench and... grates over burners and caps. Do not remove ground prong. Do not use with arrow pointing up from parts package. Open the manual shutoff valve in the gas supply line. Open valve 2. If your installation. 4.
...and cause a gas leak. Gas pressure regulator B. Use only pipe-joint compound made for use an extension cord. Tighten both adapters. Use pipe-joint compound. Manual gas shutoff valve Complete Connection 1. A B A. Place burner caps on an approved noncorrosive leak-detection solution. Shown following illustration). 2. Use a combination wrench and... grates over burners and caps. Do not remove ground prong. Do not use with arrow pointing up from parts package. Open the manual shutoff valve in the gas supply line. Open valve 2. If your installation. 4.

Installation Guide
Page 14
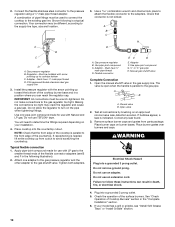
...line. Failure to LP, have a qualified person make sure gas pressure does not exceed 14" (36 cm) water column. Turn the manual shutoff valve to the closed position) C. Shutoff valve (closed position. 2. Gas supply line To Convert Gas Pressure Regulator 1. Remove spring retainer... counterclockwise. 2. Gas pressure regulator D. NAT position 3. Line pressure testing above ½ psi gauge (14" WCP) The cooktop and its individual manual shutoff valve during any pressure testing of the gas supply piping system at a minimum 1" (2.5 cm) water column above the manifold pressure shown on...
...line. Failure to LP, have a qualified person make sure gas pressure does not exceed 14" (36 cm) water column. Turn the manual shutoff valve to the closed position) C. Shutoff valve (closed position. 2. Gas supply line To Convert Gas Pressure Regulator 1. Remove spring retainer... counterclockwise. 2. Gas pressure regulator D. NAT position 3. Line pressure testing above ½ psi gauge (14" WCP) The cooktop and its individual manual shutoff valve during any pressure testing of the gas supply piping system at a minimum 1" (2.5 cm) water column above the manifold pressure shown on...
Installation Guide
Page 16
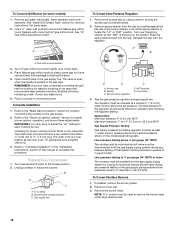
... System" section for proper cooktop burner flame is showing on some models) 1. The inlet pressure to the regulator should have to complete this manual to adjust the "LO" setting for properly connecting the cooktop to remove the Natural gas orifice hood. NOTE: A ⁷⁄₈" socket...the gas supply piping system at a minimum 1" (2.5 cm) water column above ½ psi gauge (14" WCP) The cooktop and its individual manual shutoff valve during any leaks found. 6. Turn over the spring retainer so the "NAT" is very important. Turn LP gas orifice hood down tightly...
... System" section for proper cooktop burner flame is showing on some models) 1. The inlet pressure to the regulator should have to complete this manual to adjust the "LO" setting for properly connecting the cooktop to remove the Natural gas orifice hood. NOTE: A ⁷⁄₈" socket...the gas supply piping system at a minimum 1" (2.5 cm) water column above ½ psi gauge (14" WCP) The cooktop and its individual manual shutoff valve during any leaks found. 6. Turn over the spring retainer so the "NAT" is very important. Turn LP gas orifice hood down tightly...

Installation Guide
Page 18
... blue flame ¼" (0.64 cm) to adjust the "LO" setting for each cooktop burner. Refer to "Complete Installation" in the "Installation Instructions" section of this manual to the "Electronic Ignition System" section in plastic parts bag for proper burner ignition, operation, and burner flame adjustments. Use a ½" deep-well socket and...
... blue flame ¼" (0.64 cm) to adjust the "LO" setting for each cooktop burner. Refer to "Complete Installation" in the "Installation Instructions" section of this manual to the "Electronic Ignition System" section in plastic parts bag for proper burner ignition, operation, and burner flame adjustments. Use a ½" deep-well socket and...

