
Use & Care Guide
Page 2
... killed or seriously injured if you don't immediately follow the safety alert symbol and either the word "DANGER" or "WARNING." TABLE OF CONTENTS COOKTOP SAFETY 2 PARTS AND FEATURES 4 COOKTOP USE 7 Cooktop Controls 7 Cooktop Surface 8 Sealed Surface Burners 8 Even-Heat™ Grill 9 Even-Heat™ Electric Chrome Griddle 11 Cookware 12 Home...
... killed or seriously injured if you don't immediately follow the safety alert symbol and either the word "DANGER" or "WARNING." TABLE OF CONTENTS COOKTOP SAFETY 2 PARTS AND FEATURES 4 COOKTOP USE 7 Cooktop Controls 7 Cooktop Surface 8 Sealed Surface Burners 8 Even-Heat™ Grill 9 Even-Heat™ Electric Chrome Griddle 11 Cookware 12 Home...

Use & Care Guide
Page 3
... building. • Immediately call the fire department. - Be sure the cooktop is equipped with the National Electrical Code, ANSI/NFPA70 or the Canadian Electrical Code, Part 1. Follow the gas supplier's instructions. • If you smell gas" instructions. Do not cut or remove the grounding prong from combustible materials, gasoline, and other...
... building. • Immediately call the fire department. - Be sure the cooktop is equipped with the National Electrical Code, ANSI/NFPA70 or the Canadian Electrical Code, Part 1. Follow the gas supplier's instructions. • If you smell gas" instructions. Do not cut or remove the grounding prong from combustible materials, gasoline, and other...

Use & Care Guide
Page 4
..." (55.9 cm) and adjustable backguards Optional griddle cover Optional grill cover Optional wok ring Optional stainless steel knobs Control Panels KGCU407 F E G H A. Right rear control knob D. PARTS AND FEATURES This manual covers several different models. Drip tray (on some models) F. The cooktop you have purchased may not match those of the items...
..." (55.9 cm) and adjustable backguards Optional griddle cover Optional grill cover Optional wok ring Optional stainless steel knobs Control Panels KGCU407 F E G H A. Right rear control knob D. PARTS AND FEATURES This manual covers several different models. Drip tray (on some models) F. The cooktop you have purchased may not match those of the items...
Use & Care Guide
Page 14
...Griddle results not what expected ■ Is the proper cookware being used to "Replacement Parts & Accessories" and click on our full line of a service call the KitchenAid Customer eXperience Center toll free at 1-800-442-9991 and follow the instructions below. ...factory specified parts will increase cooking time. KitchenAid® Stainless Steel Cleaner and Polish Order Part Number 4396920 KitchenAid® Stainless Steel Wipes Order Part Number 8212510 Cooktop Cleaner Order Part Number 31464 Cooktop Protectant Order Part Number 31463 Gas Grate/Drip Pan Cleaner Order Part Number 31617 ...
...Griddle results not what expected ■ Is the proper cookware being used to "Replacement Parts & Accessories" and click on our full line of a service call the KitchenAid Customer eXperience Center toll free at 1-800-442-9991 and follow the instructions below. ...factory specified parts will increase cooking time. KitchenAid® Stainless Steel Cleaner and Polish Order Part Number 4396920 KitchenAid® Stainless Steel Wipes Order Part Number 8212510 Cooktop Cleaner Order Part Number 31464 Cooktop Protectant Order Part Number 31463 Gas Grate/Drip Pan Cleaner Order Part Number 31617 ...

Use & Care Guide
Page 15
... to instructions attached to or furnished with the product, KitchenAid or KitchenAid Canada will pay for Factory Specified Parts for Factory Specified Parts and repair labor to correct defects in materials or workmanship. KITCHENAID® COOKTOP WARRANTY LIMITED WARRANTY For one year from ...after-warranty service, anywhere in your major appliance, to instruct you can write to KitchenAid Canada with : ■ Features and specifications on how to local dealers, repair parts distributors and service companies. Costs associated with the removal from the date of purchase...
... to instructions attached to or furnished with the product, KitchenAid or KitchenAid Canada will pay for Factory Specified Parts for Factory Specified Parts and repair labor to correct defects in materials or workmanship. KITCHENAID® COOKTOP WARRANTY LIMITED WARRANTY For one year from ...after-warranty service, anywhere in your major appliance, to instruct you can write to KitchenAid Canada with : ■ Features and specifications on how to local dealers, repair parts distributors and service companies. Costs associated with the removal from the date of purchase...
Use & Care Guide
Page 16
... the "Troubleshooting" section of purchase or installation date for in a remote area where service by an authorized KitchenAid servicer is not available. 9. 7. Repairs to parts or systems resulting from your major appliance to know your sales slip together for product service if your authorized... KitchenAid dealer to the appliance. 8. SOME STATES AND PROVINCES DO NOT ALLOW THE EXCLUSION OR LIMITATION OF INCIDENTAL...
... the "Troubleshooting" section of purchase or installation date for in a remote area where service by an authorized KitchenAid servicer is not available. 9. 7. Repairs to parts or systems resulting from your major appliance to know your sales slip together for product service if your authorized... KitchenAid dealer to the appliance. 8. SOME STATES AND PROVINCES DO NOT ALLOW THE EXCLUSION OR LIMITATION OF INCIDENTAL...

Installation Guide
Page 4
... a 600 CFM or larger vent hood be mounted above 6,560 ft (1999.5 m), order a High Altitude Conversion Kit. ■ Part Number W10237848 - Parts Supplied Check that all governing codes and ordinances. See "Electrical Requirements" section. ■ Conversion label (W10221320) NOTE: The cooktop is... cooktop must be sealed. ■ Cabinet opening dimensions that the materials used . Check local codes and consult gas supplier. Order Part Number W10225948 †®TORX is not recommended that a microwave hood combination be installed above the cooktop. ■ Grill grate ...
... a 600 CFM or larger vent hood be mounted above 6,560 ft (1999.5 m), order a High Altitude Conversion Kit. ■ Part Number W10237848 - Parts Supplied Check that all governing codes and ordinances. See "Electrical Requirements" section. ■ Conversion label (W10221320) NOTE: The cooktop is... cooktop must be sealed. ■ Cabinet opening dimensions that the materials used . Check local codes and consult gas supplier. Order Part Number W10225948 †®TORX is not recommended that a microwave hood combination be installed above the cooktop. ■ Grill grate ...
Installation Guide
Page 9
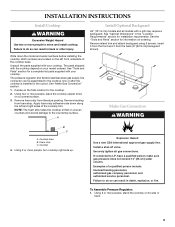
...screws, insert 3 from the front and 3 from foam strip. Cooktop 4. Examples of the cooktop trim. See "Tools and Parts" section for a complete list parts supplied with your model ordered. Using 2 or more people, stand the cooktop on its side or back. 9 Remove backing ... foam strip from literature packing. A Install Optional Backguard 48" (121.9 cm) models and all gas connections. See the "Tools and Parts" section for information on the final location for installation requirements. Make Gas Connection WARNING B C A. Cooktop base B. If connected to move...
...screws, insert 3 from the front and 3 from foam strip. Cooktop 4. Examples of the cooktop trim. See "Tools and Parts" section for a complete list parts supplied with your model ordered. Using 2 or more people, stand the cooktop on its side or back. 9 Remove backing ... foam strip from literature packing. A Install Optional Backguard 48" (121.9 cm) models and all gas connections. See the "Tools and Parts" section for information on the final location for installation requirements. Make Gas Connection WARNING B C A. Cooktop base B. If connected to move...
Installation Guide
Page 10
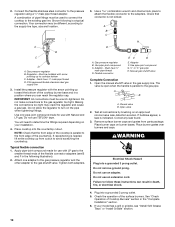
... cooktop bottom C. Place burner grates over burners and caps. Adapter - Manual gas shutoff valve Complete Connection 1. 2. Install the pressure regulator with arrow pointing up from parts package. Plug into a grounded 3 prong outlet. 5. Do not use with LP gas to the existing gas line. Use pipe-joint compound. If your installation. 4. Must...
... cooktop bottom C. Place burner grates over burners and caps. Adapter - Manual gas shutoff valve Complete Connection 1. 2. Install the pressure regulator with arrow pointing up from parts package. Plug into a grounded 3 prong outlet. 5. Do not use with LP gas to the existing gas line. Use pipe-joint compound. If your installation. 4. Must...
Installation Guide
Page 15
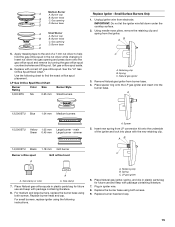
... Blue 1.04 mm Medium burners 15,500 BTU Yellow 1.05 mm Large burner - A. Place Natural gas igniter, spring, and clip in plastic parts bag for future use and keep with the new retaining clip. Burner cap B B. Replace with package containing literature. 8. Natural gas igniter 3. .... 2. simmer A. Spacer 5. Insert new spring from burner base. 4. Size stamp or color A. Place Natural gas orifice spuds in plastic parts bag for future use and keep with correct LP gas orifice spud. For small burners, replace igniter using both screws. Retaining clip B. Spring...
... Blue 1.04 mm Medium burners 15,500 BTU Yellow 1.05 mm Large burner - A. Place Natural gas igniter, spring, and clip in plastic parts bag for future use and keep with the new retaining clip. Burner cap B B. Replace with package containing literature. 8. Natural gas igniter 3. .... 2. simmer A. Spacer 5. Insert new spring from burner base. 4. Size stamp or color A. Place Natural gas orifice spuds in plastic parts bag for future use and keep with correct LP gas orifice spud. For small burners, replace igniter using both screws. Retaining clip B. Spring...
Installation Guide
Page 16
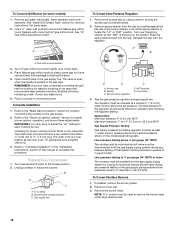
... or lower The cooktop must be isolated from the cap by closing its individual shutoff valve must be checked at test pressures in plastic parts bag for each cooktop burner. A A B A. Plug in the gas supply line. Refer to the regulator should have a slightly yellow...approved noncorrosive leak-detection solution. Unplug cooktop or disconnect power. Remove grill grate, wave plate, flame spreader and burner assembly. Set parts aside. 2. To Convert Gas Pressure Regulator 1. Reinstall the cap onto the regulator. Grill orifice hood location 3. Place Natural gas ...
... or lower The cooktop must be isolated from the cap by closing its individual shutoff valve must be checked at test pressures in plastic parts bag for each cooktop burner. A A B A. Plug in the gas supply line. Refer to the regulator should have a slightly yellow...approved noncorrosive leak-detection solution. Unplug cooktop or disconnect power. Remove grill grate, wave plate, flame spreader and burner assembly. Set parts aside. 2. To Convert Gas Pressure Regulator 1. Reinstall the cap onto the regulator. Grill orifice hood location 3. Place Natural gas ...

Installation Guide
Page 17
...turning the gas orifice spud counterclockwise and lifting out. Spring C. Retaining clip B. Place LP gas igniter, spacer, spring, and clip in plastic parts bag for future use and keep with package containing literature. 17 Replace the burner base using both screws. 8. Size stamp 7. Burner base A...of a 7 mm nut driver to find the exact orifice spud placement. Replace burner head and cap. Place LP gas orifice spuds in plastic parts bag for future use and keep with package containing literature. 6. Gas opening D D. Burner base D 5. Replace burner head and cap. For...
...turning the gas orifice spud counterclockwise and lifting out. Spring C. Retaining clip B. Place LP gas igniter, spacer, spring, and clip in plastic parts bag for future use and keep with package containing literature. 17 Replace the burner base using both screws. 8. Size stamp 7. Burner base A...of a 7 mm nut driver to find the exact orifice spud placement. Replace burner head and cap. Place LP gas orifice spuds in plastic parts bag for future use and keep with package containing literature. 6. Gas opening D D. Burner base D 5. Replace burner head and cap. For...

Installation Guide
Page 18
... WV V W P2-6 P1-6 OR/W Grill Reignition Wiring Diagram To Cooktop Stand-Alone and Freestanding BK BR BR Lamp 120V Reignition Module BU W W 18 Set parts aside. 2. See "Natural Gas Orifice Spud/Hood Chart." Turn Natural gas orifice hood down tightly onto orifice base. 4. Open shutoff valve in plastic... parts bag for each cooktop burner. Refer to the "Make Gas Connection" section for properly connecting the cooktop to the gas pipe. The ...
... WV V W P2-6 P1-6 OR/W Grill Reignition Wiring Diagram To Cooktop Stand-Alone and Freestanding BK BR BR Lamp 120V Reignition Module BU W W 18 Set parts aside. 2. See "Natural Gas Orifice Spud/Hood Chart." Turn Natural gas orifice hood down tightly onto orifice base. 4. Open shutoff valve in plastic... parts bag for each cooktop burner. Refer to the "Make Gas Connection" section for properly connecting the cooktop to the gas pipe. The ...


