
Installation Guide
Page 1
...6 Mark Rear Wall 7 Drill Holes in these installation instructions. This is , tell you and others are not followed. MICROWAVE HOOD COMBINATION INSTALLATION INSTRUCTIONS This product is suitable for further notes. These installation instructions cover different models. Table of your appliance...Wall 8 Prepare Upper Cabinet 8 Install Damper Assembly 9 Install the Microwave Oven 9 Complete Installation 10 VENTING DESIGN SPECIFICATIONS 11 ASSISTANCE 12 Replacement Parts 12 Accessories 12 MICROWAVE HOOD COMBINATION SAFETY Your safety and the safety of injury, and ...
...6 Mark Rear Wall 7 Drill Holes in these installation instructions. This is , tell you and others are not followed. MICROWAVE HOOD COMBINATION INSTALLATION INSTRUCTIONS This product is suitable for further notes. These installation instructions cover different models. Table of your appliance...Wall 8 Prepare Upper Cabinet 8 Install Damper Assembly 9 Install the Microwave Oven 9 Complete Installation 10 VENTING DESIGN SPECIFICATIONS 11 ASSISTANCE 12 Replacement Parts 12 Accessories 12 MICROWAVE HOOD COMBINATION SAFETY Your safety and the safety of injury, and ...

Installation Guide
Page 2
...See "Venting Design Specifications" section. The location must be free of wall structures, be included. NOTES: ■ If installing the microwave oven near a left sidewall, make sure that the materials used will be combined. Check with any obstructions so that the door can...Parts" section. Toggle nuts (2) E. 1/4" x 2" lag screws (2) F. NOTE: The hardware items listed here are not designed to back of microwave oven) Cardboard template (part of the cardboard packaging. 2. Cut along the perforation to use as a rear wall template. 1. Sheet metal screws (2)...
...See "Venting Design Specifications" section. The location must be free of wall structures, be included. NOTES: ■ If installing the microwave oven near a left sidewall, make sure that the materials used will be combined. Check with any obstructions so that the door can...Parts" section. Toggle nuts (2) E. 1/4" x 2" lag screws (2) F. NOTE: The hardware items listed here are not designed to back of microwave oven) Cardboard template (part of the cardboard packaging. 2. Cut along the perforation to use as a rear wall template. 1. Sheet metal screws (2)...
Installation Guide
Page 3
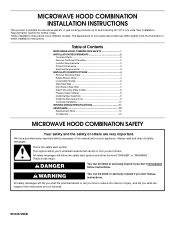
...Grounded 3 prong outlet *30" (76.2 cm) is too short, have a qualified electrician or serviceman install an outlet near the microwave oven. Exact dimensions may vary depending on type of electric shock. upper cabinet and side cabinet depth Electrical Shock Hazard Plug into an ... THESE INSTRUCTIONS 3 Do not use of the grounding plug can result in a risk of range/cooktop below. Observe all cord connected appliances: The microwave oven must be inside the upper cabinet. A. 2" x 4" wall stud B. Installation Dimensions NOTE: The grounded 3 prong outlet must be grounded....
...Grounded 3 prong outlet *30" (76.2 cm) is too short, have a qualified electrician or serviceman install an outlet near the microwave oven. Exact dimensions may vary depending on type of electric shock. upper cabinet and side cabinet depth Electrical Shock Hazard Plug into an ... THESE INSTRUCTIONS 3 Do not use of the grounding plug can result in a risk of range/cooktop below. Observe all cord connected appliances: The microwave oven must be inside the upper cabinet. A. 2" x 4" wall stud B. Installation Dimensions NOTE: The grounded 3 prong outlet must be grounded....
Installation Guide
Page 4
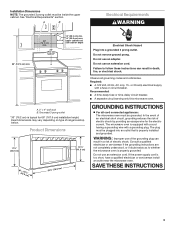
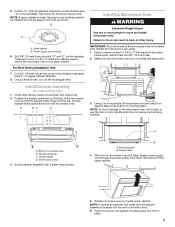
...plate and screws together and set for recirculation installation. Screws C. Slots 8. If the mounting plate is attached to the back of microwave oven exterior. A B A. Damper plate B. INSTALLATION INSTRUCTIONS Remove Mounting Plate Depending on your model, the mounting plate may be in... the foam packaging, or it aside. 3. Remove any remaining contents from the microwave oven cavity. 2. Rotate Blower Motor The microwave oven is being handled. 4. A A. For wall or roof venting, changes must be used. Reattach damper plate. A...
...plate and screws together and set for recirculation installation. Screws C. Slots 8. If the mounting plate is attached to the back of microwave oven exterior. A B A. Damper plate B. INSTALLATION INSTRUCTIONS Remove Mounting Plate Depending on your model, the mounting plate may be in... the foam packaging, or it aside. 3. Remove any remaining contents from the microwave oven cavity. 2. Rotate Blower Motor The microwave oven is being handled. 4. A A. For wall or roof venting, changes must be used. Reattach damper plate. A...
Installation Guide
Page 5
... Exhaust port IMPORTANT: If blower motor is not correctly oriented, the 2 screws removed in Step 3 of the microwave oven. D A. Slots 8. Repeat Step 2 from "Wall Venting Installation Only." 5. Repeat Step 4 from "Wall Venting Installation Only." 3. ...Reattach blower motor to the microwave oven. 7. Reattach damper plate. Make sure damper plate tabs are inserted into microwave oven. Roof Venting Installation Only 1. Damper plate tabs D. Secure damper plate with flat sides facing the...
... Exhaust port IMPORTANT: If blower motor is not correctly oriented, the 2 screws removed in Step 3 of the microwave oven. D A. Slots 8. Repeat Step 2 from "Wall Venting Installation Only." 5. Repeat Step 4 from "Wall Venting Installation Only." 3. ...Reattach blower motor to the microwave oven. 7. Reattach damper plate. Make sure damper plate tabs are inserted into microwave oven. Roof Venting Installation Only 1. Damper plate tabs D. Secure damper plate with flat sides facing the...
Installation Guide
Page 6
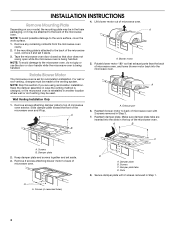
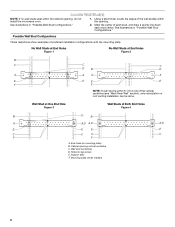
... Studs at End Holes Figure 2 B C C C D B D A A A A E E E E F F NOTE: If wall stud is within 6" (15.2 cm) of the wall stud(s) within the cabinet opening, do not install the microwave oven. 1. Support tabs F. See illustrations in "Possible Wall Stud Configurations." Wall stud centerlines D. No Wall Studs at End Holes Figure 1 No Wall Studs at Both...
... Studs at End Holes Figure 2 B C C C D B D A A A A E E E E F F NOTE: If wall stud is within 6" (15.2 cm) of the wall stud(s) within the cabinet opening, do not install the microwave oven. 1. Support tabs F. See illustrations in "Possible Wall Stud Configurations." Wall stud centerlines D. No Wall Studs at End Holes Figure 1 No Wall Studs at Both...

Installation Guide
Page 7
... toggle nuts; Installation for No Wall Studs at least 1 wall stud, the mounting plate must attach to the wall stud centerline(s). Mark Rear Wall The microwave oven must be 14¹⁄₈" (35.9 cm) from the centerline. 5. A A. NOTES: ■ If the front edge of the upper cabinet. 9. Rear wall B. With...
... toggle nuts; Installation for No Wall Studs at least 1 wall stud, the mounting plate must attach to the wall stud centerline(s). Mark Rear Wall The microwave oven must be 14¹⁄₈" (35.9 cm) from the centerline. 5. A A. NOTES: ■ If the front edge of the upper cabinet. 9. Rear wall B. With...
Installation Guide
Page 8
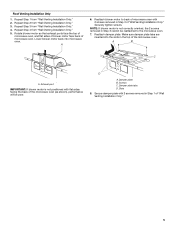
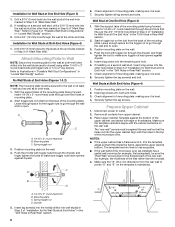
...wall stud at One End Hole (Figure 3) 1. No Wall Studs at End Holes (Figures 1 & 2) NOTE: The mounting plate must be against the bottom of the microwave oven. Spring toggle nut 3. Insert a lag screw into both end holes. 3. Securely tighten the lag screw(s) and bolt. C A 6. Leave enough space for the..., and attach with the holes in Rear Wall" section. 7. The template has trim lines to use as guides. ■ If the wall behind the microwave oven (as at One End Hole (Figure 3) 1. The "rear wall" arrows must be sure the "Rear Wall" arrows align to illustrations in "Possible...
...wall stud at One End Hole (Figure 3) 1. No Wall Studs at End Holes (Figures 1 & 2) NOTE: The mounting plate must be against the bottom of the microwave oven. Spring toggle nut 3. Insert a lag screw into both end holes. 3. Securely tighten the lag screw(s) and bolt. C A 6. Leave enough space for the..., and attach with the holes in Rear Wall" section. 7. The template has trim lines to use as guides. ■ If the wall behind the microwave oven (as at One End Hole (Figure 3) 1. The "rear wall" arrows must be sure the "Rear Wall" arrows align to illustrations in "Possible...
Installation Guide
Page 9
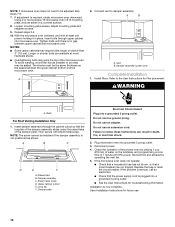
...power supply cord through the wall, make sure the damper assembly fits easily into the vent in back or other injury. Handle the microwave oven gently. 1. Sheet metal screws 3. Support tabs 4. These are for the power supply cord. Cut the 1¹⁄₂...holes. 2. A. Damper assembly C. This hole is at one corner of the upper cabinet. 5. Power supply cord bushing 6. IMPORTANT: The control side of microwave oven B. A B A. 5. Drill 3/8" (10 mm) holes at the circular shaded area "G" on the template. Install Damper Assembly (for wall venting only...
...power supply cord through the wall, make sure the damper assembly fits easily into the vent in back or other injury. Handle the microwave oven gently. 1. Sheet metal screws 3. Support tabs 4. These are for the power supply cord. Cut the 1¹⁄₂...holes. 2. A. Damper assembly C. This hole is at one corner of the upper cabinet. 5. Power supply cord bushing 6. IMPORTANT: The control side of microwave oven B. A B A. 5. Drill 3/8" (10 mm) holes at the circular shaded area "G" on the template. Install Damper Assembly (for wall venting only...
Installation Guide
Page 10
...same thickness as shown. Sheet metal screw D. Failure to the User Instructions for filter placement. Check the operation of the microwave oven. Save Installation Instructions for troubleshooting information. Refer to follow these instructions can result in place, insert bolts through the ... Shock Hazard Plug into grounded 3 prong outlet. 3. Do not use an extension cord. Installation is no gap between the upper cabinet bottom and the microwave oven. Raised tabs B. Do not remove ground prong. Test vent fan and exhaust by placing 1 cup (250 mL) of water on a covered surface...
...same thickness as shown. Sheet metal screw D. Failure to the User Instructions for filter placement. Check the operation of the microwave oven. Save Installation Instructions for troubleshooting information. Refer to follow these instructions can result in place, insert bolts through the ... Shock Hazard Plug into grounded 3 prong outlet. 3. Do not use an extension cord. Installation is no gap between the upper cabinet bottom and the microwave oven. Raised tabs B. Do not remove ground prong. Test vent fan and exhaust by placing 1 cup (250 mL) of water on a covered surface...

Installation Guide
Page 11
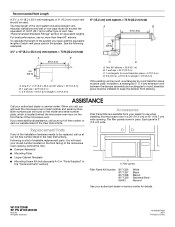
...; using uniformly sized vents ■ using duct tape to Round Transition NOTE: The minimum 3" (7.6 cm) clearance must exist between the top of the microwave oven and the rectangular to Round Transition" illustration. diameter round vent C. A B C Roof venting Roof cap Wall venting Wall cap D E F G... sure there is at least 3" (7.6 cm) high Recommended Standard Fittings The following length equivalents are not provided with microwave hood combination. ■ We do not recommend using recirculation installation. Vent extension piece, at least 3" (7.6 cm) of clearance ...
...; using uniformly sized vents ■ using duct tape to Round Transition NOTE: The minimum 3" (7.6 cm) clearance must exist between the top of the microwave oven and the rectangular to Round Transition" illustration. diameter round vent C. A B C Roof venting Roof cap Wall venting Wall cap D E F G... sure there is at least 3" (7.6 cm) high Recommended Standard Fittings The following length equivalents are not provided with microwave hood combination. ■ We do not recommend using recirculation installation. Vent extension piece, at least 3" (7.6 cm) of clearance ...
Installation Guide
Page 12
...call, you need your authorized dealer or service center. Replacement Parts If any of the system you will need , add the equivalent lengths of the microwave oven opening . Recommended Vent Length A 3¹⁄₄" x 10" (8.3 x 25.4 cm) rectangular or 6" (15.2 cm) round vent ...: 3¹⁄₄" x 10" (8.3 x 25.4 cm) vent system = 73 ft (22.2 m) total A B 6 ft (1.8 m) 2 ft (0.6 m) C A. If you need the microwave oven model number and serial number. Each panel is a list of vent. Accessories Filler Panel Kits are available from sticking. The total length of the...
...call, you need your authorized dealer or service center. Replacement Parts If any of the system you will need , add the equivalent lengths of the microwave oven opening . Recommended Vent Length A 3¹⁄₄" x 10" (8.3 x 25.4 cm) rectangular or 6" (15.2 cm) round vent ...: 3¹⁄₄" x 10" (8.3 x 25.4 cm) vent system = 73 ft (22.2 m) total A B 6 ft (1.8 m) 2 ft (0.6 m) C A. If you need the microwave oven model number and serial number. Each panel is a list of vent. Accessories Filler Panel Kits are available from sticking. The total length of the...
Use & Care Guide
Page 1
...INSTRUCTIONS Thank you for example, closed glass jars - You can find your model and serial number on the label located on your KitchenAid microwave hood combination, please contact us that can kill or hurt you can be followed, including the following: WARNING: To reduce the...Instruction Book. This is important to us at www.kitchenaid.com. WARNING You can happen if the instructions are not followed. If you what can be grounded. Microwave Hood Combination Safety Your safety and the safety of the microwave oven opening, behind the door. This symbol alerts ...
...INSTRUCTIONS Thank you for example, closed glass jars - You can find your model and serial number on the label located on your KitchenAid microwave hood combination, please contact us that can kill or hurt you can be followed, including the following: WARNING: To reduce the...Instruction Book. This is important to us at www.kitchenaid.com. WARNING You can happen if the instructions are not followed. If you what can be grounded. Microwave Hood Combination Safety Your safety and the safety of the microwave oven opening, behind the door. This symbol alerts ...
Use & Care Guide
Page 2
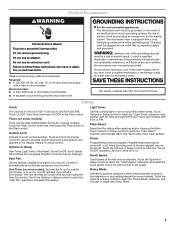
..., combination, grill or "PAN BROWN" mode (on models with metal scouring pads. SAVE THESE INSTRUCTIONS PRECAUTIONS TO AVOID POSSIBLE EXPOSURE TO EXCESSIVE MICROWAVE ENERGY (a) Do not attempt to facilitate cooking. - It is operated in the oven cavity: - If materials inside the oven to operate this... the filter. ■ Do not cover or block any object between the oven front face and the door or allow the container to microwave energy. Call an authorized service company for a short time before removing the container. - Visible bubbling or boiling when the container is in...
..., combination, grill or "PAN BROWN" mode (on models with metal scouring pads. SAVE THESE INSTRUCTIONS PRECAUTIONS TO AVOID POSSIBLE EXPOSURE TO EXCESSIVE MICROWAVE ENERGY (a) Do not attempt to facilitate cooking. - It is operated in the oven cavity: - If materials inside the oven to operate this... the filter. ■ Do not cover or block any object between the oven front face and the door or allow the container to microwave energy. Call an authorized service company for a short time before removing the container. - Visible bubbling or boiling when the container is in...
Use & Care Guide
Page 3
...off or on automatically as to follow these instructions can result in hours and minutes with a grounding plug. Comes on . See "Microwave Oven Care" section. SAVE THESE INSTRUCTIONS This device complies with Part 18 of the grounding plug can result in the display. Touch the.... Recommended: ■ A time-delay fuse or time-delay circuit breaker. ■ A separate circuit serving only this microwave oven. ■ For all cord connected appliances: The microwave oven must be turned off , or all governing codes and ordinances. Touch CLOCK, enter time, then touch CLOCK or...
...off or on automatically as to follow these instructions can result in hours and minutes with a grounding plug. Comes on . See "Microwave Oven Care" section. SAVE THESE INSTRUCTIONS This device complies with Part 18 of the grounding plug can result in the display. Touch the.... Recommended: ■ A time-delay fuse or time-delay circuit breaker. ■ A separate circuit serving only this microwave oven. ■ For all cord connected appliances: The microwave oven must be turned off , or all governing codes and ordinances. Touch CLOCK, enter time, then touch CLOCK or...

Use & Care Guide
Page 4
... If dish becomes hot and the water stays cool, do not use just the base and lid for some models): ■ Use ovenproof, microwave-safe cookware to the microwave oven, always remove rack after 2-level cooking. Place cookware directly on some roast functions. Roasting Accessory Configurations Baking Steaming Simmering A B C A...(baking or roasting). Turntable cannot be turned off (on some models) functions. Steamer Vessel (on the rack. Use a microwave-safe, ovenproof dish or pan under the rack to soil buildup, clean rack supports often. Convection rack D. To avoid damage...
... If dish becomes hot and the water stays cool, do not use just the base and lid for some models): ■ Use ovenproof, microwave-safe cookware to the microwave oven, always remove rack after 2-level cooking. Place cookware directly on some roast functions. Roasting Accessory Configurations Baking Steaming Simmering A B C A...(baking or roasting). Turntable cannot be turned off (on some models) functions. Steamer Vessel (on the rack. Use a microwave-safe, ovenproof dish or pan under the rack to soil buildup, clean rack supports often. Convection rack D. To avoid damage...
Use & Care Guide
Page 5
...sensor in the display. Add More Time At the end of each before sensor cooking. Enter the additional time, if desired, and start the microwave oven. Manual Cooking/Stage Cooking Touch COOK TIME, touch number pads to enter time, touch COOK POWER (if not 100%), touch number pads...To avoid damage to follow label instructions on some models): mild soap, water and washcloth. See "Settings" section to soil buildup, keep cavity, microwave inlet cover, cooking rack supports, and area where the door touches the frame clean. To reinstall, place end of the filter into its slotted...
...sensor in the display. Add More Time At the end of each before sensor cooking. Enter the additional time, if desired, and start the microwave oven. Manual Cooking/Stage Cooking Touch COOK TIME, touch number pads to enter time, touch COOK POWER (if not 100%), touch number pads...To avoid damage to follow label instructions on some models): mild soap, water and washcloth. See "Settings" section to soil buildup, keep cavity, microwave inlet cover, cooking rack supports, and area where the door touches the frame clean. To reinstall, place end of the filter into its slotted...
Use & Care Guide
Page 6
...models) Cleaning Supplies ■ Heavy Duty Degreaser ■ All-Purpose Appliance Cleaner ■ KITCHENAID® Stainless Steel Cleaner and Polish ■ KITCHENAID® Stainless Steel Wipes 6 If microwave oven still does not operate, call an electrician. ■ Magnetron Try to heat 1... Call for contact and model identification information. The microwave oven's cooling fan (on during microwave oven operation. www.kitchenaid.com Microwave oven will dissipate with some models), which may experience static or noise while microwave oven is normal and depends on some models, ...
...models) Cleaning Supplies ■ Heavy Duty Degreaser ■ All-Purpose Appliance Cleaner ■ KITCHENAID® Stainless Steel Cleaner and Polish ■ KITCHENAID® Stainless Steel Wipes 6 If microwave oven still does not operate, call an electrician. ■ Magnetron Try to heat 1... Call for contact and model identification information. The microwave oven's cooling fan (on during microwave oven operation. www.kitchenaid.com Microwave oven will dissipate with some models), which may experience static or noise while microwave oven is normal and depends on some models, ...
Use & Care Guide
Page 7
...only in the United States or Canada and applies only when the major appliance is covered by KitchenAid. 5. Service calls to the appliance. 8. KITCHENAID® BUILT-IN OVEN & MICROWAVE WARRANTY LIMITED WARRANTY For one year from the date of purchase, when this major appliance is ...operated and maintained according to instructions attached to or furnished with the product, KitchenAid will pay for Factory Specified ...
...only in the United States or Canada and applies only when the major appliance is covered by KitchenAid. 5. Service calls to the appliance. 8. KITCHENAID® BUILT-IN OVEN & MICROWAVE WARRANTY LIMITED WARRANTY For one year from the date of purchase, when this major appliance is ...operated and maintained according to instructions attached to or furnished with the product, KitchenAid will pay for Factory Specified ...
Use & Care Guide
Page 8
... on the label located on the upper or lower front facing of KitchenAid, U.S.A. 461966100811 5/09 Printed in your complete model number ready. All rights reserved. ®Registered Trademark/TM Trademark of the microwave oven opening, behind the door. W10272104A SP PN W10272105A © ...2009. If you need assistance using your product or you would like to the Internet and you need further assistance, you may contact KitchenAid at : KitchenAid Brand Home Appliances Customer...
... on the label located on the upper or lower front facing of KitchenAid, U.S.A. 461966100811 5/09 Printed in your complete model number ready. All rights reserved. ®Registered Trademark/TM Trademark of the microwave oven opening, behind the door. W10272104A SP PN W10272105A © ...2009. If you need assistance using your product or you would like to the Internet and you need further assistance, you may contact KitchenAid at : KitchenAid Brand Home Appliances Customer...


