
Instruction Manual
Page 3
... Use 8 Before First Use ...8 Blender Assembly ...8 Using the Blender ...10 Before Use...10 Operating the Blender with the Pitcher or Accessory Jar 10 CRUSh ICE...10 PULSE MODE...11 Accessory Jar (Model KSB755 11 Ingredient Cup ...11 Drizzle Cap (Model KSB755 11 Soft Start® Blending Feature 11 Speed Control Guide...12...
... Use 8 Before First Use ...8 Blender Assembly ...8 Using the Blender ...10 Before Use...10 Operating the Blender with the Pitcher or Accessory Jar 10 CRUSh ICE...10 PULSE MODE...11 Accessory Jar (Model KSB755 11 Ingredient Cup ...11 Drizzle Cap (Model KSB755 11 Soft Start® Blending Feature 11 Speed Control Guide...12...

Instruction Manual
Page 6
...not put locking collar and blade assembly on or taking off parts, and before putting on the base without having the pitcher or accessory jar properly attached. 12. Always operate Blender with a damaged cord or plug or after appliance malfunctions, or is necessary when any manner.... is sharp. Flashing light indicates ready to the nearest Authorized Service Center for other liquid. 3. The use of attachments, including canning jars, not recommended by KitchenAid may be used by or near children. 4. Do not use , before cleaning. 5. To protect against risk of injury to reduce...
...not put locking collar and blade assembly on or taking off parts, and before putting on the base without having the pitcher or accessory jar properly attached. 12. Always operate Blender with a damaged cord or plug or after appliance malfunctions, or is necessary when any manner.... is sharp. Flashing light indicates ready to the nearest Authorized Service Center for other liquid. 3. The use of attachments, including canning jars, not recommended by KitchenAid may be used by or near children. 4. Do not use , before cleaning. 5. To protect against risk of injury to reduce...

Instruction Manual
Page 8
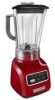
ENGLIsH Blender features stay-Put Lid with clear, 2 oz. (60 ml) Ingredient cup Easy Pour 48 oz. (1.5 L) Glass Pitcher Patented stainless steel Blade Locking collar and Blade Assembly 24 oz. (0.75 L) Accessory Jar* Accessory Jar Lid with Drizzle cap* Durable steel-Reinforced coupler Die-cast Metal Base * Model KSB755 only 6 speed selection Buttons clean touch™ control Pad
ENGLIsH Blender features stay-Put Lid with clear, 2 oz. (60 ml) Ingredient cup Easy Pour 48 oz. (1.5 L) Glass Pitcher Patented stainless steel Blade Locking collar and Blade Assembly 24 oz. (0.75 L) Accessory Jar* Accessory Jar Lid with Drizzle cap* Durable steel-Reinforced coupler Die-cast Metal Base * Model KSB755 only 6 speed selection Buttons clean touch™ control Pad

Instruction Manual
Page 9
...keeps the blades from rotating until the pitcher or accessory jar is properly attached to the collar and put on the accessory jar lid (model KSB755). 24 oz. (0.75 L) shatter-Resistant Accessory Jar (Model KsB755) Durable accessory jar is built into the blade then quickly increases to ...coupler with Drizzle cap (Model KsB755) The twist-lock lid includes a removable drizzle cap that fits both the accessory jar and pitcher lids. This advanced KitchenAid design maintains an optimal blending speed for quiet operation. Easy pour spout provides smooth, drip-free pouring. The ingredient...
...keeps the blades from rotating until the pitcher or accessory jar is properly attached to the collar and put on the accessory jar lid (model KSB755). 24 oz. (0.75 L) shatter-Resistant Accessory Jar (Model KsB755) Durable accessory jar is built into the blade then quickly increases to ...coupler with Drizzle cap (Model KsB755) The twist-lock lid includes a removable drizzle cap that fits both the accessory jar and pitcher lids. This advanced KitchenAid design maintains an optimal blending speed for quiet operation. Easy pour spout provides smooth, drip-free pouring. The ingredient...

Instruction Manual
Page 10
...the gasket in warm, sudsy water (see Care and Cleaning, page 13). Put sealing ring, flat side down and rotate pitcher or accessory jar clockwise, approximately ¼ turn through two steps of the Blender power cord. A damp gasket makes it into the groove within the locking ...collar. Align the pitcher or accessory jar tabs with Pitcher or Accessory Jar Assembly 1. Dry with blade assembly pointing up on a sturdy surface. 3. Rinse parts and wipe dry. Put locking collar with ...
...the gasket in warm, sudsy water (see Care and Cleaning, page 13). Put sealing ring, flat side down and rotate pitcher or accessory jar clockwise, approximately ¼ turn through two steps of the Blender power cord. A damp gasket makes it into the groove within the locking ...collar. Align the pitcher or accessory jar tabs with Pitcher or Accessory Jar Assembly 1. Dry with blade assembly pointing up on a sturdy surface. 3. Rinse parts and wipe dry. Put locking collar with ...

Instruction Manual
Page 11
...Blender is now ready for use an extension cord. To attach pitcher lid, push firmly into a grounded 3-prong outlet. To attach the accessory jar lid, twist to follow these instructions can result in death, fire, or electrical shock. 8. Plug power cord into place. Before removing the ...pitcher or accessory jar from the base, always press OFF and unplug the power cord. 9 Do not use 6. WARNING NotE: When properly positioned, pitcher or accessory jar assembly will rest completely on Blender base. No Gap Gap Electrical Shock ...
...Blender is now ready for use an extension cord. To attach pitcher lid, push firmly into a grounded 3-prong outlet. To attach the accessory jar lid, twist to follow these instructions can result in death, fire, or electrical shock. 8. Plug power cord into place. Before removing the ...pitcher or accessory jar from the base, always press OFF and unplug the power cord. 9 Do not use 6. WARNING NotE: When properly positioned, pitcher or accessory jar assembly will rest completely on Blender base. No Gap Gap Electrical Shock ...

Instruction Manual
Page 12
...will automatically pulse at that speed. Put ingredients into place. The Off button will stay lit. Do not interfere with the Pitcher or Accessory Jar The KitchenAid® Blender has five speeds: STIR, ChOP, MIx, PURÉE and LIQUEFY. To attach the accessory... jar lid, twist to lock onto the accessory jar. 3. To attach the accessory jar lid, twist to lock onto the accessory jar. 4. The indicator light will stop any speed and deactivate the Blender at the optimal...
...will automatically pulse at that speed. Put ingredients into place. The Off button will stay lit. Do not interfere with the Pitcher or Accessory Jar The KitchenAid® Blender has five speeds: STIR, ChOP, MIx, PURÉE and LIQUEFY. To attach the accessory... jar lid, twist to lock onto the accessory jar. 3. To attach the accessory jar lid, twist to lock onto the accessory jar. 4. The indicator light will stop any speed and deactivate the Blender at the optimal...

Instruction Manual
Page 13
... on the Blender base. To attach the accessory jar lid, twist to chop fresh herbs or nuts while preparing recipes. Remove cup and add ingredients at -any Speed" feature. To turn off the CRUSh ICE feature press OFF. PuLsE MoDE Your KitchenAid® Blender offers PULSE MODE, which allows a... "Pulse-at STIR, ChOP or MIx speeds. Before operating the Blender, make sure the pitcher or accessory jar assembly is selected from the OFF mode and does not work with ...
... on the Blender base. To attach the accessory jar lid, twist to chop fresh herbs or nuts while preparing recipes. Remove cup and add ingredients at -any Speed" feature. To turn off the CRUSh ICE feature press OFF. PuLsE MoDE Your KitchenAid® Blender offers PULSE MODE, which allows a... "Pulse-at STIR, ChOP or MIx speeds. Before operating the Blender, make sure the pitcher or accessory jar assembly is selected from the OFF mode and does not work with ...

Instruction Manual
Page 15
...the bottom rack of dishwashing liquid. Wipe the Blender base and cord with a warm, sudsy cloth; ENGLIsH care and cleaning The Blender pitcher, accessory jar, locking collar and blade assembly can be put in the top rack. Rinse and wipe dry. For best results, hand washing is recommended. to separate... locking collar and blade assembly, and sealing ring from the pitcher or accessory jar. Put the lid on the Blender base, fill half full with warm (not hot) water, and add 1 or 2 drops of an automatic dishwasher. NotE...
...the bottom rack of dishwashing liquid. Wipe the Blender base and cord with a warm, sudsy cloth; ENGLIsH care and cleaning The Blender pitcher, accessory jar, locking collar and blade assembly can be put in the top rack. Rinse and wipe dry. For best results, hand washing is recommended. to separate... locking collar and blade assembly, and sealing ring from the pitcher or accessory jar. Put the lid on the Blender base, fill half full with warm (not hot) water, and add 1 or 2 drops of an automatic dishwasher. NotE...

Instruction Manual
Page 16
... circuit the Blender is connected to the ingredients may be jammed. Remove the pitcher or accessory jar assembly from the base and with the steps provided in this section, contact KitchenAid or an Authorized KitchenAid Service Center. usA/Puerto Rico: 1-800-541-6390 canada: 1-800-807-6777 Mexico: 01...-800-002-2767 See the KitchenAid Warranty and Service section on , but blades will allow the pitcher assembly or accessory jar to the retailer - they do not provide service. 14 Press OFF to the motor. the Blender turns...
... circuit the Blender is connected to the ingredients may be jammed. Remove the pitcher or accessory jar assembly from the base and with the steps provided in this section, contact KitchenAid or an Authorized KitchenAid Service Center. usA/Puerto Rico: 1-800-541-6390 canada: 1-800-807-6777 Mexico: 01...-800-002-2767 See the KitchenAid Warranty and Service section on , but blades will allow the pitcher assembly or accessory jar to the retailer - they do not provide service. 14 Press OFF to the motor. the Blender turns...

Instruction Manual
Page 17
...fruit compote. Begin blending warm foods on STIR, ChOP or MIx speeds. • When operating at higher speeds with a full pitcher or accessory jar or with hot contents, stop the Blender and then add ingredients. • Stop the Blender before blending. add gelatin. Use smaller cookies as... an ingredient in main dish casseroles and vegetable dishes. Place in pitcher or accessory jar. In PULSE MODE, cover and blend on STIR. Follow procedure for cookies. you can of orange juice concentrate, combine the juice and...
...fruit compote. Begin blending warm foods on STIR, ChOP or MIx speeds. • When operating at higher speeds with a full pitcher or accessory jar or with hot contents, stop the Blender and then add ingredients. • Stop the Blender before blending. add gelatin. Use smaller cookies as... an ingredient in main dish casseroles and vegetable dishes. Place in pitcher or accessory jar. In PULSE MODE, cover and blend on STIR. Follow procedure for cookies. you can of orange juice concentrate, combine the juice and...

Instruction Manual
Page 18
...fruits: Place 2 cups (475 ml) canned or cooked fruit in pitcher. Puree meats: Place cooked, cubed, tender meat in pitcher or accessory jar. Cover and blend on LIQUEFY about 5 to 10 seconds. Prepare pancake or waffle batter from adult food: Place prepared adult food in pitcher or ...MIx until desired consistency, about 5 to 35 seconds. Cover and blend on LIQUEFY for a baby: Place uncooked rolled oats in pitcher or accessory jar. Make oatmeal for 10 to room temperature, then blend on MIx until well mixed, about 10 seconds. If necessary, add 1 tablespoon (15 ml...
...fruits: Place 2 cups (475 ml) canned or cooked fruit in pitcher. Puree meats: Place cooked, cubed, tender meat in pitcher or accessory jar. Cover and blend on LIQUEFY about 5 to 10 seconds. Prepare pancake or waffle batter from adult food: Place prepared adult food in pitcher or ...MIx until desired consistency, about 5 to 35 seconds. Cover and blend on LIQUEFY for a baby: Place uncooked rolled oats in pitcher or accessory jar. Make oatmeal for 10 to room temperature, then blend on MIx until well mixed, about 10 seconds. If necessary, add 1 tablespoon (15 ml...

